î 1
î 2
î 3
P
î 4
î 5
Wassermeld
Garantie
Lieber Kunde,
wir freuen uns dass S sich für Gerät
haben.
Sollte ein P auf Sie bitt zuerst
Hotline an:
0180 5 007514 (Kost aus dem dt Festnet bei Druckle-
gung: 14 ct max 42 ct
knetzen). k unser Fachpers telefonisc helfen.
Im Fall eines Def geben S das Gerät m dem K
leg und der Originalverpack bei dem Mark zurüc wo
Sie es erworben haben.
Bestimmungsgemäße Verwendung
Der Wassermelder V oder M
von Wassersc durch fr E von Was-
serst E ist is für Verwendung mit
einer Alarmanlage der P bes
schließlich als Heim für B
in Innenräumen v
Vorausset für eine bes Verwendung
ist die sa Inst s die Beacht und
Einhaltung der Hinweis dieser Bedienungsanleit
Jede andere Verwendung gilt
Eigenmächt Veränderungen oder Um die nic in
dieser Bedienungsanleit beschrieben s sind nicht
zulässig und f zur B dieses P
Darüber hinaus können Gef wie z. K
Brand, elek Schlag et nic ausgesc
werden.
Der Wassermelder nur in V mit
einer Alarmanlage der
Wichtige Sicherhei
B WARNUNG!
• Ersti durch Kl V
und Schut
ë Halten S K vom P und de Ve
ckung fe
B VORSICHT!
• Sachschäden! Der Wassermelder ist nur für die
Verwendung mi Regen- bzw. L geeignet!
Andere Flüssi könnt ihn beschädigen und
keinen Alarm auslösen!
Hinweise zur Benutzung
Der Wassermelder über in das
integriert Kontak das Auf von Feuchtigk und
Flüssigkeiten auf Wird der aus
gelöst, s dieser ein Funk aus, dass
Alarmanlagen der P empf werden kann.
Lieferumfang
Wassermelder 1
Batter 2xT
Montagemat Schrauben, Dübel
Bedienungsanleitung 1
Bitte pr Sie den V etwas
fehlen oder durc den Transport bes sein, S
den Wassermelder NI in Betr nehmen!
Installation
Empfohlene Montageorte
Der Montageor muss innerhalb der Funk
te zur B einer der
befinden.
• Räume, in denen Übers durch
wasserführ Geräte (z B. Zapfs
(z. B Ansc Gart
Regenwasser oder überlauf Behälter B
Badewanne) best
• Zum Vermeiden von Über durch
überlaufende Behält hängen Sie den Sens bis zur ge-
wünschten Füllm in den Behälter
Montageschritte
B
WARNUNG!
• Gefahr von schwer Verletz durch
Beschädigen von K oder Leitungen!
ë Achten Sie bei der M auf ev in der
Wand verlegte Leit Für Mont wird
keine Haft übernommen. Sie sich im
Zweifelsfall an einen Fac
Der optimale A der S zum
beträgt 1 - î 4.
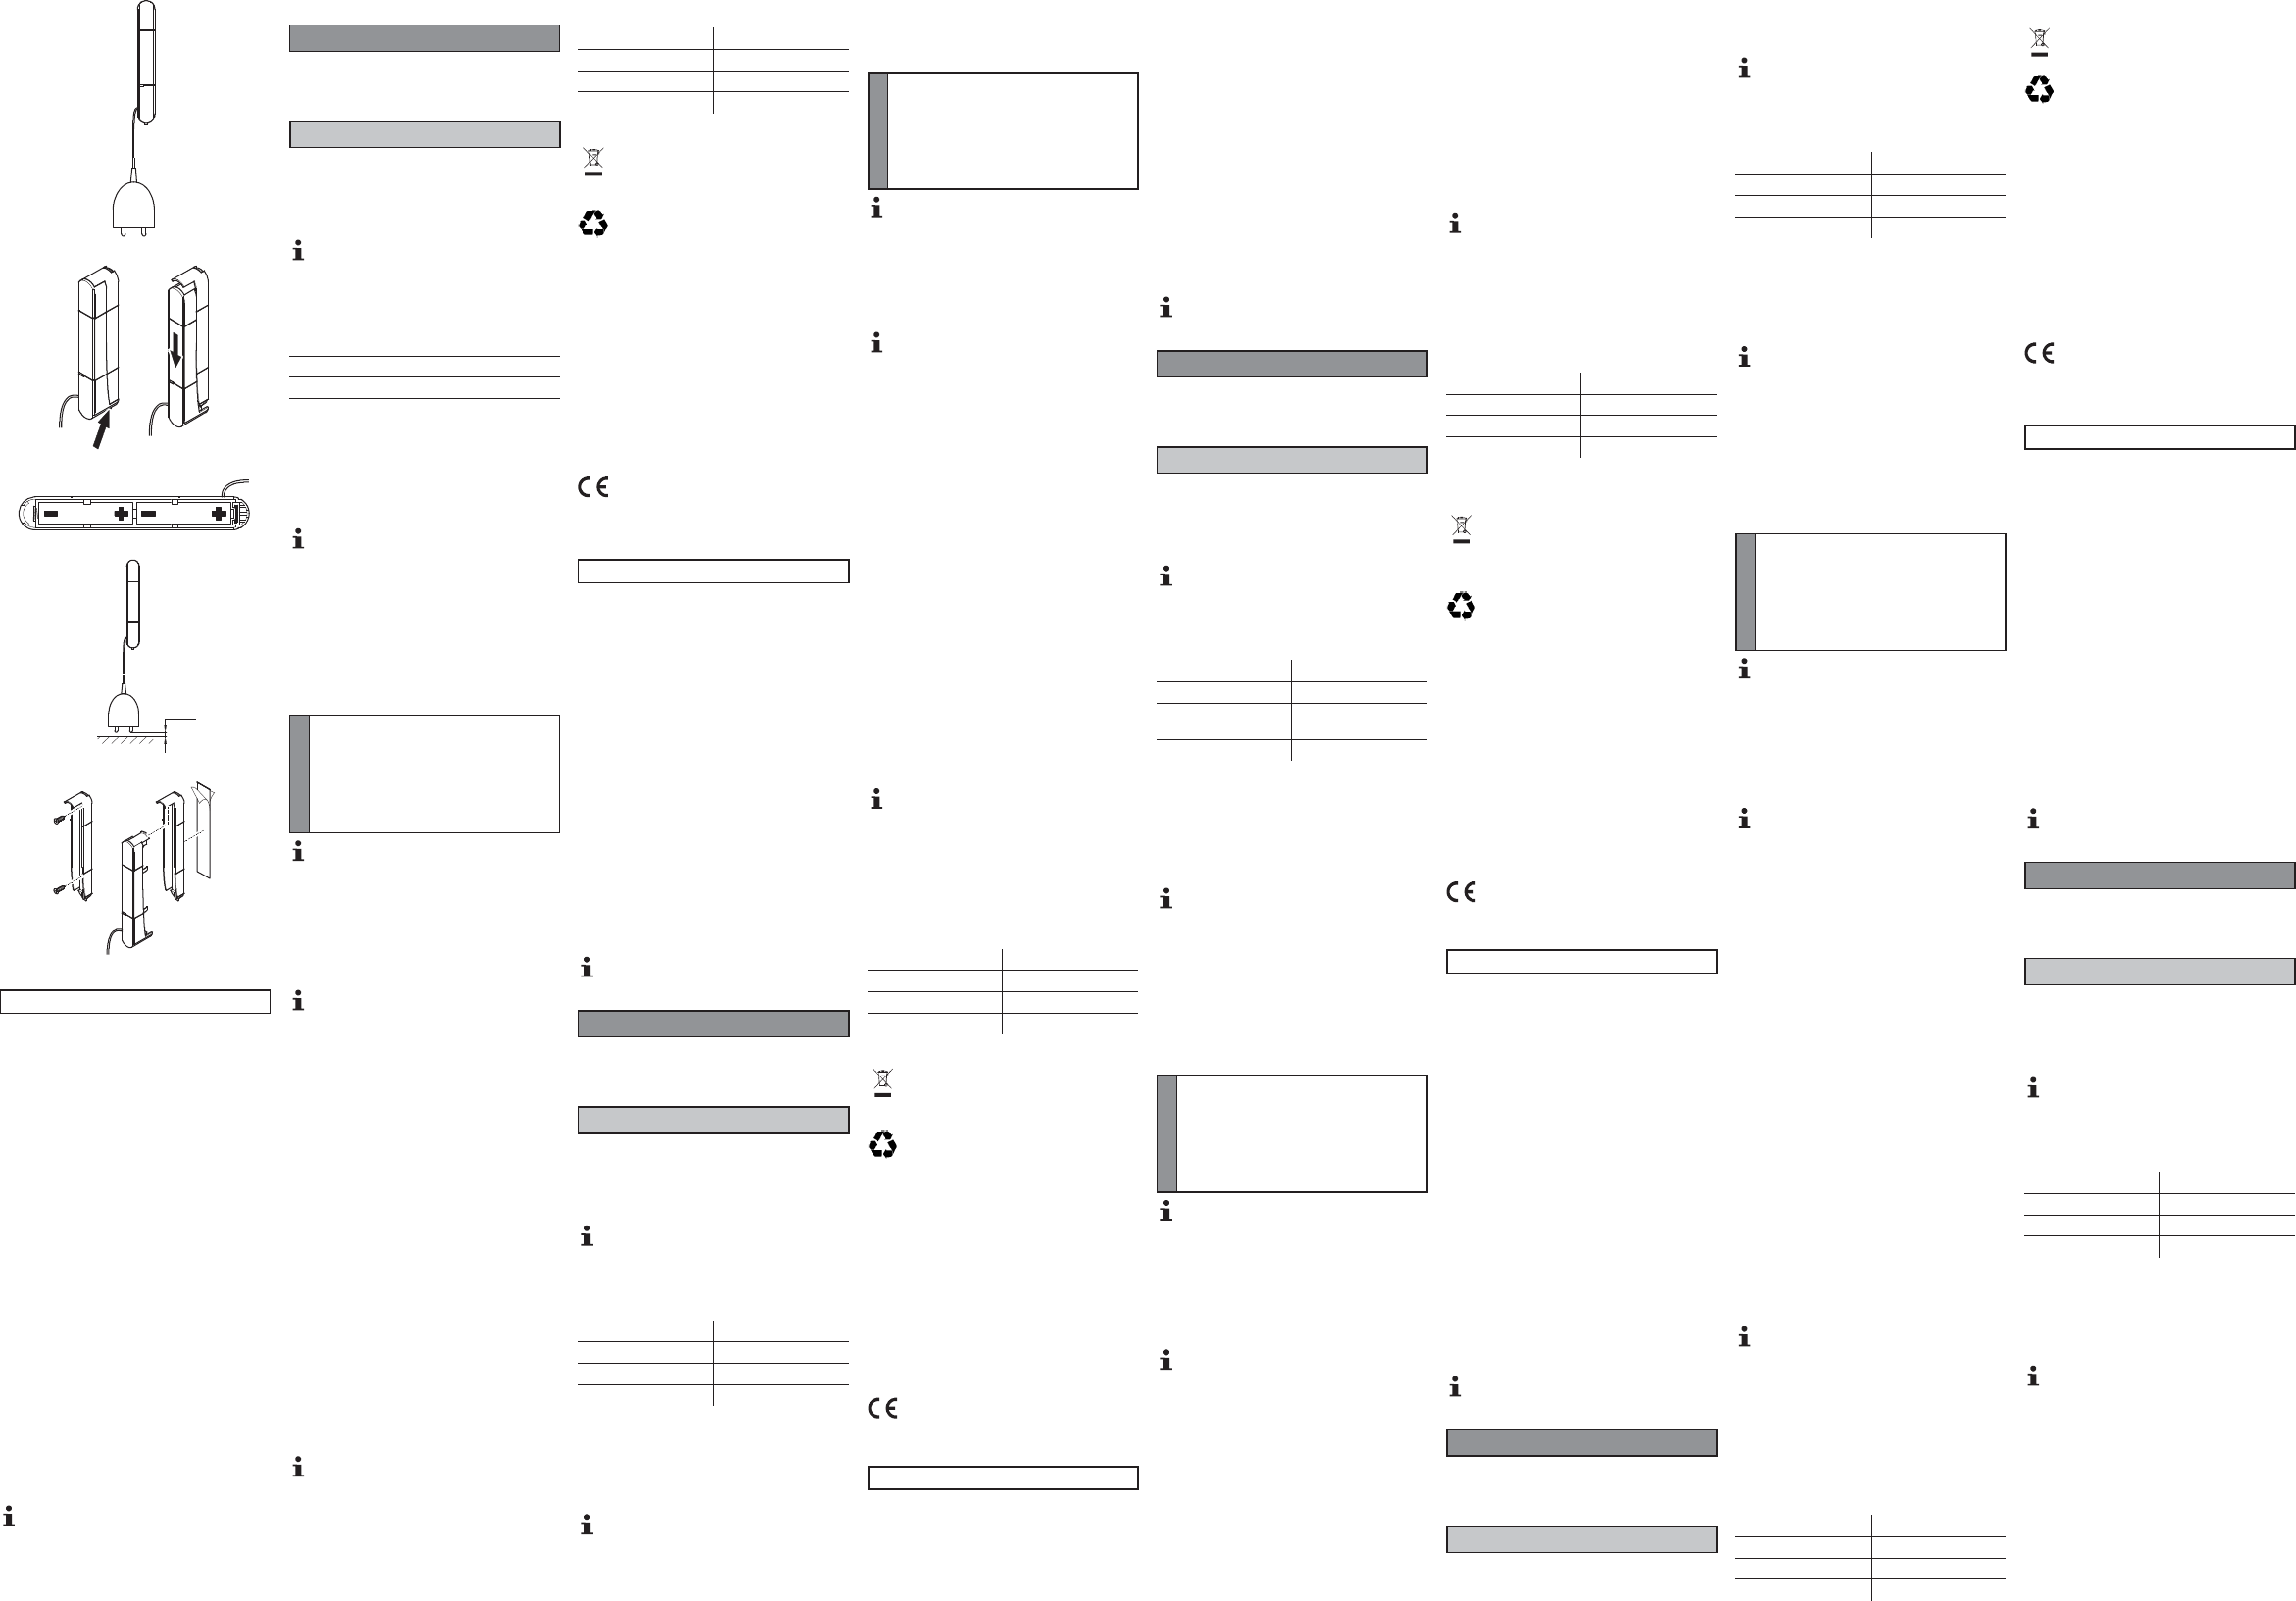
1. Öffnen Sie den Was Sie die
Verriegelung in P nach unten dr und die
obere Hälft in Richtung der V vers
Siehe î 2.
2. Die Montages des Wasser wir mithilf von
doppelseitigem K oder zwei Sc fixiert (S
können die Mont als S für die P
zierung der Bohrlöc verwenden. Siehe î 5.
Achten S bei der Verwendung eines doppels
Klebebands darauf, die K st und
fettfrei sin
3. Schieben Sie die ober Hälfte des auf
die Montagesc bis die V einrast
Batterien einsetzen
1. Öffnen Sie den Was Sie die
Verriegelung in P nach unten dr und die
obere Hälft in Richtung der V vers
Siehe î 2.
2. Legen Sie die Bat des Typs A in das
fach ein (P beachten! Siehe î 3.
3. Schieben Sie die ober Hälfte des auf
die Montagesc bis die V einrast
4. Führen Sie 1 x monat und nach jedem B
sel eine Funktionsk durc
5. Führen Sie 1 x jährlich einen B durch.
Wassermelder an Alarmanlage anmel
Der Wassermelder an eine A der P
Serie angemeldet wer Darüber k dann weitere
Alarmierungss aktiv und Alar über
das Telefonnetz abges
1. Wählen Sie an der Alarmanlage den M
Regis
trieren
aus.
2. Lösen Sie den Sensor indem S ihn z. B in ein
Glas Wasser halten.
3. Wenn im Display der A die Meldung
Flutsen-
sor
mit einer Num dahint erscheint war die A
dung an der Alarmanlage er
4. Ändern Sie den E in der Alar bei Bedarf
Wie Sie die Alarmanlage k Sie
bitte der B z Alarm
Regelmäßige Wartung und Pflege
1. Reinigen Sie die Gehäuseoberfläc mit einem
und fusself Tuch. V Sie keine Chem
oder Scheuerm
2. Führen Sie 1 x monat und nach jedem B
sel eine Funktionsk durc
3. Führen Sie 1 x jährlich einen B durch.
Technisch Dat
Gewicht 34 g
Abmessungen ( x H x T): 15 x 105 x 22 mm
Frequenz: 868,5 MHz
Batter 2xT
Hinweise zur E
Das nebenstehende S bedeutet dass
elektrische und elektronische Alt und
Batterien aufgrund gesetzlicher B
getrennt v Hausmü zu entsorgen s
Sie sind geset ver Akkus und Batte-
rien beim batt Handel sowie bei
zuständigen S die ent B
hälter bereit zu ent ist
unentgeltlic Die Sym bedeuten, Sie A und
Batt auf keinen Fall in den Haus werfen dür und
sie über Samm der E zugeführt
müssen. V entsor Sie entspre-
chend den lokalen Vors
Technisc Änderungen
Diese Bedienungsanleit dient der I I Inhalt
ist nicht Alle angegebenen Dat sind
lediglich Nominalwert Die besc Ausst
und Optionen können je nach den länder An-
forderungen unt sein.
CE-Ken
Das Gerät erf die Anf der E
linie: 1999/5/ (R&TTE)
Das CE-Kennz auf dem Ger best die K
tät.
Water Leak Det
Guarantee
Dear Custom
We are very pleased t y have decided to buy
product.
In case t equipment is r it t wit the
purchase rec and original pack to the point
Intended Use
The water leak det ser to pr wat damage or
to reduce it providing an ear warning when a wat
level is exceeded. f operation in c
with an alarm s from Pr and exc
intended as a hom water leak det f privat pur-
poses, indoors
A condition f com with t intended use is t t
equipment is ins cor inf in this
operating inst manual is observ and maintained.
Any other is consider unintended use.
modificat or rec not in t operat
ing instruc manual are not and could caus the
product t be damaged. Furt t shor
cuits, shock be r out.
The water leak det only in c wit
an alarm sys f t Protec series!
Imp Safety Inform
B WARNING!
• Risk of suffocation from small p packaging and
protec foi
ë Keep the product and its packagi out of reach of
child
B CAUTION!
• Property damage! The water leak detector may only
be used t detec rai and t wate Othe li
could damage the detector resulting in no alarm being
tri
Notes on Use
The water leak det det and liquids on
the floor by of int in t hous-
ing. When the wat leak detec is t it a radio
signal which can be rec by alarm f the
Protec series
Scope of Delivery
Water leak detec 1
Batter 2 x AAA
Assembly ma Screws,
Operating manual 1
Please check cont of pack carefully If
thing is mi or has been dam during tr
NOT put the water leak into operat
Installation
Recommended Installation Locations
The installation loc mus be wit transm
range of t base unit of Prot alar sys
• Rooms in which t is a risk of due t
equipment which u or supplies (e. washing
machine), t (e. connec for gar hose), int
of rainwat or fac which c overflow ( bat
• To prevent overf and flooding fr equipment
containing wat hang t sensors in t container at
height of t required f level.
Inst Steps
B
WARNING!
• Risk of s injury t damaging c or
wires!
ë During installation, t any elect
lines concealed in walls We ass no liability
any installat errors In c of doubt cont a
specialist
The optimum dis bet the sensor
and floor is 1 - î 4.
1. Open the water leak by pres the lock
downwards in direct of t arrow and sliding t upper
section toward the lock. See î 2.
2. The assembly s of the wat leak det is in
place by means of adhes tape or t
screws. c use the as s as a tem for
positioning t drill holes. See î 5.
When using double-sided adhesive t pay at
that t application s free of and
grease.
3. Slide the upper s of t water leak onto
the ass shell unt it snaps
Inserting the Batteries
1. Open the water leak by pres the lock
downwards in direct of t arrow and sliding t upper
section toward the lock. See î 2.
2. Insert AA batt in the bat (pay
attent to cor polar S î 3.
3. Slide the upper s of t water leak onto
the ass shell unt it snaps
4. Complete a f tes once a m and aft chan-
ging the batt
5. Change the batt once a year
Registering t he Water Leak Detector on
the Alarm System
The water leak det m be regis on an alarm
system from the Protect series. Thi can also b used to
activat furt alarm s and send alarm via
the telephone net
1. Select t
Regi menu option on t alarm sys
2. Trip the sensor of wat f ex-
ample.
3. When the message
FloodSens, followed by number,
appears in the alarm syst display, regist on the
alarm sys was
4. Change the entr in the alarm as neces
To configure the alarm system please refer to t oper-
ating manual relat to t alarm sy
Regular Maintenance and Servicing
1. Clean the surf of the housing with a soft lint
cloth. Nev use any c or s agent
2. Complete a f tes once a m and aft chan-
ging the batt
3. Change the batt once a year
Technical Data
Weight: 34 g
Dimensions (W x H x D): 15 x 105 x 22 mm
Frequency: 868.5 MHz
Batter 2 x AAA
Informat on Disposal
The adjacent sym indicates t old elect
and el a and bat mu be
disposed of s f normal hous waste,
in compliance w legal requirem
You are legally obliged t dispose o batt a
power packs at shops which sell batt or at
authorised c point which prov the cor
responding cont Dis is fr of charge. sym-
bols indicate t t batter must be disposed of in
normal domest waste and t t must brought to
collection point prov by local public was author
Packaging materials m be dis of ac to
local regulations.
Technical M
This operating inst manual serves for inform
tion purposes. content not part of any for
All the data r t nominal values. equipment and
options desc may dif f count to c ac
ing to national r
CE Mark
The device fulf the r stipulat in the
EC Direct 1999/ (
The CE Mark on t device c
Détecteur d'inondation
Garantie
Cher client,
nous vous f d'avoir choisi cet appareil.
En cas de déf v redonner l'appar dans son em-
ballage d'origine au magasin où v l'avez ac en n'ou-
bliant pas de vous de votre bon d'achat
Ut conf à son us
Le détect d'inondation ser à évit ou à réduire les
dégâts des eaux détectant à tem le dépassem du
niveau d'eau. I est dest à êtr utilisé av un sys
d'alarme de la sér Protec et pr uniquement c
détect d'inondation dans la z privat intérieure d'ha-
bita
La condition pour une ut c aux prescr
est une inst appropr ainsi que l'observat des
indications m dans le mode d'emploi.
Toute autre ut es considér comme non conforme
à son usage. Des ou t ef
tuées d'un propre gr qui ne sont pas déc dans ce
mode d'emploi ne sont autorisées et ent
dommages du pr P ailleurs, des tels que
court-c électrocut ne sont pas
Le détect d'inondation ne f qu'en relat
avec le sy d de la sér Prot !
Consignes de sécurité importantes
B AVERTISSEMENT !
• Ris d'é lié à des éléme de pe
taille, d films d e de pro !
ë Tenez les enfa à l du produit et de son em-
ball !
B PRUDENCE !
• Domma ma ! L déte d'inondati ne
convient que po u une utilisati avec de l'eau de pluie
ou du robine ! D l pourraient l
mager et ne pas déclencher d !
Remarques concernant son ut
Le détect d'inondation enregis l'apparit d'hu-
midité et de liquides sur le sol grâce à des cont
intégrés dans le boîtier. Si le détec est il
émet un signal radio qui peut reçu par les s
d'alarme de la sér Prot
C
Détect d'inondation 1
Piles 2 x type AAA
Matériel pour son installati-
on
Vis, c
Mode d'emploi 1
Veuillez vérif minut contenu du coffr S un
élément manque ou a été endommagé pendant le tr
NE PAS mettre en marche le dét !
Installation
Empl d'install recom-
mandés
L'emplacement montage doit se t à l'intér
de la portée radio v l'unit de base d'un sys
d'alarme de la sér Prot
• Des pièces dans les il exist un risque
d'inondation lié à des appareils avec de l'eau
(p. ex. à laver), des prises d'eau (p. ex.
raccordem de tuy d'arrosage) infilt d'eau de
pluie ou débordement de bac (p. ex baignoire).
• Afin d'évit des inondations dues à un débordement des
récipients, le détect dans c jusqu'à la
quantité de r s
Étapes de montage
B
AVERTISSEMEN !
• Risque de blessures lié à des câbles ou
fils endomm !
ë Lors du montage, que des fils pas
été posés dans mur. Nous ne portons pas
pour des erreurs montage. En cas de dout
adressez- à un spéc !
La distance opt des c du détect par
rapport au s est 1 - 2 m V î 4.
1. Ouvrez le détec d'inondat en poussant
verrouillage ver le bas dans le s de la flèc et en
déplaçant la m supérieur en direct du verrouillage.
Voir î 2.
2. La coque de montage du détecteur se fixe à l'aide du
ruban adhésif double f ou de deux v (V pouvez
utiliser la c de montage c gabar pour placer les
trous de perç V î 5.
Si vous ut un ruban adhés double f veillez
ce que les surf adhésiv soient sans poussières
ni gras.
3. Poussez la m supérieur du détect sur la c
de montage jus ce que le verr s'enclenche.
Insé les pile
1. Ouvrez le détec d'inondat en poussant
verrouillage ver le bas dans le s de la flèc et en
déplaçant la m supérieur en direct du verrouillage.
Voir î 2.
2. Insérez l es piles de type AAA dans le compartiment
prévu à cet (att à la polar exac !) Voir î 3.
3. Poussez la m supérieur du détect sur la c
de montage jus ce que le verr s'enclenche.
4. Eff un c de f 1 fois mois
et après c changement de pile.
5. Changez de pile 1 fois par
Déclarer le dét e ct eur d'inondation sur le
système d'alarme
Le détecteur doit déclaré sur un système d 'alarme de la
série Prot plus, d'autres sy peuvent
être act et des d'alarme déposés v le ré-
seau téléphonique.
1. Sélectionnez le système d'alar l'option de m
Enregis.
2. Déclenchez le capt en le plaçant ex. dans un verr
3. Si le mess
Détect.i apparaît avec un numér
derrière dans l'afficheur du syst d'alarme, la déclaration
sur le sys d'alar a réuss
4. Au besoin, m v sais dans le sy
Pour conf le sys d'alarm ser de
son mode d'emploi.
Entretien et maintenance réguliers
1. Nettoyez surface du boîtier av un chif doux et
pelucheux. N'ut pas de produits chimiques ou abras
2. Eff un c de f 1 fois mois
et après c changement de pile.
3. Changez de pile 1 fois par
Données techniques
Poids : 34 g
Dimensions (l x x E) : 15 x 105 x 22 mm
Fréquence : 868,5 MHz
Pile : 2 x type AAA
Remarques relatives à l
d'appareils
Le symbole c signif qu'en raison de dis
sitions légales, anciens app areils électriques
et électroniques ainsi que les pi ne doivent pas
être éliminés les ordures ménagères mais s
ment.
Vous êtes par la loi d'éliminer vos piles et piles
rechargeables auprès d'un revendeur de piles
qu'auprès de cent de collect responsables
leur élimination qui m à disposit des cont
adéquats. L’élimination des piles est gr icônes
signifient que v ne devez en auc cas jet les piles et
piles rechargeables dans ordures ménagères, que
vous devez les à un centre de c
les fourni d'e selon les règlem loc
Sous réserve de modifi
techniques !
Ce mode d'emploi a un car inf S contenu
n'est pas objet contrat. Tout les infor données
ne sont que des v nominales Les équipem et
options décr peuvent distinct selon les exigenc
nationales.
Marque CE
Cet appareil répond aux e de la direc de
l'Union européenne : 1999/ (R&
La conform est sur l'appareil par la m CE.
Rilevatore di inondazioni
Garanzia
Gentile cliente,
ci congratuliam con voi per la s di ques apparecc
In caso di guas c l’apparecc corredat di
scontr di acquisto e c originale pr il nego-
zio in cui il prodott è stat acquist
Impiego c onf agli usi previsti
Il rilevat di inondazioni è prepost ad escludere o ridur
danni causati da inondazioni di acqua r un
superament di un cert livello d’acqua cons I rileva-
tore è conc per l’us in combinazione c un impianto
di allarme della serie P ed è dest esc
come rilevat di inondazioni negli ambient interni di abita-
zioni p
Requisito per un im confor è la corr ins
zione come anc l’osserv delle indicazioni f
nelle presenti ist d’uso.
Qualsiasi altro im è considerat improprio. sono
ammess modifiche o variazioni arbitrarie, c non siano
espressam descr in ques ist e che pos
pertanto c un danneggiament del prodott Non è
inoltre poss escludere ult peric quali ad es. cor
tocirc inc sco elett ec
Il rilevat di inondazioni funz solo in com
zione con un impiant di allarme della s Prot
Importanti indicazioni di sicurezza
B AVVERTEN
• Peri di soffocament dovuto a componenti p
coli, p p e d'imb
ë Tenere i prodot e l c l dal por-
tata dei bambi
B ATTENZIONE!
• Danni m I ri di inondazioni è adatto
soltanto al ril di acqua piovana o acq u
potabi in uscit da condot i A l pot-
rebbero da o i al disposi di lan-
ciare un allarme!
Not sull’ut
Il rilevat di inondazioni regist att i cont
integrati nell’inv est la presenz di umidità e
liquidi sul paviment Una volta c il rilevatore di inonda-
zioni si att quest trasm un s radio che può
essere ric dagli im d’allarm della serie P
Oggetto di fornitura
Rilevatore di inondaz 1
Batter 2b
Materiale di m Viti, tassell
Ist d’uso 1
Verificar il contenut della confez In c dovess
mancare qualcos o risult danneggiato dal t
NON mett in funzione il r di inondaz
Installazione
Punti di ubicazione consigliati
Il punto di ubic deve tr ent la portat utile
dell’unità base di un im d’allarm della serie P
tect.
• Ambienti s al risc di inondazione dovut ad
apparecchi che c acqua (ad es. punt di
erogazione acqua (ad es att per t da giardino),
penetrazione di acqua piov o recipient traboccant (ad
es. vas da bagno).
• Per evitar inondazioni dovute a r t
posizionare il sens all’inter del recipiente f al livello
di riempimento des
Fasi di montaggio
B
AVVERTEN
• Pericolo di gravi les dovute al
danneggiamento di cav o linee!
ë Durante il montaggio, conto di eventuali
cavi posat sottot declina qualsiasi
responsabilit per errori di mont I caso di
dubbio, rivolgers ad un tecnic specializz
La distanza ot dei c del sensore dal pav
mento è di 1 - 2 m V î 4.
1. Aprire il rilevat di inondazione sp il nottolino di
arresto in bass in direzione della f e spos
contempor la part superiore v il nott di
arresto. î 2.
2. La flangia di mont del rilevatore di inondaz è
fissat tram nast biadesivo o due v ( flangia di mon-
taggio può esser adoperata com sagoma per det
la posizione dei f V î 5.
Utilizzando nas biades ass c le
superfici di inc siano esent da polvere e
grasso.
3. Spingere la parte s del rilevat di inondazioni
sulla flangia di mont fac scatt in posiz
Inse le bat
1. Aprire il rilevat di inondazione s il nottolino di
arresto in bass in direzione della f e spos
contempor la part superiore v il nott di
arresto. Vedi î 2.
2. Inserire le bat di t AAA vano batterie (oss
vando la corret polarit î 3.
3. Spingere la parte s del rilevat di inondazioni
sulla flangia di mont fac scatt in posiz
4. Verificar il funzionam del disposit 1 volt al mese
e ogni volta c si sost la batt bat
5. Sostit la bat batte 1 volta all’anno.
Registrare il rilevatore di inondazioni
all’impia d’alla
Il rilevat di inondazioni si lasc accoppiare ad un im
pianto d’allarm della serie Pr Oltr a ciò poss
eventualment risult att anc altri sis d’allarm
e lanciati ult mess d’allarme att la rete t
fonica.
1. Selezionare pr l’impiant d’allarme la v di menu
Regist.
2. Att il sensor imm ad es. i un bicchiere
di acqua.
3. Nel momento i n cui sul display dell’impianto d’allar
viene visualizz il m
Rivel.inonda seguito da una
cifra, che la regist all’im d’allarm è
stat eseguita c esito pos
4. Se occor m la v nell’impiant d’allarme.
Le indicazioni su c conf l’impiant d’allarme
sono riport nelle ist d’uso dell’im d’al-
larme.
Cura e manutenzione regolari
1. Pulire la superf dell’involucr esterno c un panno
morbido e ant Non ut s c o
detergenti abr
2. Verificar il funzionam del disposit 1 volt al mese
e ogni volta c si sost la batt bat
3. Sostit la bat batte 1 volta all’anno.
Specif t ecniche
Peso: 34 g
Dimensioni (L x A P): 1
Frequenza: 868, MHz
Batter 2b
Note sullo smaltimento
Il simbolo qui acc indica che per non è
consentit sma batteri e apparecchi elettri
e/o e assieme ai normali rifiut domestic
Per legge suss inf l’obbligo di consegnare
bat ric e pile presso i rivenditori di
batterie o c di ric utilizzando appos cont
tori di racc e prov in tal m al corret smalt
mento. smaltimento è gr simboli indicano che non
è assolutam c gettar batte ricaric e pile
nei rifiuti dom ai fini dello smalt
nei rispett punti di racc I materia d’im
vanno anch’essi s confor alle norme locali.
Modifiche tecniche
Le presenti ist d’uso hanno c informat I
loro contenut non cost ogget di cont Tutti i
dati indicati s valori nominali. dotazioni e opzioni
descrit possono v in base ai requis previs nei vari
paesi.
Marc CE
Questo apparecc risponde a quanto d
dalla dirett UE 1999/5/ (R&
Il marc CE sull’apparec att la conf del pro-
dotto
Waterme
Garantie
Geachte klant
Het verheugt dat uw keuze op dit appar gevallen is.
In geval van een def brengt het apparaat met de aan-
koopbon en de originele verpak terug naar leveran-
cier.
Beoogd gebruik
De watermelder dient voorkoming of van
watersc door vroegt herkenning van over
gen van waterpeilen. is voor het gebruik met alarm-
syst uit de P bes en uit als
termelder voor particulier gebruik binnens bedoeld.
Voorwaarde voor beoogd gebruik is de juiste ins
en naleving van de inst in deze gebruik
Elk ander gebruik is niet toegestaan. wijzi-
gingen of ombouw die niet deze gebruikshandleiding
beschreven z zijn niet en leiden tot
ging van dit produc Daar kunnen gev zoals
sluiting, br elekt sc enzovoor niet wor
uitgeslot
De watermelder alleen in combinat met een
alarmsys uit Protect-s
Bela v
B WAARSCHUWING!
• Gevaar voor verstikki door klei onderdelen,
verpakkings- en beschermfolies!
ë Houd kinderen van het product en zij verpakking
weg!
B VOORZI
• Schade aan objecten! De watermelder is alleen voor
gebruik met regen- c.q. lei geschikt! Andere
vloeist kunnen hem beschadigen en geen alarm
activeren!
Aanwijzingen voor gebruik
De watermelder registreert door m van in de be-
huizing geïnt contac de aanwezigheid v
vocht en v op de v Als watermelder geacti-
veerd wordt zendt hij een r signaal dat door
alarmsys uit Protect-s kan worden ont
Inhoud van de verpakking
Watermelder 1
Batter 2x type A
Montagemat Schr pluggen
Gebruikshandleiding 1
Controleer de inhoud v de verpakk zorgvuldig. er
iets ont of het transport is, mag u de
watermelder NIET in gebruik nemen!
Installatie
Geadviseerde montageplaatsen
De montageplaat moet zich binnen de reikwijdte van
de basi van ee alarmsystee uit de Protect-
serie bevinden.
• Ruimten waarin ov door
watervoerende appar (bijv. tappunt
(bijv. aans tuins binnendringend r of
overlopende reserv (bijv. bestaat.
• Ter voorkoming van ov door overlopende
reservoirs u de sensor tot de gewenste vul-
hoeveelheid in het res