The function button on the pulse oximeter has three functions in total:
•
Switch-on function
: When the pulse oximeter is switched o you can hold down the function button to switch it on.
•
Display function
: To select your desired display format (vertical format, horizontal format), press the function button during operation. There are
four dierent display formats to choose from.
•
Settings menu function:
To enter the settings menu, you must first set the display format to a horizontal format. To call up the settings menu,
press and hold down the function button during operation. You can set the following parameters in the settings menu: display brightness, alarm set-
tings, activate/deactivate data transfer, data storage and upload data to a PC.
Note
To be able to set the following functions (sections 8.2 to 8.6), you must select a horizontal format as the display format (see 8.1 Function button /
Display function). If the display format is set to a vertical format and you would like to use the following functions, an error message appears on the
display (“Please change direction first!”).
8.2 Display brightness
•
To set the display brightness, switch on the pulse oximeter and press and hold down the function button. In the settings menu, the menu item
“Brightness” is selected.
•
There are four dierent brightness levels to choose from. To set the desired display brightness, press and hold down the function button until the
desired level of brightness has been reached.
•
To exit the settings menu, use the function button to select the “Exit” menu item and confirm by pressing and holding down the function button.
8.3 Alarm settings
•
Switch on the pulse oximeter and press and hold down the function button. The settings menu appears on the display.
•
In the settings menu, use the function button to select the “Alarm” menu item and confirm by pressing and holding down the function button.
•
Use the function button to select the desired parameter and set the desired value by pressing and holding down the function button.
Y
ou can set the following parameters in the alarm menu:
“Dir”
Here you can set whether the setting value runs up or down when setting the alarm limits in the alarm menu. It is nec-
essary to change the setting direction if you would like to move the limits up or down.
“SPO2 ALM HI”
Here you can set an upper limit for oxygen saturation. If, during a measurement, the set limit is exceeded, the satura-
tion value appears yellow and a signal sounds (if the alarm is activated).
“SPO2 ALM LO”
Here you can set a lower limit for oxygen saturation. If, during a measurement, the set limit is undercut, the saturation
value appears yellow and a signal sounds (if the alarm is activated).
“PR ALM HI”
Here you can set an upper limit for the pulse rate. If, during a measurement, the set limit is exceeded, the pulse rate
appears yellow and a signal sounds (if the alarm is activated).
“PR ALM LO”
Here you can set a lower limit for the pulse rate. If, during a measurement, the set limit is undercut, the pulse rate ap-
pears yellow and a signal sounds (if the alarm is activated).
“Alarm”
Here you can activate (“on”) or deactivate (“o”) the alarm. If you have activated the alarm and the set upper or lower
limit is exceeded or undercut, a signal sounds.
“Pulse Sound”
Here you can activate (“on”) or deactivate (“o”) the pulse tone. If you have activated the pulse tone, a signal sounds at
every beat during the measurement.
•
To exit the alarm menu, use the function button to select the “Exit” menu item and confirm by pressing and holding down the function button.
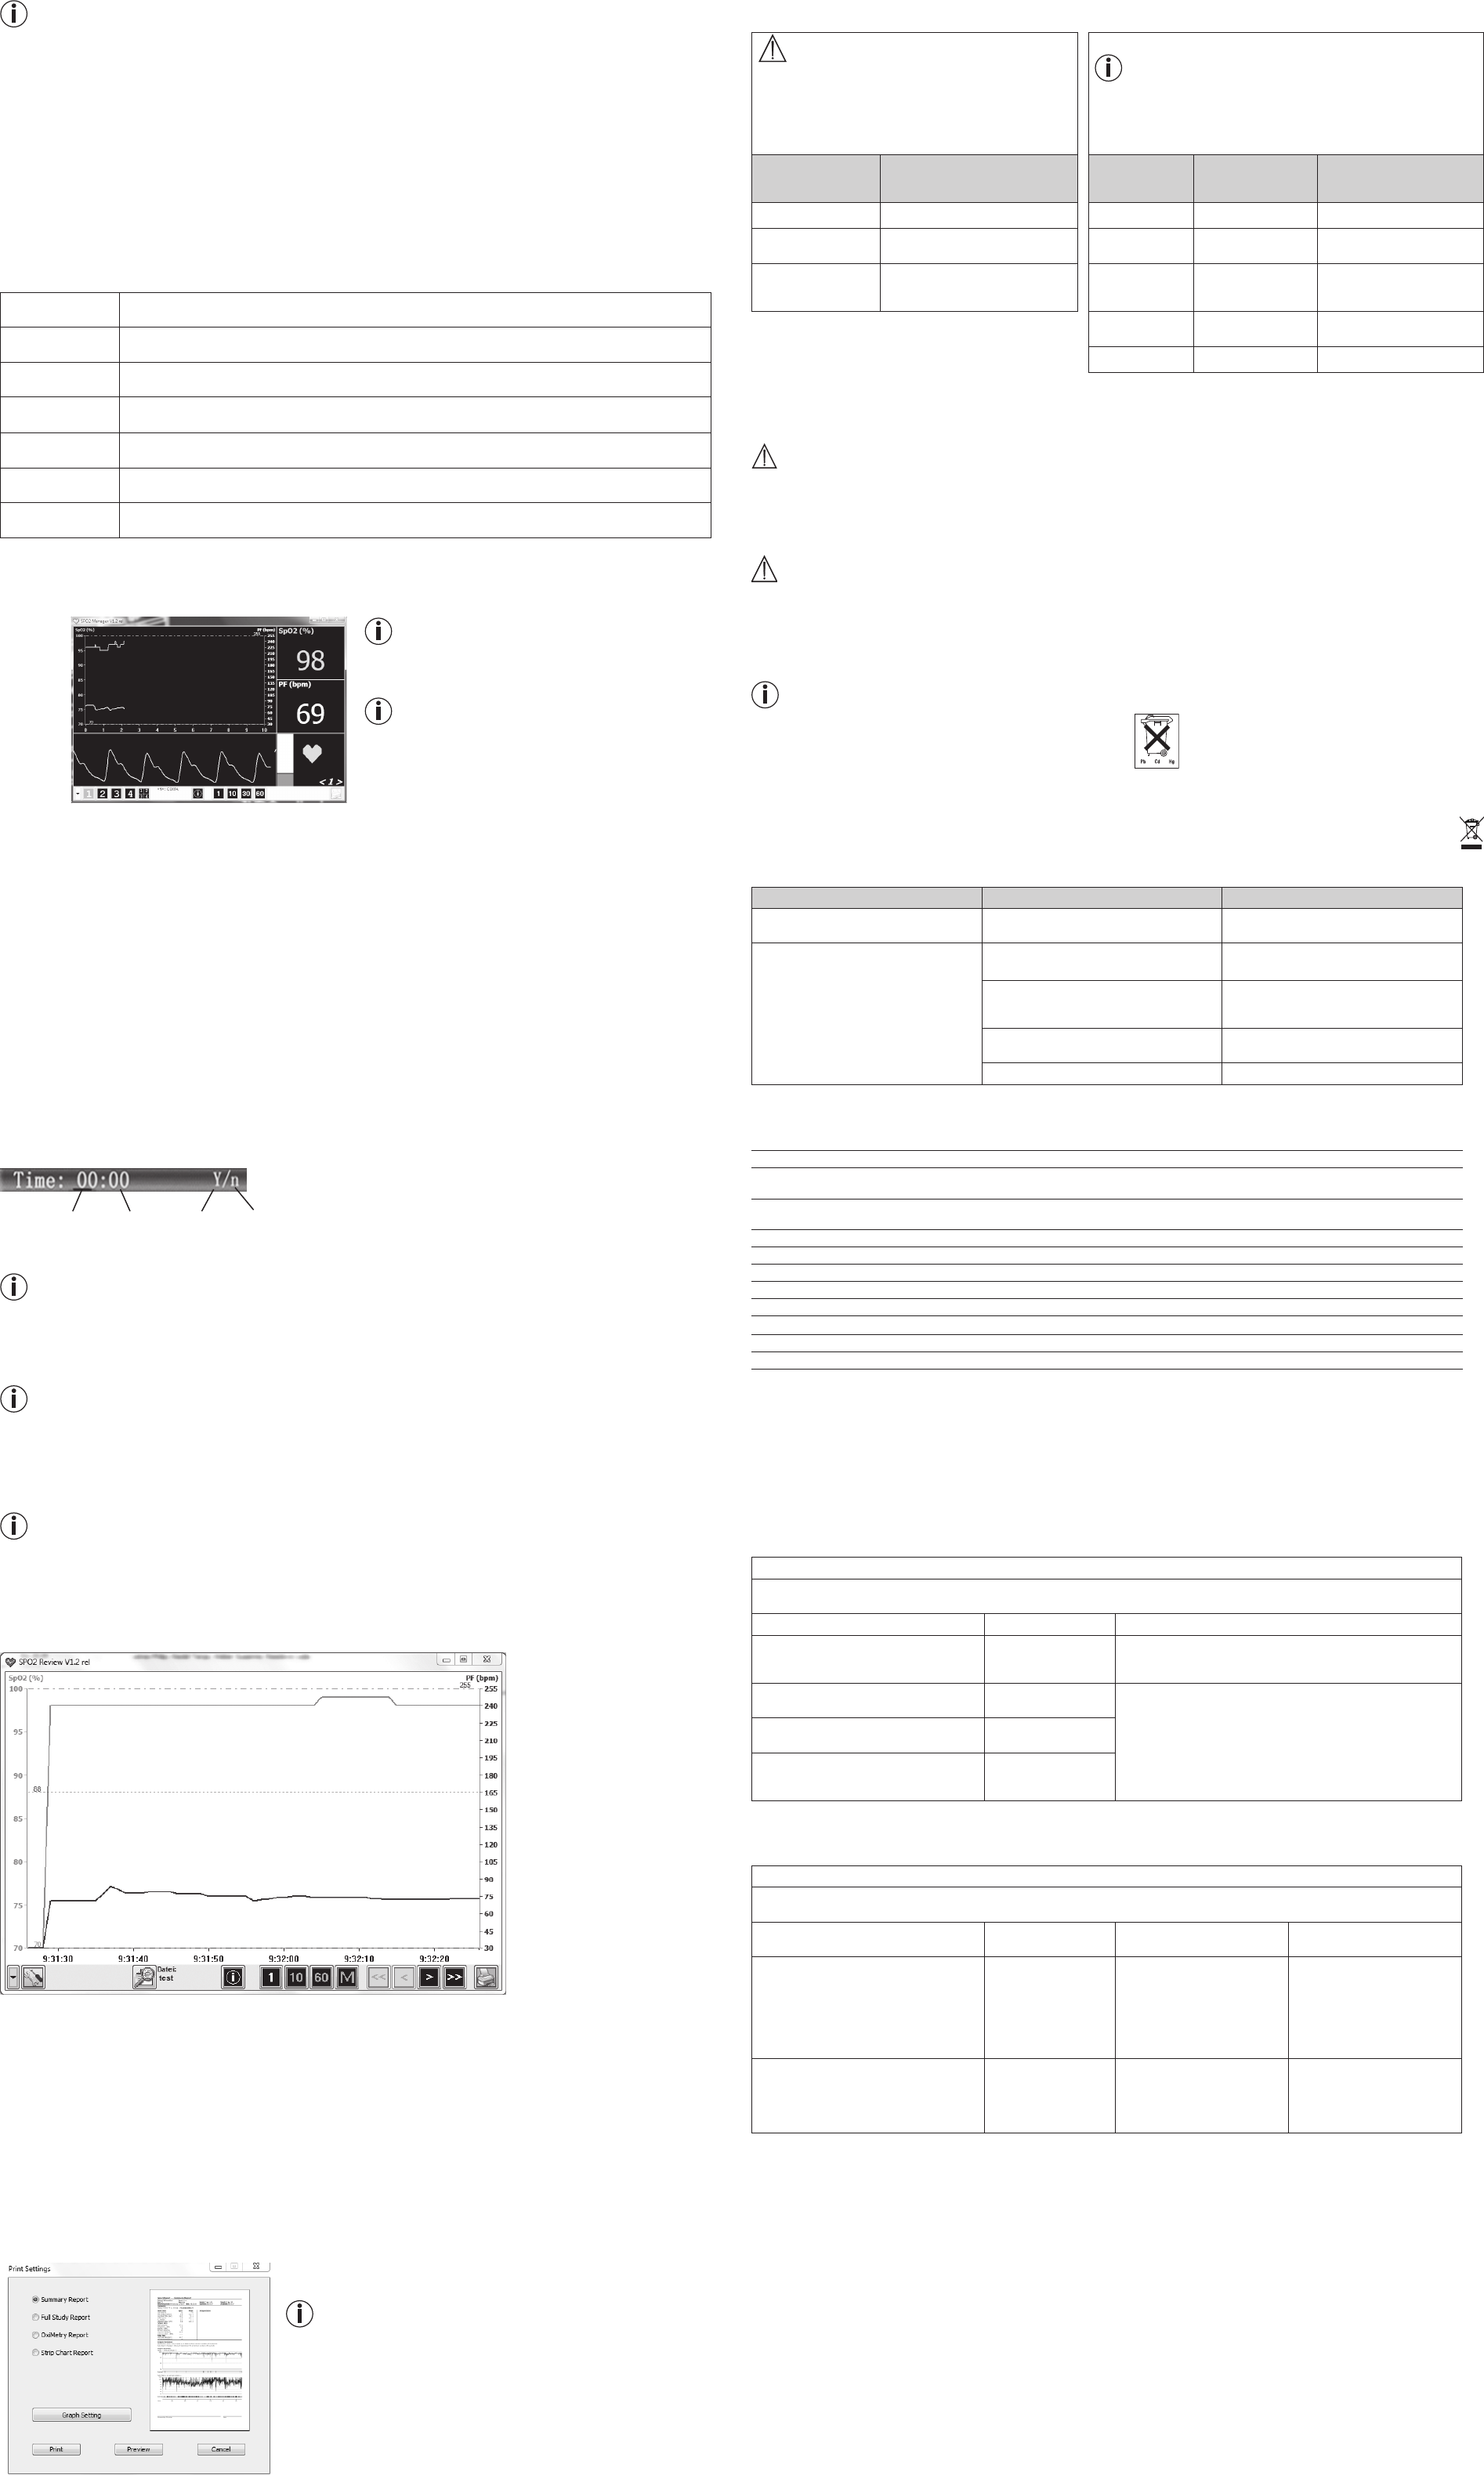
8.4 Displaying measurement values in real time on a PC (“USB”)
Note
You can create a printout at any time during measurement
data recording by using the print function. The printout shows
the trend of the current measurement up to that point.
Note
You can view the measurement data of up to four devices at
once in the software program. In the software program, you
can enlarge the view of the individual measurement data by
selecting the corresponding measurement position number.
Measurement posi-
tion number & view
Trend display timeReport
Current
wave form
of the
pulse rate
Trend
•
Connect the pulse oximeter to your PC using the supplied USB data cable.
•
Start the “SpO₂-Viewer” program on your PC. If you have not yet installed the program, follow the instructions in section 7.2 (Installing the “SpO₂-
Viewer/Manager” software).
•
Switch on the pulse oximeter and press and hold down the function button. The settings menu appears on the display.
•
Select the “USB” menu item using the function button.
•
Press and hold down the function button. The word “on” is displayed in the “USB” menu item. Insert one finger into the finger opening of the pulse
oximeter. After a few seconds, the measurement data is displayed on your PC in real time.
•
If you disconnect the data cable from the computer or close the program, an entry mask appears on the PC screen. Here you can enter personal
details and store the current measurement data. As standard, the measurement data is stored under C:/Programs/SpO2/Data.
•
If you no longer want to display the measurement data on your PC, press and hold down the function button. The word “o” is displayed in the
“USB” menu item.
•
To exit the settings menu, use the function button to select the “Exit” menu item and confirm by pressing and holding down the function button.
8.5 Recording measurement data
With the pulse oximeter PO 80, you can record your measurement data over a period of up to 24 hours. If required, the measurement data can be
stored on your computer or printed out as a report.
To record the measurement data, follow these steps:
•
Switch on the pulse oximeter and press and hold down the function button. The settings menu appears on the display.
•
Select the “Record” menu item using the function button.
•
Press and hold down the function button. The word “Time” will appear on the display. Here you can enter the current time of day so that, later on in
the PC software program, you are able to read o the time you started your recording.
Time;
hours
Time;
minutes
Start record-
ing
Do not start
recording
•
To enter the current time of day, press and hold down the function button and confirm your entry by pressing the function button briefly.
Note
If you start a new recording, the previous recording is automatically overwritten and cannot be recalled. The maximum recording duration is 24
hours.
•
To start the recording, use the function button to select the “Y” on the display and confirm by pressing and holding down the function button. The
pulse oximeter starts recording. If you do not want to start recording, select “N” and confirm by pressing and holding down the function button.
Note
If you have started a recording and return to the display, a red recording symbol appears (REC •). To save battery power, the device automatically
switches to energy-saving mode 30 seconds after the recording starts. If the pulse tone is activated, it is automatically deactivated.
•
If you press the function button briefly when in energy-saving mode, “Recording” appears on the display for 2 seconds.
•
If you press and hold down the function button when in energy-saving mode, the normal display appears.
•
“Memory is full” appears on the display when the pulse oximeter memory is full.
8.6 Uploading measurement data to a computer
Note
You cannot transfer measurement data to the computer while a measurement data recording is underway.
You can upload the measurement data that you previously stored on the pulse oximeter to your computer.
To upload your stored measurement data to your computer, follow these steps:
•
Connect the pulse oximeter to your PC using the supplied USB data cable.
•
Start the “SpO₂-Manager” program on your PC.
Options
glass symbole
(New Session)
Trend display time
Report
•
Click the magnifying glass symbol in lower section of the program. The “New Session” window opens.
•
Please enter your user data. To confirm the user data, click “ok”. The program now displays that the pulse oximeter is connected to the computer
and that the program is ready to receive the measurement data (“Device connected : wating for data ...”).
•
Switch on the pulse oximeter.
•
Press and hold down the function button on the pulse oximeter. The settings menu appears.
•
Select the “Upload” menu item by pressing the function button briefly.
•
Briefly press the function button. The word “on” is displayed in the “Upload” menu item. Your measurement data are now transferred to the com-
puter. It is not possible to cancel the transfer of the measurement data manually.
•
When the transfer of the measurement data is complete, the “Exit” menu item is highlighted automatically. To exit the settings menu, press and hold
down the function button.
•
As soon as your measurement data has been transferred to the computer, your measurement data appears in the software program.
After the measurement data has been transferred successfully to the PC, you can also print out the data in the software program, if required.
To do so, follow these steps:
•
Click the print symbol in the bottom right-hand corner of the program. The “Report” window opens.
Note
When printing the measurement data, you can choose between four dierent display
variants (Summary Report, Full Study Report, OxiMetry Report, Strip Chart Report).
Together with the printout, the user is oered an automatic appraisal of the recorded
measurement data. This printout serves exclusively to support the diagnostic findings
of your attending doctor. The printout is not a substitute for a medical certificate and is
not exhaustive!
8.7 Calling up stored measurement data
To call up previously stored measurement data in the software program, follow these steps:
•
Start the “SpO₂-Manager” program on your PC.
•
Click the magnifying glass symbol in the lower section of the program. Select “Review” in the upper section of the window and click “Find File” in
the lower section.
•
Select the file you stored (as standard, the files are located under C:/Programs/SpO2/Data) and click “Open” followed by “Ok”.
•
Your stored measurement data is now displayed in the software program.
9. Evaluating measurement results
WARNING
The following table for evaluating your measurements does NOT
apply to people with certain pre-existing conditions (e.g. asthma,
heart failure, respiratory diseases) or whilst staying at altitudes
above 1500 metres. If you have a pre-existing condition, always
consult your doctor to evaluate your measurements.
Decline in oxygen saturation depending on altitude
Note
The following table informs you of the eects of various altitudes on oxygen
saturation value and its impact on the human body. The following table does
NOT apply to people with certain pre-existing conditions (e.g. asthma, heart
failure, respiratory diseases etc.). People with pre-existing conditions can show
signs of illness (e.g. hypoxia) at lower altitudes.
Wilderness Medicine, 3rd edition; Mosby, St.Louis, MO 1995; 1-37.
10. Maintenance/cleaning
IMPORTANT:
D
o not use high-pressure sterilisation on the pulse oximeter!
Under no circumstances should you hold the pulse oximeter under water, as this can cause liquid to enter and damage the pulse oximeter.
•
Clean the housing and the interior rubber surface with a soft cloth dampened with medical alcohol after each use.
11. Storage
IMPORTANT:
Store the pulse oximeter in a dry place (relative humidity ≤95 %). If the humidity is too high it may shorten the service life of the pulse oximeter or dam-
age it. Store the pulse oximeter in a place where the ambient temperature is between -40°C and 60°C.
12. Disposal
Batteries must not be disposed of with household waste. As a consumer, you are required by law to recycle used batteries. You can recycle your
old batteries and rechargeable batteries at public collection points in your community, or wherever batteries of the relevant type are sold.
Note
The codes below are printed on batteries containing harmful substances:
Pb = Battery contains lead,
Cd = Battery contains cadmium,
Hg = Battery contains mercury.
For environmental reasons, do not dispose of the devices including the batteries in the household waste at the end of their service life. Dispose of
the unit at a suitable local collection or recycling point. Observe the local regulations for material disposal.
Please dispose of the device in accordance with EC Directive – WEEE (Waste Electrical and Electronic Equipment). If you have any queries,
please contact the appropriate local authorities.
13. What if there are problems?
ProblemPossible causeSolution
The pulse oximeter is not displaying meas-
urement values
The pulse oximeter has run out of battery.Charge the battery via the USB connection.
The pulse oximeter is displaying measure-
ment interruptions or high measurement
value jumps
Insucient circulation in the measurement
finger
Observe the warnings and safety notes in
section 5
Measurement finger is too large or too small
Fingertip must have the following measure-
ments: Width between 10 and 22 mm
Thickness between 5 and 15 mm
Finger, hand or body is moving
Keep your finger, hand and body still during
the measurement.
Cardiac arrhythmiaSeek medical attention
14. Technical Data
Model no.PO 80
Measurement methodNon-invasive measurement of arterial oxygen saturation of haemoglobin and pulse rate in finger
Libble takes abuse of its services very seriously. We're committed to dealing with such abuse according to the laws in your country of residence. When you submit a report, we'll investigate it and take the appropriate action. We'll get back to you only if we require additional details or have more information to share.
Product:
Forumrules
To achieve meaningful questions, we apply the following rules:
First, read the manual;
Check if your question has been asked previously;
Try to ask your question as clearly as possible;
Did you already try to solve the problem? Please mention this;
Is your problem solved by a visitor then let him/her know in this forum;
To give a response to a question or answer, do not use this form but click on the button 'reply to this question';
Your question will be posted here and emailed to our subscribers. Therefore, avoid filling in personal details.
Register
Register getting emails for Beurer PO 80 at:
new questions and answers
new manuals
You will receive an email to register for one or both of the options.
Get your user manual by e-mail
Enter your email address to receive the manual of Beurer PO 80 in the language / languages: English, German as an attachment in your email.
The manual is 4,02 mb in size.
You will receive the manual in your email within minutes. If you have not received an email, then probably have entered the wrong email address or your mailbox is too full. In addition, it may be that your ISP may have a maximum size for emails to receive.
If you have not received an email with the manual within fifteen minutes, it may be that you have a entered a wrong email address or that your ISP has set a maximum size to receive email that is smaller than the size of the manual.
The email address you have provided is not correct.
Please check the email address and correct it.
Your question is posted on this page
Would you like to receive an email when new answers and questions are posted? Please enter your email address.