(ed): Wilderness Medicine, 3rd edition; Mosby, St.Louis, MO 1995; 1-37.
10. Reinigung / Instandhaltung
ACHTUNG:
Wenden Sie am Pulsoximeter keine Hochdruck-Sterilisation an!
Halten Sie das Pulsoximeter auf keinen Fall unter Wasser, da sonst Flüssigkeit eindringen kann und das Pulsoximeter beschädigt wird.
•Reinigen Sie nach jeder Anwendung das Gehäuse und die gummierte Innenfläche des Pulsoximeters mit einem weichen, mit medizinischem
Alkohol angefeuchteten Tuch.
11. Aufbewahrung
ACHTUNG:
Bewahren Sie das Pulsoximeter in einer trockenen Umgebung auf (relative Luftfeuchtigkeit ≤95 %). Zu hohe Luftfeuchtigkeit kann die Lebens-
dauer des Pulsoximeters verkürzen oder es beschädigen. Bewahren Sie das Pulsoximeter an einem Ort auf, in dem die Umgebungstemperatur
zwischen -40°C und 60°C liegt.
12. Entsorgung
Batterien und Akkus gehören nicht in den Hausmüll. Als Verbraucher sind Sie gesetzlich verpflichtet, gebrauchte Batterien zurückzugeben. Sie
können Ihre alten Batterien und Akkus bei den öentlichen Sammelstellen Ihrer Gemeinde oder überall dort abgeben, wo Batterien und Akkus der
betreenden Art verkauft werden.
Hinweis
Diese Zeichen finden Sie auf schadstohaltigen Batterien:
Pb = Batterie enthält Blei,
Cd = Batterie enthält Cadmium,
Hg = Batterie enthält Quecksilber.
Im Interesse des Umweltschutzes dürfen die Geräte einschließlich der Batterien am Ende ihrer Lebensdauer nicht mit dem Hausmüll entfernt wer-
den. Die Entsorgung kann über entsprechende Sammelstellen in Ihrem Land erfolgen. Befolgen Sie die örtlichen Vorschriften bei der Entsorgung
der Materialien.
Bitte entsorgen Sie das Gerät gemäß der Elektro- und Elektronik Altgeräte EG-Richtlinie – WEEE (Waste Electrical and Electronic Equipment).
Bei Rückfragen wenden Sie sich bitte an die für die Entsorgung zuständige kommunale Behörde.
13. Was tun bei Problemen?
ProblemMögliche UrsacheBehebung
Das Pulsoximeter zeigt keine MesswerteDer Akku des Pulsoximeters ist leer.
Laden Sie den Akku über den USB-Aschluss
auf.
Pulsoximeter zeigt Messunterbrechungen
oder hohe Messwertsprünge
Unzureichende Durchblutung des Messfingers
Warn- und Sicherheitshinsweise in Kapitel 5
beachten
Messfinger ist zu groß oder zu klein.
Fingerspitze muss folgende Maße haben:
Breite zwischen 10 - 22 mm
Dicke zwischen 5 -15 mm
Finger, Hand oder Körper befindet sich in
Bewegung
Finger, Hand und Körper während der Mes-
sung ruhig halten.
HerzrhythmusstörungenEinen Arzt aufsuchen.
14. Technische Daten
Modell-Nr.PO 80
MessmethodeNicht invasive Messung der arteriellen Sauerstoffsättigung des Hämoglobins und Pulsfrequenz am Finger
Messbereich SpO₂ 0 – 100%,
Puls 0 – 254 Schläge /Minute
GenauigkeitSpO₂ 70 – 100%, ± 2%,
Puls 30-250 bpm, ± 2 Schläge /Minute
AbmessungenL 57 mm x B 32 mm x H 30 mm
Gewicht Ca. 42 g
Sensorik zur Messung von SpO₂Rotlicht (Wellenlänge 660 nm); Infrarot (Wellenlänge 905 nm); Silizium-Empfangsdiode
Zulässige Betriebs bedingungen+10 °C bis +40 °C, ≤75 % relative Luftfeuchte, 700 –1060 hPa Umgebungsdruck
Zulässige Aufbewahrungsbedingungen-40 °C bis +60 °C, ≤95 % relative Luftfeuchte, 500 –1060 hPa Umgebungsdruck
Stromversorgung
Integrierter wiederaufladbarer Lithium-Akku 500mAh / 3,7 V
KlassifikationIP22, Anwendungsteil Typ BF
Systemvoraussetzungen für SoftwareUnterstützte Betriebssysteme: Windows XP, Windows Vista und Windows 7
Änderungen der technischen Angaben ohne Benachrichtigung sind aus Aktualisierungsgründen vorbehalten.
•Dieses Gerät entspricht der europäischen Norm EN60601-1-2 und unterliegt besonderen Vorsichtsmaßnahmen hinsichtlich der elektromagne-
schen Verträglichkeit. Bitte beachten Sie dabei, dass tragbare und mobile HF-Kommunikationseinrichtungen dieses Gerät beeinflussen können.
Genauere Angaben können Sie unter der angegebenen Kundenservice-Adresse anfordern oder am Ende der Gebrauchsanweisung nachlesen.
•Das Gerät entspricht der EU-Richtlinie für Medizinprodukte 93/42/EC, dem Medizinproduktegesetz und der Norm DIN EN ISO 9919 (Medizi-
nisch elektrische Geräte − Besondere Festlegungen für die grundlegende Sicherheit und die wesentlichen Leistungsmerkmale von Pulsoxime-
tern für den medizinischen Gebrauch).
15. Garantie und Service
Wir leisten 3 Jahre Garantie für Material- und Fabrikationsfehler des Produktes. Die Garantie gilt nicht:
•im Falle von Schäden, die auf unsachgemäßer Bedienung beruhen,
•für Verschleißteile,
•für Mängel, die dem Kunden bereits beim Kauf bekannt waren,
•bei Eigenverschulden des Kunden.
Die gesetzlichen Gewährleistungen des Kunden bleiben durch die Garantie unberührt. Für die Geltend machung eines Garantiefalles innerhalb der
Garantiezeit ist durch den Kunden der Nachweis des Kaufes zu führen.
Die Garantie ist innerhalb eines Zeitraumes von 3 Jahren ab Kaufdatum gegenüber der Beurer GmbH, Söflinger Straße 218, 89077 Ulm, Germany
geltend zu machen. Der Kunde hat im Garantiefall das Recht zur Reparatur der Ware bei unserem eigenen oder bei von uns autorisierten Werk-
stätten. Weitergehende Rechte werden dem Kunden (aufgrund der Garantie) nicht eingeräumt.
Dear customer,
Thank you for choosing one of our products. Our name stands for high-quality, thoroughly tested products for applications in the areas of heat,
weight, blood pressure, body temperature, pulse, gentle therapy, massage, beauty, baby and air. Please read these instructions for use carefully and
keep them for later use, be sure to make them accessible to other users and observe the information they contain.
With kind regards,
Your Beurer team
1. Included in delivery
1 PO 80 pulse oximeter
1 Lanyard
1 Mini CD (SpO₂-Viewer/Manager software)
1 Data cable
1 USB charger
1 Belt bag
1 These instructions for use
2. Intended use
Only use the Beurer PO 80 pulse oximeter on humans to measure the arterial oxygen saturation (SpO₂) of haemoglobin and the heart rate (pulse rate).
The pulse oximeter is suitable for private use (at home, on the go) as well as for use in the medical sector (hospitals, medical establishments).
3. Getting to know your device
The Beurer PO 80 pulse oximeter provides a non-invasive measurement of the arterial oxygen saturation (SpO
2
) and the heart rate (pulse rate). Oxygen
saturation indicates the percentage of haemoglobin in arterial blood that is loaded with oxygen. Therefore it is an important parameter for assessing
the respiratory function. If the values fall below or exceed your individually set alarm limits, you receive an acoustic warning. Thanks to the integrated
memory, it is possible to record data continuously for up to 24 hours. The pulse oximeter can be connected to a PC using the integrated USB connec-
tion. The software included in the delivery allows you to obtain a detailed evaluation of your recordings.
To take a measurement, the pulse oximeter uses two rays of light with diering wavelengths, which strike the finger inserted inside the housing.
A low oxygen saturation value generally indicates underlying illnesses (respiratory diseases, asthma, heart failure etc.). People with a low oxygen satu-
ration value are more likely to experience the following symptoms: shortness of breath, increased heart rate, weakness, nervousness and outbreaks
of sweating. If oxygen saturation is known to be chronically diminished, it requires monitoring using the pulse oximeter under medical supervision. If
you have acutely diminished oxygen saturation, with or without the accompanying symptoms, you must consult a doctor immediately as it could lead
to a life-threatening situation. The pulse oximeter is particularly suitable for patients at risk such as people with heart disease or asthma, but also for
athletes and healthy people who exercise at high altitude (e.g. mountaineers, skiers or amateur pilots).
4. Signs and symbols
The following symbols are used in these instructions for use, on the packaging and on the type plate for the device:
WARNING
Warning instruction indicating a risk of injury or dam-
age to health
Manufacturer
IMPORTANT
Safety note regarding potential for damage to the
device/accessories
Application part, type BF
Note
Note on important information
SN
Serial number
Observe the instructions for use
0483
The CE labelling certifies that the product complies with the
essential requirements of Directive 93/42/EEC on medical
products.
%SpO₂
Arterial oxygen saturation of haemoglobin (in percent)Date of manufacture
PR bpm
Pulse rate (beats per minute)
IP22
Device protected against foreign objects ≥ 12.5 mm and
against falling drops of water
Disposal in accordance with EC Directive WEEE
(Waste Electrical and Electronic Equipment)
5. Warnings and safety notes
Read these instructions for use carefully. Non-observance of the following information may result in personal injury or material damage. Store these
instructions for use and make them accessible to other users. Make sure you include these instructions for use when handing over the device to third
parties.
WARNING
•
Check to ensure that the package contains all the parts that should be included in the delivery.
•
Before use, ensure that there is no visible damage to the unit or accessories. When in doubt, do not use the unit and contact your dealer or the
customer service address provided.
•
Do not use any additional parts that are not recommended by the manufacturer or oered as equipment.
•
Under no circumstances should you open or repair the device yourself, as faultless functionality could no longer be guaranteed thereafter. Failure to
comply will result in voiding of the warranty. For repairs, please contact Beurer customer services or an authorised retailer.
Do NOT use the pulse oximeter
−
if you are allergic to rubber products.
−
if the device or the finger you are using is damp.
−
on small children or babies.
−
during an MRI or CT scan.
−
whilst taking a blood pressure measurement on the same arm using a cu.
−
on fingers that have nail varnish on, are dirty or have a plaster or other dressing on them.
−
on large fingers that do not fit into the device easily (fingertip: width approx. > 20 mm, thickness >15 mm).
−
on fingers with anatomical changes, oedemas, scars or burns.
−
on fingers that are too small, as with small children for example (width approx. < 10 mm, thickness < 5 mm).
−
on patients who are not steady at the site of application (e.g. trembling).
−
near flammable or explosive gas mixtures.
•
Using the device for long periods may cause discomfort or pain for people with circulatory disorders. Therefore do not use the pulse oximeter for
longer than 2 hours on one finger.
•
Do not self-diagnose or self-medicate on the basis of the measurements without consulting your doctor. In particular, do not start taking any new
medication or change the type and/or dosage of any existing medication without prior approval.
•
Do not look directly inside the housing during the measurement. The red light and the invisible infra-red light in the pulse oximeter are harmful to
your eyes.
•
This device is not intended for use by people (including children) with restricted physical, sensory or mental skills or a lack of experience and/or a
lack of knowledge, unless they are supervised by a person who has responsibility for their safety or they receive instructions from this person on
how to use the device. Children should be supervised around the device to ensure they do not play with it.
•
Neither of the displays for the pulse wave and pulse bar allows the strength of the pulse or circulation to be evaluated at the measurement site.
Rather, they are exclusively used to display the current visual signal variation at the measurement site and do not enable reliable diagnostics for the
pulse.
Non-observance of the following instructions can lead to inaccurate or incorrect measurements.
•
There must not be any nail varnish, artificial nails or other cosmetics on the finger to be measured.
•
Ensure that the finger nail on the finger to be measured is short enough that the fingertip covers the sensor element in the housing.
•
Keep your hand, finger and body steady during the measurement.
•
For people with cardiac arrhythmia, the measurement values of SpO₂ and the heart rate may be incorrect or the measurement may not be possible
at all.
•
In cases of carbon monoxide poisoning, the pulse oximeter displays a measurement value that is too high.
•
To avoid falsifying the measuring result, there should not be any strong light sources (e.g. fluorescent lamps or direct sunlight) in the immediate
vicinity of the pulse oximeter.
•
People with low blood pressure, who suer from jaundice or take medication for vascular contraction, may experience incorrect or falsified measure-
ments.
•
Incorrect measurements are likely for patients who have been administered medical dye in the past or for those who have abnormal haemoglobin
levels. This applies in particular for cases of carbon monoxide poisoning and methaemoglobin poisoning, which can occur for example from the
administration of local anaesthetics or from an existing methaemoglobin reductase deficiency.
•
Protect the pulse oximeter from dust, shocks, moisture, extreme temperatures and explosive materials.
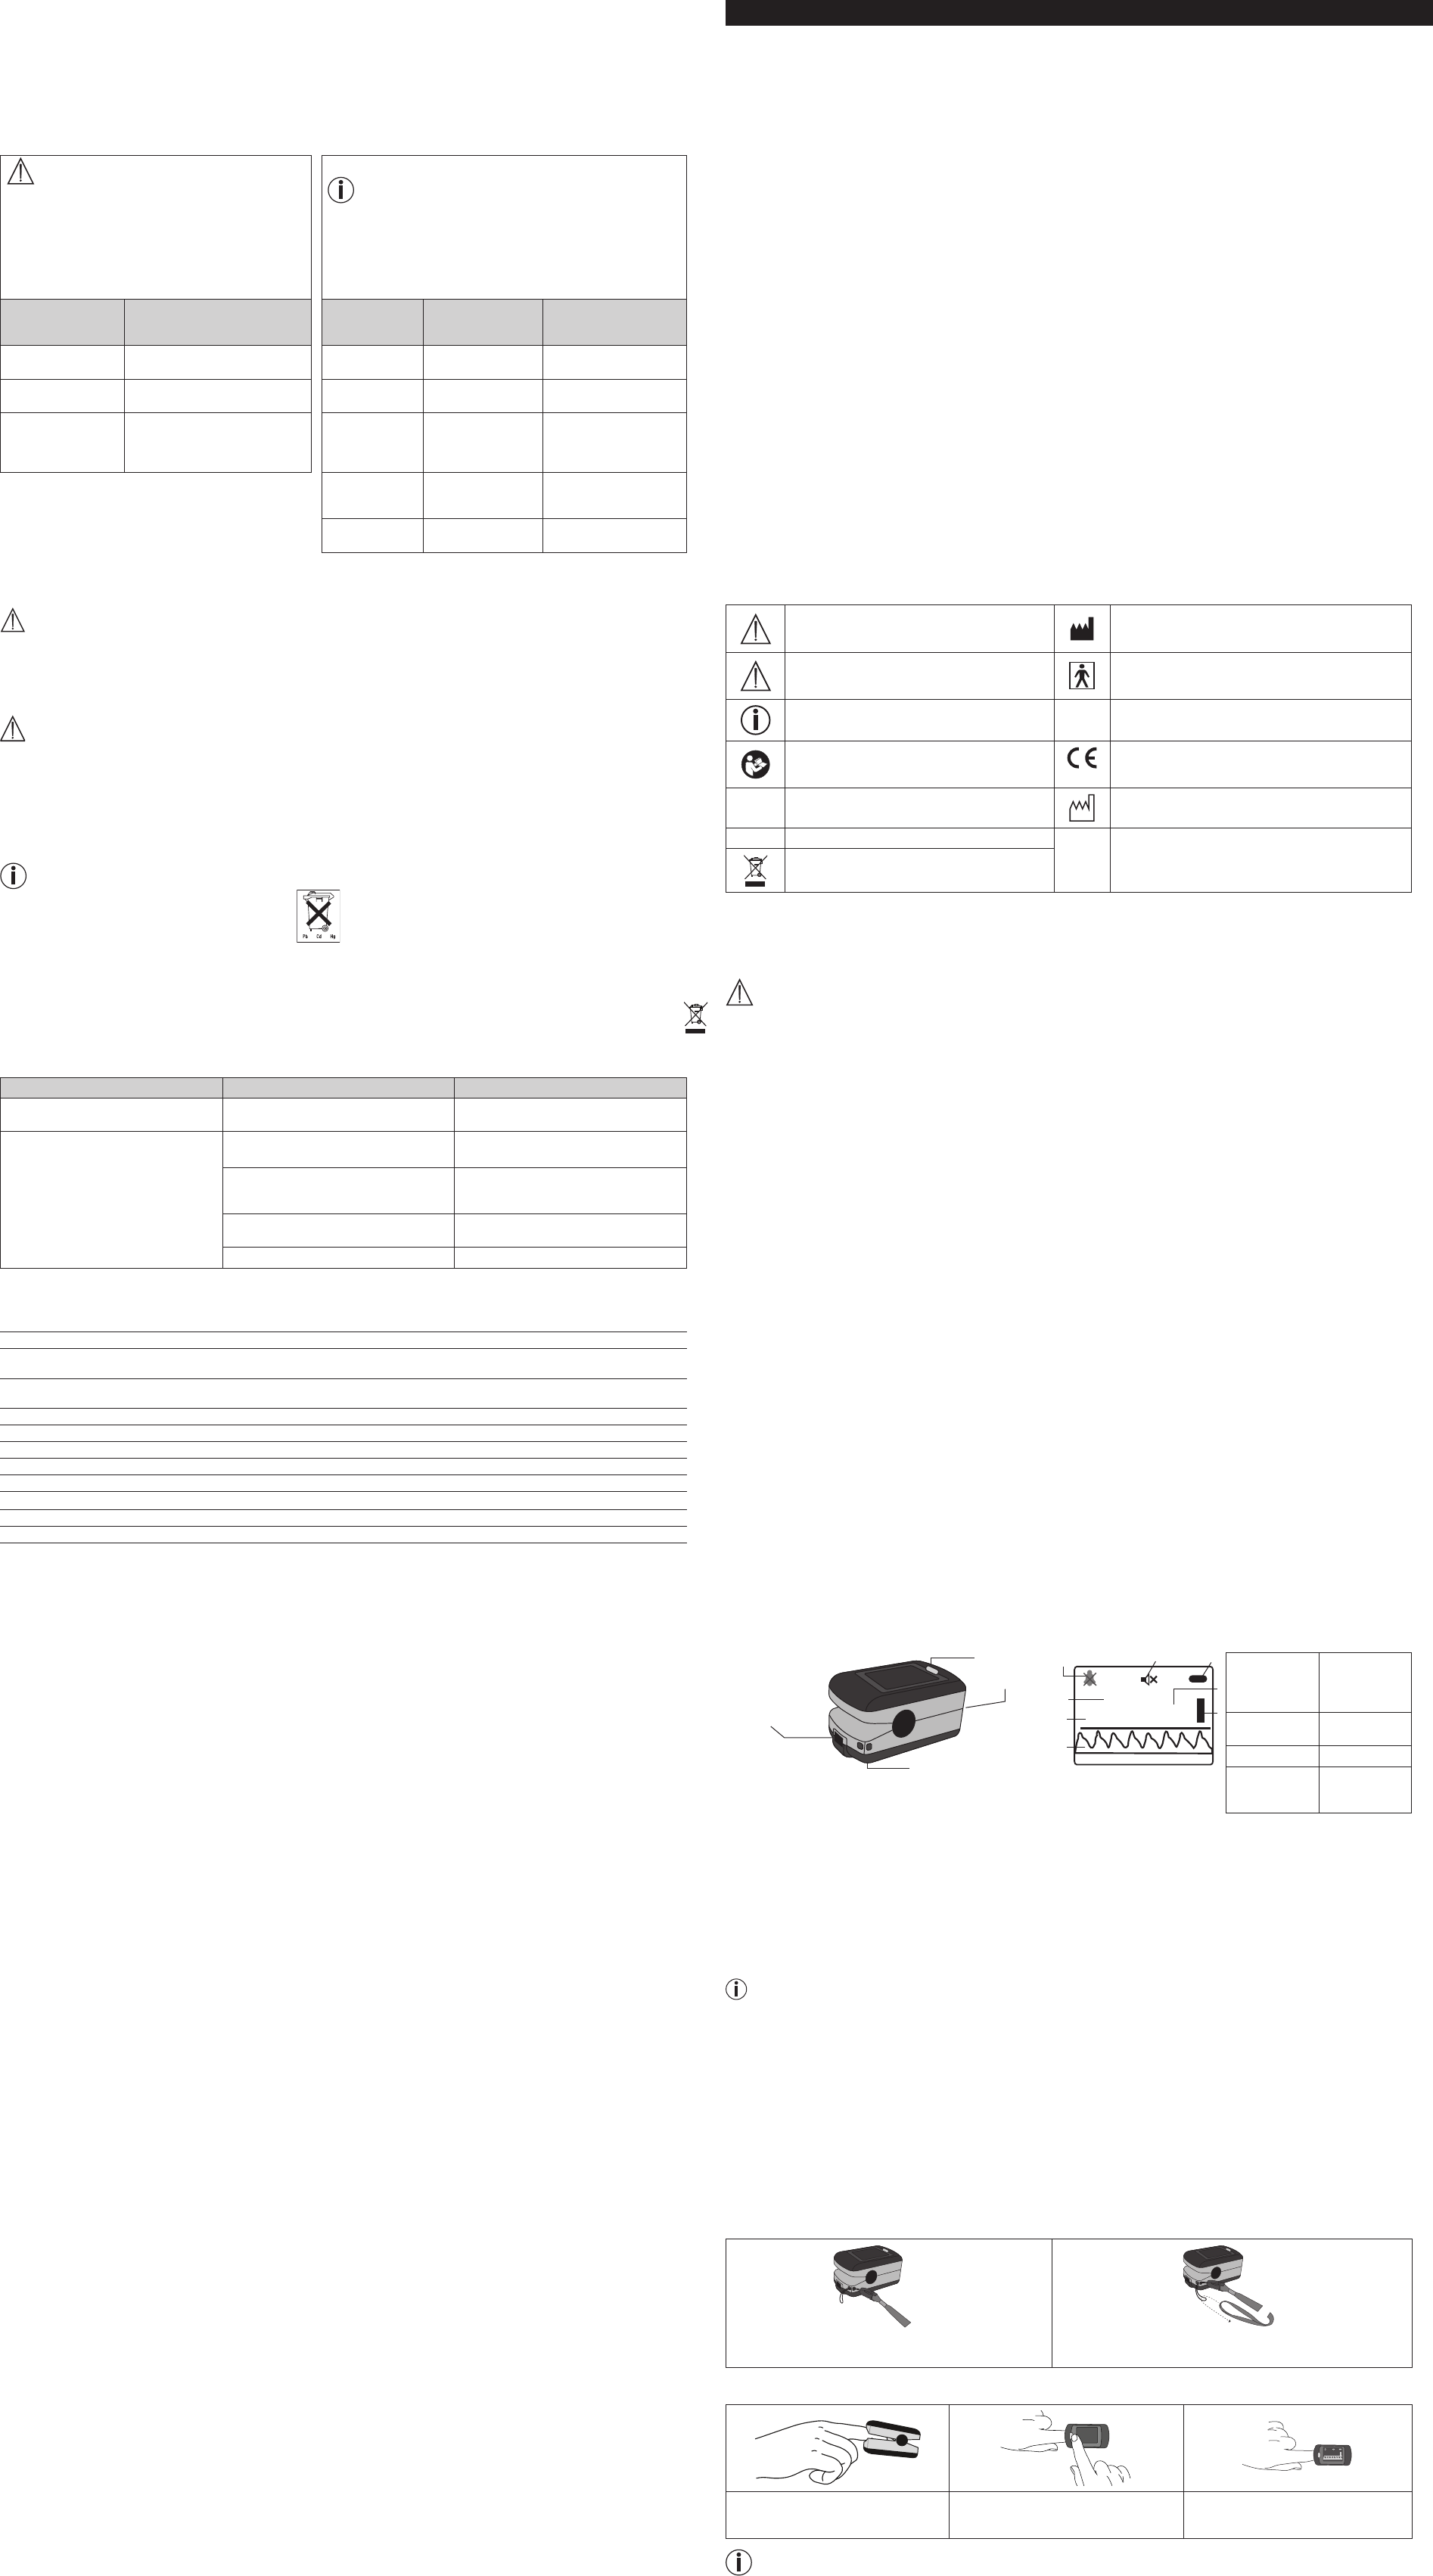
6. Unit description Display description
USB connection
Lanyard holder/charger
indicator lamp
Finger opening
Function button
1
2
3
4
5
6
7
8
98
85
065
%SpO
2
bpm
1. Alarm symbol
(crossed out =
alarm is deacti-
vated)
2. Pulse tone
symbol (crossed
out = pulse tone
is deactivated)
3. Battery indica-
tor
4. Pulse rate
(value in bpm)
5. Pulse bar6. Pulse wave
7. SpO₂ alarm
(lower limit)
8. Oxygen
saturation (value
in %)
7. Initial use
7.1 Charging the pulse oximeter
If the battery indicator on the display shows a low battery charge state, the pulse oximeter must be charged. There are two ways to charge the pulse
oximeter.
Option 1: connect the supplied data cable to the pulse oximeter’s USB connection. Insert the other (large) end of the data cable into the supplied
charger. Insert the charger into the socket.
Option 2: connect the supplied data cable to the pulse oximeter’s USB connection. Insert the other (large) end of the data cable into your computer’s
USB port.
Note
When the device is charging, the blue charger indicator lamp on the pulse oximeter lights up. The blue charger indicator lamp goes out as soon as the
battery is fully charged.
7.2 Installing the “SpO₂-Viewer/Manager” software
You can transfer the measurement data from the pulse oximeter to your computer using the supplied software. The software consists of the “SpO₂-
Viewer” and the “SpO
₂-Manager”. Using “SpO₂-Viewer” you can display your values in real time on the computer screen during the recording. You
can use “SpO₂-Manager” to transfer previously stored measurement data to your computer and manage the data.
To install the software, follow these steps:
•
Insert the supplied mini CD into your computer’s drive.
•
Run the “SpO2Setup.exe” installation file.
•
Follow the instructions during the installation process.
7.3 Attaching the lanyard
To transport the pulse oximeter more easily (e.g. whilst on the move) you can attach a lanyard to the device.
1
. Insert the narrow end of the lanyard through the holder as
shown.
2
. Draw the other end of the lanyard through the loop at the narrow end
and tighten.
8. Operation
98
85
065
%SpO
2
bpm
1
. Insert one suitable finger into the finger
opening of the pulse oximeter as shown
and hold it steady.
2
. Press the function button. The pulse oxime-
ter begins its measurement. Do not move
during the measurement.
3
. Your measurement values will appear on
the screen after a few seconds.
Note
When you remove your finger from the pulse oximeter, the device will automatically switch o after approx. five seconds.
Libble takes abuse of its services very seriously. We're committed to dealing with such abuse according to the laws in your country of residence. When you submit a report, we'll investigate it and take the appropriate action. We'll get back to you only if we require additional details or have more information to share.
Product:
Forumrules
To achieve meaningful questions, we apply the following rules:
First, read the manual;
Check if your question has been asked previously;
Try to ask your question as clearly as possible;
Did you already try to solve the problem? Please mention this;
Is your problem solved by a visitor then let him/her know in this forum;
To give a response to a question or answer, do not use this form but click on the button 'reply to this question';
Your question will be posted here and emailed to our subscribers. Therefore, avoid filling in personal details.
Register
Register getting emails for Beurer PO 80 at:
new questions and answers
new manuals
You will receive an email to register for one or both of the options.
Get your user manual by e-mail
Enter your email address to receive the manual of Beurer PO 80 in the language / languages: English, German as an attachment in your email.
The manual is 4,02 mb in size.
You will receive the manual in your email within minutes. If you have not received an email, then probably have entered the wrong email address or your mailbox is too full. In addition, it may be that your ISP may have a maximum size for emails to receive.
If you have not received an email with the manual within fifteen minutes, it may be that you have a entered a wrong email address or that your ISP has set a maximum size to receive email that is smaller than the size of the manual.
The email address you have provided is not correct.
Please check the email address and correct it.
Your question is posted on this page
Would you like to receive an email when new answers and questions are posted? Please enter your email address.