658520
24
Zoom out
Zoom in
Previous page
1/56
Next page
24
ENGLISH
Protect the power supply cable
from heat, aggressive liquids and
sharp edges.
Use only rubber-insulated exten-
sion cables of sufficient lead
cross section (3 x 1.5 mm
2
, for
machines with 3-phase motor:
5
x 1.5 mm
2
).
Do not pull on the power supply
cable to unplug.
A
Changing the direction of rota-
tion (3-phase motor only):
Depending on phase sequence the
band saw blade may turn in the
wrong direction. This can cause the
work piece being tossed away when
attempting to cut. Therefore, always
check direction of rotation after every
connection to the power supply.
If the direction of rotation is incor-
rect, the electrical connection must
be changed by a qualified electrician!
1. When the saw is assembled and all
safety devices are installed, connect
it to the power supply.
2. Start saw briefly and turn OFF imme-
diately again.
3. Check the band saw blade's direc-
tion of rotation: in the cutting area
it must run from the top down-
wards.
4. If the band saw blade turns in the
wrong direction, unplug the power
supply cable at the saw.
5. Have the electrical connection
changed by a qualified electrician!
A
Danger!
To reduce the risk of personal
injury as much as possible, the fol
-
lowing safety recommendations
should be observed when operating
the saw.
Use personal protection gear:
dust respirator;
hearing protection;
safety goggles.
Cut only one work piece at a time.
Always hold the work piece down
on the table.
Do not jam any work pieces.
Do not try to slow the band saw
blade down or stop it by pushing
the work piece against the saw
blade from the side.
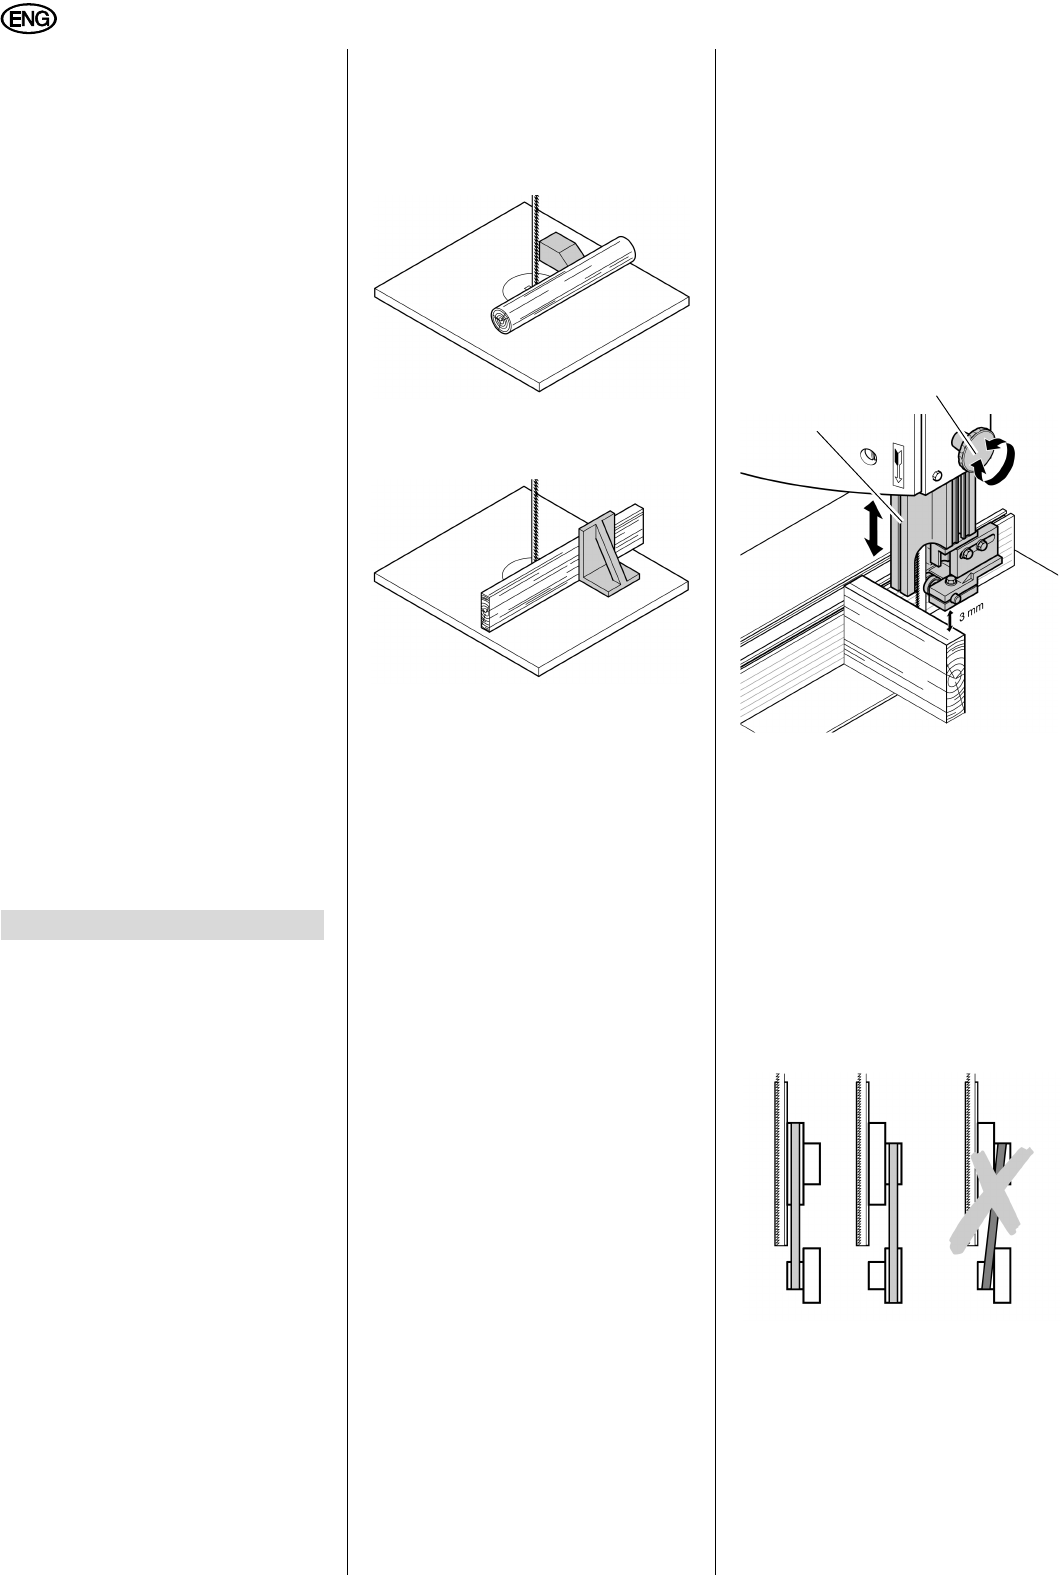
If the type of work requires, use
the following:
push stick – if distance rip
fence – band saw blade
120 mm;
work support – for long stock,
which would otherwise fall off
the table on completion of the
cut;
dust collector;
an appropriate jig when cut-
ting round stock, to keep it
from turning;
a suitable guide for firm sup-
port when cutting thin stock
layed on edge.
Before starting work, check to
see that the following are in
proper working order:
band saw blade;
upper and lower blade guard.
Replace damaged parts immedi-
ately.
Assume correct work position
(the band saw blade's teeth must
point towards the operator).
Never cut several work pieces at
the same time – and also no bun
-
dles containing several individual
pieces. Risk of personal injury if
individual pieces are caught by
the saw blade uncontrolled.
c
Entangelement hazard!
Do not wear loose clothing, jewel-
lery, or gloves, which may get
caught and wound up by revolv-
ing machine parts.
Contain long hair with a hairnet.
Never cut stock to which ropes,
cords, strings, cables or wires
are attached or which contain
such materials.
Upper blade guide adjustment
The height of the upper blade guide (69)
needs to be adjusted:
prior to every cutting operation, to
accommodate the height of the work
piece (the upper blade guide should
be set approx. 3 mm above the work
piece);
after adjustments of band saw blade
or saw table (e.g. band saw blade
change, tensioning of the band saw
blade, saw table alignment).
A
Danger!
Before adjusting the upper
blade guide and saw table tilt:
switch machine OFF;
wait until the band saw blade has
come to a complete stop.
Set upper blade guide (69) with the
adjusting knob (70) to the desired
height.
Cutting speed adjustment
1. Open the lower housing door.
2. Slacken V-belt by turning the crank
clockwise.
3. Put V-belt on the required pulley of
the driving wheel (lower band saw
wheel) and the corresponding motor
pulley – note label inside the lower
housing door.
A
Caution!
The V-belt must run either on
both front or both rear pulleys. Never
have the V-belt run diagonally!
V-belt on front pulley
= low speed, high torque.
V-belt on rear pulleys
= high speed, low torque.
4. Tighten the V-belt again by turning
the crank counter-clockwise (half-
way between the pulleys the V-belt
should flex approx. 10
mm).
5. Close the lower housing door.
7. Operation
69
70
800 m/min370 m/min
24

Need help? Post your question in this forum.

Forumrules


Report abuse

Libble takes abuse of its services very seriously. We're committed to dealing with such abuse according to the laws in your country of residence. When you submit a report, we'll investigate it and take the appropriate action. We'll get back to you only if we require additional details or have more information to share.

Product:

For example, Anti-Semitic content, racist content, or material that could result in a violent physical act.

For example, a credit card number, a personal identification number, or an unlisted home address. Note that email addresses and full names are not considered private information.

Forumrules

To achieve meaningful questions, we apply the following rules:

Register

Register getting emails for Metabo BAS 317 Precision at:


You will receive an email to register for one or both of the options.


Get your user manual by e-mail

Enter your email address to receive the manual of Metabo BAS 317 Precision in the language / languages: English, German, French, Italian as an attachment in your email.

The manual is 6,76 mb in size.


You will receive the manual in your email within minutes. If you have not received an email, then probably have entered the wrong email address or your mailbox is too full. In addition, it may be that your ISP may have a maximum size for emails to receive.

Others manual(s) of Metabo BAS 317 Precision

Metabo BAS 317 Precision User Manual - Dutch, Portuguese, Spanish - 44 pages


The manual is sent by email. Check your email

If you have not received an email with the manual within fifteen minutes, it may be that you have a entered a wrong email address or that your ISP has set a maximum size to receive email that is smaller than the size of the manual.

The email address you have provided is not correct.

Please check the email address and correct it.

Your question is posted on this page

Would you like to receive an email when new answers and questions are posted? Please enter your email address.


Info