The optional HM-162 remotely controls the transceiver and pro-
vides an optional Intercom function.
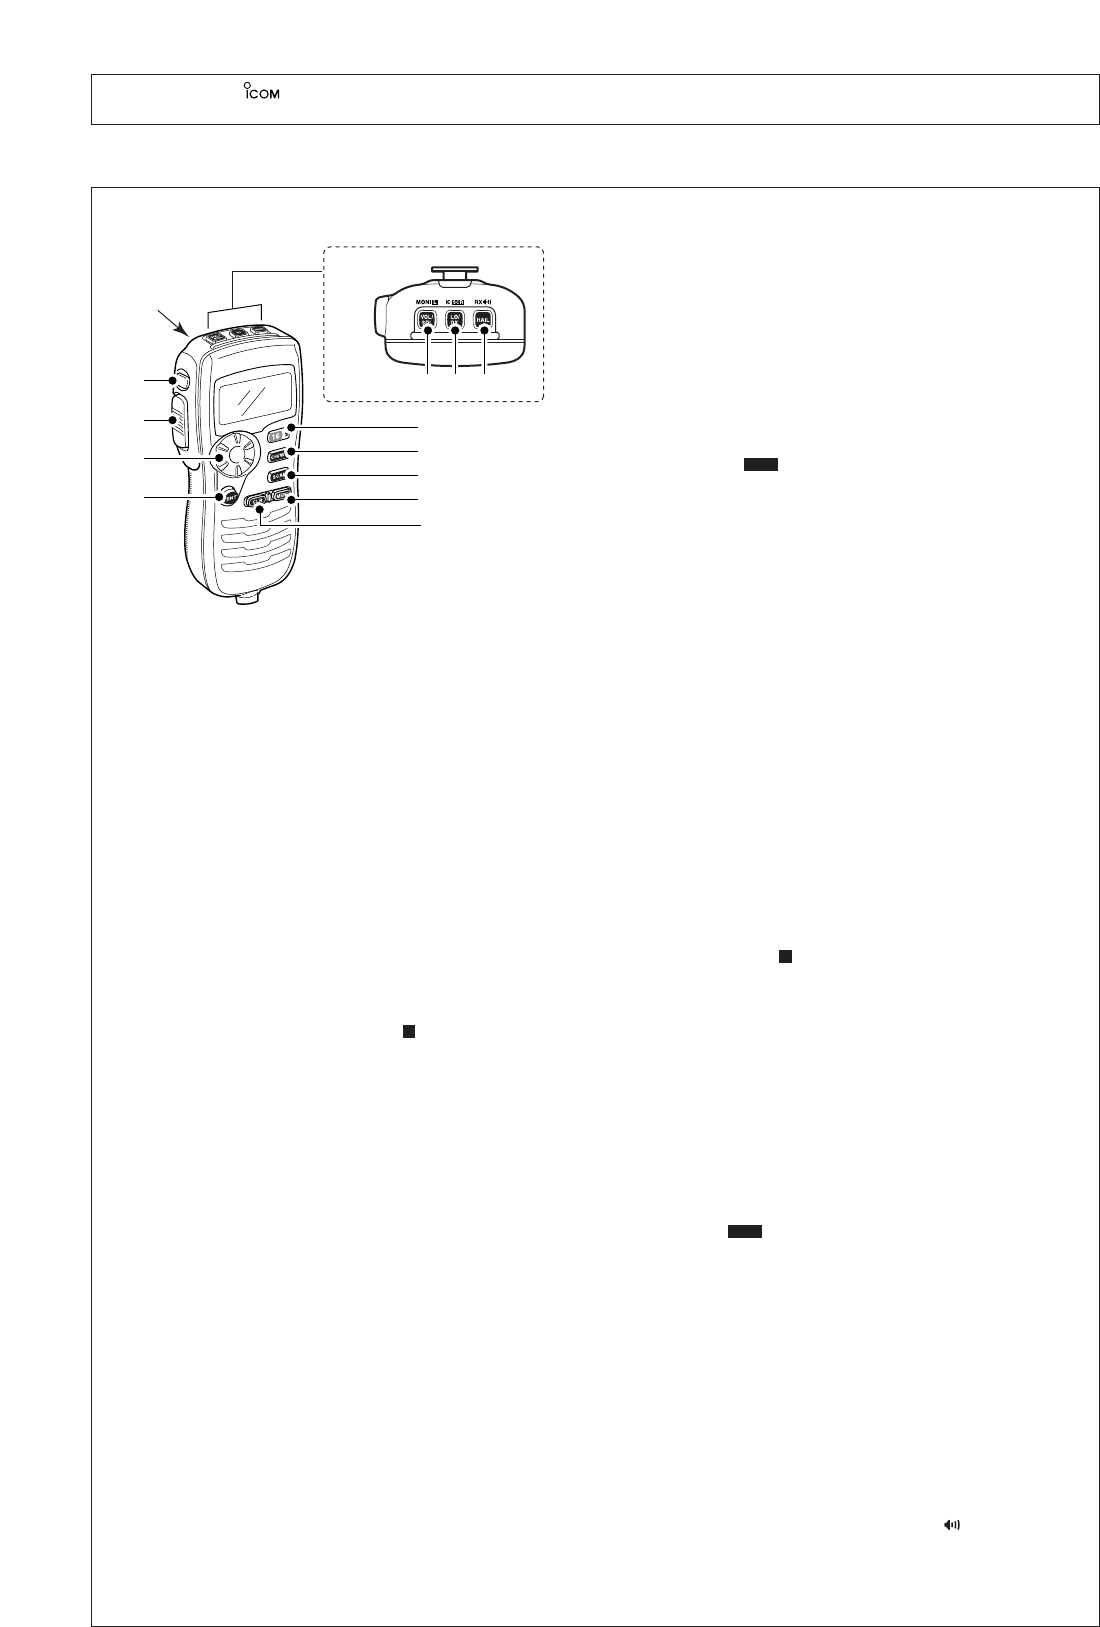
q DISTRESS KEY [DISTRESS]
Push for 5 sec. transmit a Distress call.
w TRANSMIT POWER KEY [H/L]
➥ Push to toggle high or low power.
• Some Channels are set to low power only.
➥ While pushing this key, other keys perform secondary
functions.
➥ While pushing this key, turn power ON to toggle the All key
Lock function ON or OFF.
•“ ” blinks while the All key Lock function is in use.
• Only [PWR] ([CLR]/[MENU]), [DISTRESS] and [PTT] are
functional when the All key Lock function is in use.
e PTT SWITCH [PTT]
Push and hold to transmit; release to receive.
r SELECTOR DIAL [SELECTOR]
➥
Rotate to adjust the audio level
, or select the items in DSC
menu, Set mode settings in set mode, etc.
➥ Rotate to select the noise squelch level or operating chan-
nel after pushing
[VOL/SQL•MONI ].
➥ Rotate to adjust the brightness of the LCD and key back-
light while pushing [H/L].
➥ Checks TAG channels or changes scanning direction dur-
ing scan.
➥ Rotate to adjust the audio level during in hailer mode.
➥ Rotate [SELECTOR] then push [ENT] to adjust the audio
level during in RX Speaker mode.
t ENTER KEY [ENT]
➥ Push to fix the selected contents, or select Set mode set-
tings, etc.
➥ Push for 1 sec. to indicate the GPS information of the con-
nected transceiver.
• No information appears when GPS receiver is not con-
nected to the transceiver.
y CLEAR•POWER KEY [CLR•PWR]
➥ While HM-162’s power is OFF, push this key and [MENU]
for 1 sec. to turn the power ON.
• The connected transceiver power is also turned ON, if it’s
OFF.
➥ While HM-162’s power is ON;
●
●
While pushing this key, push [MENU] to turn the HM-
162 power OFF.
• The connected transceiver power is also turned OFF de-
pending on the transceiver’s Set mode setting.
●
●
Push to clear the selected contents, or select Set mode
settings, etc.
u DSC MENU KEY [MENU]
➥ Toggles the DSC menu ON or OFF when pushed.
➥ While pushing [CLR], push this key to turn the HM-162
power ON and OFF.
i SCAN KEY [SCAN•TAG]
➥ Push to start and stop Normal or Priority scan when TAG
channels are programmed.
➥ Push for 1 sec. to set the displayed channel as a TAG
(scanned) channel.
➥ While pushing [H/L], push for 3 sec. to clear or set all TAG
channels.
o CHANNEL/DUALWATCH/TRI-WATCH KEY
[CH/WX•DW ]
➥ Push to select and toggle the regular channels and
weather channels.
➥ While pushing [H/L], push to select one of three channel
groups in sequence.
• U.S.A., International and Canadian channels are available.
➥ Push for 1 sec. to start Dualwatch or Tri-watch.
➥ Push to stop Dualwatch or Tri-watch when either is acti-
vated.
➥ Move the cursor backward while in the channel comment
programming condition.
!0 CHANNEL 16/CALL CHANNEL KEY [16•9]
➥ Push to select Channel 16.
➥ Push for 1 sec. to select call channel.
• “CALL” appears when call channel is selected.
➥ Push for 3 sec. to enter call channel programming condi-
tion when call channel is selected.
➥ While pushing [H/L], push to enter the channel comment
programming condition.
➥ While turning power ON, push to enter Set mode.
➥ Advance the cursor while in channel comment program-
ming condition.
!1 VOLUME/SQUELCH•MONITOR/LOCK KEY
[
VOL/SQL• MONI
]
➥ Push to select the volume, channel or squelch setting con-
dition.
➥ After pushing this key, rotate [SELECTOR] to set the
audio level, channel selection or squelch level.
➥ Push for 1 sec. to turn the monitor function ON.
➥ While pushing [H/L], push this to toggle the (microphone)
Key Lock function ON or OFF.
•“ ” appears while (microphone) Key Lock function is in use.
• [PWR] ([CLR]/[MENU]), [PTT], [VOL/SQL], [H/L] and [DIS-
TRESS] still function when the (microphone) Key Lock func-
tion is turned ON.
!2 ATTENUATOR/INTERCOM/SCRAMBLER KEY
[LO/DX•IC ]
➥ Push to toggle the Attenuator function ON or OFF.
•“
LLOOCC
” appears when the Attenuator function is turned ON.
➥ Push for 1 sec. to activate the Intercom function.
➥ Calls the transceiver when pushed and held while in In-
tercom mode.
➥ While pushing [H/L], activates an optional Voice scram-
bler function when it’s installed into the transceiver.
•“
SSCCRRAAMM
” appears when the Voice scrambler function is
turned ON.
•Voice scrambler function is available depending on the
transceiver or transceiver’s version.
• The optional Voice scrambler function cannot be used on
Channel 16 and 70.
!3 HAILER/RX SPEAKER KEY [HAIL•RX ]
➥ Push to turn the hailer mode ON or OFF.
➥ Push for 1 sec. to turn the RX Speaker mode ON or OFF.
➥ While pushing [H/L], push to turn the automatic foghorn
function ON or OFF.
SCR
é
L
U/I/C
L
é