742019
1
Zoom out
Zoom in
Previous page
1/4
Next page
Introduction
Compact structure, high durability and ease of use. All you need to do is aim
at the desired spot, press the button and read the current surface tempe-
rature in less than one second. This instrument allows to safely take tem-
perature measurements of surfaces which are hot, dangerous or difficult to
access without the need for touching them.
Principle of operation
The infrared thermometer measures temperature of an object’s surface.
The optic system of this instrument enables to measure the emitted, re-
flected and transmitted energy which is conducted towards the sensor after
being concentrated. The electronic system of this instrument converts infor-
mation into a temperature value which is displayed on the LCD. Thanks to
the laser beam, aiming is more precise, which guarantees better effective-
ness and accuracy of measurement.
Note
The infrared thermometer should be protected against the following:
Electromagnetic field (EMF) emitted by welding equipment and induction
heaters;
Thermal shock (caused by rapid or significant change of ambient tempe-
rature; prior to using the instrument, wait 30 minutes for it to adjust to the
new ambient temperature).
Avoid leaving the thermometer on objects with high temperature or near
them.
Warning: Do not aim the laser at someone’s eyes, either directly or indirectly
by reflecting the beam from surfaces which reflect light.
1. In order to measure temperature, aim the thermometer at the object and
hold the yellow trigger. The measured object should be larger than the size of
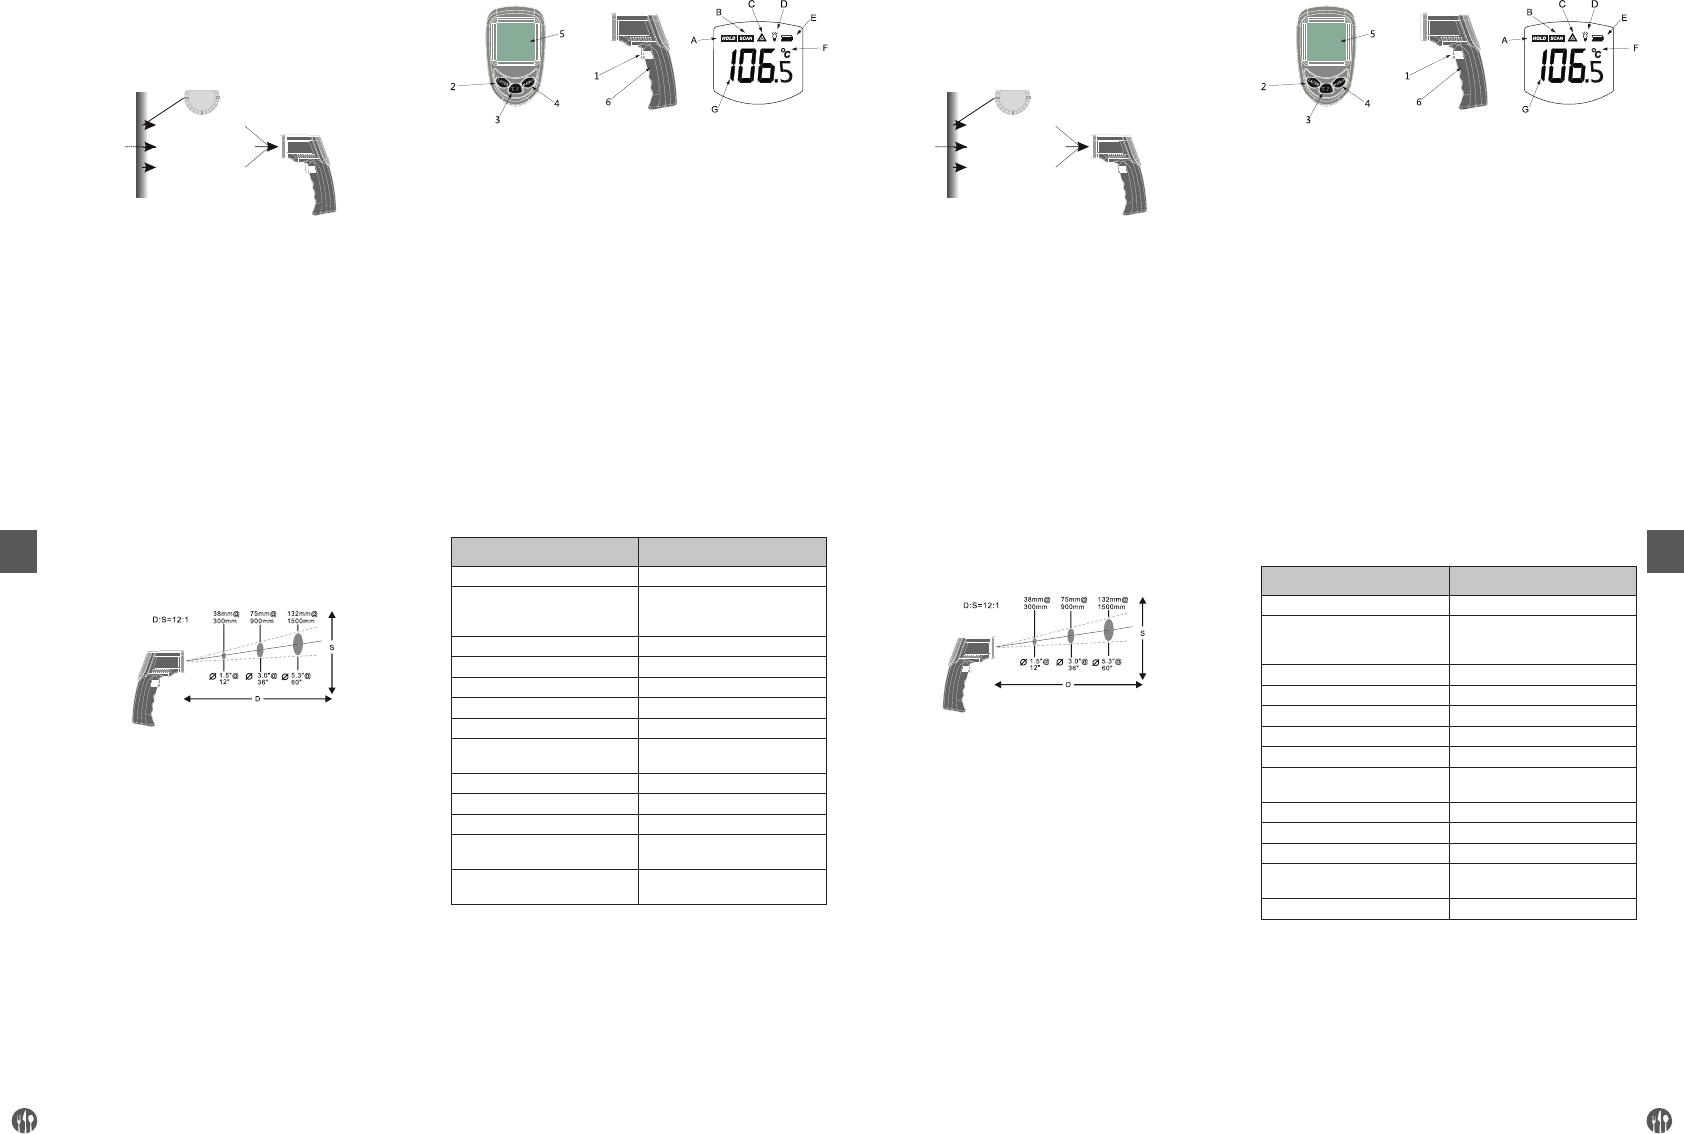
the beam spot which can be calculated on the basis of the visual field table.
2. The distance and size of the measuring spot: the larger the distance from
the object, the larger the spot size required for taking measurements.
3. Visual field: Make sure that the object is larger than the measuring spot.
The smaller the object, the smaller the measuring distance. In case high
precision is required, the object should be at least twice the size of the
measuring spot of the instrument.
4. Emission coefficient: Most organic materials and painted or oxidized sur-
faces have an emissivity of 0.95 (pre-set in the unit). In case of measuring
glossy or polished surfaces of metals, the obtained results may not be ac-
curate. In order to increase accuracy of the measurements, cover the sur-
face with protective tape or apply a thin coat of lacquer and then measure
the temperature of the tape or lacquer coating as soon as it acquires the
temperature of the material underneath it.
Quick start guide
Press the lock on the battery compartment and place the batteries inside.
Press the trigger (the measurement value and battery symbol will appear
on the LCD). After releasing the trigger, the measurement value will be dis-
played for 7 seconds.
Locating a hot point
Move the thermometer outside the measured area, then move the thermo-
meter up and down towards the measured object until finding the hot point.
(Switch the laser on in order to take accurate measurements).
Note
The red laser spot only indicates the general direction. The sensor opening is
the most important element for temperature measurement.
Einführung
Kompakt, robust und leicht einzusetzen. Zielen Sie einfach,drücken Sie den
Knopf und lesen Sie die aktuelle Oberflächentemperatur in weniger als einer
Sekunde ab. Messen Sie auf eine sichere Weise Oberflächentemperaturen
von heißen, gefährlichen oder schwer zu erreichbaren Objekten, ohne sie
zu berühren.
Funktionsweise
Das Infrarot Thermometer misst die Oberflächentemperatur eines Ob-
jekts. Die Optik des Geräts misst abgestrahlte, reflektierte und übertragene
Energie, die konzentriert auf einen Sensor geleitet wird. Die Elektronik der
Einheit wandelt die Information in einen Temperaturwert um, der auf dem
Display der Einheit angezeigt wird. Für eine noch bessere Effizienz und Ge-
nauigkeit macht der Laserstrahl das Zielen noch präziser
Vorsicht
Das Infrarot Thermometer sollte vor folgenden Einflüssen geschützt werden:
EMF (elektromagnetische Felder) von Schweißger äten, Induktionsheizungen.
Thermische Schocks (verursacht durch eine abrupte oder starke Tempe-
raturänderung in der Umgebung. Erlauben Sie dem Gerät, sich etwa 30
Minuten an die Umgebung anzupassen, bevor Sie es einsetzen).
Lassen Sie die Einheit nicht auf oder in der Nähe von Objekten mit hohen
Temperaturen.
Warnung: Richten Sie den Laser nicht In die Augen, auch nicht Indirekt über
reflektierende Oberflächen.
1. Wenn Sie Messungen vornehmen, richten Sie das Thermometer in Richt-
ung des zu messenden Objekts und halten Sie den gelben Auslöser. Das
zu messende Objekt sollte größer als die Punktgröße sein, die über die
Sichtfeld· Tabelle berechnet werden kann.
2. Distanz & Punktgröße: Je größer die Distanz zum Objekt ist, desto größer
ist die für die Messung notwendige Objektfläche.
3. Sichtfeld: Stellen Sie sicher, dass das Objekt gröBer als die Punktgröße
des Geräts ist. Je kleiner das Ziel desto geringer ist die Messdistanz.
wenn eine hohe Genauigkeit erforderlich ist, sollte das Objekt wenigstens
zweimal so groß sein wie die Punktgröße des Geräts.
4.
Emissionsgrad: Die meisten organischen Materialien und gestrichene oder
oxidierte Oberflächen haben einen Emissionsgrad von 0,95 (voreingestellter
Wert). Bei der Messung von glänzenden oder polierten Metalloberflächen
können ungenaue Messungen entstehen. Um dies zu kompensieren, dec-
ken Sie die Oberfläche mit einem Abdeckband oder mit einer dünnen Schicht
schwarzen Lacks ab. Messen Sie dann die Temperatur des Bands oder der
Lackierung, sobald diese die Temperatur des darunter liegenden Materials
erreicht hat.
Schnellstartanleitung
Drücken Sie den Clip des Batteriefachs und legen Sie die Batterien ein. Betä-
tigen Sie den Auslöser, LCD Anzeige Messwert & Batteriesymbol. Lassen Sie
den Auslöser los und die Messung wird für weitere 7 Sekunden angezeigt.
Lokalisieren eines Wärmepunktes
Zielen Sie mit dem Thermometer außerhalb des zu messenden Punktes, be-
wegen Sie dann den Punkt mit Auf- und Abbewegungen in Richtung des zu
messenden Objekts, bis Sie einen Wärmepunkt gefunden haben. (Schalten
Sie den Laser für eine genaue Messung ein).
Achtung
Der rote Laserpunkt zeigt nur die allgemeine Richtung an. Die Sensor-Öffn-
ung ist das wichtigste Teil zur Messung der Temperatur.
Table description
(1) Trigger: after pressing the trigger, the LCD shows the measurement va-
lue and the SCAN symbol. After releasing the trigger, the measurement
value will be displayed together with the HOLD symbol for approximately
7 seconds. The instrument is equipped with automatic switch-off function
which activates after 20 seconds.
(2) Laser On/off button.
(3) Button for changing the measurement units - Celsius/Fahrenheit
(4) Backlight On/off button.
(5) LCD
(6) Battery compartment cover: To replace the batteries, open the battery
compartment cover.
(A) Hold symbol
(B) Scan symbol
(C) Laser on symbol
(D) Backlight symbol
(E) Battery indicator
(F) Measuring unit
(G) Measurement value
Maintenance
1. Cleaning the lens: Blow off any particles using clean compressed air.
Carefully wipe off the remaining residues using a soft, damp cloth.
2. Cleaning the casing: Clean the casing using a damp sponge/cloth.
Note: Do not use any cleaning agents to clean the lens. Do not immerse
in water.
Specifications
Temperature range -32°C to 400°C (-26°F to 752°F)
Accuracy
(with ambient temperature of
23°C ±3°C)
-32°C to 0°C ±3°C
0°C to 400°C ±1,5°C or ±1,5%
(always the higher value applies)
Repeatability 1% of measurement or 1°C
Reaction time 500 mSec
Spectral range 8-14um
Emission coefficient 0.95
Operating temperature 0°C to 40°C
Relative humidity of air
10-95% RH without condensation,
@ to 3°C
Storage temperature -20°C to 60°C, without batteries
Weight/ dimensions 147,5g; 153x101x43mm
Power supply 9V Alkaline Battery
Battery life Laser models
(alkaline batteries)
12 hours
Dependence of the distance and
measuring spot size
12 : 1
Hendi b.v.
For technical information and Declarations of Conformity see www.hendi.eu.
Tabellenbeschreibung
(1) Auslöser : Wenn Sie den Auslöser betätigen, zeigt das LCD d ie Messung
mit dem SCAN Symbol an. Lassen Sie den Auslöser los. Die Messung
wird zusammen mit dem HOLD Symbol für weitere 7 Sekunden angezeigt
(annähernd). Integrierte automatische 20-Sekunden Abschaltfunktion.
(2) Laser Ein/Aus Schalter
(3) Celsius/ Fahrenheit Umschaltknopf
(4) Hintergrundbeleuchtung Ein/Aus Knopf.
(5) LCD
(6) Batteriefach-Abdeckung: Um die Batterien auszutauschen, öffnen Sie
bitte die BatteriefachAbdeckung
(A) Data Hold Symbol
(B) Scan-Symbol
(C) Laser An Symbol
(D) Hintergrundbeleuchtung An Symbol
(E) Batterieladezustand Symbol
(F) Messeinheit
(G) Messwert
Wartung
1. Reinigung der Linse: Blasen Sie lose Partikel mit sauberer Pressluft ab.
Wischen Sie verbleibende Ablagerungen sanft mit einem feuchten weichen
Tuch ab.
2. Gehäusereinigung: Reinigen Sie das Gehäuse mit einem feuchten-
Schwamm/ Tuch.
Anmerkung
Benutzen Sie keine Reinigungsmittel, um die Linse zu reinigen. Nicht in
Wasser tauchen.
Spezifikationen
Temperaturbereich -32°C bis 400°C (-26°F to 752°F)
Genauigkeit
(Bei Umgebungstemperatur
23°C ±3°C
-32°C bis 0°C ±3°C
0°C bis 400°C ±1,5°C oder ±1,5%
(was immer größer ist)
Wiederholpräzision 1% der Messung oder 1°C
Antwortzeit 500 mSec
Spektralempfindlichkeit 8-14um
Emissionsgrad 0.95
Betriebstemperatur 0°C bis 40°C
Relative Feuchtigkeit
10-95% RH nicht kondensierend,
@ bis 3°C
Lagertemperatur -20°C bis 60°C, ohne Batterie
Gewicht / Maße 147,5g; 153x101x43mm
Stromversorgung 9V Alkali-Batterie
Batterie Lebensdauer
(Alkaline)
12 hours
Distanz zu Punktgröße 12 : 1
Hendi b.v.
Für technische Auskünfte und Konformitätserklärungen siehe www.hendi.eu.
Reflected energy reflektierte Energie
Transmitted energy tragene Energie
Emitted energy emittierte Energie
Object Object
EN DE
1 2
1


Need help? Post your question in this forum.

Forumrules


Report abuse

Libble takes abuse of its services very seriously. We're committed to dealing with such abuse according to the laws in your country of residence. When you submit a report, we'll investigate it and take the appropriate action. We'll get back to you only if we require additional details or have more information to share.

Product:

For example, Anti-Semitic content, racist content, or material that could result in a violent physical act.

For example, a credit card number, a personal identification number, or an unlisted home address. Note that email addresses and full names are not considered private information.

Forumrules

To achieve meaningful questions, we apply the following rules:

Register

Register getting emails for Hendi 271148 at:


You will receive an email to register for one or both of the options.


Get your user manual by e-mail

Enter your email address to receive the manual of Hendi 271148 in the language / languages: English, German, Dutch, French, Italian, Polish as an attachment in your email.

The manual is 5,63 mb in size.


You will receive the manual in your email within minutes. If you have not received an email, then probably have entered the wrong email address or your mailbox is too full. In addition, it may be that your ISP may have a maximum size for emails to receive.

The manual is sent by email. Check your email

If you have not received an email with the manual within fifteen minutes, it may be that you have a entered a wrong email address or that your ISP has set a maximum size to receive email that is smaller than the size of the manual.

The email address you have provided is not correct.

Please check the email address and correct it.

Your question is posted on this page

Would you like to receive an email when new answers and questions are posted? Please enter your email address.


Info