- ENGLISH -
TRD02B0000SE 026889 180516
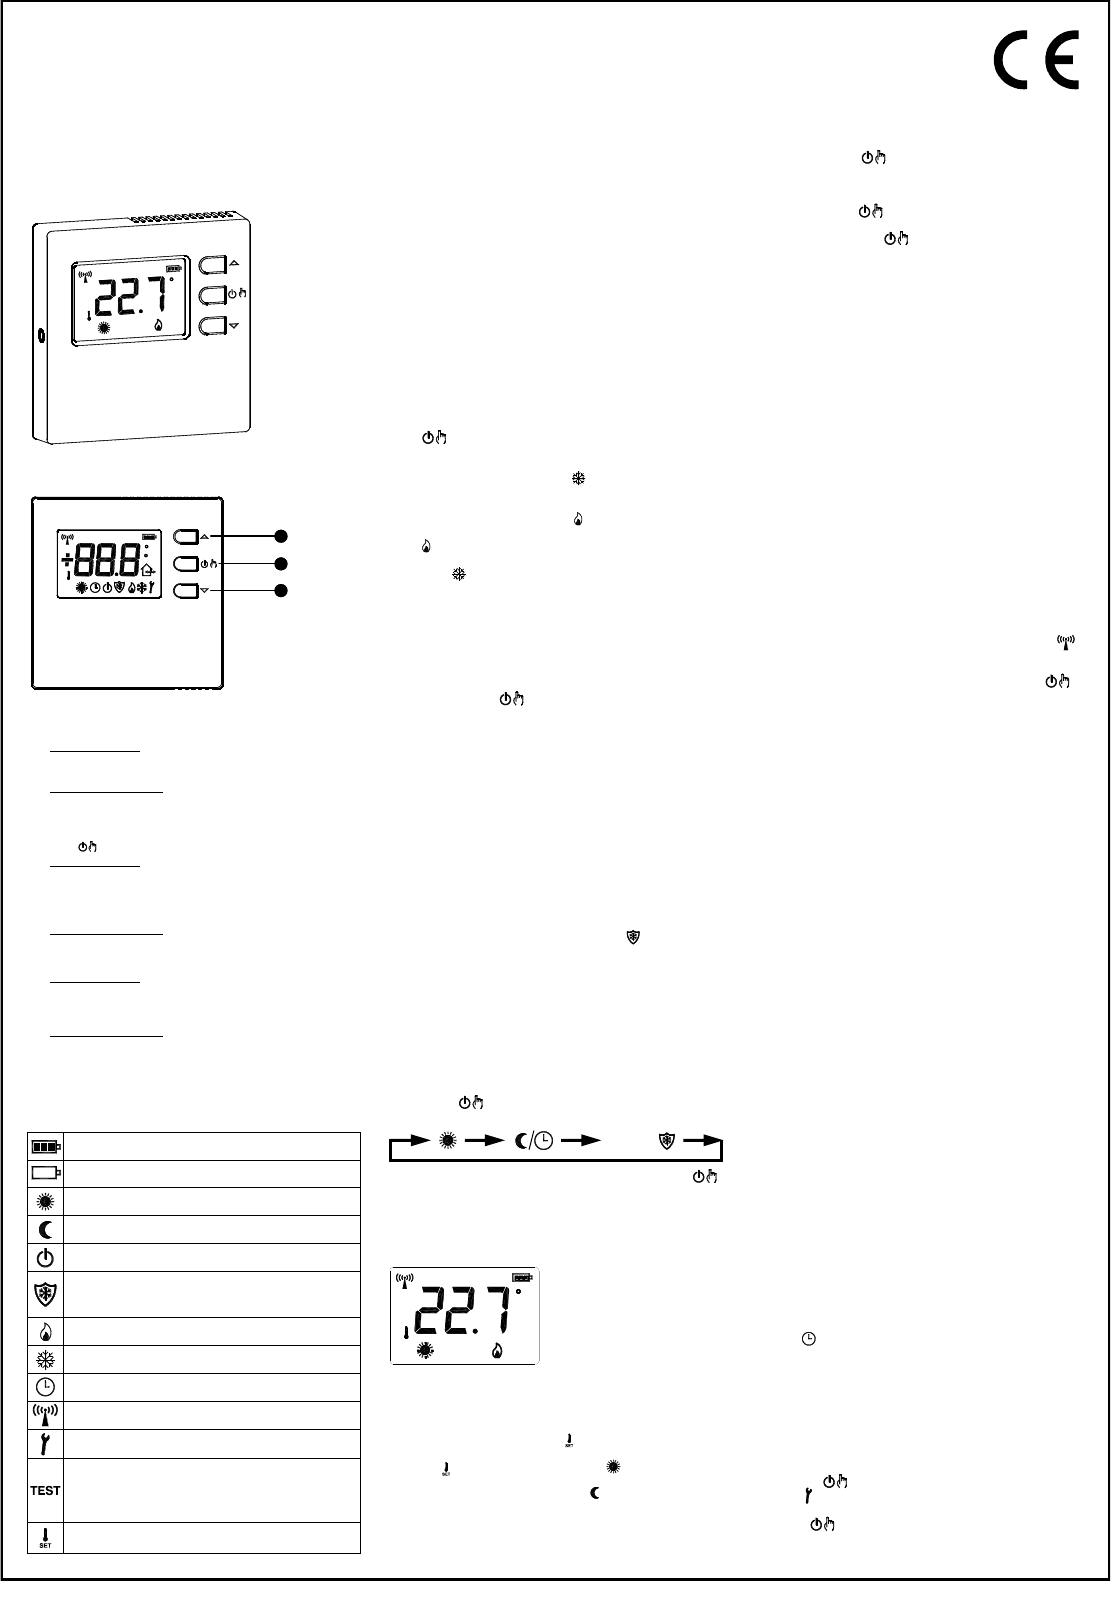
DESCRIPTION OF CONTROLS
KEY:
A Key ' ': multifunction key
Normal operation
-
-
In configuration mode
-
- pressed repe the s parameter
(increases the value).
B Key ' ': multifunction key:
Normal operation
- the regulation mode (according to parameter P02 ):
Comfort => Economy => OFF/ANTIFROST.
- more than 10 seconds reve operation
logic: Heating Cooling.
In configuration mode
-
C Key ' ': Multifunction key
Normal operation:
-
- pres repe decre the set
temperature.
In configuration mode
-
- pressed repe the s parameter
(decreases the value).
DISPLAY INDICATIONS
The
Indication of battery charge status.
Batteries discharged; replace batteries.
Temperature adjustment in Comfort mode.
Temperature adjustment in Economy m
Thermostat off, OFF mode.
Active antifrost m the thermostat adjusts to
antifrost temperature.
Output on in heating mode.
Output on in cooling mode.
Temperature adjustment in "auto" mode.
The thermostat is transmitting a radio control.
The thermostat is under configuration.
The
a sel the
receiver every 2 seconds.
T set-point display.
OVERVIEW
This ra
the room temperature with possibility of choosing fr
different adjustm modes and re set-point
temperatures: Comfort, Econom
The thermostat i default configured to operate in Comfort,
Economy and Antifrost modes; it can be adapted to the
different i requirements by modifying configuration,
and final user intervention can be limited, with the aim of
maximising wellbeing in the environment and energy saving.
The thermostat can be used in both heating and cooling
systems.
The thermostat is suitable for floor heating system
START-UP
At first open as in
'INSTALLATION' C Fig. and insert
correct polarity. The batteri
Heating/Cooling Set-up
The thermostat is default set in heating mode.
Hold ' pressed seconds to regulation
mode.
A. mode be set the thermostat previously
set on heating and t
seconds.
B. Heating will if the thermostat previously
set
seconds.
Icon ' ' Flame on signals heating activa during norm
operation, on
Snow icon ' '.
The heating/cooling m se be m if the
thermostat i configured to operate with a programmable
thermostat i New Wave radio system, as the setting i
defined on the programm thermostat or on the relay
module.
Adjustment mode set-up
There are 2
chosen by pressing ' '.
Comfort: the thermostat adjusts the room temperature
in
temperature during the day-time.
Economy/Auto: The t
according t the economy mode (this is
usually desired during night
time), when parameter P01 is set on trA .
When, on hand, parameter P0
set on rEC the thermostat adjusts the room
temperature according to comfort mode or
economy mode based on t t prog
which has been set on the associated
chronostat.
OFF / Antifrost: Turns off t thermostat. The d will
show
set
be
the display; in this case the roo
temperature w
value set as antifrost temperature in
parameter P03 (see paragraph 'INSTALLE
CONFIGURATION').
The thermostat is default configured for usin the, OF
Comfort and Economy modes.
Through the i P02 on e or more operating
modes c be re (see the 'INSTALLER
CONFIGURATION' paragraph).
Pressing ' ' cyclically selects between th
activated adjustment modes:
Once '
key is pressed again.
See the 'INSTALLER
information on how to configure the adjustment m
Set-point Temperature
Fig. 8
During normal operation the d the temperature
measured the room icon selected operating
mode. In order to show the relevant set-point temperature
press the keys ' ' or ' ': the will set
point icon ' ' on (thus
that the value shown refers to t
The
the displa is showing t ‘Comfort’ set-point temperature or,
as alternative, icon ' meaning
display is showing the ’Economy’ set-point temperature.
Pressing the key ' ' or ' ' res
point temperature. B the key ' ' or ' ' the set-point
temperature digits st to po out that the s point
can be changed.
Pressing the key ' ' whi the display is showing the
‘Comfort’ set-point temperature results in switch to the
‘Economy’ set-point display.
On
point
set-point.
A further
temperature,
keys.
EXTERNAL NTC SENSOR
The thermostat features an input (B in
Fig. 6) for connect an externa NTC sensor (optional)
alternatively the the internal one.
The external sensor can be used to measure the room
temperature when
does not allow a c measure of the roo
temperature.
When the installation requires
is P10
4700 25 sensor. If in about the
sensor to be connected, please consult the ma
The
with the internal sensor.
RADIO SYSTEM CONFIGURATION
Check the receiver to be coupled with the thermostat i
compatible fr the 'COMPATIBILITY W NEW W
RADIO SYSTEM' paragraph.
Check the r
signals
operation is carried out by ac 'Test' funct
simultaneously pressing ' ' and ' ' .
The thermostat displays the writing 'T ' and continuously
transmits switch-on an off controls to th a 2
second pause
on the
a radio control.
The 'Test' mode can be ended at any time by pressing ' '.
However, the 'Test' mode auto
17 minutes.
The 'Test' mode must be used to self-learn the ther
address on the receiver and, subsequently, the relative
output's
off every 2
If so, the thermostat correctly communicates with the receiver.
Ensure the two devices still correctly communicate when
positioning the thermostat in the wanted area.
The
positioned too far from the receiver: if so, we recommend
finding a be position, maybe closer to the receiver, and
ensure it is not near m
walls that might weaken radio transmission.
The signal quality can be monitored the recei the
relative documentation for further information).
ASSOCIATION WITH A PROGRAMMABLE
THERMOSTAT
It i possible for th thermostats to adjust the room
temperature based on the hourly program set on th
programmable thermostat, in a New W radio system
consisting of a more cha receiver module, a
programmable thermostat and m
This
the thermostats on the receiver, to the p
thermostat ones. A programmable thermostat and the
thermostats associated to it, in this way form an 'area'.
For
home,
programmable hourly bands on tw programmable
thermostats.
The associate channels rece information from th
programmable thermostat of which adj mode to use
and, therefore, which tem to adjust, comfort or
economy, off or antifrost.
If the programmable thermostat is adjusting at a Comfort
temperature, the associated therm a to
their Com set-point; w i th programm
thermostat is adjusting an economy temperature, the
associated thermostats adjust with their economy
temperature. Simila if the programm thermostat is off
with
adjust the antifrost temperature 5°C.
The di
a programmable the set in '
(symbol ' ' the receiver adj the adj
mode received from the programmable thermostat.
The P01 rEC ',
the thermostat in association with a programmable thermostat.
See the receiver instructions for the association procedure.
INSTALLER CONFIGURATION
The installer configuration allows defi the therm
operation to adjust it to the different types of rooms an
systems.
Hold '
until the ' ' symbol and the writi ' Con ' (con
appear on the display, to access configuration.
Pressing ' ' fro now, scrolls the different installer
parameters id with 'P ' an by the parameter nu
from P01 to P18.
OFF /
1
Fig. 1
B
A
C
WIRELESS DIGIT
Operating frequenc
Display with blue backli
Heating/Cooling selection can be m by t
thermostat or on t
User limit to adjusting t
Internal sensor and input
Indication of discharged