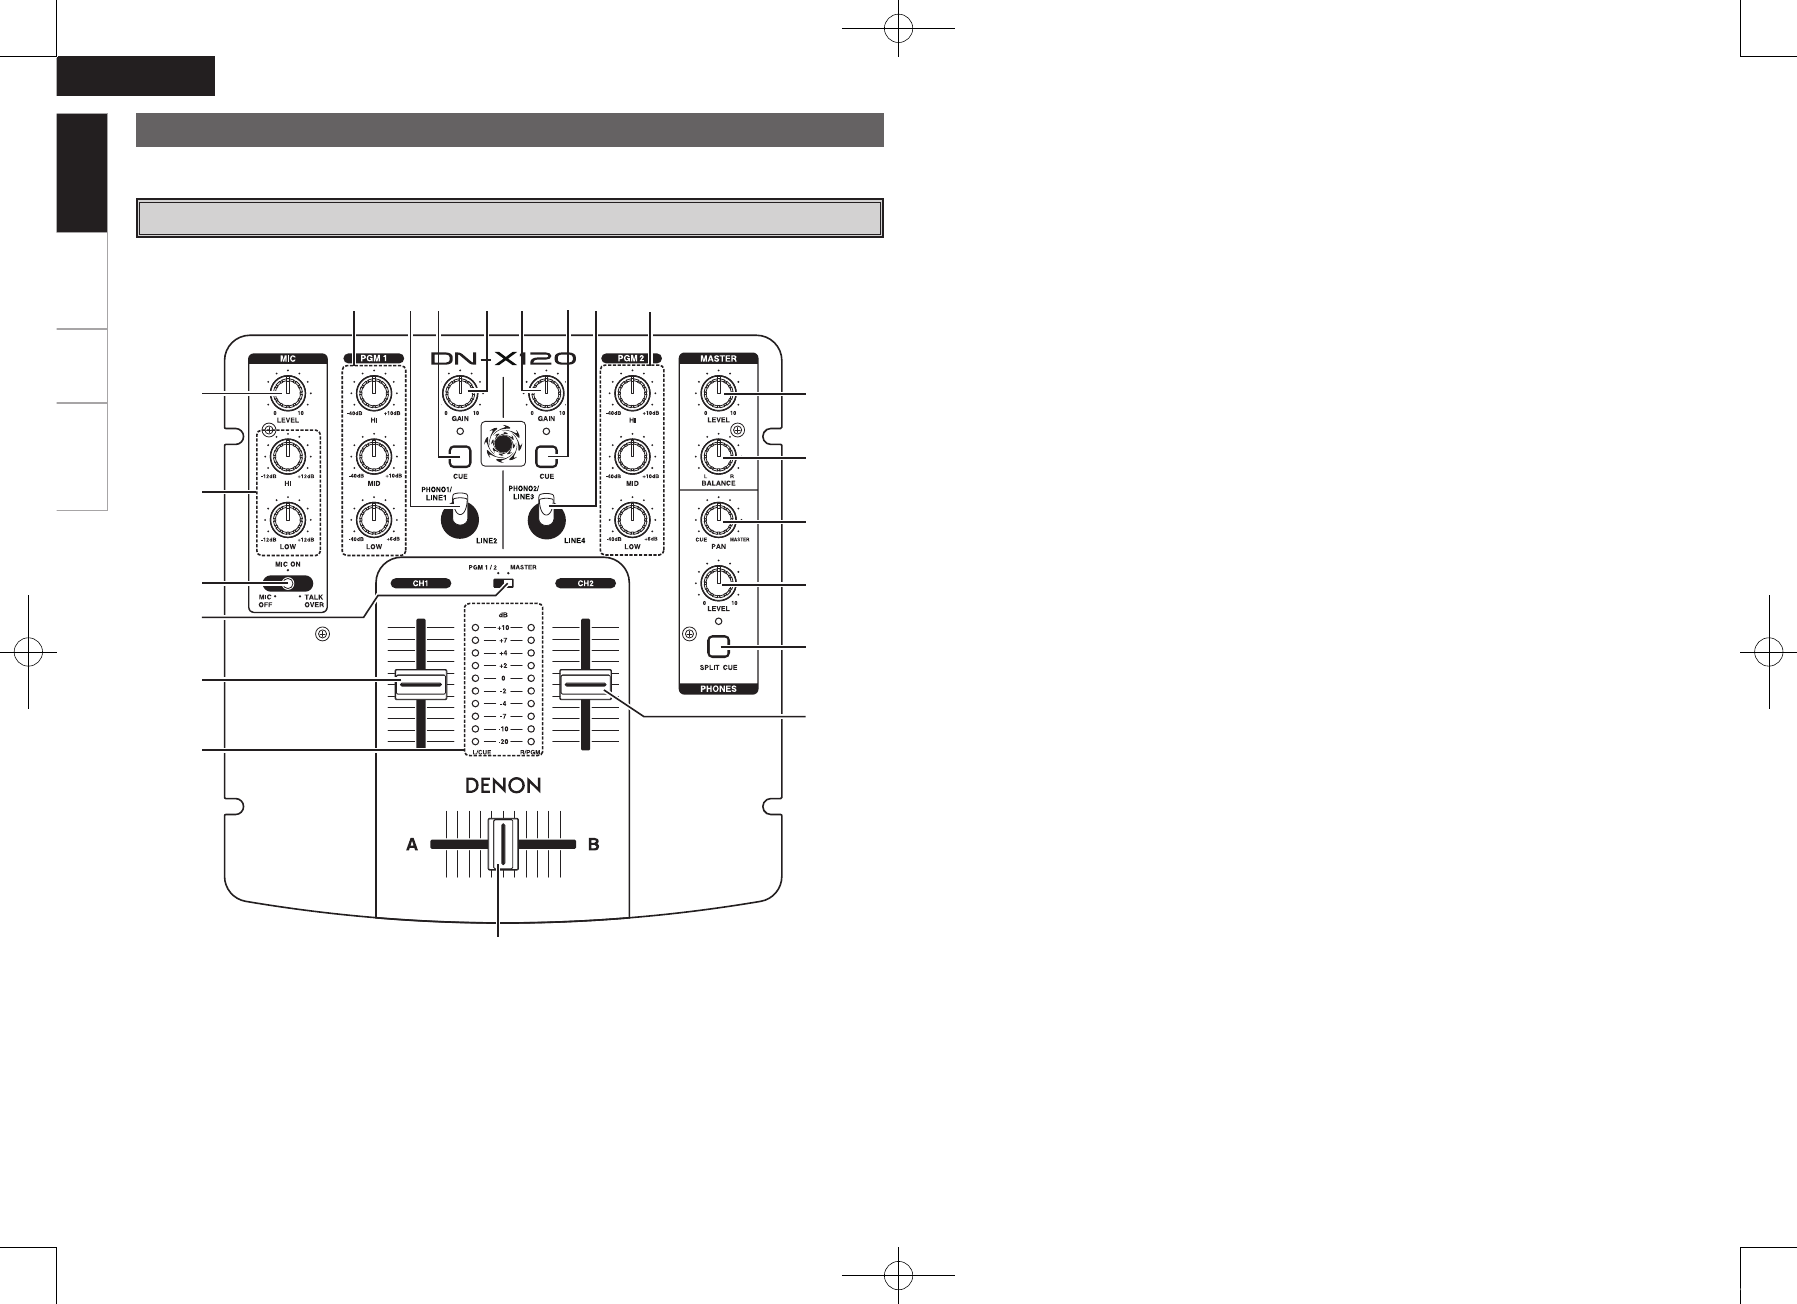
e MIC LEVEL control
Adjust the level of Mic signal.
r Source EQ controls
Contour the frequency response of the selected
inputs.
HI and MID:
• Adjusts the high-tone and mid-tone sound –40
dB to +10 dB.
LOW:
• Adjusts the high-tone and mid-tone sound –40
dB to +6 dB.
NOTE:
Clipping may occur if adjustments are set to
harsh.
t Input select switch
• Switches between the PHONO/LINE and LINE
inputs.
• When the lever of switch is vertical position, the
LINE2 or LINE4 input is selected.
• When the lever of switch is slope, the PHONO1/
LINE1 or PHONO2/LINE3 input is selected.
• You can perform 4 direction placement (vpage
4).
y CUE buttons
These buttons are used to activates a channels
“CUE” mode, the LED above the cue button will
glow when cue mode is activated. Cue mode
will send a channels incoming signal to the
headphones.
u GAIN
Adjusts the gain of each input channel.
i MASTER LEVEL control
Adjust the level of the MASTER output.
o MASTER BALANCE control
Adjust the L/R balance of the MASTER outputs.
Q0 Headphone PAN control
• This function allows you to monitor the CUE
level as well as the MASTER output in your
headphones. A CUE Level may only be monitored
of the CUE signal is selected.
• Serves two purposes. In the STEREO mode
it changes the relative levels of the CUE and
MASTER mixed together in both ear cups. In
the SPLIT CUE mode it changes the balance
between the monaural CUE sound in the left and
monaural MASTER sound in the right.
q MIC ON/OFF/TALKOVER switch
When TALKOVER is selected, all signals except
the microphone level are decreased by 20 dB.
When at the ON or OFF position all signals
remain at their standard levels.
Part Names and Functions
Top Panel
Q1 PHONES LEVEL control
Adjusts the headphone output level.
Q2 SPLIT CUE button
• In the STEREO mode, the stereo sound of
MASTER and CUE are fed to both ear cups. In
the SPLIT CUE mode, the headphone circuit
provides monaural CUE sound to the left and
monaural MASTER sound to the right.
• When the Level Meter mode select switch is set
to “MASTER”. In the STEREO mode, the meter
indicates the stereo level in the L/R Master
output. In the SPLIT CUE mode, the monaural
CUE sound level is displayed on the left and the
monaural MASTER sound level is displayed on
the right.
• In the SPRIT CUE mode, the LED is lit.
Q3 Channel Fader
Controls the channel output level.
Q4 Crossfader
Fades the overall mixer output between channels
1 and 2.
Q5 Level Meter
The dual LED’s indicators are used to detail
either the master output level, a combination of
the master output level and the CUE signal level,
or the PGM1/2 monaural level.
Q6 Level meter mode select switch
The position of this switch will determine the
Level Meter mode. In the “MASTER” position,
the meter will detail the out level of the left and
right channels. In the “PGM 1/2” position, the
left side of the meter will indicate monaural level
of the PGM 1 and the right side of the meter will
indicate monaural level of the PGM 2.
w MIC EQ controls
• Contour the frequency response of the Mic
input –12 dB to +12 dB.
• At the center position, sound is flat.
Getting Started