EN
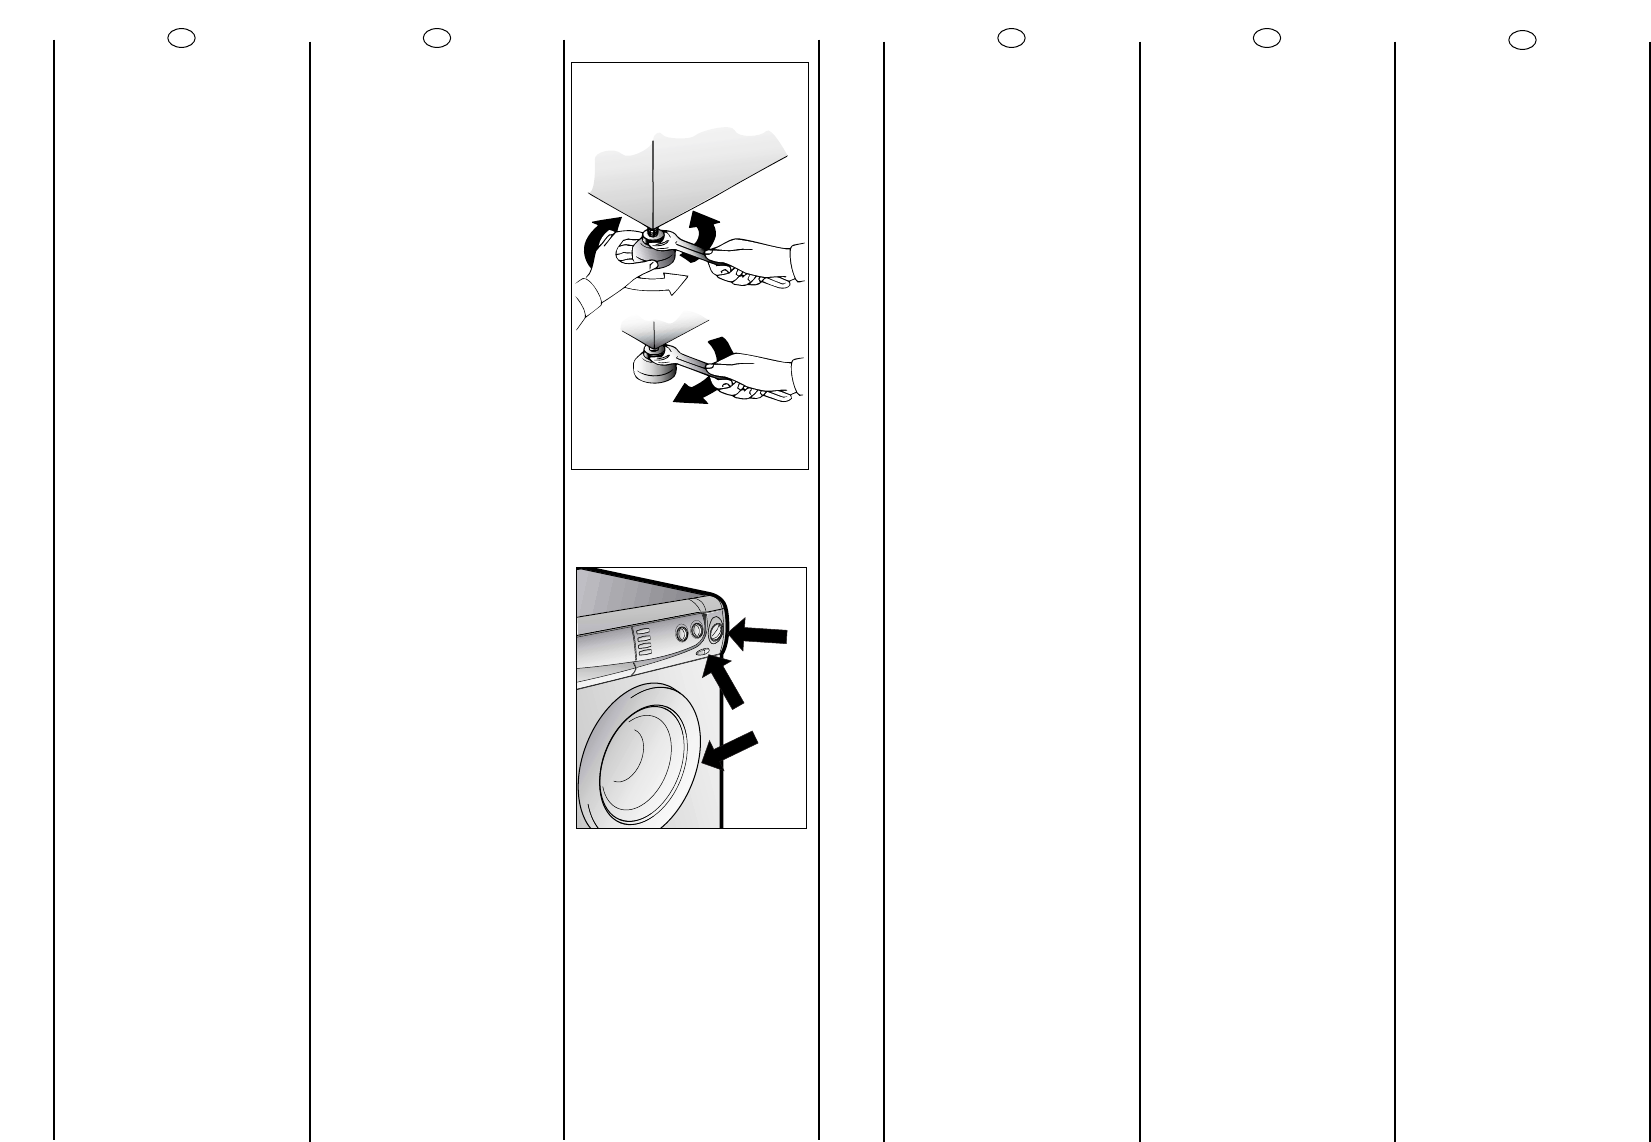
Use front feet to level the
machine with the floor.
a) Turn the nut clockwise to
release the screw adjuster of
the foot.
b) Rotate foot to raise or
lower it until it stands firmly on
the ground.
c) Lock the foot in position
by turning the nut anti-
clockwise until it comes up
against the bottom of the
machine.
Ensure that the Off/On
button (C) is not pressed.
Ensure that all the knobs are
on the “0”position and that
the door is closed.
Insert the plug.
After installation, the
appliance must be
positioned so that the plug is
accessible.
Press the START (C) button.
The power on (N) light will
light up.
If this does not light up see
faults search.
21
RU
Óñòàíîâèòå ìàøèíó ïî
ópîâíю ñ ïîìîùüю ïåpåäíèõ
íîæåê.
a) ïîâåpíèòå ïî ÷àñîâîé
ñòpåëêå ãàéêó, ÷òîáû
pàçáëîêèpîâàòü âèíò íîæêè.
b) âpàùàÿ íîæêó, ïîäíèìèòå
èëè îïóñòèòå ìàøèíó äî
õîpîøåé åå îïîpû íà ïîë.
c) çàáëîêèpóéòå âèíò íîæêè,
çàòÿíóâ ãàéêó ïpîòèâ
÷àñîâîé ñòpåëêè äî óïîpà.
Óáåäèòåñü â òîì, ÷òîáû
êëàâèøà âêë/âûêë C íå áûëà
íàæàòà.
Óáåäèòåñü â òîì, ÷òîáû âñå
pó÷êè íàõîäèëèñü â
ïîëîæåíèè Î, à ëюê çàêpûò.
Âêëю÷èòå âèëêó â pîçåòêó.
èÓÒΠÔÓ‰ÒÓ‰ËÌÂÌËfl ÔË·Ó
‰ÓÎÊÂÌ ·˚Ú¸ ‡ÒÔÓÎÓÊÂÌ Ú‡ÍËÏ
Ó·‡ÁÓÏ, ˜ÚÓ·˚ ÓÁÂÚ͇ ·˚·
‰ÓÒÚÛÔÌÓÈ.
Íàæìèòå íà êëàâèøó (C)
âêë/âûêë, ïpè
∋òîì çàãîpèòñÿ
èíäèêàòîp pàáîòû N.Åñëè
èíäèêàòîp íå çàãîpèòñÿ,
èùèòå íåèñïpàâíîñòü.
PL
Wypoziomowaç pralkë
manipulujåc jej przednimi
n
ó
ãkami.
aa))
Przekrëciç w kierunku
zgodnym z kierunkiem
wskaz
ó
wek zegara nakrëtkë
blokujåcå n
ó
ãkë pralki.
bb))
Przekrëciç n
ó
ãkë
podnoszåc jå lub
opuszczajåc, tak aby
uzyskaç doskonaäe
przyleganie do podäoãa.
cc))
Zablokowaç n
ó
ãkë
przykrëcajåc nakrëtkë w
kierunku przeciwnym do
ruchu wskaz
ó
wek zegara, aã
bëdzie przylegaäa do dna
pralki.
Upewnij sië, ãe przycisk
wäåczajåcy pralkë (C) nie
jest wciéniëty.
Upewnij sië, ãe wszystkie
pokrëtäa så ustawione w
pozycji „0”, a drzwiczki pralki
så zamkniëte.
Wäoãyç wtyczkë kabla
zasilajåcego do gniazda
sleciowego.
Po zainstalowaniu,
urzådzenie naleãy ustawiç w
pozycji zapewniajåcej
swobodny dostëp do
kontaktu (wtyczki).
Wciénij przycisk wäåczajåcy
pralkë (C). Spowoduje to
zapalenie sië lampki
sygnalizujåcej zasilanie (N).
Jeéli kontrolka nie zapali sië
naleãy poszukaç przyczyny
na liécie podanej w rozdziale
„Lokalizacja usterek”.
PT
Nivele a máquina
regulando a altura dois pés
dianteiros.
a) Rode a porca no sentido
dos ponteiros do relógio
para soltar a rosca de
fixação do pé.
b) Rode a pé para o erguer
ou baixar até estar
firmemente assente no
chão.
c) Fixe o pé nessa posição
rodando a porca no sentido
contrário co dos ponteiros
do relógio até embater no
fundo da máquina.
Assegure-se de que a tecla
de ligar/desligar (C) não
esteja premida.
Assegure-se de que todos os
botões da máquina estejam
colocados na posição “0”e
de que a porta da máquina
esteja fechada.
Ligue a máquina à corrente,
inserindo a ficha do
respectivo cabo de
alimentação na tomada.
Depois da instalação, os
acessórios devem estar
posicionados, pelo que a
tomada deve estar num
local acessível.
Pressione a tecla de
ligar/desligar (C).O
indicador luminoso de que
a máquina está ligada (N)
iluminar-se-á.Se,porém,este
indicador luminoso não se
acender deverá consultar o
capítulo “Eliminação de
Avarias”.
IT
Livelli la macchina con i
piedini anteriori.
a) Girare in senso orario il
dado per sbloccare la vite
del piedino.
b) Ruotare il piedino e farlo
scendere o salire fino ad
ottenere la perfetta
aderenza al suolo.
c) Bloccare infine il piedino
riavvitando il dado in senso
antiorario, fino a farlo
aderire al fondo della
lavatrice.
Si assicuri che il pulsante
Marcia/Arresto (C) non sia
premuto.
Si assicuri che tutte le
manopole siano in posizione
“0” e l’oblò sia chiuso.
Inserisca la spina.
L’ a pparecchio deve essere
connesso alla rete idrica
solo con i nuovi tubi di
carico forniti in dotazione.
I vecchi tubi di carico non
devono essere riutilizzati.
Quindi prema il tasto START
(C), si accenderà la spia di
funzionamento corrente
inserita (N), se non si
accende veda ricerca
guasti.