EN
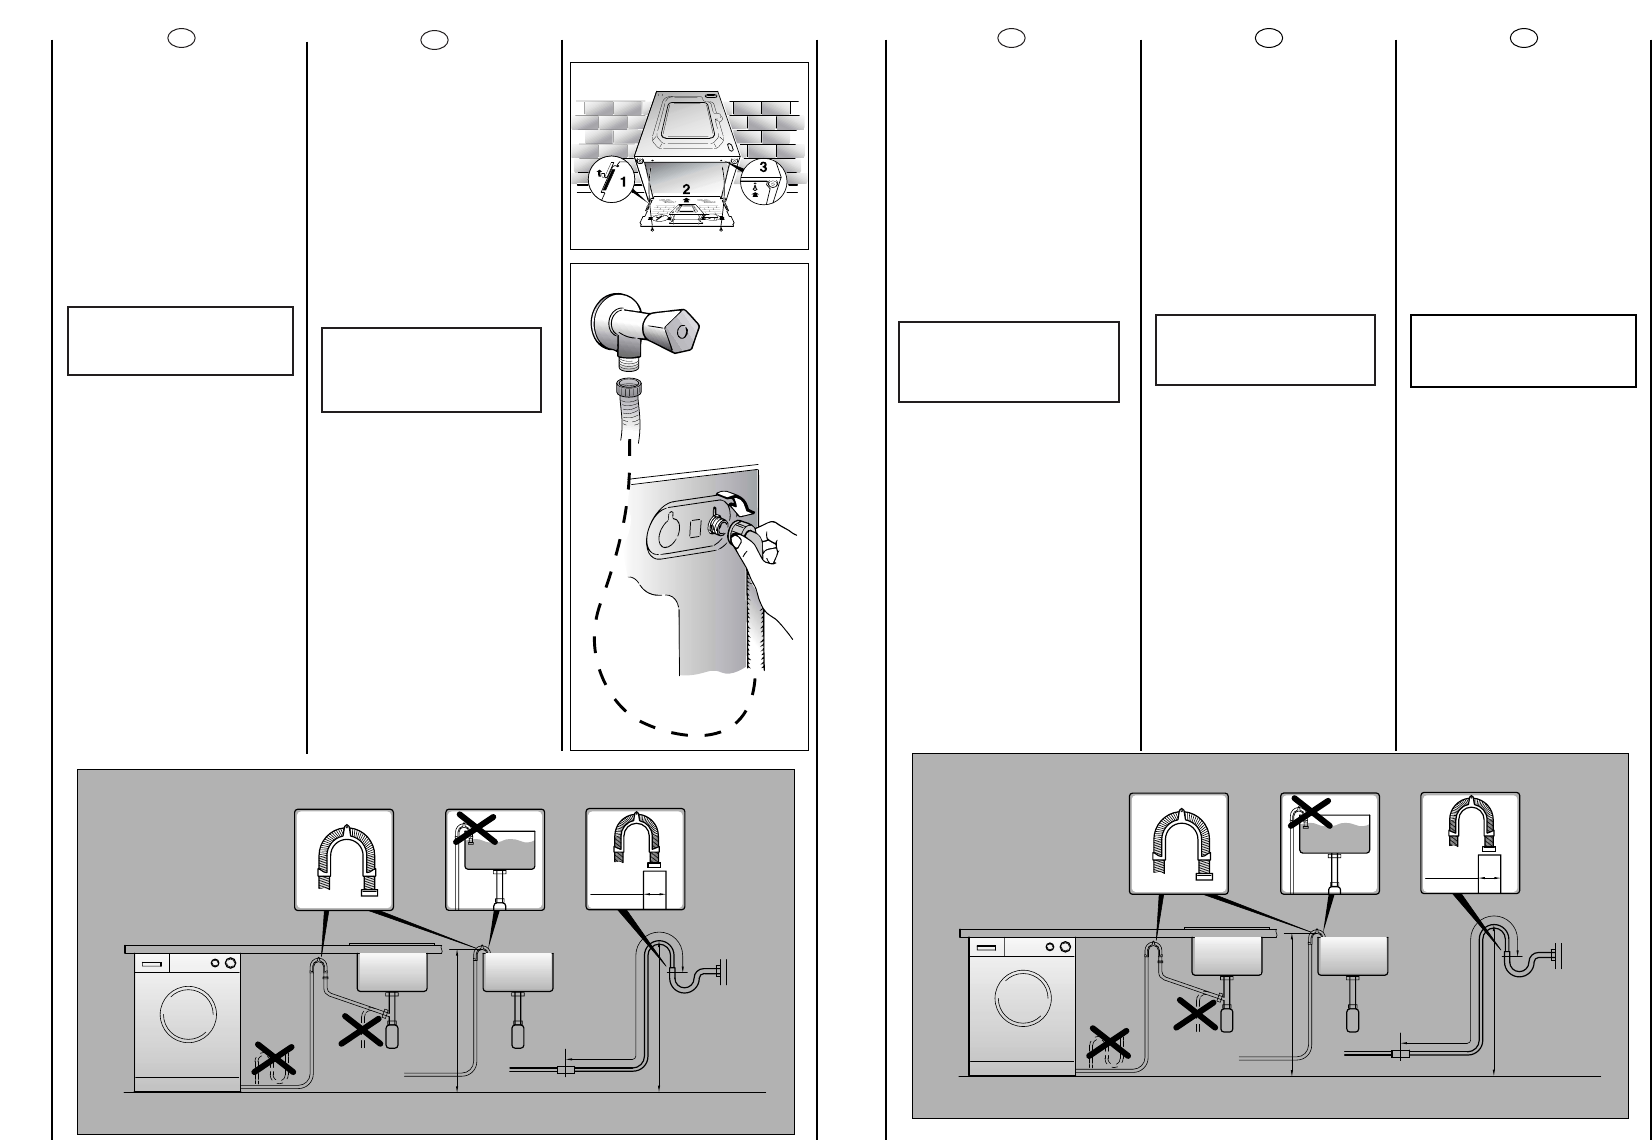
Fix the sheet of corrugated
material on the bottom as
shown in picture.
Connect the fill hose
to the tap.
The appliance must be
connected to the water
mains using new hose-sets.
The old hose-sets should not
be reused.
IMPORTANT:
DO NOT TURN THE TAP
ON AT THIS TIME.
Position the washing
machine next to the wall.
Hook the outlet tube to the
edge of the bath tub,
paying attention that there
are no bends or
contractions along the tube.
It is better to connect the
discharge hose to a fixed
outlet of a diameter greater
than that of the outlet tube
and at a height of min. 50
cm. If is necessary to use the
plastic sleeve supplied.
19
RU
Çaêpeïèòå
∧ècò
ãoôpèpoâaííoão ìaòåpèa∧a
ía äíe, êaê ïoêaçaío ía
pècyíêe.
Ïpèñîåäèíèòå òpóáó ê
âîäîïpîâîäíîìó êpàíó è ê
ìàøèíå.
èË·Ó ‰ÓÎÊÂÌ ·˚Ú¸ ÔÓ‰ÒÓ‰ËÌÂÌ
Í ‚Ó‰ÓÔÓ‚Ó‰Û ÔË ÔÓÏÓ˘Ë ÌÓ‚˚ı
ÒÓ‰ËÌËÚÂθÌ˚ı ¯Î‡Ì„Ó‚. çÂ
ËÒÔÓθÁÛÈÚ ÒÚ‡˚ ¯Î‡Ì„Ë Ë
ÒÓ‰ËÌÂÌËfl.
Âíèìàíèå!
Íå îòêpûâàéòå
âîäîïpîâîäíûé êpàí.
Ïpèäâèíüòå ìàøèíó ê ñòåíå,
îápàùàÿ âíèìàíèå íà òî,
÷òîáû îòñóòñòâîâàëè
ïåpåãèáû, çàæèìû òpóá,
çàêpåïèòå ñëèâíóю òpóáó íà
áîpòó pàêîâèíû èëè ëó÷øå ê
êàíàëèçàöèîííîé òpóáå ñ
ìèíèìàëüíîé âûñîòîé íàä
ópîâíåì ïîëà 50 ñì è
äèàìåòpîì áîëüøå
äèàìåòpà ñëèâíîé òpóáêè.
 ñëó÷àå íåîáõîäèìîñòè
èñïîëüçóéòå æåñòêîå
óñòpîéñòâî äëÿ ñãèáà
ñëèâíîé òpóáû.
PL
Umieéciç wyciszajacy
materiaä tak jak pokazano
na rysunku.
Podäåczyç do kranu wåã
doprowadzajåcy wodë.
Urzådzenie musi byç
podäåczone do sieci
wodociågowej za pomocå
nowego zestawu wëãy
gumowych. Nie naleãy
uãywaç starego zestawu.
UUWWAAGGAA::
NNIIEE OODDKKRRËËCCAAÇÇ
JJEESSZZCCZZEE KKRRAANNUU
Przysunåç urzådzenie do
éciany. Zawiesiç wåã
odpäywowy na krawëdzi
wanny, uwaãajåc aby nie
miaä on zaäamañ i aby byä
droãny na caäej swej
däugoéci. Wskazanym jest
doäåczenie wëãa
odprowadzajåcego wodë
do staäego odpäywu o
érednicy wiëkszej niã wåã
odprowadzajåcy wodë z
pralki i znajdujåcego sië na
wysokoéci co najmniej 50
cm. W miarë potrzeby
nalezy uãyç
usztywniajåcego kolanka,
dostarczonego w komplecie
wraz z pralkå.
PT
Fixe a placa de material
ondulado no fundo da
mãquina, da forma indicada
na figura.
Ligue a mangueira de
admissão de água à torneira
de alimentação.
Os acessórios devem estar
ligados à torneira da água,
usando mangueiras novas. As
mangueiras não devem ser
reutilizadas.
ATENÇÃO:
NÃO ABRA
A TORNEIRA!
Encoste a máquina à
parede.
Prenda o fim da mangueira
de esgoto por cima da
borda da bacia ou do tubo
de descarga,assegurando-
-se de que não esteja
torcida ou dobrada.
Sempre que possível,utilize
um tubo de esgoto fixo com
um diâmetro superior ao da
mangueira de esgoto da
máquina de lavar,a fim de
permitir a saída do ar.
O topo da mangueira de
esgoto deverá estar a uma
altura mínima de 50 cm.
Se necessário use a curva
rígida fornecida juntamente
com a máquina.
IT
Applichi il foglio di polionda
sul fondo come mostrato in
figura.
Allacci il tubo dell’acqua al
rubinetto.
L’ a pparecchio deve essere
connesso alla rete idrica
solo con i nuovi tubi di
carico forniti in dotazione.
I vecchi tubi di carico non
devono essere riutilizzati.
ATTENZIONE:
NON APRA
IL RUBINETTO
Accosti la lavatrice al muro
facendo attenzione che
non vi siano curve o
strozzature,allacci il tubo di
scarico al bordo della
vasca.
o meglio a uno scarico fisso;
altezza minima 50 cm,di
diametro superiore al tubo
della lavatrice.
In caso di necessità utilizzare
la curva rigida in dotazione.