16
EN
CHAPTER 5
SETTING UP
INSTALLATION
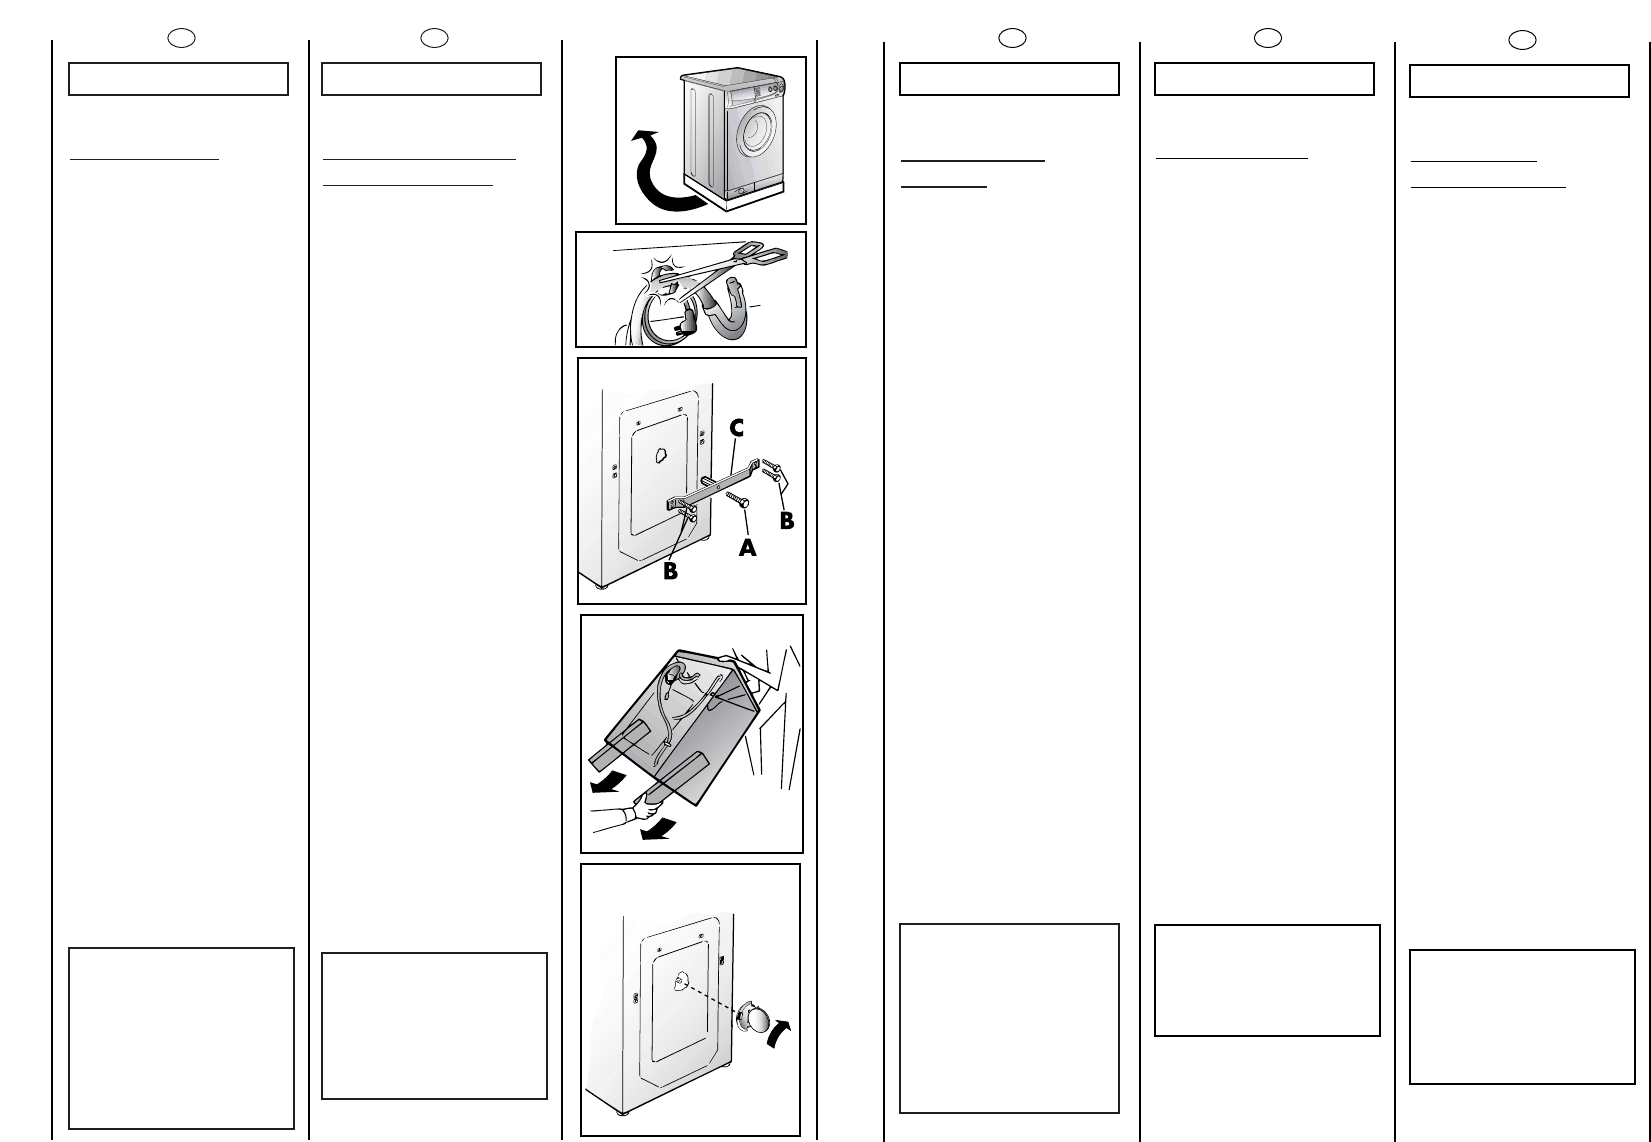
Move the machine near its
permanent position without
the packaging base.
Cut tube-holding straps.
Unscrew the central screw
(A); unscrew the 4 lateral
screws (B) and remove the
cross piece (C).
Lean the machine forward
and remove the plastic
bags containing the two
polystyrene blocks at the
sides, pulling downwards.
Press the plug (to be found
in the envelope with the
instructions) into the hole.
WARNING:
DO NOT LEAVE THE
PACKAGING IN THE
REACH OF CHILDREN AS
IT IS A POTENTIAL
SOURCE OF DANGER.
17
RU
ÏÀPÀÃPÀÔ 5
ÓÑÒÀÍÎÂÊÀ
Ïîìåñòèòå ìàøèíó âáëèçè
ìåñòà åå èñïîëüçîâàíèÿ áåç
ïîäñòàâêè è óïàêîâêè.
Îòpåæüòå ëåíòû, êpåïÿùèå
øëàíã.
Îòêpóòèòå öåíòpàëüíûé áîëò
(A), 4 áîêîâûõ áîëòà (B) è
îòñîåäèíèòå òpàâåpñó (C).
Hàêëîíèòå ìàøèíó âïåpåä è
âûòàùèòå äâà ïëàñòèêîâûõ
ïàêåòà, ñîäåpæàùèõ äâà
çàùèòíûõ ∋ëåìåíòà èç
ïîëèñòèpîëà, ïîòÿíóâ âíèç.
Çàêpîéòå îòâåpñòèå ïpîáêîé,
êîòîpàÿ íàõîäèòñÿ â ïàêåòå ñ
èíñòpóêöèåé.
ÂÍÈÌÀÍÈÅ!
ÍÅ ÎÑÒÀÂËßÉÒÅ
∋ËÅÌÅÍÒÛ
ÓÏÀÊÎÂÊÈ ÄÅÒßÌ
ÄËß ÈÃP.
PL
RROOZZDDZZIIAAÄÄ 55
INSTALACJA
PRALKI
Ustawiç pralkë w miejscu
przeznaczenia bez
opakowania.
Przeciåç taémy
przytrzymujåce wëãe i
przewody.
Wykrëciç érodkowå érubë
(
AA
), 4 boczne (
BB
) po czym
zdemontowaç blokadë.
Pochyliç pralkë do przodu i
wyciågnåç dwie wkäadki
styropianowe.
Zatkaj otw
ór w tylnym
panelu zatyczk
å
dostarczonå wraz z pralkå.
UUWWAAGGAA::
NNIIEE NNAALLEEÃÃYY
PPOOZZOOSSTTAAWWIIAAÇÇ
EELLEEMMEENNTT
Ó
WW
OOPPAAKKOOWWAANNIIAA DDOO
ZZAABBAAWWYY DDZZIIEECCIIOOMM,,
GGDDYYÃÃ EELLEEMMEENNTTYY TTEE
MMOOGGÅÅ SSTTAANNOOWWIIÇÇ
PPOOTTEENNCCJJAALLNNEE ÃÃRR
ÓD
ÄÄOO
NNIIEEBBEEZZPPIIEECCZZEEÑÑSSTTWWAA..
PT
CAPÍTULO 5
INSTALAÇÃO
Coloque a máquina, sem a
base da embalagem, perto
do local onde vai ficar
permanentemente
instalada.
Corte a tira que prende os
tubos e o cabo eléctrico.
Desaperte o parafuso
central (A); desaperte os
quatro parafusos laterais (B)
e retire a barra (C).
Com a ajuda de outra
pessoa incline o aparelho
para a frente e solte os
sacos de plástico contendo
os dois blocos de esferovite
de ambos os lados,
puxando-os para baixo.
Tape a abertura com o
bujão (fornecido
juntamente com a
máquina, no envelope que
contém o manual de
instruçóes).
ATENÇÃO:
NÃO DEIXE A
EMBALAGEM DA
MÁQUINA OU OS SEUS
COMPONENTES AO
ALCANCE DE
CRIANÇAS: ELA É UMA
POTENCIAL FONTE DE
PERIGO.
IT
CAPITOLO 5
MESSA IN OPERA
INSTALLAZIONE
Porti la macchina vicino al
luogo di utilizzo senza il
basamento dell’imballo.
Tagli le fascette fermatubo
Svitare la vite centrale (A);
svitare le 4 viti laterali (B) e
rimuovere la traversa (C).
Inclinare la macchina in
avanti e sfilare i sacchetti in
plastica che contengono i
due blocchetti in polistirolo
posti sui 2 lati tirando verso il
basso.
Richiudere il foro utilizzando
il tappo contenuto nella
busta istruzioni.
ATTENZIONE:
NON LASCI ALLA
PORTATA DI BAMBINI
GLI ELEMENTI
DELL’IMBALLAGGIO IN
QUANTO POTENZIALI
FONTI DI PERICOLO.