WAP3205 v3
Wireless N300 Access Point
Quick Start Guide
Hardware Installation Wi-Fi Connection
Ethernet Cable Connection
ZyXEL Warranty Informaon
Thank you for purchasing a ZyXEL product!
We take great pride in our quality, value
and performance and believe that this
product should offer you trouble-free
operaon throughout its lifeme. If you do
experience any problems with your
product, please contact ZyXEL
Communicaons Corporaon offices
worldwide.
For further informaon on our warranty
regulaons and liability in your country
please visit the ZyXEL web site:
hp://www.zyxel.com/warranty.
Warranty Form
In certain countries, the seller has to fill
out, sign and stamp the following warranty
informaon in order for the ZyXEL
warranty to be valid.
Product model number
Product serial number
Date of purchase
Seller’s stamp and signature
Copyright © 2016 ZyXEL Communicaons Corp. All Rights Reserved.
See the User's Guide at www.zyxel.com
for more informaon, including safety
warnings and customer support.
EU Importer
ZyXEL Communicaon A/S
Generatorvej 8D, 2860 Søborg, Denmark.
hp://www.zyxel.dk
US Importer
ZyXEL Communicaons, Inc
1130 North Miller Street Anaheim, CA 92806-2001
hp://www.us.zyxel.com
WAP3205 v3
WAP3205 v3
I88WAP3205V3
產品名稱:無線基地台
機種
輸入電源
中國製造
1
Back Label
Wi-Fi Name (SSID):
ZyXEL WAP3205 v3
Network Key (Password):
XXXXXXXX
2
Power outlet
POWER ON
3 4
5
Power On Ethernet On
Wi-Fi On
1
6
ZyXEL WAP3205 v3
OK
Wi-Fi
Network
Password
Wi-Fi Name (SSID):
ZyXEL WAP3205 v3
Network Key (Password):
XXXXXXXX
EN
This setup will walk you through seng up the Access Point with its default sengs.
If you wish to modify your mode sengs (Repeater or Client mode) or change the
current Wi-Fi network name and password, please refer to the User’s Guide at
hp://www.zyxel.com/products_services/wap3205_v3.shtml
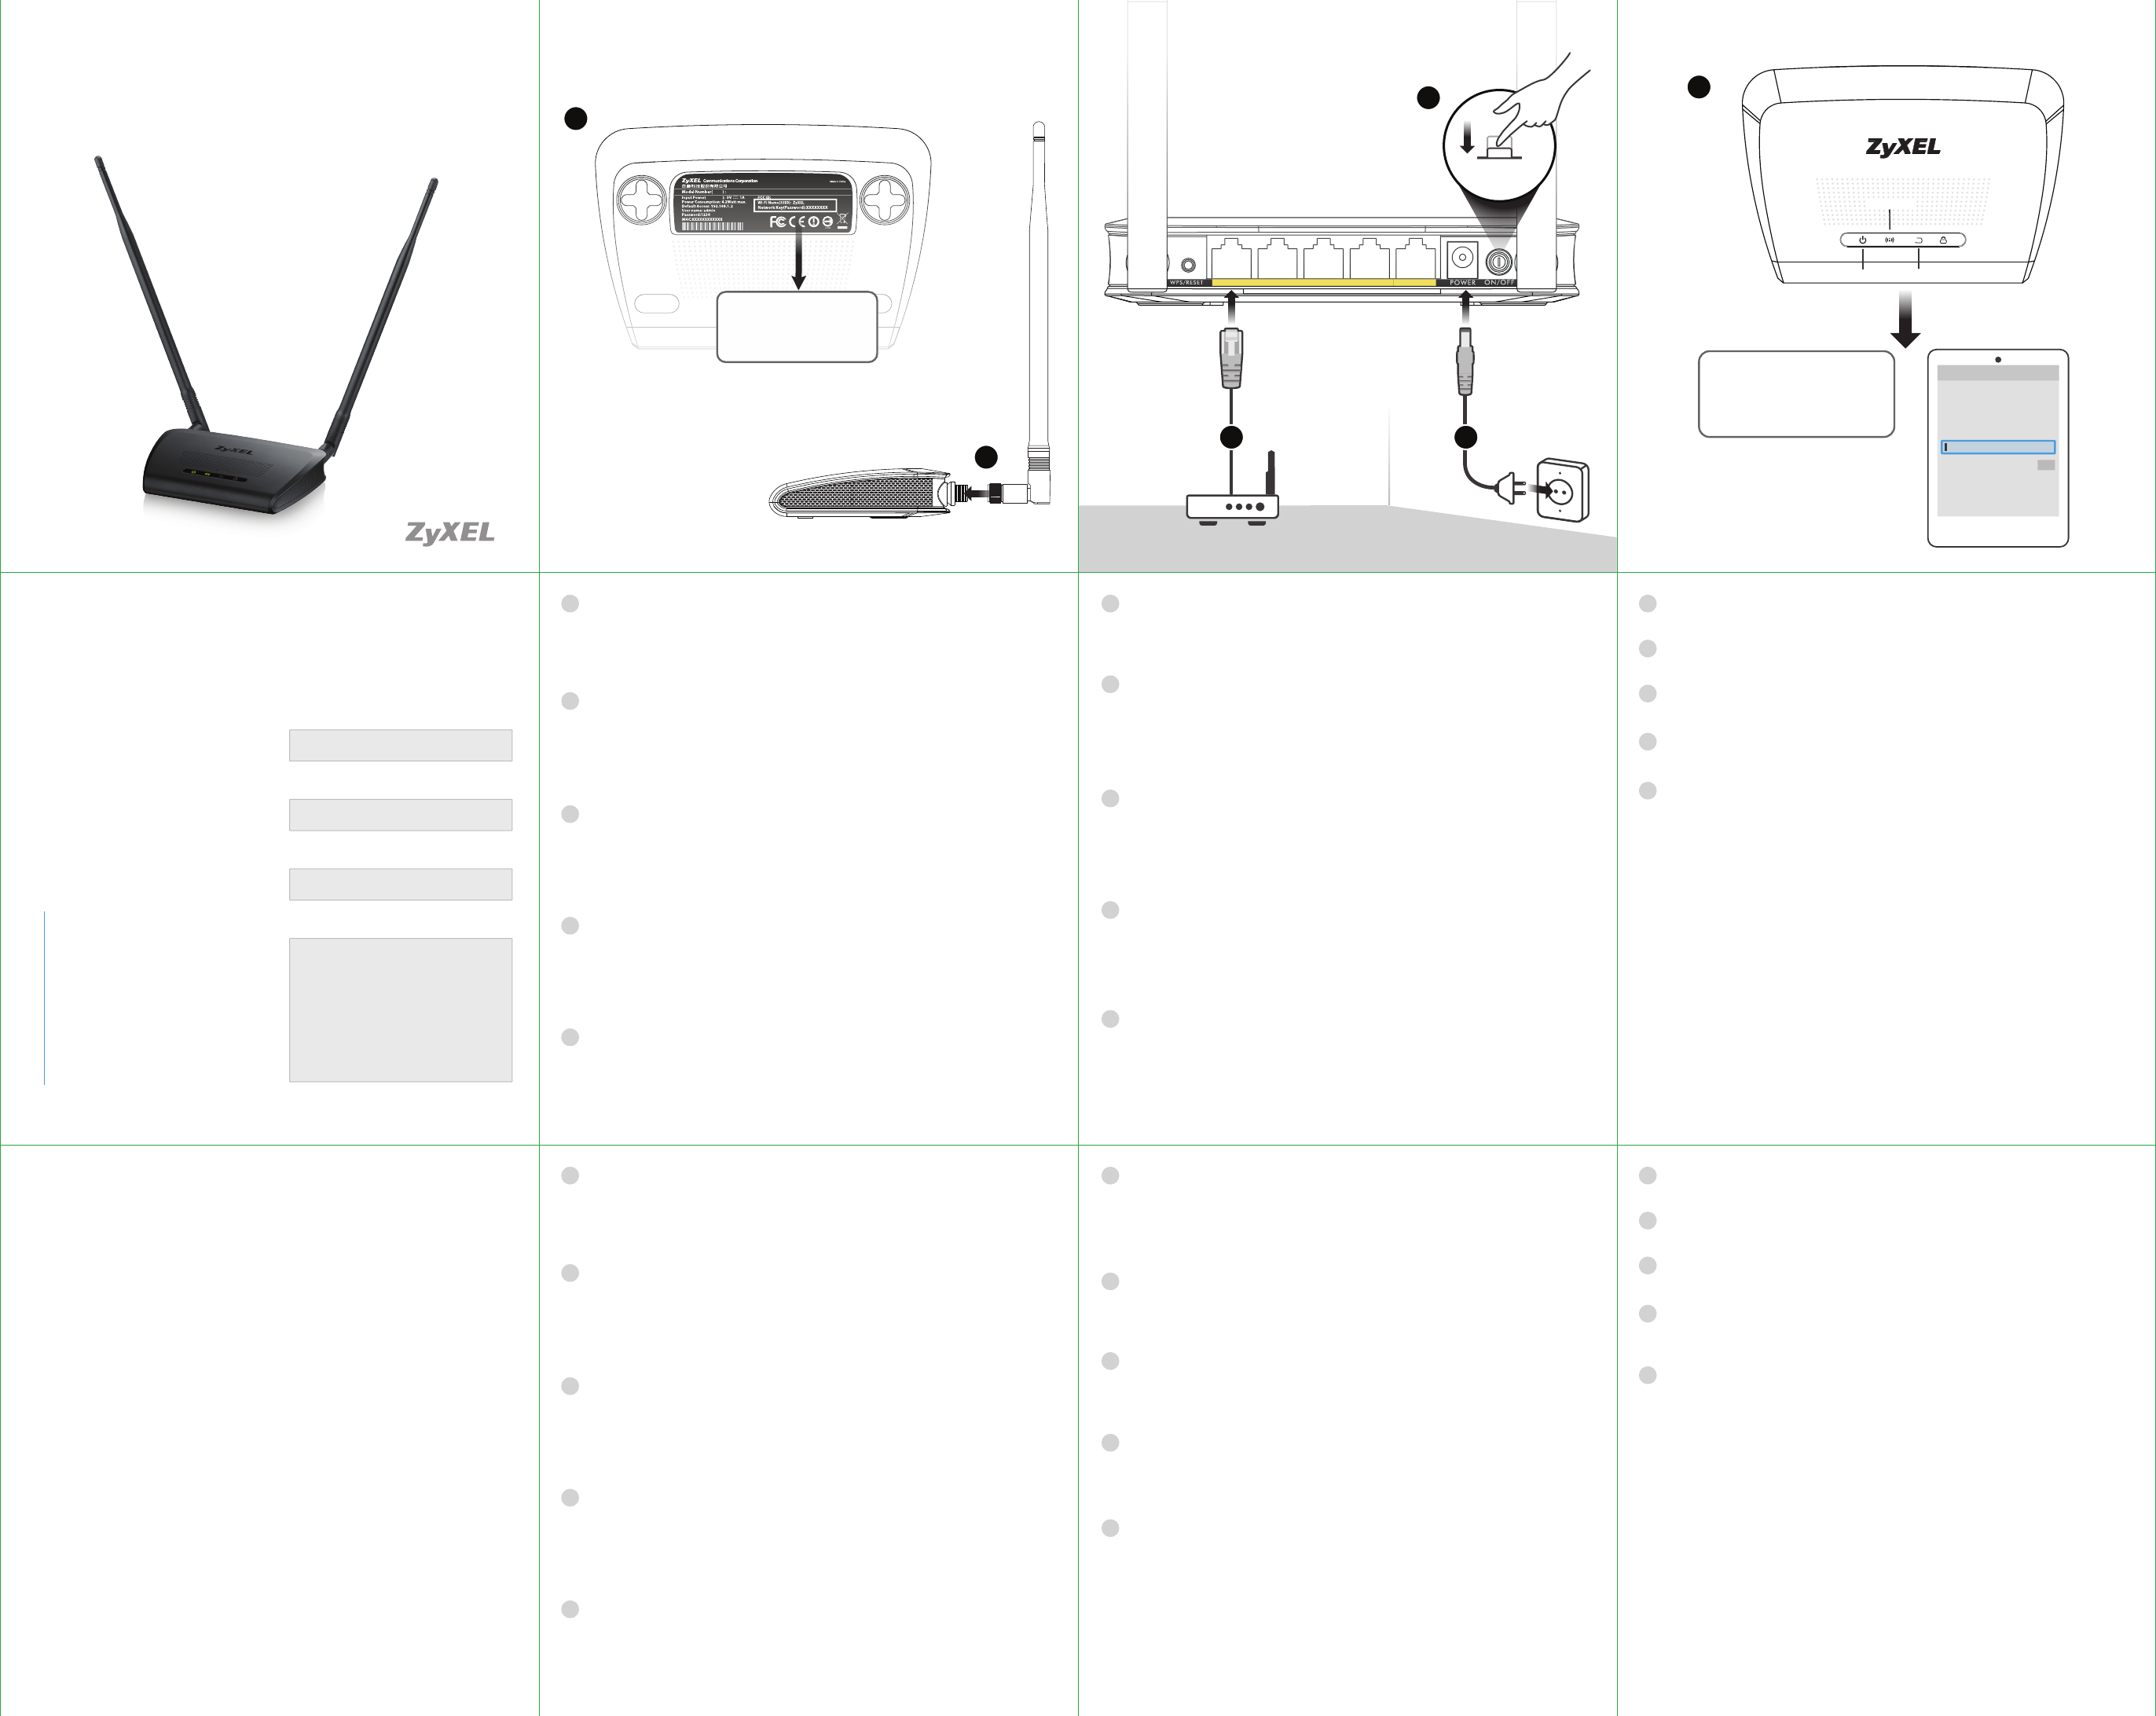
① Please make note of the scker label located under the access point and copy down the
“Wi-Fi Name (SSID) ” and “Network Key (Password)”.
② Connect the two provided external antennas.
EN
③
Connect one of the access point’s Ethernet port with the provided Ethernet cable and
connect the other end of the Ethernet cable to an Internet sharing gateway/router.
④ Use the included power adaptor to connect the power socket to a power outlet.
⑤ Push the POWER buon down to its on posion.
DE
③
Verbinden Sie einen Ethernet Port des Access Point mit dem beiliegenden Ethernet Kabel
und das andere Ende des Ethernet Kabels mit einem mit dem Internet verbundenen
Gateway/Router.
④ Schließen Sie den mitgelieferten Netzadapter an den Netzanschluss und an eine
Netzsteckdose an.
⑤ Stellen Sie die POWER (EIN/AUS) Taste in die Posion Ein.
FR
③
Connectez le port Ethernet de l'un des points d'accès avec le câble Ethernet fourni et
branchez l'autre extrémité du câble Ethernet à une passerelle / un routeur de partage
Internet.
④ Ulisez l’adaptateur d’alimentaon inclus pour connecter la fiche d’alimentaon à une
prise de courant.
⑤ Appuyez sur le bouton POWER (Alimentaon) pour le mere sur sa posion de marche.
IT
③
Collegare una delle porte Ethernet del punto di accesso con il cavo Ethernet fornito in
dotazione e collegare l'altra estremità del cavo Ethernet a un gateway/router con
condivisione di Internet.
④ Ulizzare l’alimentatore fornito a corredo per collegare la presa di alimentazione a una
presa della corrente.
⑤ Premere il tasto POWER nella sua posizione ON.
ES
③
Conecte uno de los puertos Ethernet del punto de acceso con el cable Ethernet
suministrado y conecte el otro extremo del cable Ethernet a un router o puerta de enlace
de uso compardo de Internet.
④ Ulice el adaptador de alimentación incluido para conectar el zócalo de alimentación a
una toma de corriente.
⑤ Presione el botón POWER a su posición de encendido.
EN
⑥
When the Power , Wi-Fi , and Ethernet LEDs are solidly lit you can connect your Wi-Fi
enabled devices with the sengs informaon from step 1.
DE
⑥
Wenn die Power (Ein/Aus) , Wi-Fi (WLAN) und Ethernet LEDs leuchten, können Sie Ihre
WLAN-fähigen Geräte mit den Einstellungsinformaonen aus Schri 1 verbinden.
FR
⑥
Lorsque les LED Power (Alimentaon) , Wi-Fi , et Ethernet sont allumées en connu, vous
pouvez connecter vos appareils Wi-Fi avec les informaons de configuraon de l'étape 1.
IT
⑥
Quando i led di Accensione , Wi-Fi , e Ethernet sono accesi fissi è possibile collegare
disposivi ava per Wi-Fi con le informazioni di impostazione dal punto 1.
ES
⑥
Cuando los LEDs Power , Wi-Fi , y Ethernet estén encendidos fijos podrá conectar sus
disposivos con Wi-Fi siguiendo la información de la configuración en el paso 1.
NL
③
Sluit een van de Ethernet-poorten van het Toegangspunt aan met de geleverde
Ethernet-kabel en sluit het andere einde van de Ethernet-kabel aan op een Internet
sharing gateway/router.
④ Gebruik de bijgesloten stroomadapter om de stroomaansluing op een stopcontact aan
te sluiten.
⑤ Druk de AAN knop tot op zijn aan posie.
DK
③
Tilslut et af access-punkternes Ethernet-port med det medfølgende Ethernet-kabel, og
den anden ende af kablet l en internetdelt gateway/router.
④ Brug den medfølgende strømadapter l at lslue strømskket l en skkontakt.
⑤ Skub POWER-knappen ned l dens on-posion.
NO
③
Koble en av lgangspunktets Ethernet-porter l den medfølgende Ethernet-kabelen, og
koble den andre enden av Ethernet-kabelen l gatewayen/ruteren for Interne-deling.
④ Bruk den medfølgende strømadapteren for å koble strømkontakten l strømuak.
⑤ Skyv ned AV/PÅ-knappen l på-posisjon.
FI
③
Kytke toinen yhdyspisteen Ethernet-porteista laieen mukana toimitetulla
Ethernet-kaapelilla yhdyskäytävään tai reimeen, josta on Internet-yhteys.
④ Yhdistä virtapistoke pistorasiaan mukana toimitetulla virtasovimella.
⑤ Kytke virtakytkin POWER päälle-asentoon.
SE
③
Anslut en av åtkomstpunkternas Ethernet-portar ll den medföljande Ethernet-kabeln
och anslut andra änden av Ethernet-kabeln ll en Internet-delningsgateway/router.
④ Använd den medföljande strömadaptern och anslut eluaget ll e vägguag.
⑤ Tryck knappen POWER nedåt ll påslagen posion.
NL
⑥
Als de Stroom, Wi-Fi, en Ethernet LEDs goed branden, kunt u uw Wi-fi apparaten
aansluiten met de instellingsinformae van stap 1.
DK
⑥
Når lysdioderne for Power , Wi-Fi , og Ethernet lyser konstant, kan du lslue dine
Wi-Fi-akverede enheder med indsllingsoplysningerne fra trin 1.
NO
⑥
Når indikatorene for strøm , Wi-Fi , og Ethernet lyser konnuerlig, kan du koble l de
Wi-Fi-akverte enhetene ved hjelp av innsllingsinformasjonen fra trinn 1.
FI
⑥
Kun Power- , Wi-Fi- ja Ethernet-merkkivalot palavat jatkuvas, voit liiää langatonta
verkkoyhteyä tukevia laieita langaomaan verkkoon käyäen vaiheessa 1 mainiuja
asetusetoja.
SE
⑥
När LED-lamporna Power, Wi-Fi och Ethernet lyser med fast sken kan du ansluta dina
Wi-Fi-akverade enheter med inställningsinformaon från steg 1.
DE
Diese Einrichtung wird Sie durch die Einrichtung des Access Point mit den
Standardeinstellungen führen.
Wenn Sie Ihre Moduseinstellungen (Repeater oder Client Modus) oder den Namen und
das Kennwort des aktuellen WLAN Netzwerks ändern möchten, lesen Sie bie das
Benutzerhandbuch unter hp://www.zyxel.com/products_services/wap3205_v3.shtml
① Bie schauen Sie auf den Auleber unter dem Access Point und schreiben Sie „WLAN
Name (SSID)“ und „Netzwerkschlüssel (Kennwort)“ auf.
② Bringen Sie die beiliegenden Antennen an.
FR
Cee configuraon vous guidera tout au long de l'installaon du point d'accès avec ses
paramètres par défaut.
Si vous souhaitez modifier les paramètres de votre mode (Mode Répéteur ou Client) ou
modifier le nom et le mot de passe du réseau Wi-Fi actuel, référez-vous au Guide de
l'ulisateur à hp://www.zyxel.com/products_services/wap3205_v3.shtml
① Localisez l’équee située sous le point d’accès et copiez le “Nom Wi-Fi (SSID)” et la “Clé
réseau (Mot de passe)”.
② Fixez les antennes fournies.
IT
Questa configurazione vi guiderà araverso la creazione del punto di accesso con le
impostazioni predefinite.
Se si desidera modificare le impostazioni della modalità (modalità ripetore o client) o
modificare il nome della rete Wi-Fi e la password corren, consultare la Guida per
l'utente su hp://www.zyxel.com/products_services/wap3205_v3.shtml
① Si prega di prendere nota della echea adesiva posta soo il punto di accesso e copiare
il "Nome Wi-Fi (SSID)" e la “Chiave di rete (password)".
② Collegare le antenne fornite a corredo.
ES
Esta instalación le guiará a través de la configuración del punto de acceso con su
configuración predeterminada.
Si se desea modificar los ajustes del modo repedor (o el modo cliente) o cambiar el
nombre y contraseña de la red Wi-Fi, consulte la Guía del usuario en
hp://www.zyxel.com/products_services/wap3205_v3.shtml
① Tome nota de la pegana situada bajo el punto de acceso y copie “Wi-Fi Name (SSID)” y
“Network Key (contraseña)”.
② Coloque las antenas incluidas.
NL
Deze instelling leidt u door het instellen van het Toegangspunt met
standaardinstellingen.
Als u uw modusinstelling wilt wijzigen (Repeater of Client modus) of naam en
wachtwoord van het huidige Wi-fi-netwerk wilt veranderen, raadpleeg dan de
Gebruikersgids op hp://www.zyxel.com/products_services/wap3205_v3.shtml
① Let op het plakeket onder het toegangspunt en kopieer de “Wi-Fi Naam (SSID)” en
“Netwerksleutel (Wachtwoord)”.
② Sluit de bijgesloten antennes aan.
DK
Denne vejledning vil føre dig igennem installaonen af access-punktet med dets
standardindsllinger.
Hvis du ønsker at ændre dine funkonsindsllinger (Repeater- eller Klient-funkon) eller
ændre det aktuelle Wi-Fi-netværksnavn og adgangskode, henvises l brugervejledningen
på hp://www.zyxel.com/products_services/wap3205_v3.shtml
① Noter ændringerne på ekeen placeret i bunden af access-punktet og kopier
“Wi-Fi-navn (SSID)” og “Network Key (Adgangskode)”..
② Monter de medfølgende antenner.
NO
Dee installeringstrinnet vil hjelpe deg med å konfigurere lgangspunktets
standardinnsllinger.
Hvis du ønsker å endre modusinnsllingene (repeater- eller klientmodus) eller endre
navn og passord for gjeldende Wi-Fi-neverk, se brukerhåndboken på
hp://www.zyxel.com/products_services/wap3205_v3.shtml
① Merk deg hva som står på ekeen under lgangspunktet, og skriv ned Wi-Fi-navn –
SSID og Neverksnøkkel – passord.
② Koble l de medfølgende antennene.
FI
Tässä ohjeessa kerrotaan, miten yhdyspiste asennetaan käyäen oletusasetuksia.
Jos haluat vaihtaa toimintalan (Repeater- tai Client-la) tai vaihtaa langaoman verkon
nimen ja salasanan, lue lisäetoja käyöoppaasta osoieesta
hp://www.zyxel.com/products_services/wap3205_v3.shtml
① Kirjoita laieen pohjassa olevasta tarrasta muisin seuraavat edot: Wi-Fi Name (SSID)
(Langaoman verkon nimi/SSID-tunnus) ja Network Key (Password)
(Verkkoavain/salasana).
② Liitä mukana toimitetut antennit.
SE
Den här konfiguraonen vägleder dig genom inställningen av åtkomstpunkten med dess
standardinställningar.Om du önskar modifiera dina lägesinställningar (Repeater- eller
klientläge) eller byt aktuellt Wi-Fi-nätverksnamn och lösenord, se bruksanvisningen på
hp://www.zyxel.com/products_services/wap3205_v3.shtml
① Observera ekeen som sier under åtkomstpunkten och kopiera “Wi-Fi-namn (SSID)”
och “Nätverksnyckel (Lösenord)”.
② Montera de medföljande antennerna.