ENGLISH | DEUTSCH | ESPAÑOL | FRANÇAIS | ITALIANO |
РУССКИЙ | SVENSKA | ČEŠTINA | POLSKI | SLOVENSKY |
MAGYAR | 简体中文|繁體中文
1/2
ZyWALL/USG/VPN/ATP | Power adaptor/Power cord | Rack-mounting kit (available only for models with rack-mounting holes) | Antennas (available only for models with antenna connectors) | Quick Start Guide
ZyWALL/USG/VPN/ATP | Netzadapter/Netzkabel | Rackmontage-Zubehör (nur für Modelle mit Rack-Montage Öffnungen verfügbar) | Antennen (nur für Modelle mit Antennenanschlüssen verfügbar) | Kurzanleitung in
Druckform
ZyWALL/USG/VPN/ATP | Adaptador de alimentación/Cable de alimentación | Kit para montaje en un equipo (disponible sólo para modelos con agujeros de montaje en equipo) | Antenas (disponible sólo para modelos con
conectores de antena) | Guía de inicio rápido impresa
ZyWALL/USG/VPN/ATP | Adaptateur d'alimentation/Cordon d'alimentation | Kit de montage en rack (disponible uniquement pour les modèles avec des trous pour montage en rack) | Antennes (disponibles uniquement pour
les modèles avec connecteurs d'antenne) | Guide d'installation rapide imprimé
ZyWALL/USG/VPN/ATP | Alimentatore/Cavo di alimentazione | Kit di montaggio a rack (disponibile solo per i modelli con fori di montaggio sul telaio) | Antenne (disponibili solo per i modelli con connettori per antenna) |
ZyWALL/USG/VPN/ATP | Nätkabeln/Strömadaptern | Stativmonteringssats (finns även för modeller med stativmonteringshål) | Antenner (finns endast för modeller med antennanslutning) | Snabbstartguide
ZyWALL/USG/VPN/ATP | Napájecí adaptér/napájecí šňůra | Montážní kit do racku (dostupný pouze pro modely s otvory pro montáž do racku) | Antény (pouze pro modely s anténními konektory). | Příručka k rychlé instalaci
ZyWALL/USG/VPN/ATP | Zasilacz/kabel zasilający | Zestaw do montażu w szafie rack ( dostępny tylko w zestawie przystosowanym do montażu w rack) | Anteny (dostępne tylko dla modeli z gniazdami antenowymi) |
Instrukcja startowa
ZyWALL/USG/VPN/ATP | Napájací adaptér/napájacia šnúra | Montážny kit do racku (dostupný len pre modely s otvormi pre montáž do racku) | Antény (len pre modely s anténovými konektormi) | Príručka pre rýchlu
ZyWALL/USG/VPN/ATP | Tápegység/tápkábel | Rack-fül ( csak olyan modelleknél, ahol az oldalkiképzés rendelkezésre áll a fülek felszereléséhez). | Antennák (csak az antennacsatlakozóval rendelkező modellek esetében) |
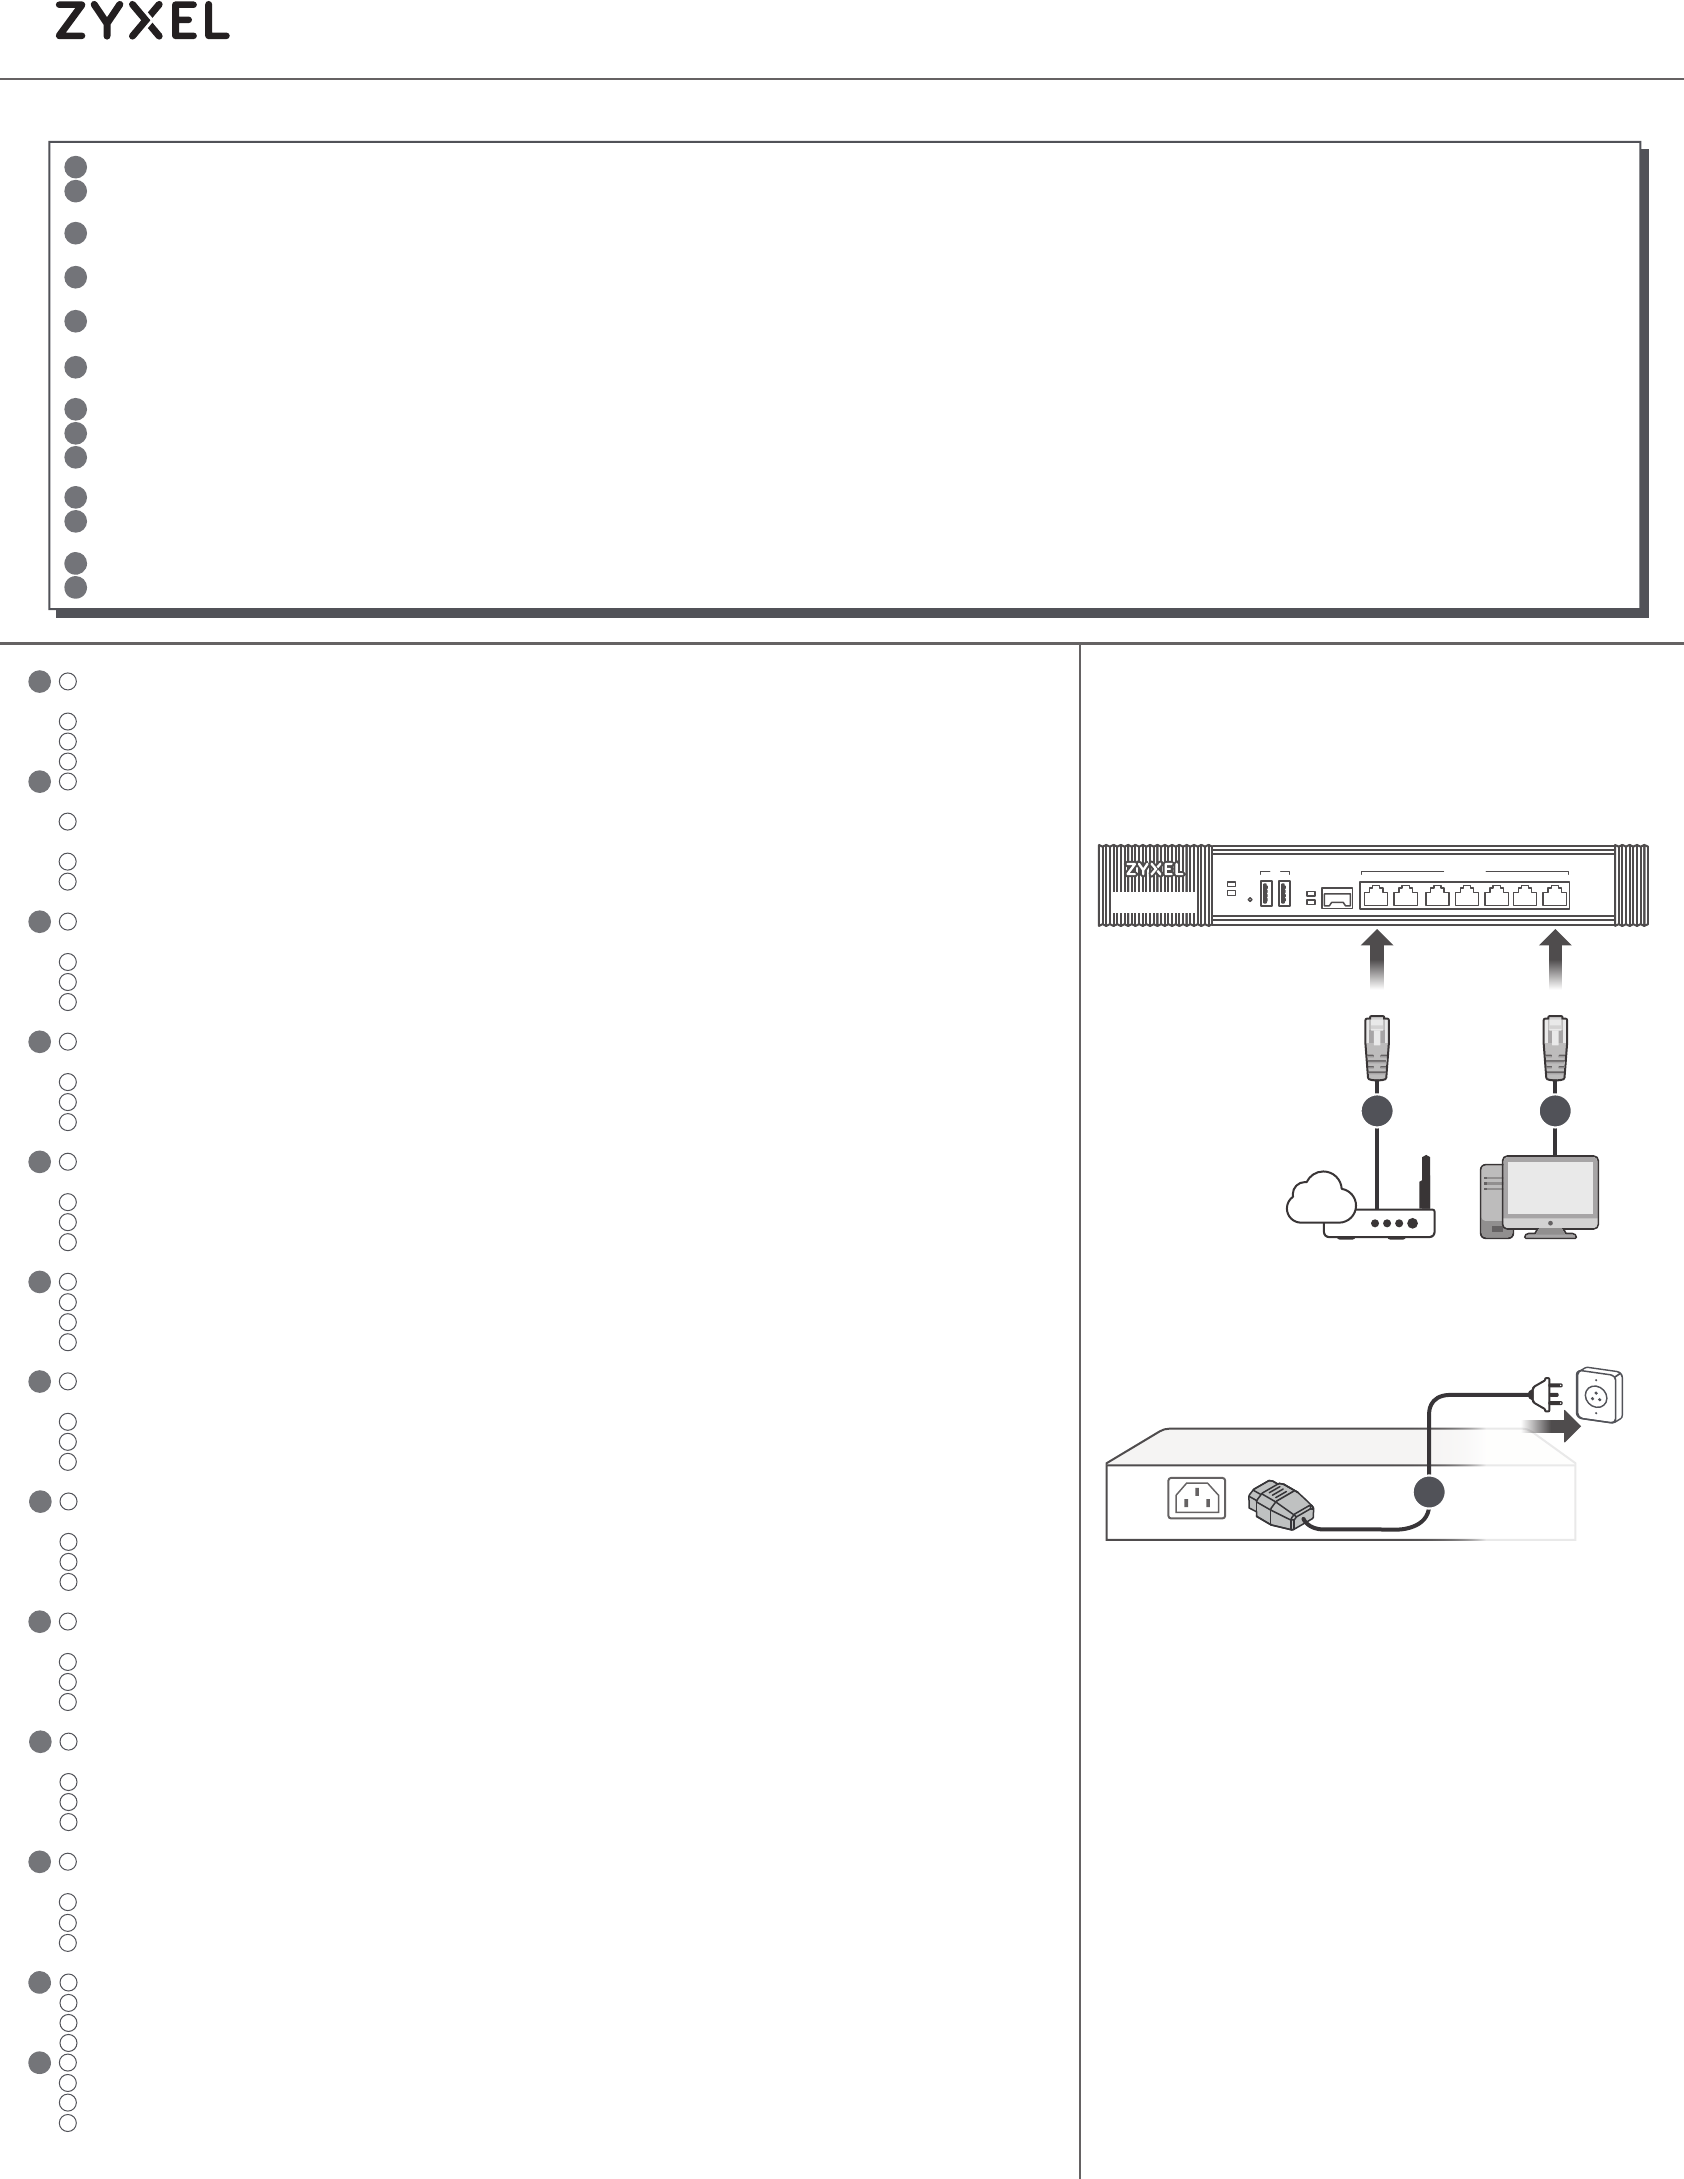
It is recommended that you configure the Security Gateway before using it to protect your network. Use an Ethernet cable to connect a computer to the
LAN port (P4 ; USG2200 - P7) of the Security Gateway.
Use another Ethernet cable(s) to connect the WAN port (P1, P2; USG2200 - P5, P6) to an Ethernet jack with Internet access.
Use the included power adaptor or power cord to connect the power socket (on the rear panel) to a power outlet.
Look at the front panel. The PWR light turns on. The SYS light blinks during system testing and initialization and then stays on when the system is ready.
Es wird empfohlen, die Security Gateway zu konfigurieren, bevor Sie sie zum Schutz Ihres Netzwerks einsetzen. Schließen Sie einen Computer mit einem
Ethernet-Kabel an den LAN-Port (P4 ; USG2200 - P7) der Zyxel Security Gateway.
Verwenden Sie ein anderes Ethernet-Kabel, um den WAN Port (P1 oder P2 ; USG2200- P5 oder P6) mit einer Ethernet-Buchse mit Internetzugang zu
verbinden .
Verwenden Sie das mitgelieferte Netzteil oder Stromkabel, um die Strombuchse (an der Rückseite) mit einer Steckdose zu verbinden.
Betrachten Sie das vordere Bedienfeld. Die PWR-LED beginnt zu leuchten. Die SYS-LED blinkt während des Systemtests und der Initialisierung, und sie
leuchtet, wenn der Test abgeschlossen und das System bereit ist.
Se recomienda que configure el Security Gateway antes de usarlo para proteger su red. Utilice un cable Ethernet para conectar un equipo al puerto LAN
(P4 ; USG2200 - P7) del Zyxel Security Gateway.
Utilice otro cable o cables Ethernet para conectar el puerto WAN (P1 o P2; USG2200 -P5 o P6) a una clavija Ethernet con acceso a Internet.
Utilice el adaptador o cable de alimentación incluido para conectar el zócalo de alimentación (en el panel posterior) a una salida de alimentación.
Mire al panel frontal. La luz PWR se encenderá. La luz SYS parpadeará durante la prueba el sistema y la inicialización y luego se mantendrá encendida
cuando el sistema esté listo.
Il est recommandé de configurer le Security Gateway avant de l'utiliser pour protéger votre réseau. Utilisez un câble Ethernet pour connecter un
ordinateur au port LAN (P4 ; USG2200 - P7) de l'Zyxel Security Gateway.
Utilisez un autre (d'autres) câble(s) Ethernet pour connecter le port WAN (P1 ou P2; USG2200-P5 ou P6) à une prise Ethernet avec accès à Internet.
Utilisez l'adaptateur ou le cordon d'alimentation fournis pour connecter le connecteur d'alimentation (sur le panneau arrière) à une prise de courant.
Sur la face avant, le temoin lumineux PWR s'allume. Puis, le témoin lumineux SYS clignote pendant le test et l'initialisation du système et reste ensuite
allumé quand le système est prêt.
Si consiglia di configurare Security Gateway prima di utilizzarlo per proteggere la rete. Usare un cavo Ethernet per connettere un computer alla porta
LAN (P4 ; USG2200 - P7) dell'Zyxel Security Gateway.
Utilizzare un altro cavo Ethernet per collegare la porta WAN (P1 o P2; USG2200 -P5 o P6) a una porta Ethernet con accesso a Internet.
Utilizzare l'alimentatore o il cavo di alimentazione fornito a corredo per collegare la presa di alimentazione (sul pannello posteriore) a una presa elettrica.
Osservare il pannello anteriore. Si dovrà accendere la luce PWR, poi dovrà lampeggiare la luce SYS durante il test e l'inizializzazione del sistema, infine
Проверьтеиндикациюнапереднейпанели. Индикатор PWR долженгоретьпостоянно. Индикатор SYS мигаетприинициализациисистемы, затемгоритпостоянно, что
означаетготовностьустройствакработе.
Vi rekommenderar att du konfigurerar Security Gateway före användningen för att skydda nätverket. Använd en Ethernet-kabel för att ansluta en dator
till LAN-porten (P4 ; USG2200 - P7) för Zyxel Security Gateway.
Använd en annan Ethernet-kabel för att ansluta WAN-porten (P1 eller P2; USG2200- P5 eller P6) till en Ethernet-anslutning med Internet-åtkomst.
Använd den medföljande strömadaptern eller nätkabeln för att ansluta strömanslutningen (på bakpanelen) till ett eluttag.
Titta på frontpanelen. Indikatorlampan PWR tänds. SYS-indikatorlampan blinkar under systemets test och initialisering, och lyser därefter stadigt när
systemet är redo.
Je doporučeno nakonfigurovat zařízení Security Gateway před použitím pro ochranu vaší sítě. Pomocí ethernetového kabelu připojte počítač k LAN
portu (P4 ; USG2200 - P7) na Zyxel Security Gateway.
Druhým kabelem Ethernet propojte WAN port (P1 nebo P2 ; USG2200- P5 nebo P6) s konektorem s přístupem na internet.
Dodaným napájecím adptérem nebo napájecí šňůrou připojte přístroj ke zdroji elektrické energie.
Sledujte přední panel. Rozsvítí se kontrolka PWR (napájení).Kontrolka SYS začne blikat (probíhá systémový test), a potom zůstane trvale svítit (systém je
připraven).
Zalecane jest skonfigurowanie Security Gateway przed wykorzystaniem go do ochrony sieci. Użyj kabla Ethernet, aby podłączyć komputer do portu LAN
(P4 ; USG2200 - P7) Zyxel Security Gateway.
Użyj następnego kabla ethernet, aby połączyć port WAN (P1 lub P2; USG2200- P5 lub P6) z dowolnym portem ethernet z dostępem do Internetu.
Dołączony zasilacz lub kabel zasilający podłącz do gniazda zasilania (na panelu tylnym).
Spójrz na panel przedni. Dioda zasilania PWR powinna świecić światłem ciągłym. Dioda SYS miga podczas testu systemu i jego inicjalizacji, następnie
zaświeci na stałe gdy system będzie gotowy do pracy.
Odporúča sa nakonfigurovať zaradenie Security Gateway pred použitím k ochrane vašej siete. Pomocou ethernetového kábla propojte počítač k LAN
portu (P4 ; USG2200 - P7) na Zyxel Security Gateway.
Druhým káblom Ethernet pripojte WAN port (P1 alebo P2; USG2200 - P5 alebo P6) s konektorom s prístupom na internet.
Dodaným napájacím adptérom alebo napájacou šnúrou pripojte prístroj ku zdroju elektrickej energie.
Sledujte predný panel. Rozsvieti sa kontrolka PWR (napájanie).Kontrolka SYS začne blikať (prebieha systémový test), a potom zostane trvalo svietiť
(systém je pripravený).
Javasoljuk, hogy úgy állítsa be a Security Gateway-t használat előtt, hogy az védje a hálózatot. Ethernet kábel segítségével csatlakoztassa a számítógé
pet az Zyxel Security Gateway LAN portjához (P4 ; USG2200 - P7).
Használjon egy másik ethernet kábelt a WAN port (P1 vagy P2; USG2200 - P5 vagy P6) és egy internethozzáférést biztosító csatlakozó összekötéséhez.
A mellékelt tápegységet csatlakoztassa a tűzfal hátoldalán található csatlakozóhoz, majd dugja be egy hálózati aljzatba.
Nézze meg az előlapot. A PWR LED-nek világítania kell. A SYS LED villog mialatt a rendszer ellenőrzése és inicializálása zajlik, illetve folyamatosan világít
Libble takes abuse of its services very seriously. We're committed to dealing with such abuse according to the laws in your country of residence. When you submit a report, we'll investigate it and take the appropriate action. We'll get back to you only if we require additional details or have more information to share.
Product:
Forumrules
To achieve meaningful questions, we apply the following rules:
First, read the manual;
Check if your question has been asked previously;
Try to ask your question as clearly as possible;
Did you already try to solve the problem? Please mention this;
Is your problem solved by a visitor then let him/her know in this forum;
To give a response to a question or answer, do not use this form but click on the button 'reply to this question';
Your question will be posted here and emailed to our subscribers. Therefore, avoid filling in personal details.
Register
Register getting emails for ZyXEL USG40W at:
new questions and answers
new manuals
You will receive an email to register for one or both of the options.
Get your user manual by e-mail
Enter your email address to receive the manual of ZyXEL USG40W in the language / languages: English, German, French, Italian, Polish, Swedish, Spanish as an attachment in your email.
The manual is 0,3 mb in size.
You will receive the manual in your email within minutes. If you have not received an email, then probably have entered the wrong email address or your mailbox is too full. In addition, it may be that your ISP may have a maximum size for emails to receive.
The manual is sent by email. Check your email
If you have not received an email with the manual within fifteen minutes, it may be that you have a entered a wrong email address or that your ISP has set a maximum size to receive email that is smaller than the size of the manual.
The email address you have provided is not correct.
Please check the email address and correct it.
Your question is posted on this page
Would you like to receive an email when new answers and questions are posted? Please enter your email address.