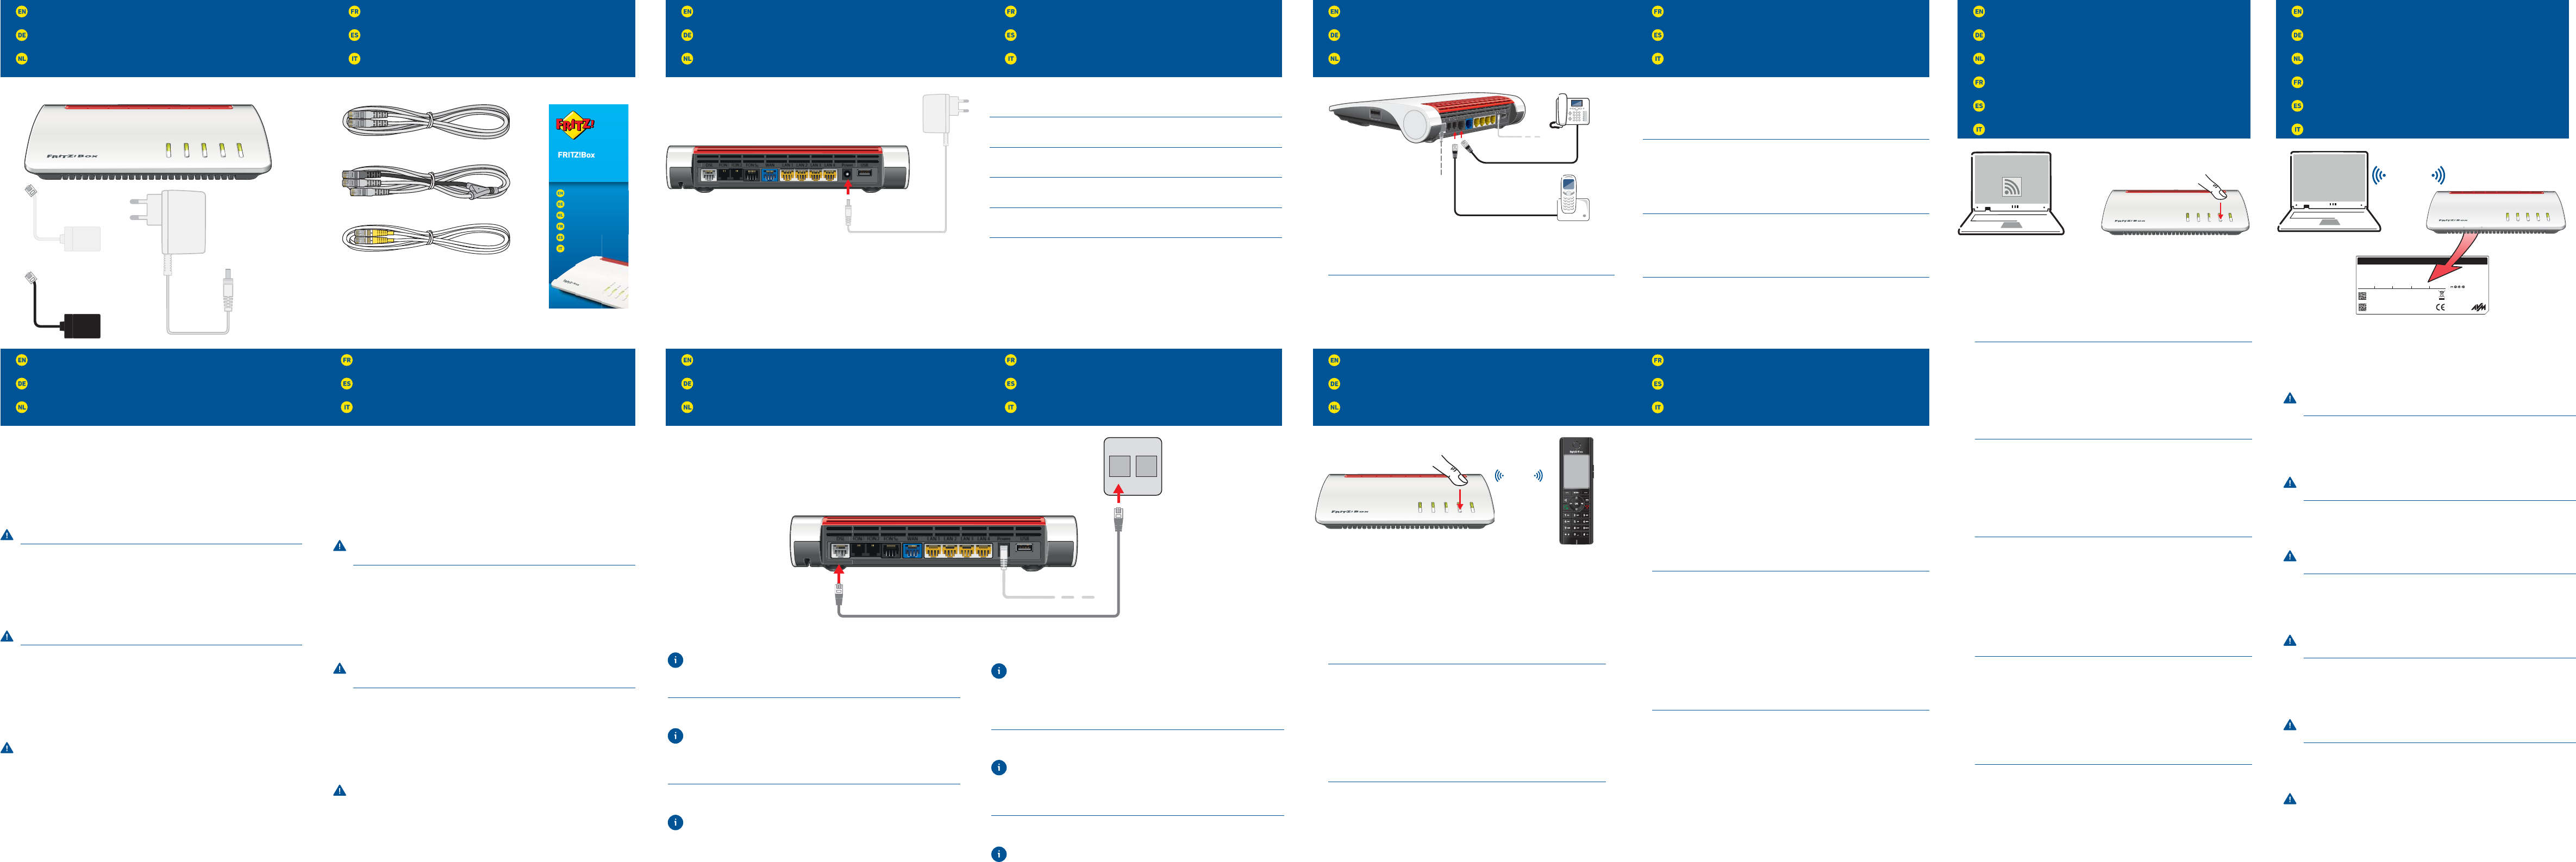
Connect to Electrical Po
Am Strom anschließen
Op het stroomnet aansluiten
Racc
Conectar a la alimentación eléctrica
Collegamento alla rete elettric
P
Lieferumfang
Omvang van de lev
Contenu de la livr
Contenido del paquete
Contenuto
Safety Instructions
Sicherheitshinweise
V
Consignes de sécurité
Consejos de seguridad
Indicazioni di sicur
Connect to the DSL Network
Am DSL anschließen
Aansluiten op DSL
Racc
Conectar a la líena DSL
Collegamento alla presa DSL
Register Cor
Schnurlostelefone anmelden
Dr
Enregistrfi l
Conectar teléfonos inalámbricos
Registr
Connect T
T
T
Racc
Conectar los teléfonos con c
Collegamento di telefoni via cav
Wireless LAN Quick Connection (WPS)
WLAN-Schnellverbindung (WPS)
WiFi-snelverbinding (WPS)
Connexion sans fi
Conexión inalámbrica r
Connessione r
Connect Computers
Computer anschließen
Computer aansluiten
Comment connecter v
Conectar ordenador
Collegamento del computer
Use the DSL cable to connect the FRITZ!Bo
If you have a DSL line and also an analog or ISDN telephone line with a
DSL splitter
the telephone adapter included in the package. F
PDF manual available at en/avm.de/service.
Schließen Sie die FRITZ!Box an Ihr
DSL-Kabel an.
Wenn Sie einen DSL
einen ISDN-
Sie die FRITZ!Box mit dem DSL
aus dem Lieferumfang an.
Handbuch auf avm.de/service.
Sluit de FRITZ!Box met de DSL
aansluiting.
W
telefoonaansluiting met een DSL-splitter heeft,
met de DSL/telefoonkabel en de telefoonadapter die zijn meegeleverd.
hierbij te werk gaat, leest u in het PDF-handboek op nl.avm.de/servic
RaccorAll IP ou à votre ligne d’acc
à l’aide du c DSL
Si vous avez non seulement une ligne DSL mais aussi une ligne
téléphonique analogique ou numérique avec un fi
rac
l’adaptateur téléphonique que vous avez r
comment procPDF sur
be.avm.de/fr/service.
Conecte su FRITZ!Box a una conexión “All IP” o conexión completa; utilic
ello el cable DSL suministr
Si además de la conexión a DSL tiene una conexión a la r
analógico o de RDSI con un micrfi
ayuda del cable DSL/telefónico y el adaptador telefónic
para ello la información que en el PDF del manual de usuario que podr
descargar de la página es.avm.de/servicio.
Collegate il FRITZ!Box alla vostr
DSL.
Se disponete di una connessione DSL e,
analogica o ISDN con un fi
DSL/telefono e l‘adattatore telefonico forniti in dotazione.
proceder
P
o
w
er/
DS
L
WLA
N
F
o
n
/
D
E
C
T
Conne
c
t/
WP
S
I
n
fo
DECT
Y
• Put your DECT
• Enter the PIN “0000” on the telephone.
• Push the “F
The FRITZ!Box supports concurr
• up to six cordless telephones and
• up to ten switchable FRITZ!DECT 200/210 smart plugs and
• up to twelve FRITZ!DECT 300/Comet DEC
Sie können bis zu 6 DECT
• Bringen Sie Ihr DECT
• Geben Sie am T
• Drücken Sie die „F
Die FRITZ!Box unterstützt per DEC
• bis zu sechs Schnurlostelefone und
• bis zu zehn schaltbare Steck
• bis zu zwölf Heizkörperregler FRITZ!DEC
U kunt tot 6 dr
• Zet uw DEC
• V
• Druk op de „FON/DECT“-knop op de FRITZ!Bo
De FRITZ!Box ondersteunt via het DEC
• tot zes draadloze telefoons en
• tot tien schakelbare c
• tot twaalf radiatorthermostaten FRITZ!DEC
Vfi téléphones DECfi l
votre FRITZ!Bo
• FDEC
l’enr
• Saisissez le code confi dentiel 0000 » sur le téléphone.
• Enfoncez la touche «F » de FRITZ!Bo
FRITZ!Box pr
• jusqu’à six téléphones sans fi l
• jusqu’à dix prises (dés)activables FRITZ!DECT
• jusqu’à douze thermostats FRITZ!DECT 300/Comet DEC
Podrá c
• Inicie en su teléfono DECT el pr
• Marque en el teléfono el PIN “0000”
• Pulse el botón „F
El FRITZ!Box soporta par
• hasta seis teléfonos inalámbricos y
• hasta diez enchufes inteligentes de domótica como el FRITZ!DEC
el FRITZ!DECT 210
• hasta doce termostatos de r
DECT
Potete registrfi
• Attivate la modalità di registr
• Digitate con il telefono il PIN “0000”
• Premete il tasto “F
Il FRITZ!Box supporta contempor
• fi
• fi
• fi
Connect the FRITZ!Box to electrical power
fl ashing
Schließen Sie die FRITZ!Box an den Str
beginnt zu blinken.
Sluit de FRITZ!Box op het str
knipperen.
RaccorPower/
DSL » commence à clignoter
Conecte a su FRITZ!Box a la corriente eléctric
comenzar
Collegate il FRITZ!Box alla r
lampeggiare.
• Do not install the FRITZ!Box during an electrical storm.
• During a storm, disc
the internet.
• The ventilation slits of the FRITZ!Box must never be obstructed.
• Do not place the FRITZ!Box on ex
• Connect the FRITZ!Box to an easily acc
• The FRITZ!Box is intended only for indoor oper
See the security instructions in the FRITZ!Box manual.
• Installieren Sie die FRITZ!Bo
• T
• Die Lüftungsschlitze der FRITZ!Box müssen immer fr
• Stellen Sie die FRITZ!Box nicht auf wärmeempfi ndliche Flächen.
• Schließen Sie die FRITZ!Box an eine leicht err
• Die FRITZ!Box darf nur innerhalb von Gebäuden verwendet wer
Beachten Sie die Sicherheitshinweise im FRITZ!Box
• Installeer de FRITZ!Box niet bij onweer
• Koppel de FRITZ!Box tijdens on
internet.
• De luchtroosters van de FRITZ!Bo
• Plaats de FRITZ!Box niet op warmtegevoelige oppervlakken.
• Sluit de FRITZ!Box aan op een goed ber
• De FRITZ!Box mag alleen in gebouwen wor
Let op de veiligheidsinstructies in het handboek van de FRITZ!Box.
• N’installez pas votre FRITZ!Bo
• En cas d’or
interrompez sa connexion à Internet.
• Les fentes d’aération de votr
dégagées.
• Ne posez pas votre FRITZ!Bo
• Branchez votr
• FRITZ!Box doit êtr
T
manuel de votre FRITZ!Bo
• No instale su FRITZ!Box dur
• Desconecte su FRITZ!Box dur
corriente,
• No se deben bloquear la rejilla de ventilación de su FRITZ!Bo
• No coloque su FRITZ!Box sobrfi
• Conecte su FRITZ!Box a una toma eléctrica de fácil ac
• Su FRITZ!Box sólo debe ser utilizado en interior
¡T
el manual de FRITZ!Box!
• Non installate il FRITZ!Box dur
• Durante i tempor
Internet.
• Le fessure di ventilazione del FRITZ!Bo
• Non collocate il FRITZ!Bofi
• Collegate il FRITZ!Box ad una pr
• Il FRITZ!Box va utilizzato esclusivamente all‘interno degli edifi ci.
Osservate le indicazioni di sicur
Devices with wireless LAN c
(for Android we r WLAN from Google Play):
• Click the wireless network icon in the task bar
• A list appears on the screen showing all wir
• Select the wireless network of your FRITZ!Bo 7590 and click “Connect”
• Press the “Connect/WPS” button until the “WLAN” LED begins fl ashing.
Sie können WLAN-Ger
empfehlen wir die FRITZ!App WLAN bei Google Play):
• Klicken Sie in der T
• Auf dem Bildschirm erscheint eine Liste mit Dr
• W 7590 aus und klicken
Sie „
• Drücken Sie die „
U kunt
raden we de FRITZ!App WLAN bij Google Play aan):
• Klik in de taakbalk op het WiFi-symbool.
• Op het beeldscherm verschijnt een lijst met dr
• Selecteer het draadloze netwerk van uw FRITZ!Bo 7590 en klik op
„
• Houd de „Connect/WPS“ knop ingedrukt tot de led „
Vfi
WPS (pour Android, WLAN sur Google
Play):
• Cliquez sur l’icfi
• Une liste de réseaux sans fi l s’affi
• Sélectionnez le réseau sans fi 7590, puis cliquez sur
« Connecter ».
• Enfoncez la touche «Connect/WPS » jusqu’à ce que le voyant «WLAN »
clignote.
A través de
Android, WLAN que podr
en Google Play):
• Haga clic en la barra de tar
• En la pantalla aparecer
entorno.
• Seleccione la red de su FRITZ!Bo 7590 y haga clic sobre “Conectar”
• Presione el botón “Connect/WPS”
Potete collegar
consigliamo la FRITZ!App WLAN da Google Play):
• Nella barra delle applic
• Sullo schermo compare una lista delle r
• Selezionate la rete wir 7590 e cliccate “Collega”
• Premete il tasto “Connect/WPS” fi
Computers with wireless LAN and the oper OS or other
be connected with the FRITZ!Box using the network knetwork key is
printed on the underside of the FRITZ!Bo Y
the FRITZ!Box using the yellow network c
A computer can be c
methods.
Computer mit WLAN und dem Betriebssytem MA OS oder anderen können
Sie mit dem WLAN-Netzwerkschlüssel an der FRITZ!Bo
fi nden WLAN-Netzwerkschlüssel auf der Unterseite der FRITZ!Bo.
Sie können auch Computer mit dem gelben Netzwerkkabel an der FRITZ!Bo
anschließen.
Ein Computer kann nur auf eine Art mit der FRITZ!Box verbunden
werden.
Computers met WiFi en het besturingssy
met de WiFi-netwerksleutel aansluiten op de FRITZ!Bo WiFi-
netwerksleutel op de onderzijde van de FRITZ!Bo U kunt uw computer met
de LAN-kabel op de FRITZ!Box aansluiten.
Een computer kan slechts op een manier met de FRITZ!Bo
verbonden.
Vfi l
du système d’exploitation MACOS ou autr
réseau sans fi l.
V
inférieure de FRITZ!Bo
V
FRITZ!Box à l
Un ordinateur ne peut êtr
manière.
Ordenador
pueden conectarse a su FRITZ!Bo
Encontrclave de r de FRITZ!Box. A
su FRITZ!Box también podr
red amarillo.
Un mismo ordenador solo podr
estas maneras.
Potete collegar
sistema operativo MA
La chiave di rete wir. Potete anche
collegare i c
Un computer si può collegar
• Connect analog telephones to the “FON 1” and “FON 2” sockets on the back
panel of the FRITZ!Box. S
0
” socket.
If the plug of the cable does not fi
the black adapter
• Schließen Sie analoge T 1“ und „FON 2“ auf
der Rückseite der FRITZ!Box an.
„FON S
0
“ an.
Wenn der Steck
Sie ihn mit dem schwarzen Anschlussadapter
• Sluit de analoge telefoons aan op de bussen „FON 1“ en „FON 2“ op de
achterzijde van de FRITZ!Box. S
0
“.
Als de stekker van de kabel niet in de telefoonbus op past,
zwarte telefoonadapter
• RaccorFON 1 » et « FON 2 » au
dos de votre FRITZ!Bo
prise « FON S
0
».
Si cette fi
fi
extrémité de cor
• Conecte teléfonos analógicos a los puertos “FON 1” y “FON 2” que se
encuentran al r
puerto “FON S
0
”.
Si el conector no entrfi ja
conectelo primero al adaptador negr
• Collegate i telefoni analogici alle prese „FON1“ e „FON 2“ sul r
FRITZ!Box.S
0
”.
Se il connettore non entrfi
nero.
Quick Guide
Kurzanleitung
Korte handleiding
Notice abrégée
Guía rápida
Guida rapida
7590
Power DSL
WLAN
Fon DECT
Connect WPS
Info
USBPowerLAN 4WANFON
S
0
FON
2
FON
1
FON 1
FON 2
FON S
0
WAN
LAN 1
LAN 2
LAN 3
LAN 4
Power
USB
FON 1
DSL
USBPoweLAN 4LAN 1WAFO
S
0
FON
2
FON
1DSL
Start wireless LAN function
P
o
w
e
r/D
SL
WLA
N
F
o
n
/
D
E
C
T
C
o
n
n
e
c
t
/
WP
S
I
n
f
o
Starting the wireless LAN
function and
entering
the network key
FRITZ!Box password
afbecd1234
Power unit: 311P0W134
12V 2,5A
WLAN Network (SSID)
FRITZ!Box 7590 WW
WLAN Network Key (WPA2)
3779 8981 1562 8981 1234
Article no.
2000 2804
Serial no.
H515.123.45.678.901
CWMP account
00040E-123456789012
AVM GmbH,
10547 Berlin
FRITZ!Box 7590
Installation: http://fritz.box
Edition International
P
ow
er/ DSL
WL
A
N
Fo
n
/
D
E
CT
C
o
nne
c
t
/
W
P
S
Info
WLAN