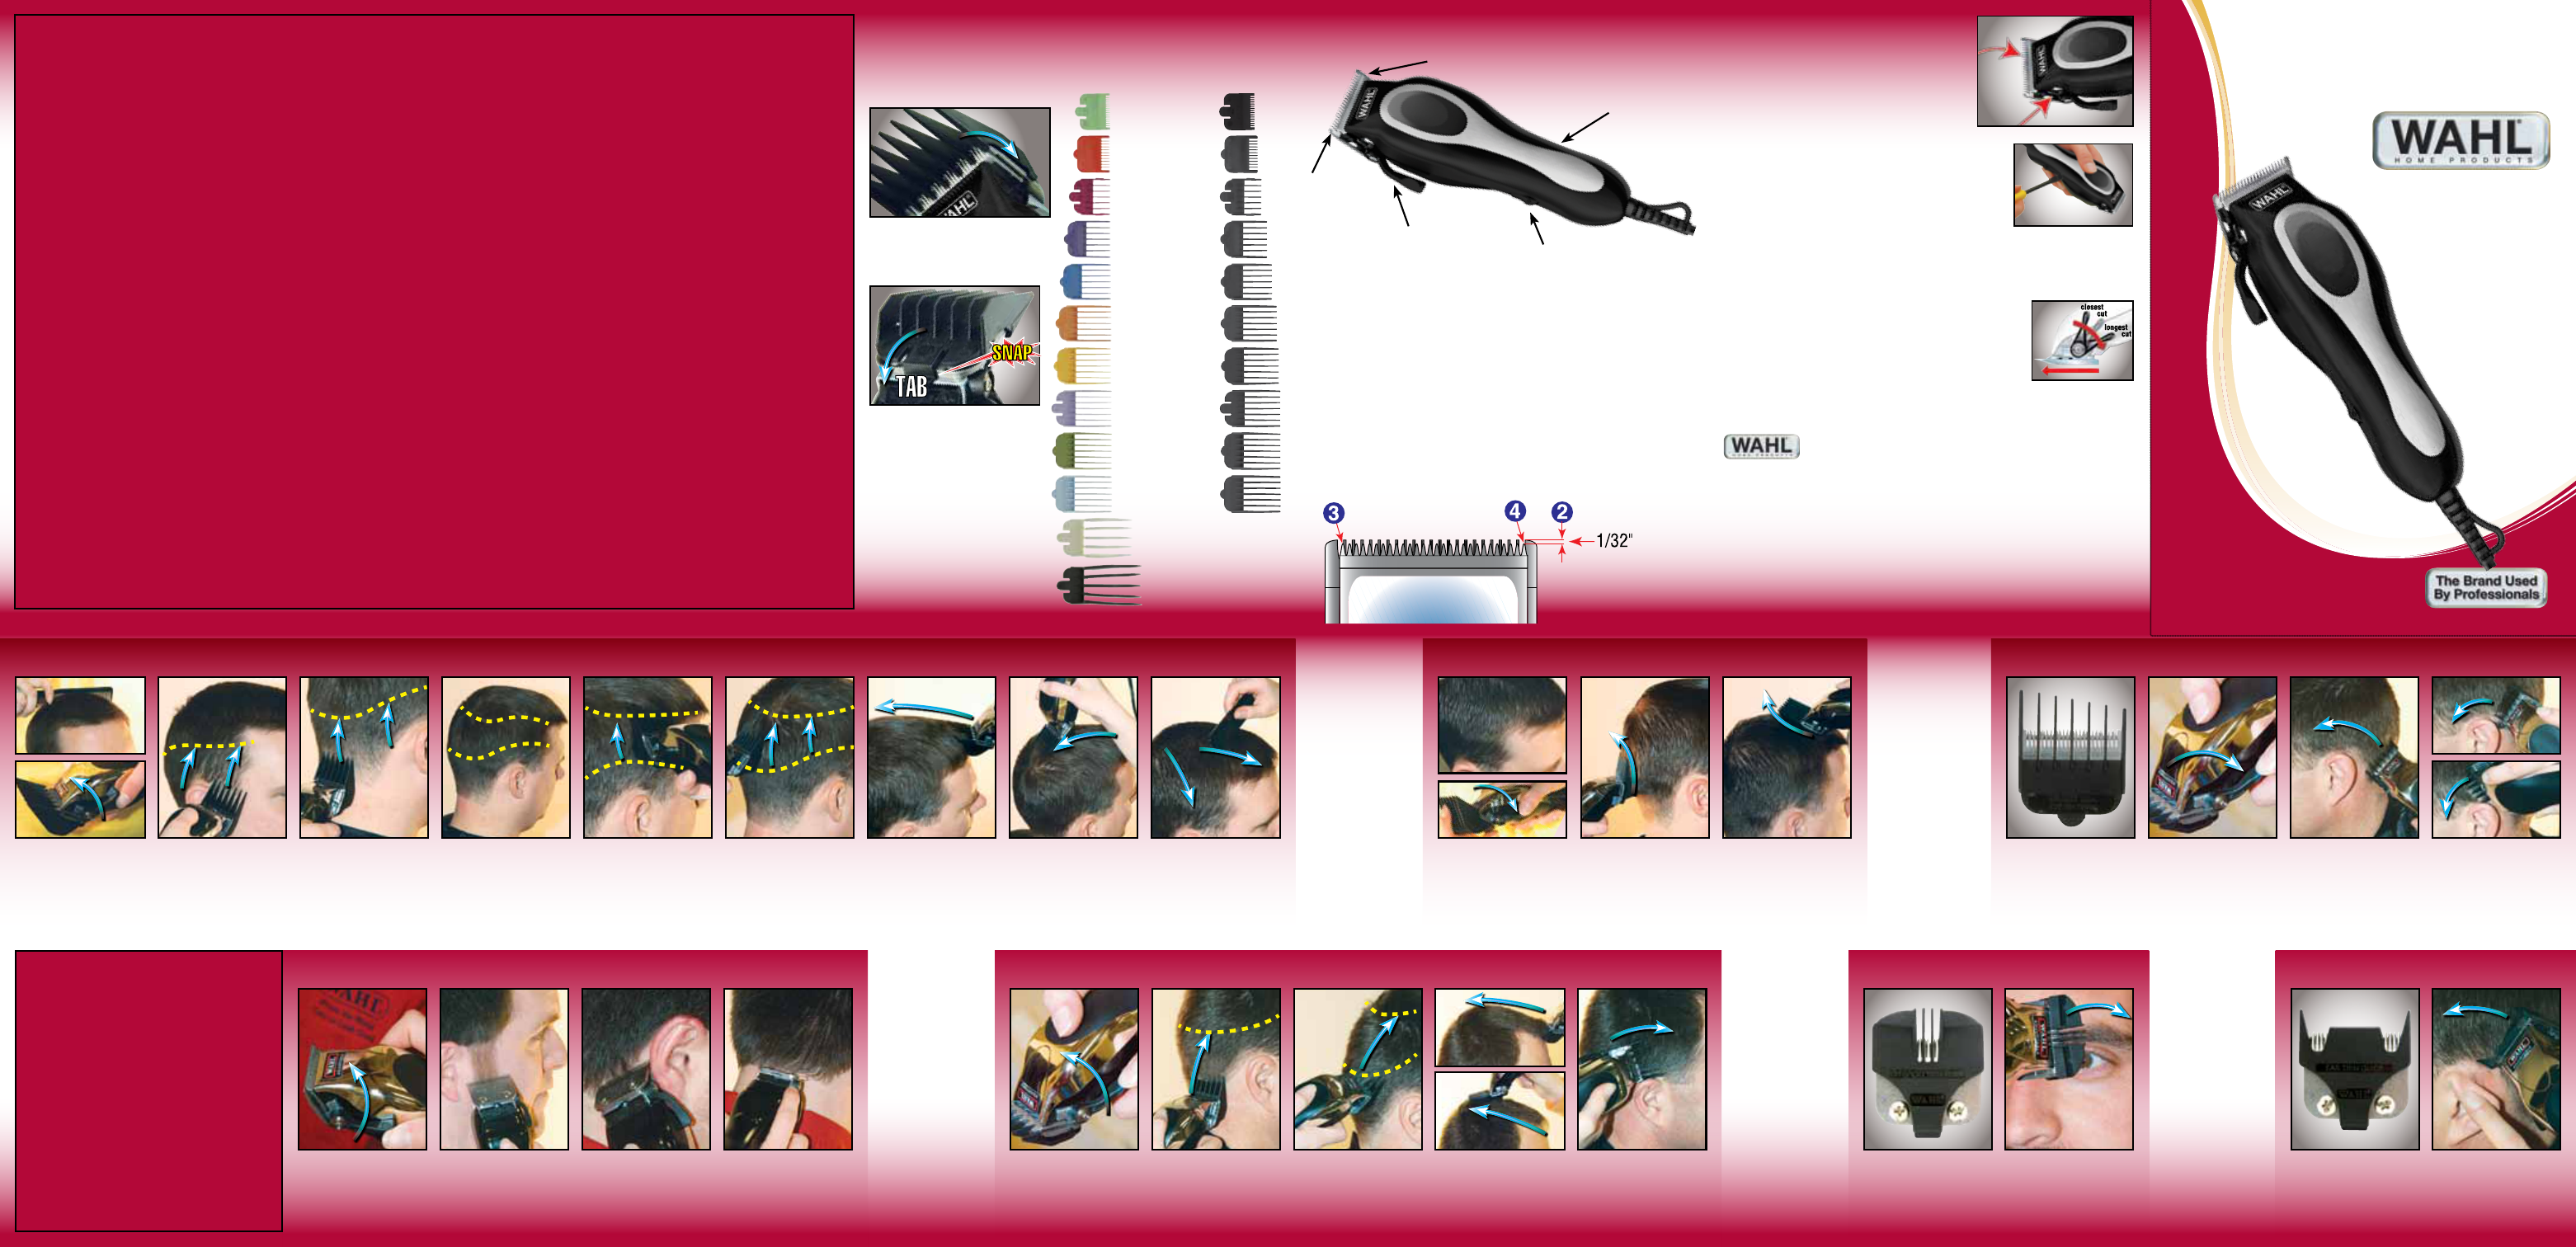
Your Wahl clipper blades were oiled and aligned before leaving our factory. Blades may need
to be realigned if they have been bumped or removed for cleaning. To determine if realignment
is necessary, compare your clipper blades with this sketch.
1. If your clipper has a taper lever, position the lever in the close cut position.
2. End of top blade teeth should be approximately 1/32-inch (.64 mm) back from bottom blade.
3. Extreme left-hand tooth of top blade must be covering or to the left of the first small tooth
of bottom blade.
4. Extreme right-hand tooth of top blade must be touching the big tooth on the bottom blade.
If blade alignment is incorrect, add a few drops of Wahl Clipper Oil to the blades, turn clipper
“ON” for a few moments, turn “OFF” and unplug. Loosen screws slightly and adjust. Tighten
screws after blades are aligned. Other than blades, this clipper has no user-serviceable parts.
1. Comb hair and
remove tangles. Attach
the largest guide comb
to the clipper. Make sure
the taper lever is in the
up position.
2. Start at hairline on
side of head and cut
up to middle of head.
Note: If cut hair is
too long repeat with
next smaller guide
comb.
3. Continue around
head repeating step 2.
4. You are now ready to
cut the middle portion of
the hair.
5. Select the proper guide
comb. Use the comb with
the next highest number
than in step 3. Example:
If you used a #6 comb in
step 3, select comb #7.
6. Continue cutting
around middle portion of
head as in steps 2 and 3.
7. For cutting top of
head, use the comb with
the next highest number
than in step 6.
Start at front bang area.
8. Cut across top of
head.
9. Comb hair on entire
head to assess if further
cutting is necessary.
10. Blend out any cut
lines. Lines may form
where you change comb
sizes. Use the same
comb used in step 3
with taper lever in down
position.
12. Using the comb used in
step 8 repeat blending the
top outline as in step 10.
OUTLINING
TAPERING
1. The ear guide combs
have a built in taper
ranging from 1/8” to 1/2”.
2. Attach the left ear
guide comb to the
clipper. Put taper lever in
down position.
3. Hold the clipper at a
slight angle just back of
the ear at the hairline.
Hold top of ear down.
4. Move the clipper
upward and around
the ear.
Repeat the same for the
right ear with the right
ear guide comb.
1. Select the guide comb
for the desired length
hair. Attach to clipper
with the taper lever in
the up position.
2. Hold the clipper flat
against the neck and
slowly move the clipper
through the hair as
shown.
3. Use the same procedure
from the lower side of the
head to the upper side of
the head.
CREWCUTS
BLENDING
Hair Issues?
wahlkeepitclean.com
1. Attach the brow trim guide to clipper
2. Starting from just above your nose, slowly guide
the clipper to the outside of your face.
For shorter brow trim repeat steps 1 and 2
working from outside face to your nose.
1. Attach ear trim guide to clipper.
2. Hold the clipper at a 45-degree angle.
3. Slowly move the clipper from back to front.
Avoid poking eyes.
BROWTRImGUIDEEARTRImGUIDE
1. No attachments
needed. Push the taper
lever up to the close cut
position.
2. Start with the
sideburns.
3. Continue around ear
as shown.
AttAching guide combs
Align comb onto blade then press
tab until you hear a snap.
CUTTINGHAIR
11. Using a rocking
motion, blend out the
middle cut line.
4. Cut the top using a
guide comb two sizes
(lengths) longer than the
comb used on sides. Start
at the front and cut slowly
to the back as shown.
4. Trim neckline as
shown.
5. Around the ears.
guIDE COMb LISTINg
Some kits do not include all Wahl guide combs. Some kits include colored
guide combs for ease in remembering which combs were previously used.
#
1
/2
-
(1.5mm)
1
/16”
Light Green/Black
#
1
-
(3mm)
1
/8”
Red/Black
#
1
1
/2
-
(4.5mm)
3
/16”
Burgundy/Black
#
2
-
(6mm)
1
/4”
Purple/Black
#
3
-
(10mm)
3
/8”
Dark Blue/Black
#
4
-
(13mm)
1
/2”
Orange/Black
#
5
-
(16mm)
5
/8”
Yellow/Black
#
6
-
(19mm)
3
/4”
Lavender/Black
#
7
-
(22mm)
7
/8”
Green/Black
#
8
-
(25mm) 1”
Light Blue/Black
#
12
-
(38mm) 1
1
/2
”
Black Only
#
10
-
(31mm) 1
1
/4
”
White Only
NOTE:
1) Always start with the largest guide
comb, then use shorter combs if a
shorter length is desired.
2) Cut only a small amount until you
become accustomed to how long
each guide comb leaves the hair.
3) Cut slowly and smoothly. Do not
force the clipper through the hair.
Home
Haircutting
witH
ActuAl BlAde Size
NOTE:
NOT ALL WAHL KITS
INCLUDE BROW OR
EAR TRIM GUIDE
The first time you cut hair, cut only
a small amount of hair until you
become accustomed to the length
of hair each guide comb provides.
• Start by attaching the largest
guide comb on the clipper.
• Then use shorter combs if a
shorter length is desired.
• For uniform cutting, cut at a
slow even speed.
1
ST
TImE
CUTTING HAIR
PRODuCT
REgISTRATION
Need help? Post your question in this forum.
Report abuse
Libble takes abuse of its services very seriously. We're committed to dealing with such abuse according to the laws in your country of residence. When you submit a report, we'll investigate it and take the appropriate action. We'll get back to you only if we require additional details or have more information to share.
Product:
Forumrules
To achieve meaningful questions, we apply the following rules:
First, read the manual;
Check if your question has been asked previously;
Try to ask your question as clearly as possible;
Did you already try to solve the problem? Please mention this;
Is your problem solved by a visitor then let him/her know in this forum;
To give a response to a question or answer, do not use this form but click on the button 'reply to this question';
Your question will be posted here and emailed to our subscribers. Therefore, avoid filling in personal details.
Register
Register getting emails for Wahl Tondeuse diverse types at:
new questions and answers
new manuals
You will receive an email to register for one or both of the options.
Get your user manual by e-mail
Enter your email address to receive the manual of Wahl Tondeuse diverse types in the language / languages: English as an attachment in your email.
The manual is 1,07 mb in size.
You will receive the manual in your email within minutes. If you have not received an email, then probably have entered the wrong email address or your mailbox is too full. In addition, it may be that your ISP may have a maximum size for emails to receive.
If you have not received an email with the manual within fifteen minutes, it may be that you have a entered a wrong email address or that your ISP has set a maximum size to receive email that is smaller than the size of the manual.
The email address you have provided is not correct.
Please check the email address and correct it.
Your question is posted on this page
Would you like to receive an email when new answers and questions are posted? Please enter your email address.