Das Sur
a V
(Ladebuchse) und einer Steckdose und laden Sie das SurfT
b Drücken Sie für ca. 2-3 Sekunden den Ein-/Ausschalter
c Befolgen Sie anschließend die Anw
um Ihr Sur
i
Im Laufe des Start-Assistenten werden Sie auf
Microsoft-Konto anzumelden. F
verfügen, r
d Nach Beendigung des Start-Assistenten wird Ihr SurfT
Dies kann einige Minuten in Anspruch nehmen. Schalten Sie das Sur
in dieser Zeit nicht aus!
Go Green
Deaktivieren Sie die
Deaktivieren SIe die mobile Internetverbindung, wenn Sie diese nicht verwenden.
Lassen Sie das Gerät nur so lange an der Steckdose, bis es vollständig geladen ist.
Reduzieren Sie in den Geräteeinstellungen die Displayhelligkeit.
Aktivieren Sie den Standby-Modus, w
Drüc
Conserving energy
Deactivate the W
Disable the mobile internet connection if you do not use it.
Only leave the device connected until it is fully charged
Reduce the display brightness in the unit settings.
Switch to standby mode when the SurfT
T
Rispetto dell'ambiente
Quando non se ne fa uso, disattivare la funzione
Se non utilizzata, disattivare la connessione internet mobile.
Lasciare il dispositivo collegato all'alimenta
Ridurre la luminosità del display nelle impostazioni del dispositivo.
Quando non si utilizza il Sur
brevemente il pulsan
Start-Screen und Desktop-Ansicht
Je nach Bedar
Geräte optimierten Startbildschir
in der klassischen Desktop-Ansicht arbeiten möchten.
Beim ersten Einschalten Ihres SurfT
Live-K
links unten auf die Live-Kachel mit dem Namen "Desktop"
Charm Bar oder unten links in der
um zum Startbildschirm zurückzukehren.
Start screen and desktop view
Depending on your needs and prefer
the start screen with live tiles optimized for mobile devices
work in the classic desktop view
When you rst start your SurfT
want to switch from this t
live tile with the name "Desktop"
Bar or at the bottom left of the taskbar to return to the home screen.
Schermata Start e visualizzazione desktop
A seconda delle vostre esigenz
la schermata Start ottimizzata per il dispositivo mobile, con le live tile
oppure avviare la classica visualizzazione desktop
Alla prima accensione del vostro SurfT
live tile. Se si desidera passare alla visualizzazione deskt
a sinistra la live tile con il test
toccare in Charm Bar o in basso a sinistra nella barra delle applicazioni sul
simbolo Windows (Avvio).
Preparing the SurfT
a Connect the completely assembled power supply with the SurfT
electrical outlet and charge the Sur
b Press the on/off switch for about 2-3 sec
c Then follow the instructions in the startup wizard to set up your Sur
i
Microsoft account. If you do not yet have a Microsoft account, please
set one up here.
d After completion of the startup, y
minutes to complete
Mettere in funzione il SurfT
a Collegare il trasf
ricaricare completamente il SurfT
b Premere il pulsante di ac
di accendere il SurfT
c In seguito seguire le indicazioni della procedura d‘
configurare il SurfT
i
Nel corso della procedura d’assistenza iniziale, sar
Microsoft del vostro conto. In caso non si disponga di un account Microsoft,
aprirlo in questa sede.
d Al termine della procedura d’assistenza iniziale il v
configurato
questo periodo di tempo!
Startbildschirm
Desktop-Ansicht | Desctop view |
i
EN
A) Camera front
B) Speaker
C) T
D) Rear camera
E) Micro-USB socket/
Charging socket
F) Audio out socket
G) On/Off switch
H) V
I) Memor
J Microphone
IT
A) F
B) Altoparlante
C) T
D) Fot
E) Presa Micro-USB/
Presa di ricarica
F) Presa di uscita audio
G) Pulsante di accensione/
spegnimento
H) V
I) Lettore schede di
memoria
J Microfono
DE
A) Kamera (Frontseit
B) Lautsprecher
C) T
D) Kamera (Rückseite)
E) Micro-USB-Buchse/
Ladebuchse
F) Audio-Out-Buchse
G) Ein-/Ausschalter
H) Lautstärke
I) Speicherkar
J Mikrofon
2
1
ES
A) Cámara (fr
B) Altavo
C) Pantalla táctil
D) Cámara (post
E) Conector Micro-USB/
T
F) Conector de salida
de audio
G) Interruptor de
encendido/apagado
H) V
I) Lector de tarjetas de
memoria
J Micrófono
FR
A) Appareil photo
(face avant)
B) Haut-parleur
C) Écran tactile
D) Appareil phot
(face arrière)
E) Port MicroUSB/
Douille de
rechargement
F) Port de sortie audio
G) Bouton marche/arrêt
H) Réglage du volume
I) Lecteur de car
mémoire
J Microphone
3
WLAN aktivieren
a Ö "Verfügbar"
b Schieben Sie den Schieber für WLAN von "
c Tippen Sie in der Liste darunter auf das zu verbindende Netzwerk.
d Tippen Sie nun auf "Verbinden"
e G
Enabling WiF
a Open the Charm bar and tap "Settings" "
b Slide the switch for
c T
d Now tap on the "Connect" button.
e Enter the corresponding password and confirm with "Next"
Attivar
a Aprire la Charm Bar e toccare "Impostazioni" "Disponibile"
b Scorrere la linguetta
c Nell’
d T
e I
SE
A) Kamera (framsida)
B) Högtalare
C) Pekskärm
D) Kamera (baksida)
E) Micro-USB-uttag/
Laddningsdosa
F) Ljud ut-uttag
G) Strömbrytare
H) V
I) Minneskor
J Mikrofon
SurfTab wintron 8.0
M.No.:ST80416-1
Designed in Germany
Made in China
TrekStor GmbH, Kastanienallee 8-10
64653 Lorsch, Germany
G
H
I
J
F
B
A
C
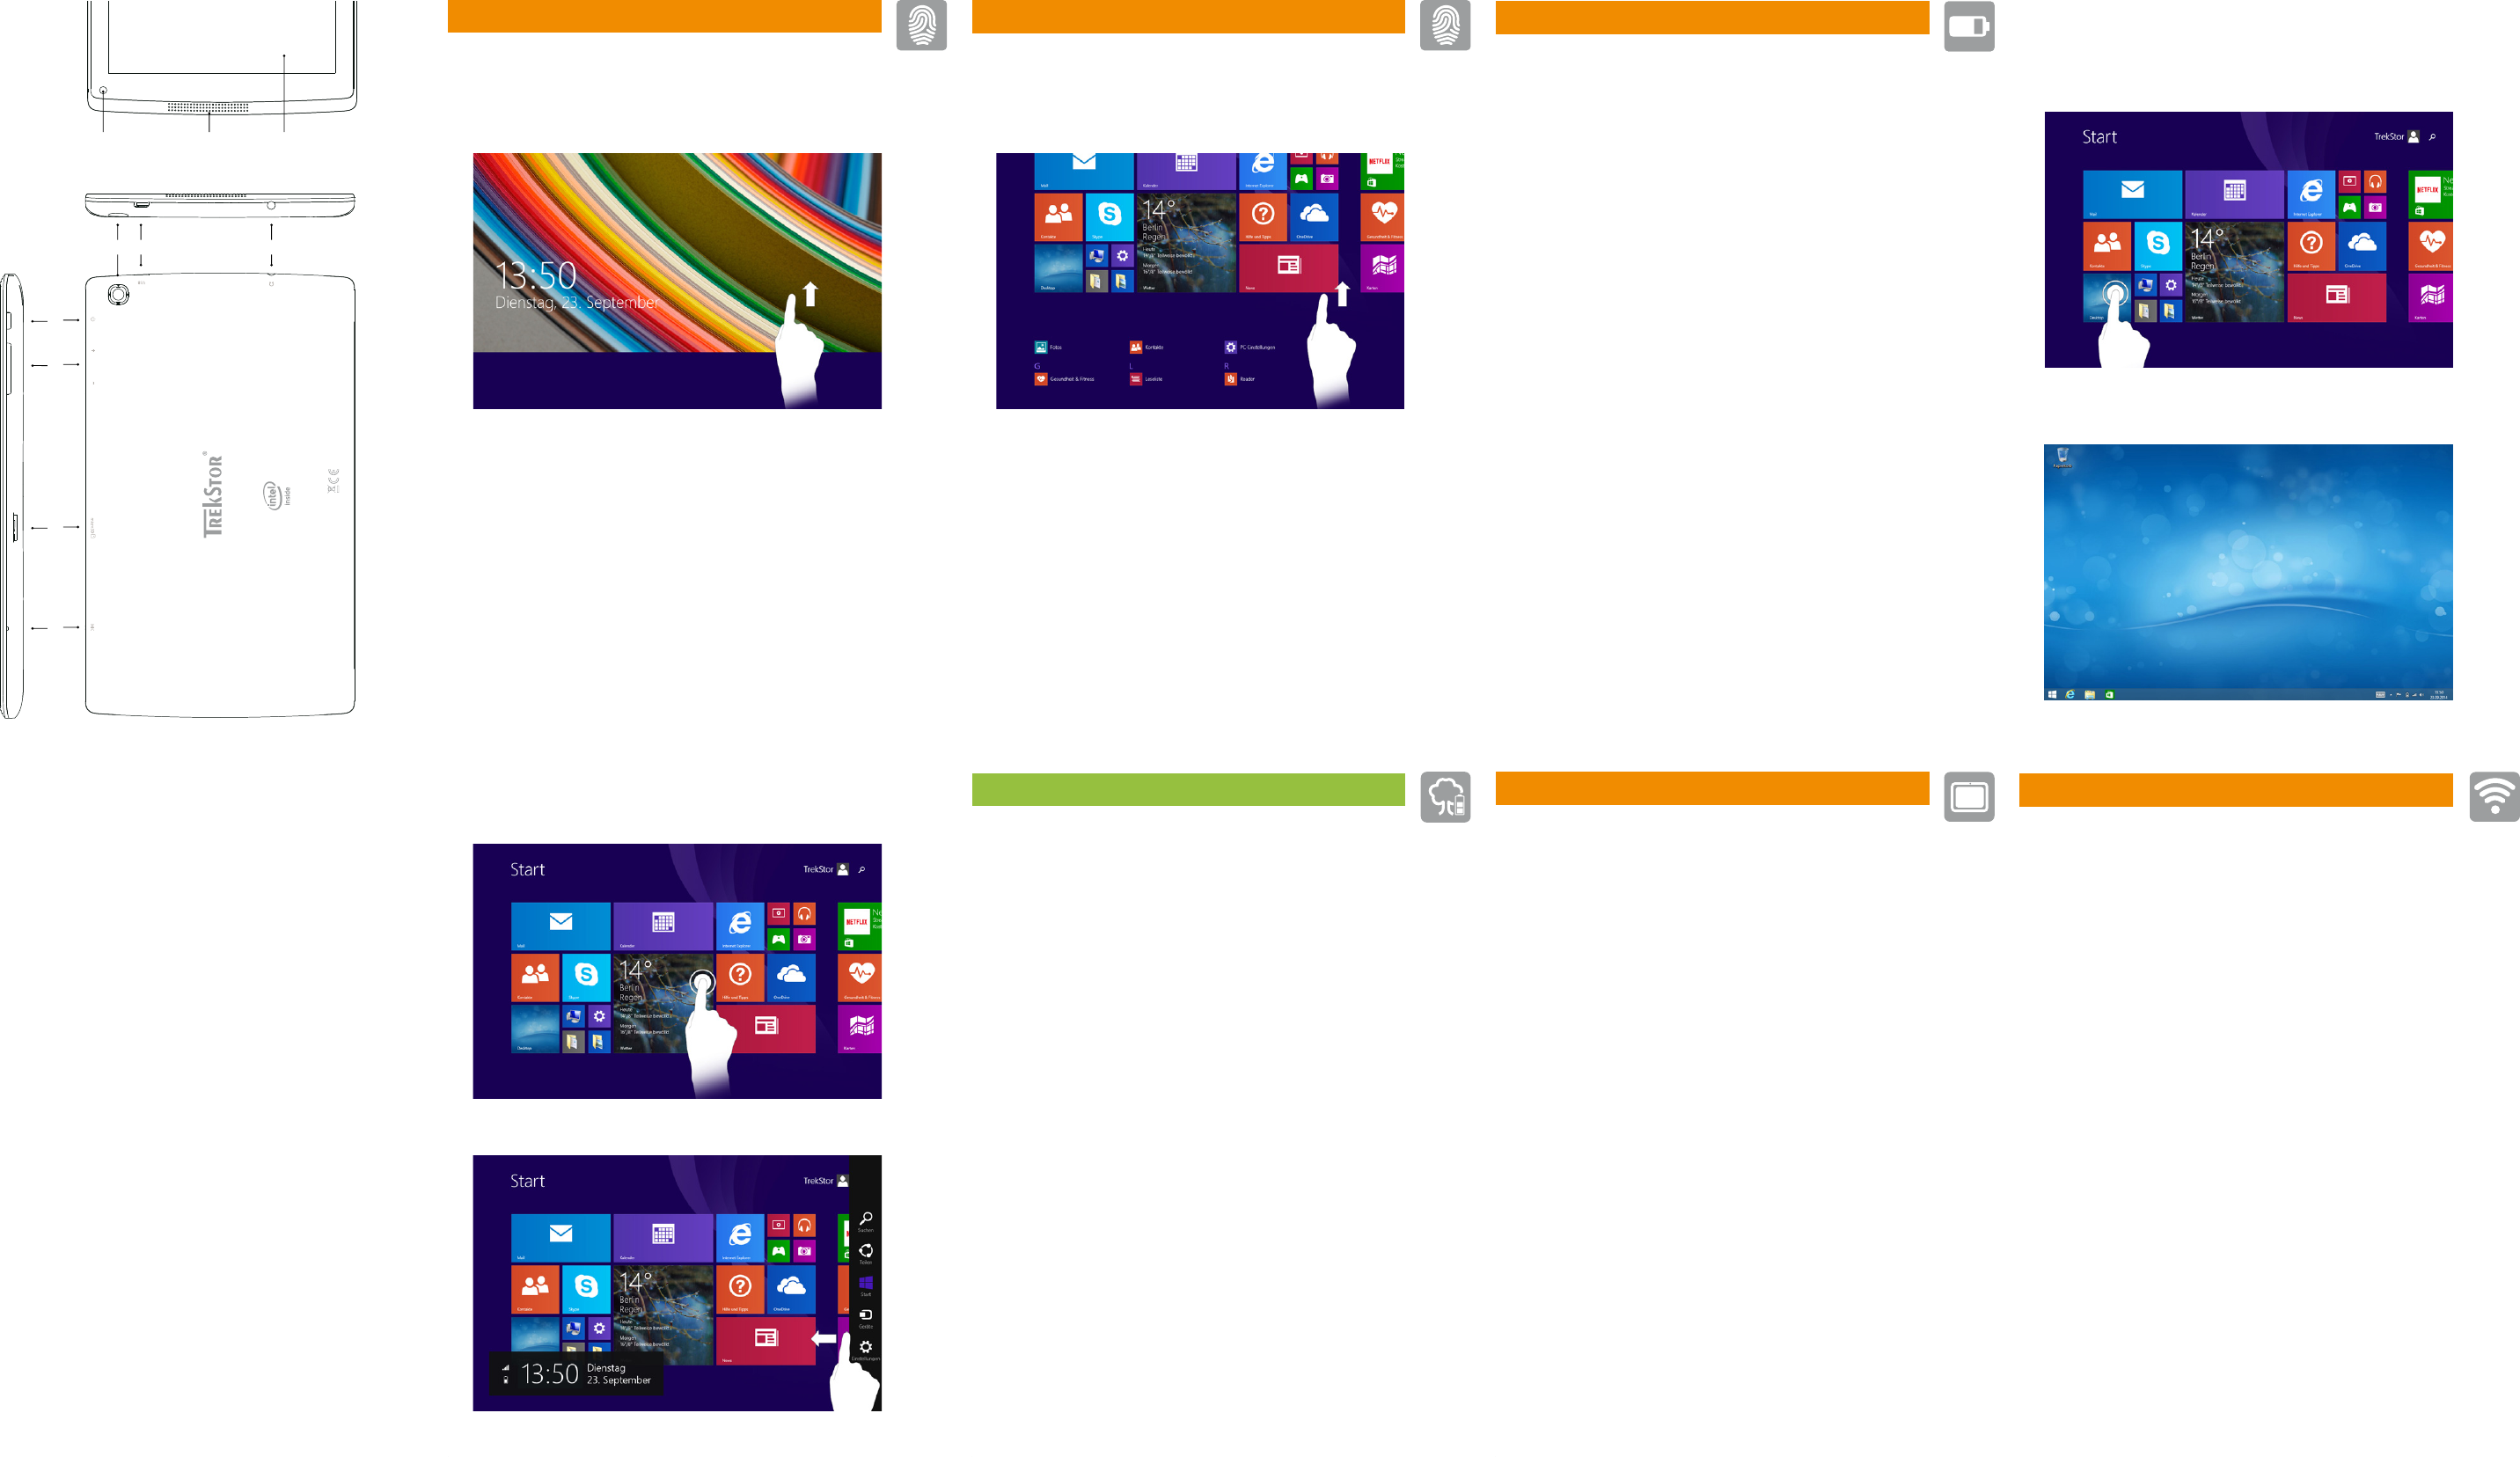
Das Display entsperren | Unlocking the display |
S
Déverrouillage de l'
Ein Element auswählen | Selecting an element |
Sele
Sélection d'un élément | V
i
Wenn Ihr SurfT
anschließend das Passw
i
If your Sur
the password.
i
Se il vostro SurfT
necessario inserirla.
i
Cuando SurfT
i
Si votre SurfT
devez saisir votre mot de passe dans un second temps
i
Om din Sur
lösenordet.
Charm Bar
Das Display bewegen | Mo
S
Défilement de l‘Flytta på displayen
i
Sie zum Applikationsmenü.
i
tiles upward.
i
schermata iniziale con le live tile.
i
inicio con pantallas dinámicas hacia arriba.
i
vers le haut sur l‘
i
live brickor uppåt.