SET button
MALIB
WIRELESS POO
Instructions Man
Cat. No. 30
Thank you for choosing this advice from TFA.
BEFORE YOU USE IT
Please be sure to read the instruction manual carefully.
This inform
device, learn all of its functions and parts, find out im
about its first use and how to operate it, and get ad
of faults.
Following the instruction m
device and loss of your statutory rights arising
incorrect use.
We shall not be liable for any damage occurr
not following these instructions. Like
responsibility for any incorrect readings and for any
consequences which may result from them.
Please look after this manual for future ref
Please take particular note of the safety adv
SCOPE OF SUPPL
• Temperature station (basic station)
• Outdoor transmitter
•
Pool sensor
• Instruction manual
FIELD OF OPER
YOUR NEW INSTRUMENT
• For pool and pond
• Water temperature wireless via pool sensor w
measuring depth
•
Outdoor temperature wireless via outdoor transm
• Transmission range up to 100 m
• Indication of indoor temperature and humi
• Maximum and minim
• Dew point
• Radio controlled clock
• Very simpl
FOR YOUR S
• The product is exclusively intended for the field of application
described above. The product should only b
described within these instructions.
•
Unauthorised repairs, modifications or changes t
are prohibited.
• The product is not to be used for medic
information, but is intended solely for hom
Caution!
Risk of injury:
• Keep the instruments and the batteries out of reach of
children.
• Batteries must not be thrown into the fire, short-circuited,
taken apart or recharged. Risk of explosion
• Batteries contain harmful acids. Low batteries should be
changed as soon as possible to prevent dam
leaking battery. Never use a com
batteries together or batteries of different types.
chemical-resistant protective gloves and glasses w
handling leaked batteries.
! Important information on product safety
• Do not expose the instrument to extreme
vibration or shock.
• The outdoor transmitter is protected against s
is not watertight. Choose a shady and dry position for the
outdoor transmitter.
• When water freezes remove the pool sensor.
ELEMENT
The tempe
The outdo
• Remote transmission of outdoor
temperature to temperature station by 868
MHz signal
•
Wall mounting case
• Mounting at a sheltered place. Avoid
direct rain and sunshine
The poo
• Remote transmission of water temperature in pool or pond to
temperature station by 868 MHz
• Waterproof case
HOW TO INST
OUTDOOR
The outdoor transmitter uses 2 x AAA, IE
1.5V batteries. To install and replace the
batteries, please follow the steps below:
1. Slide the battery cover downw
remove it.
2. Insert the batteries, observing the correct
polarity (see marki
3. Replace the battery cover.
HOW TO INST
POOL S
The pool sensor uses 2 x AA, IEC LR6, 1.5V batteries. To install and
replace the batteries, please follow the steps below
1. Hold the body of the pool sensor and unlock the upper part by
turning it counter clockwise and separate it carefully
body.
2. Insert batteries observing the correct polarity (see m
3. Screw the two parts together again. Ensure that the cover is
flat and sufficiently tight secured (m
correspond). This will prevent water from
com
HOW TO INST
TEMPER
The temp
AAA, IE
install and replace the batteries,
please follow the steps below:
1. Open the battery compartm
by pushing the battery co
upwards with your thum
Insert batteries observing the
correct polarity (see mark
2. Replace compartment co
SETTING UP
1. First, insert the batteries in the outdoor transmitter (see “To
install and replace batteries in the temperature
transmitter” above).
2. Then, insert the batteries in the pool sensor (see “To install
and replace batteries in the pool sensor” above)
3. Within 15 seconds of powering up the outdoor transm
pool sensor, insert the batteries in the tem
(see “To install and replace batteries in the temperature
station” above). Once the batteries are in plac
of the LCD will light up briefly. Following the indoor
temperature/humidity and the time as 00:00 will be displayed.
If this information is not displayed on the LCD after 60
seconds, remove the batteries and wait for at least 60
seconds before reinserting them. Once the indoor data is
displayed user may proceed to the next step.
4. After the batteries are inserted, the temperature station will
start receiving data signal from the outdoor transm
pool sensor. The outdoor temperature data should then be
displayed on the temperature station. If this does not happen
after 5 minutes, the batteries will need to be rem
units and reset from step 1.
5. In order to ensure sufficient 868 MHz transmi
the distance between the temperature station and the outdoor
transmitter should not be more than 100 meters and 25
meters to the pool sensor (in water). (see notes on
“Positioning ” and “868 MHz Reception ”).
Note:
In the event of changing batteries of the units, ensure the
batteries do not spring free from the contacts. Alw
least 1 minute after removing the batteries before reinserting,
otherwise start up and transmission problem
6. Once the outdoor data reception period is com
tower icon in the clock display will start flashing in the upper
left corner. This indicates that the clock has detected that
there is a radio signal present and is trying to receive it. When
the time code is received, the DCF tower becom
permanently lit and the tim
RADIO-CONT
The time base for the radio controlled tim
operated by the Physikalisch T
Braunschweig. It has a tim
million years. The time is
near Frankfurt via frequency signal DCF-77 (77.5 k
transmitting range of approximately 1
clock receives this signal and converts it to show
‘Changeover from summ
The quality of the reception depends greatly on the geographic
location. In normal cases, there should be no reception problem
within a 1.500 km radius of Frankfurt.
DCF reception is done twice daily
reception is not successful at 03:00 am, then the next r
place the next hour and so on until 06:00am
successful. If the reception is not successful at
next attempt will
Please take note of the following:
• The recommended distance to any interfering sources like
computer monitors or TV sets is a min
• Within Ferro-concrete rooms (baseme
the received signal is naturally weak
please place the unit close to a window
or back towards the Frankfurt transm
• During nighttime, the atmospheric disturbance
less severe and reception is possible in m
daily reception is adequate to keep the accura
under 1 second.
FUNCTION BUTTON
Temperature station:
The device has 3 easy to use function buttons
and 2 buttons on the back
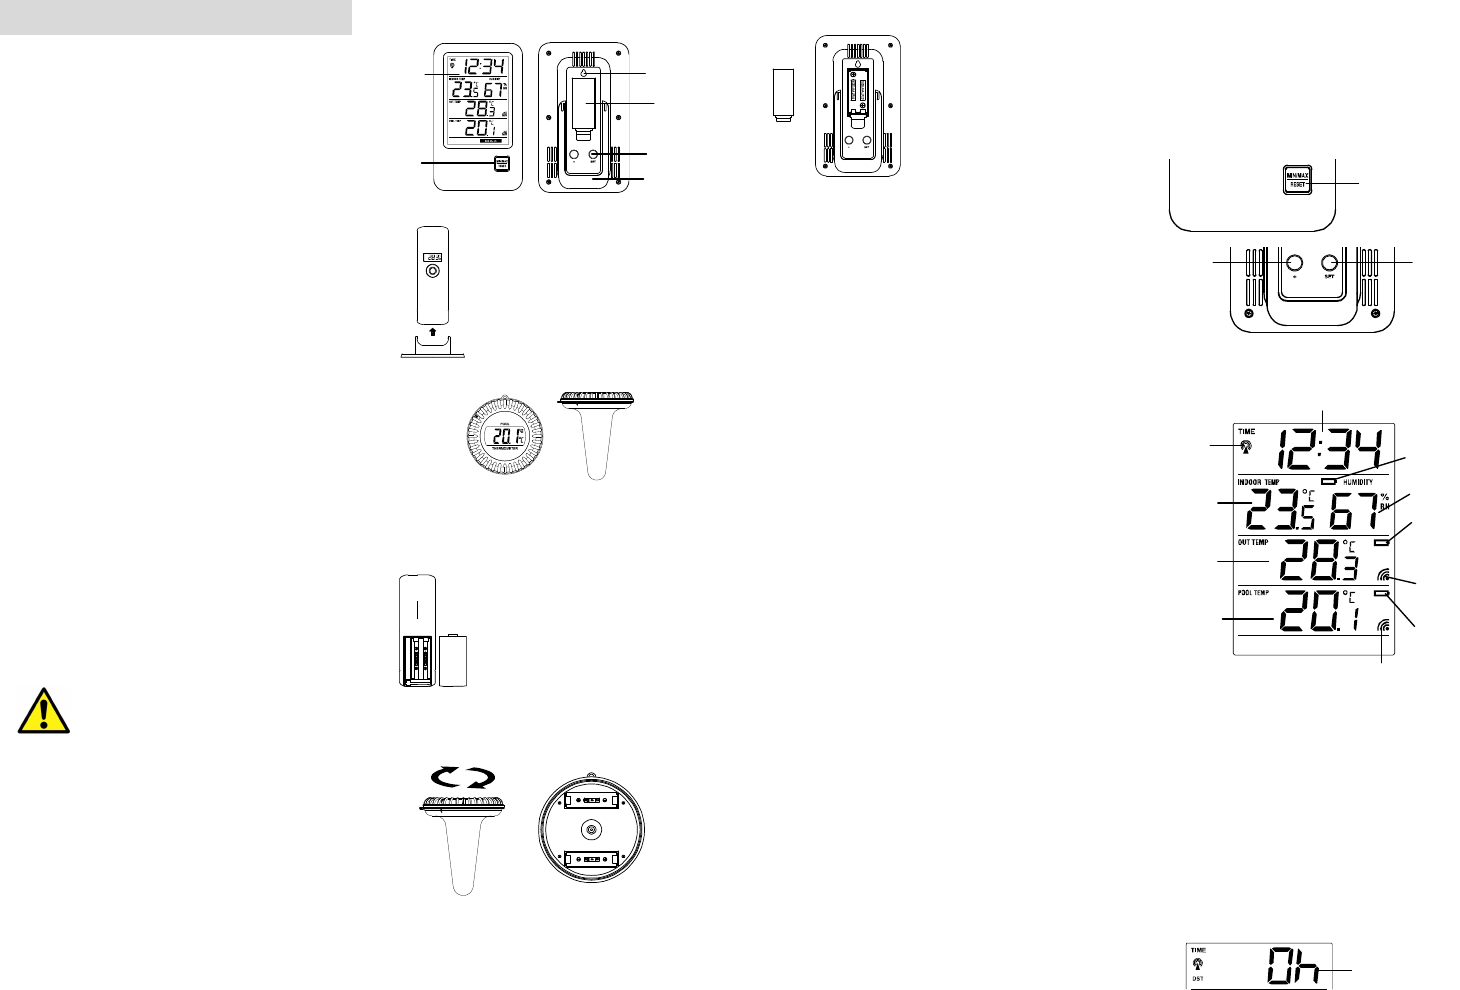
LCD SCREEN
The LCD screen is split into 4 sections display
time, indoor temperature and humidity
temperature.
* When the signal is successfully
station, the outdoor reception icon wi
successful, the icon will
easily see wh
(icon off). On the other hand, the short blink
a reception is currently takin
MANUAL SETTINGS
• Time zone setting
•
Time reception ON/OFF setting
• 12/24-hour setting
• Manual time setting
• °C/°F temperature setting
• Factory reset setting (FAC)
Press and hold the SET button for about 3 seconds to enter t
setting mode:
TIME ZONE SETTING
The time z
1. The value of the actual set tim
Foldable
stand
display
button
Hanging
hole
Battery
cover
Time
humidity %
Outdoor reception signal (pool sensor)*
°C or °F
reception)
Low battery
indicator
station)
Low battery
indicator (pool
sensor)
Low battery
indicator
(temperature
transmitter)
Outdoor
reception
signal
(transmitter)*
Function
buttons
Time Zone (flashing)