3
CAI HARDERWIJK
E. Ook de digitale TV- en Radioprogramma’s zijn nu
beschikbaar op de TV.
Alleen voor Opstelling A.
F. Om het geluid van de digitale TV- en/of
Radiokanalen beschikbaar te maken op het
audiosysteem (op de TV zijn ze automatisch
beschikbaar via de Scartaansluiting) kan vanaf
AV2 (EXT) op de Digitale Ontvanger een
verloopkabel van Scart naar Tulp gelegd worden
en deze met behulp van 2 tulpplugjes aansluiten
op het audiosysteem.
Alleen voor Opstelling B.
G. Wanneer het audiosysteem is voorzien van
optische ingang, is het mogelijk om het
geluid van de Digitale ontvanger beschikbaar
te maken op het audiosysteem met behulp
van een Optische kabel (glasvezel). Haal het
beschermkapje uit de optische uitgang van
de Digitale Ontvanger (Digital Optisch Out)
en plaats hierin de optische kabel. Het andere
uiteinde van de optische kabel plaatst u in de
optische ingang van het audiosysteem en het
geluid van radio en/of TV is beschikbaar op uw
audiosysteem.
Opstelling C
INSTRUCTIES VOOR DE AANSLUITING
Mogelijkheden met opstelling C. en D.
1. Analoge programma’s bekijken (via coaxkabel)
2. Analoge programma’s opnemen met DVD/
Videorecorder (via coaxkabel)
3. Digitale programma’s bekijken (via Scart 1 kabel
4. Digitale programma’s opnemen met DVD/
Videorecorder (via Scart 2 kabel)
5. Geluid van digitale TV- en Radiokanalen
beluisteren via TV (via Scart 1 kabel)
6. Geluid van digitale TV- en Radiokanalen
beluisteren via het audiosysteem (via Scart 3
kabel in Opstelling C. en via Optische kabel in
Opstelling D.)
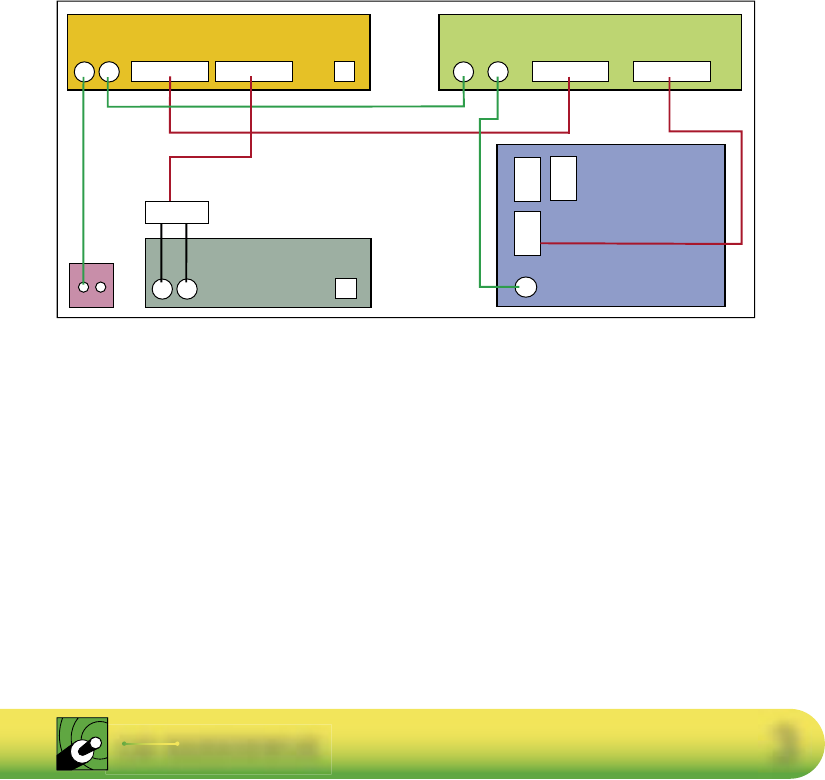
Werkzaamheden Opstelling C.
(audio systeem aangesloten d.m.v. Scartkabel)
A. De coaxkabel die van de CAI-aansluitdoos naar
de DVD/Videorecorder gaat, losnemen en
aansluiten op Digital Ontvanger (Cable in).
B. De meegeleverde coaxkabel aansluiten tussen
de Digitale Ontvanger (Loop) en de DVD/
Videorecorder (antenne ingang) (waar de eerste
kabel uitgekomen is). De aanwezige kabel tussen
DVD/Videorecorder en TV niet verwijderen!!!
C. Op de DVD/Videorecorder en TV zijn nu de
analoge programma’s weer beschikbaar.
D. De aanwezige Scartkabel tussen DVD/
Videorecorder bij de TV loshalen en aansluiten
op de Digitale Ontvanger (AV1 (TV)) De
digitale signalen zijn nu beschikbaar op DVD/
Videorecorder.
E. De meegeleverde Scartkabel aanbrengen tussen
de DVD/Videorecorder (AV (B)) en de TV, op
de aansluiting waaruit de eerste Scartkabel
losgehaald is. De digitale signalen zijn nu via de
DVD/Videorecorder beschikbaar op de TV.
Verloop van
Scart naar Tulp