3
UNPACKING INSTRUCTION
CAUTION! Immediately upon receiving the product, carefully unpack the carton, check the contents to ensure that all parts are
present, and have been received in good condition. Notify the shipper immediately and retain packing material for inspection if
any parts appear damage from shipping or the package itself shows signs of mishandling. Save the package and all packing
materials. In the event that the product must be returned to the factory, it is important that the product be returned in the original
factory box and packing. If the device has been exposed to drastic temperature fluctuation (e.g. after transportation), do not
switch it on immediately. The arising condensation water might damage your device. Leave the device switched off until it has
reached room temperature.
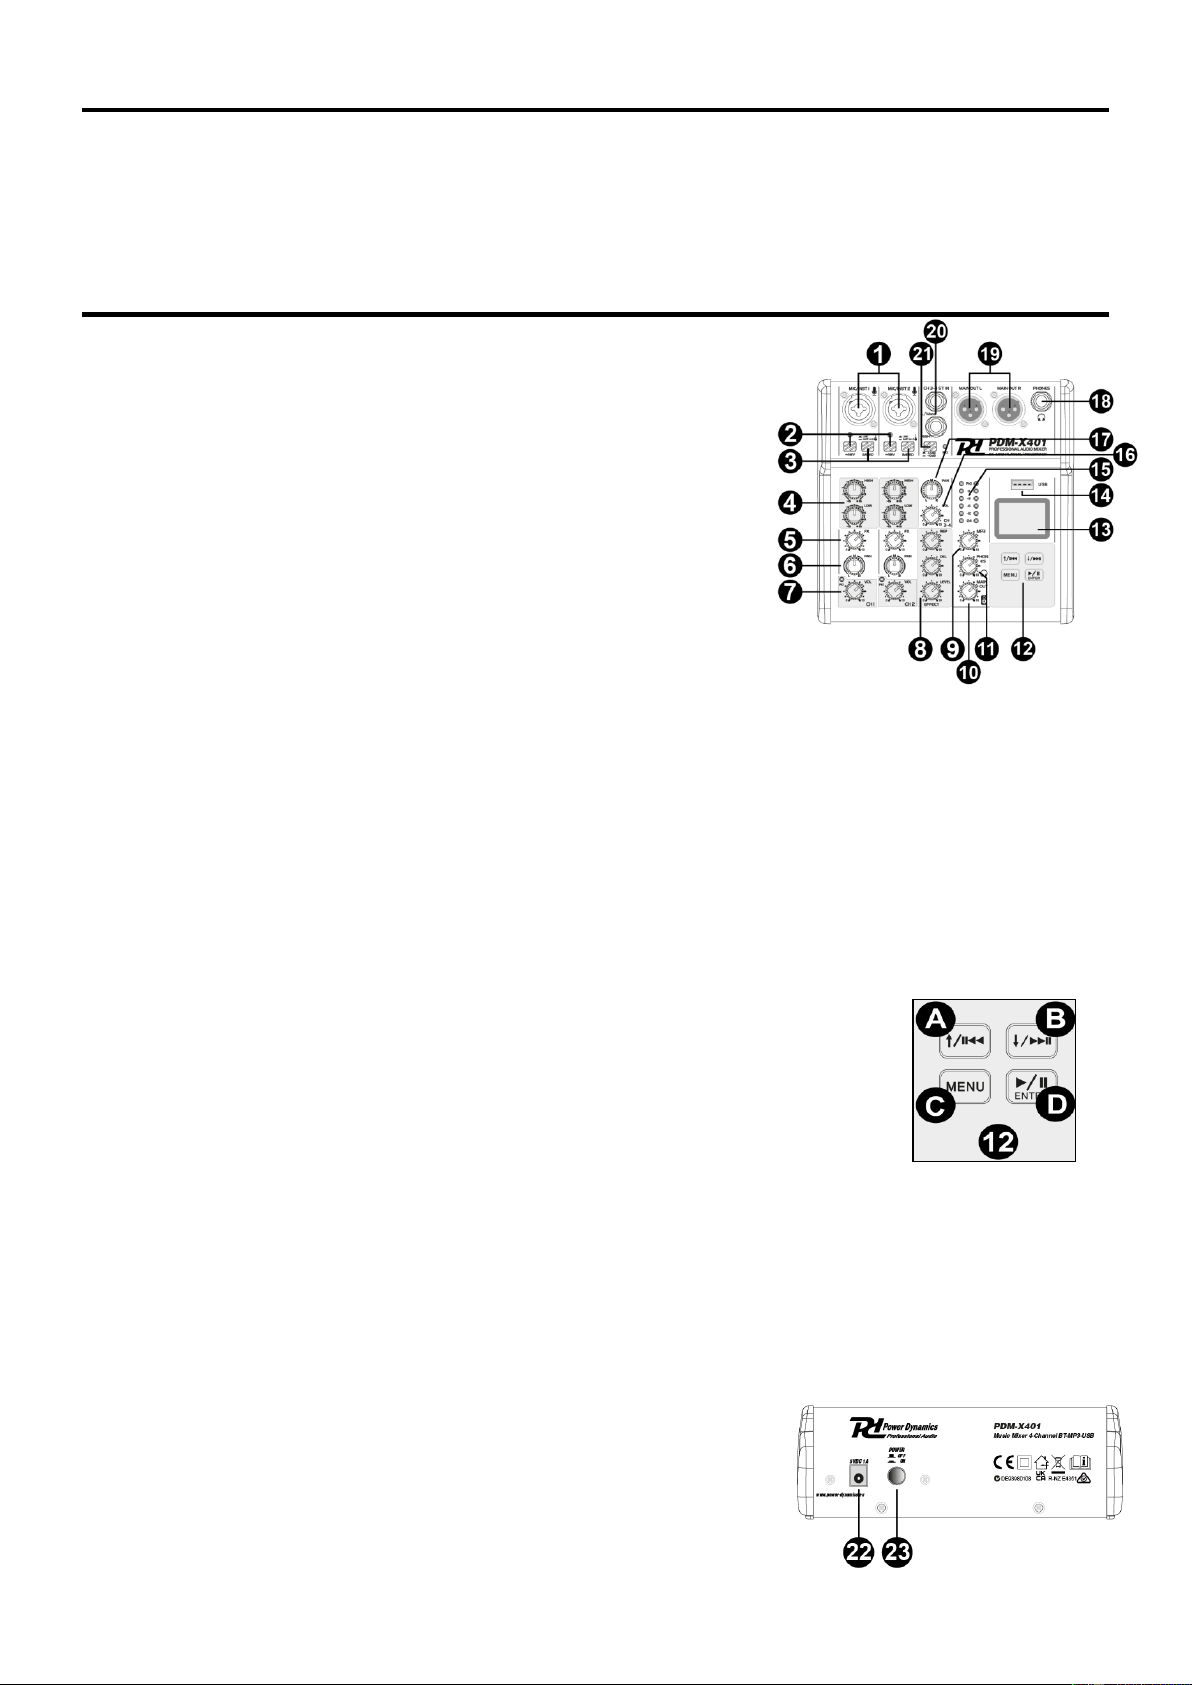
OVERVIEW
1. MICROPHONE/LINE/GUITAR INPUT COMBO JACK
Balanced XLR and 6.3mm (1/4”) combo input jacks for connecting microphone,
musical instrument or audio device.
2. +48V PHANTOM SWITCH
This switch toggles phantom power on and off. When the switch is on the mixer
supplies +48V phantom power to all channels that have XLR input jacks. Turn
this switch on when using one or more phantom-powered condenser
microphones.
3. GUITAR/LINE INPUT SWITCH
The switch is used to shift the connections to different sound sources of the input
channels. Switched up, the input channel can be connected directly with a high
impedance audio device such an electric guitar or a bass. Switched down, it can
be connected to a low-impedance sound device.
4. SIGNAL INPUT CH 2 BAND EQ
This is a high quality, sensitive, 2 segment equalizer that adjusts the overall tone
of the channel. The adjustment wave form of the high and low bass equalizer is
the shape of the broom, which affects the frequency of 12KHz and the sound
below 80Hz.
5. FX
Adjust the effects volume for corresponding channel.
6. PAN
Positions the channel signal between L/R in the stereo mix.
7. VOLUME KNOB/PEAK LED
Adjust the volume of the sound input from the microphone or other source connected to channel. When the peak light
flashes (indicating that the input signal is too high), please turn the volume knob to the left to reduce the volume.
8. DIGITAL EFFECT PROCESSOR
REP Adjust how many times the echo repeats.
DEL Adjust the time interval between each echo.
LEVEL Adjust the volume of the effect processor.
9. MP3 VOLUME
Adjust the audio signal level from the MP3 player.
10. MAIN OUTPUT VOLUME
Turn to adjust the main output volume.
11. HEADPHONES OUTPUT VOLUME
Turn to adjust the headphone output volume.
12. MP3 PLAYER/RECORDER CONTROL PANEL
A. Short press: previous track/choose upwards or left. Press and hold: reduce the volume.
B. Short press: next track/choose downwards or right. Press and hold: increase the volume.
C. Short press to enter the menu.
D. Short press to (re)start or pause playback or to confirm your input.
13. LCD DISPLAY
14. USB PORT
15. VU METER
Shows the signal output level. Adjust the output level to lower the level if peak indicators light up in red.
16. STEREO CHANNEL VOLUME.
Turn to adjust the stereo channels volume.
17. PAN
Turn to adjust the stereo input channel balance.
18. HEADPHONE JACK
6.35mm stereo headphone output.
19. MAIN OUTPUT CONNECTORS
XLR balanced output connections for active speakers, power amplifiers or other audio devices.
20. STEREO LINE INPUT CONNECTORS
6.35mm stereo line input jacks.
21. STEREO INPUT SENSTIVITY
The stereo line input signal sensitivity selection button (+4dB, -10dB).
22. DC POWER SUPPLY INPUT SOCKET
23. POWER ON/OFF