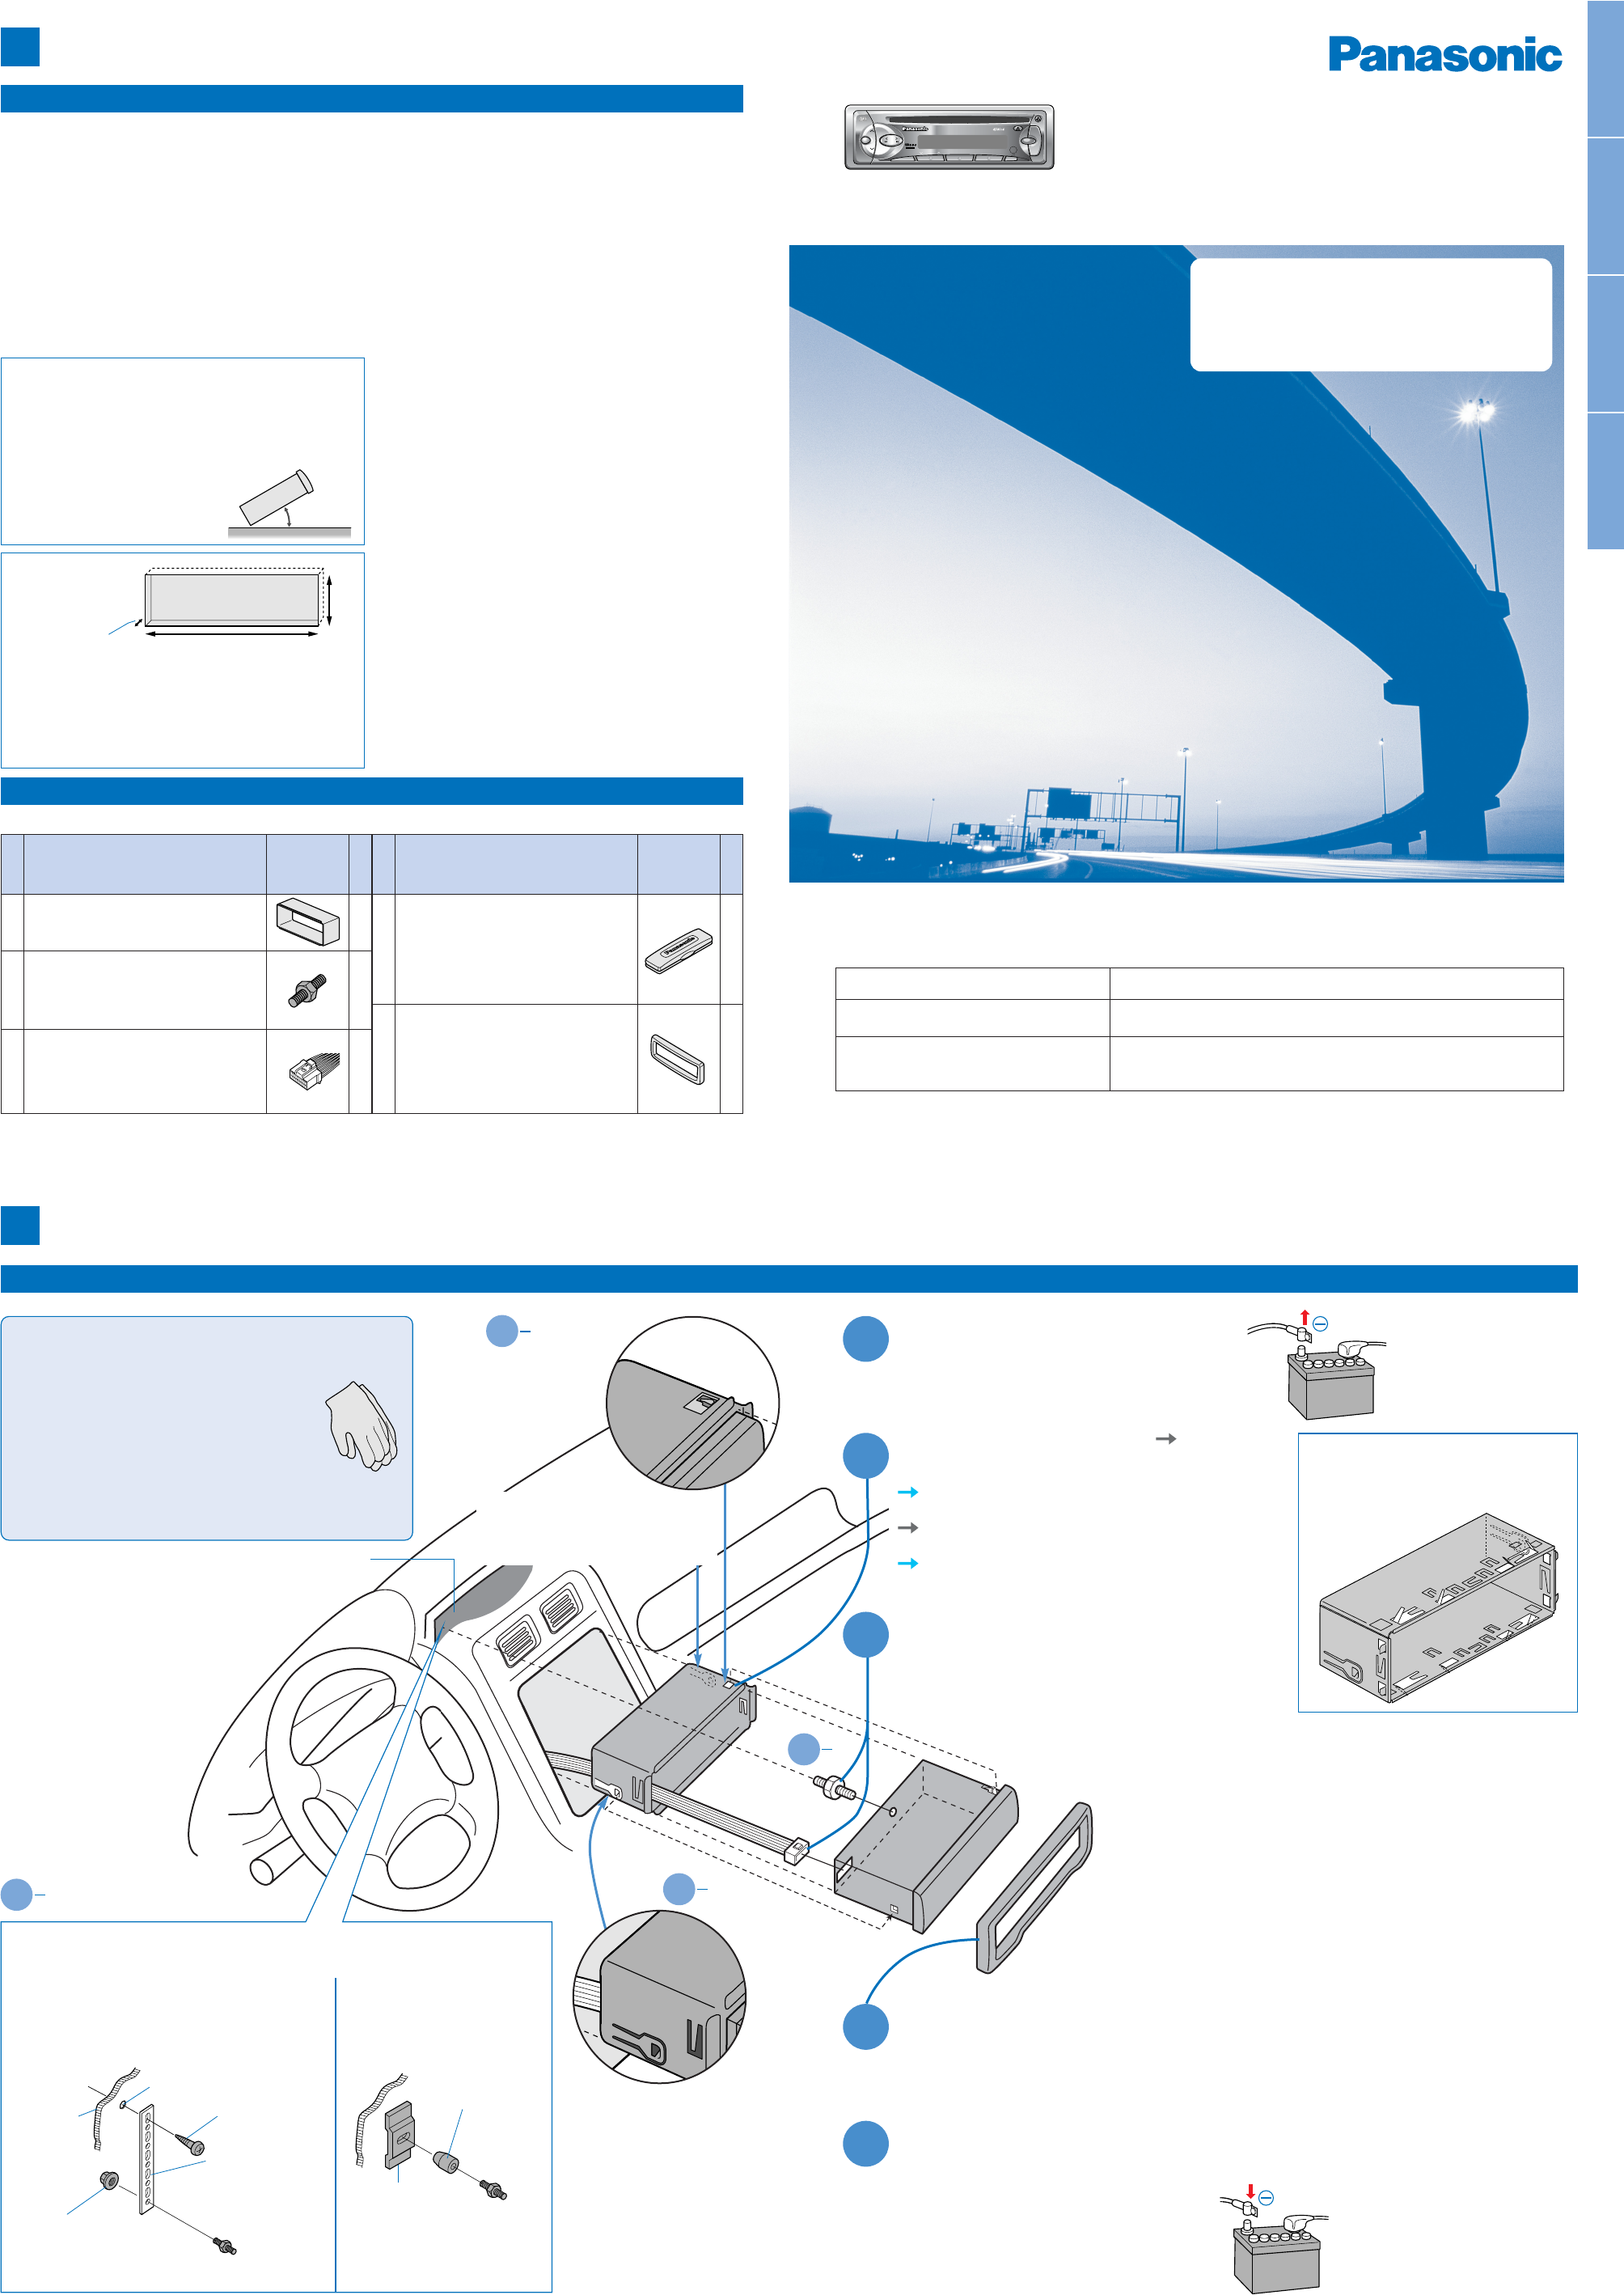
Consult a professional for installation.
●Verify the radio using the antenna and speakers before
installation.
Wenden Sie sich zum Einbau an einen Fachmann.
●Probieren Sie den Radiobetrieb vor dem Einbau mit Antenne
und Lautsprechern aus.
Prenez contact avec un spécialiste pour le montage.
●Vérifiez l’autoradio avant de procéder au montage.
Vraag een vakman voor de installatie.
●Controleer voor de installatie of de radio werkt met de
antenne en de luidsprekers.
Vorsichtsmaßnahmen beim Einbau / Précautions d
’
installation / Let op deze punten bij de installatie
Cautions in installing
1
Exclusively operated with 12-volt battery with negative (–) ground.
Dieses Gerät ist ausschließlich für den Anschluß an Bordnetze mit
12 V Batterie und negativer Klemme an Masse bestimmt.
Alimentez l’appareil absolument par la batterie de 12 volts avec sa
polarité négative (–) mise à la masse.
Uitsluitend voor gebruik met een 12 Volt accusysteem met
negatieve (–) aarding.
2
Connect the power lead (red) and the battery lead (yellow)
after having completed all other connections. (for non-ISO
connector)
Schließen Sie das Stromversorgungskabel (rot) und das
Batteriekabel (gelb) an, nachdem Sie alle anderen Anschlüsse
ausgeführt haben (wenn kein ISO-Stecker verwendet wird)
Connectez finalement le fil d’alimentation (rouge) et le fil de
batterie (jaune). (Pour un connecteur non-ISO)
Sluit pas op het allerlaatst de stroomdraad (rood) en de
accudraad (geel) aan. (Voor een niet-ISO aansluiting.)
3
Connect the battery lead (yellow) to the positive (+) terminal of
the
battery or fuse block terminal (BAT). (for non-ISO connector)
Schließen Sie das Batteriekabel (gelb) an die positive (+) Klemme
der Batterie oder an die (BAT) Klemme des Sicherungsblocks an
(wenn kein ISO-Stecker verwendet wird).
Connectez le fil (jaune) à la borne positive (+) de la batterie ou à
la borne (BAT) de la boîte à fusibles.
(Pour un connecteur non-
ISO)
Sluit de accudraad (geel) aan op de positieve (+) aansluiting van
de accu of van het zekeringenblok (BAT). (Voor een niet-ISO
aansluiting.)
4
Apply insulating tape to bare leads.
Isolieren Sie alle freiliegenden Leiter.
Recouvrez les fils nus d’un ruban isolant.
Isoleer blote draadeinden met isolatieband.
5
Secure loosened leads.
Sichern Sie alle losen Leiter.
Resserrez les connexions de fils.
Zet loshangende draden vast.
●Mounting angle side to side : horizontal
front to rear : 0-30°
●Montagewinkel seitlich : horizontal
vorne-hinten : 0-30°
●Angle de montage latéral : horizontal
longitudinal : 0 à 30°
●
Bevestigingshoek links/rechts
: horizontaal
voor/achter : 0 - 30°
●Mounting space
●Einbauöffnung
●Espace nécessaire
pour le montage
●Benodigde ruimte
53
mm
182mm
4.5 mm – 6.0 mm
Mitgelieferte Hardware / Accessoires / Meegeleverde onderdelen
Supplied Hardware
No.
Nr.
N°
Nr.
Item
Bezeichnung
Pièces
Onderdeel
Diagram
Diagramm
Croquis
Afbeelding
No.
Nr.
N°
Nr.
Item
Bezeichnung
Pièces
Onderdeel
Diagram
Diagramm
Croquis
Afbeelding
Q'ty
Stückzahl
Q’té
Hoev.
q
r
t
w
e
Mounting collar / Einbauhalterung /
Cadre de montage / Bevestigingskraag
Mounting Bolt (5 mm ø)
Befestigungsschraube (5 mm ø)
Boulon de montage (ø de 5 mm)
Bevestigingsbout (5 mm ø)
Power connector
Versorgungsstecker
Connecteur d’alimentation
Stroomstekker
Case for removable front panel
Etui für das abnehmbare Bedienteil
Coffret à panneau de façade amovible
Houder voor het afneembare voorpaneel
Trim plate
Abdeckplatte
Plaque de garniture
Afwerkingsrand
1
1
1
1
1
YEFM292867 SAH0502-0 Printed in Hungary
Precaution Precaution / Précautions / V
1
Q'ty
Stückzahl
Q’té
Hoev.
The dashboard should be 4.5 mm - 6 mm thick in order to be
able to support the unit.
Für einen solchen Einbau sollte das Armaturenbrett eine
Dicke von 4,5 bis 6 mm aufweisen.
L'épaisseur du tableau de bord doit se trouver dans les lim-
ites de 4,5 à 6 mm pour être capable d'accueillir l'appareil.
Het dashboard zelf moet 4,5 - 6 mm dik zijn om het toestel te
kunnen dragen.
MAX. 30°
Installation Einbau / Montage / Installatie
Einbau des Gerätes / Mode de montage de l’appareil / Installeren van het toestel
Cautions : ● Wear gloves for safety.
●Carry out wiring first, then check it.
Vorsicht : ●Tragen Sie Handschuhe, um sich vor
Verletzungen zu schützen.
●Beenden Sie zuerst die elektrischen
Anschlüsse und kontrollieren Sie diese
danach.
Précautions : ● Portez les gains pour la sécurité.
●Procédez d’abord aux connexions de fils
et vérifiez leur continuité.
Let op: ● Draag voor de veiligheid handschoenen.
●Sluit eerst de bedrading aan en controleer
deze vervolgens.
How to secure the rear of the unit Sichern der Geräterückseite
Fixation de l’appareil à l’arrière/ Vastzetten van de achterkant van het toestel.
3mm
Using the rear support strap (Option)
Verwendung der Einbauleiste (Option)
Exemple d’utilisation d’une plaque-support arrière (prévue
en option)
Bij gebruik van de achter-steunstrip (los verkrijgbaar)
Tapping screw (Option)
Blechschraube (Option)
Vis taraudeuse (option)
Zelftappende schroef
(los verkrijgbaar)
To the unit / An das Gerät
Côté appareil / Naar het toestel
Rear support strap (Option)
Einbauleiste (Otpion)
Plaque-support arrière (option)
Achter-steunstrip
(los verkrijgbaar)
Hexagonal nut (Option)
Sechskantmutter (Option)
Ecrou hexagonal (option)
Zeskantige moer
(los verkrijgbaar)
Fire wall of car / Brandschutzwand des Fahrzeuges
Tablier de voiture / Brandschot van de auto
b Secure the lock lever (left side).
ƒMake sure the lock lever is not
bent outward.
b Sichern Sie den
Verriegelungshebel (linke Seite).
ƒDer Hebel darf nicht nach außen
gebogen sein.
b Fixez le levier de blocage (côté
gauche).
ƒAssurez-vous que le levier n’est
pas courbé à l’extérieur.
b Zet de vergrendelstrip vast (link-
erkant).
ƒZorg ervoor dat deze strip niet
naar buiten verbogen raakt.
3
1
Disconnect battery negative.
Klemmen Sie das Massekabel (–) der Batterie ab.
Déconnectez le fil de la borne négative de la batterie.
Koppel de accukabel van de negatieve pool los.
wInsert the unit into the mounting collar q . (a , b )
wSetzen Sie das Gerät in die Einbauhalterung q ein. (a, b)
wIntroduisez l’appareil dans le cadre de montage q . (a , b )
wSchuif het toestel in de bevestigingskraag q . (a , b )
eSecure the rear of the unit.
eSichern Sie die Rückseite des Gerätes.
eFixez l’appareil à l’arrière.
eHet toestel komt van achteren vast te zitten.
Mount the trim plate t.
Setzen Sie die Abdeckplatte t auf.
Mettez en place la plaque de garniture t .
Bevestigen van de afwerkingsrand t .
5
Connect battery negative (–).
Schließen Sie die negative (–) Batterieklemme wieder an.
Reconnectez le fil à la borne négative (–) de la batterie.
Sluit de negatieve (–) accukabel weer aan.
4
3
3
How to bend the mounting tabs
Umbiegen der Einbaulaschen
Cadre de montage avec leurs onglets relevés
Ombuigen van de bevestigingslipjes
Mounting the collar q in the dashboard bend mounting
tabs.
Setzen Sie die Einbauhalterung q in das Armaturenbrett ein
Biegen Sie die Einbaulaschen um.
Introduisez le cadre de montage q dans le tableau de bord.
Pliez les onglets de montage.
Steek de bevestigingskraag q in het dashboard
Buig de bevestigingslipjes om.
Using the rubber cushion (Option)
Verwendung des Gummikissens (Option)
Exemple d’utilisation d’un canon en
caoutchouc (prévue en option)
Bij gebruik van het stootrubber (los verkrijg-
baar)
w
Mounting Bolt
w Befestigungsschraube
w
Boulon de montage
w
Bevestigingsbout
w
w
q
q
Attach the power connector e and the bolt w to the unit.
qBringen Sie den Versorgungsstecker e und die
Befestigungsschraube w am Gerät an.
qFaites passer le connecteur e et le boulon w dans l’ap-
pareil.
qBevestig de stroomstekker e en de bevestigingsbout w
aan het toestel.
Rubber cushion (Option)
Gummikissen (Option)
Canon en caoutchouc
(option)
Stootrubber (los verkrijg-
baar)
To the unit
An das Gerätt
Côté appareil
Naar het toestel
Rear support bracket
(supplied with car)
Einbauleiste (vorhan-
den im Fahrzeug)
Support arrière (fourni
avec votre voiture)
Achter-steunbeugel
(behorend bij de auto)
w
Mounting Bolt
w
Befestigungs-
schraube
w
Boulon de
montage
w
Bevestigings-
bout
How to install the unit
2
Fire wall of
car
Brandschutz
wand des
Fahrzeuges
Tablier de
voiture
Brandschot
van de auto
Example/Beispiel
Example/Voorbeeld
3
2
VOL
SEL
AF
TA
LO
UD
CT
SCAN
DISC
REPEAT
RANDOM
MUTE PTY
SOURCE
PWR
REG
TUNE
TRACK
BAND
DISP
12
CQ-RDP162N
CD RECEIVER WITH CHANGER CONTROL
REMOTE
M
O
N
O
/
L
O
C
A
L
EON
E
PTY
E
CT
A
U
T
O
·
P
●
English : Please read these instructions carefully before using this product.
●
Deutsch : Bitte lesen Sie diese Anleitung sorgfältig, bevor Sie das Produkt in Gebrauch nehmen.
●
Français : Lisez attentivement ces instructions avant d’utiliser le produit.
●
Nederlands : Leest u deze handleiding alstublieft zorgvuldig door voor u dit product gaat gebruiken.
Installation Instructions (English)
Einbauanleitung (Deutsch)
Instructions de montage (Français)
Installatie-handleiding (Nederlands)
English
Models
/
Modell / Modèle / Model
CQ-RDP162N
CQ-RDP112N
CQ-RDP152N
CQ-RDP142N
CQ-RDP102N
Changer Control
/ Wechsler-Steuerung / Commande de changeur / Bediening wisselaar
Yes / Ja / Prévu / Ja
None / Ohne / Non prévu / Nee
CD Player/Receiver with CD Changer Control
CQ-RDP162/RDP1
CD Player/Receiver
CQ-RDP152/RDP142/RDP102N
a Snap on
Einschnappen
Engagement
bloquant
Vastklikken
Lock lever (Right side): Not used
Verriegelungshebel (rechte Seite):
Nicht verwendet
Levier de blocage (côté droit): non utilisé
Vergrendelstrip (rechterkant): Niet gebruikt
3
e