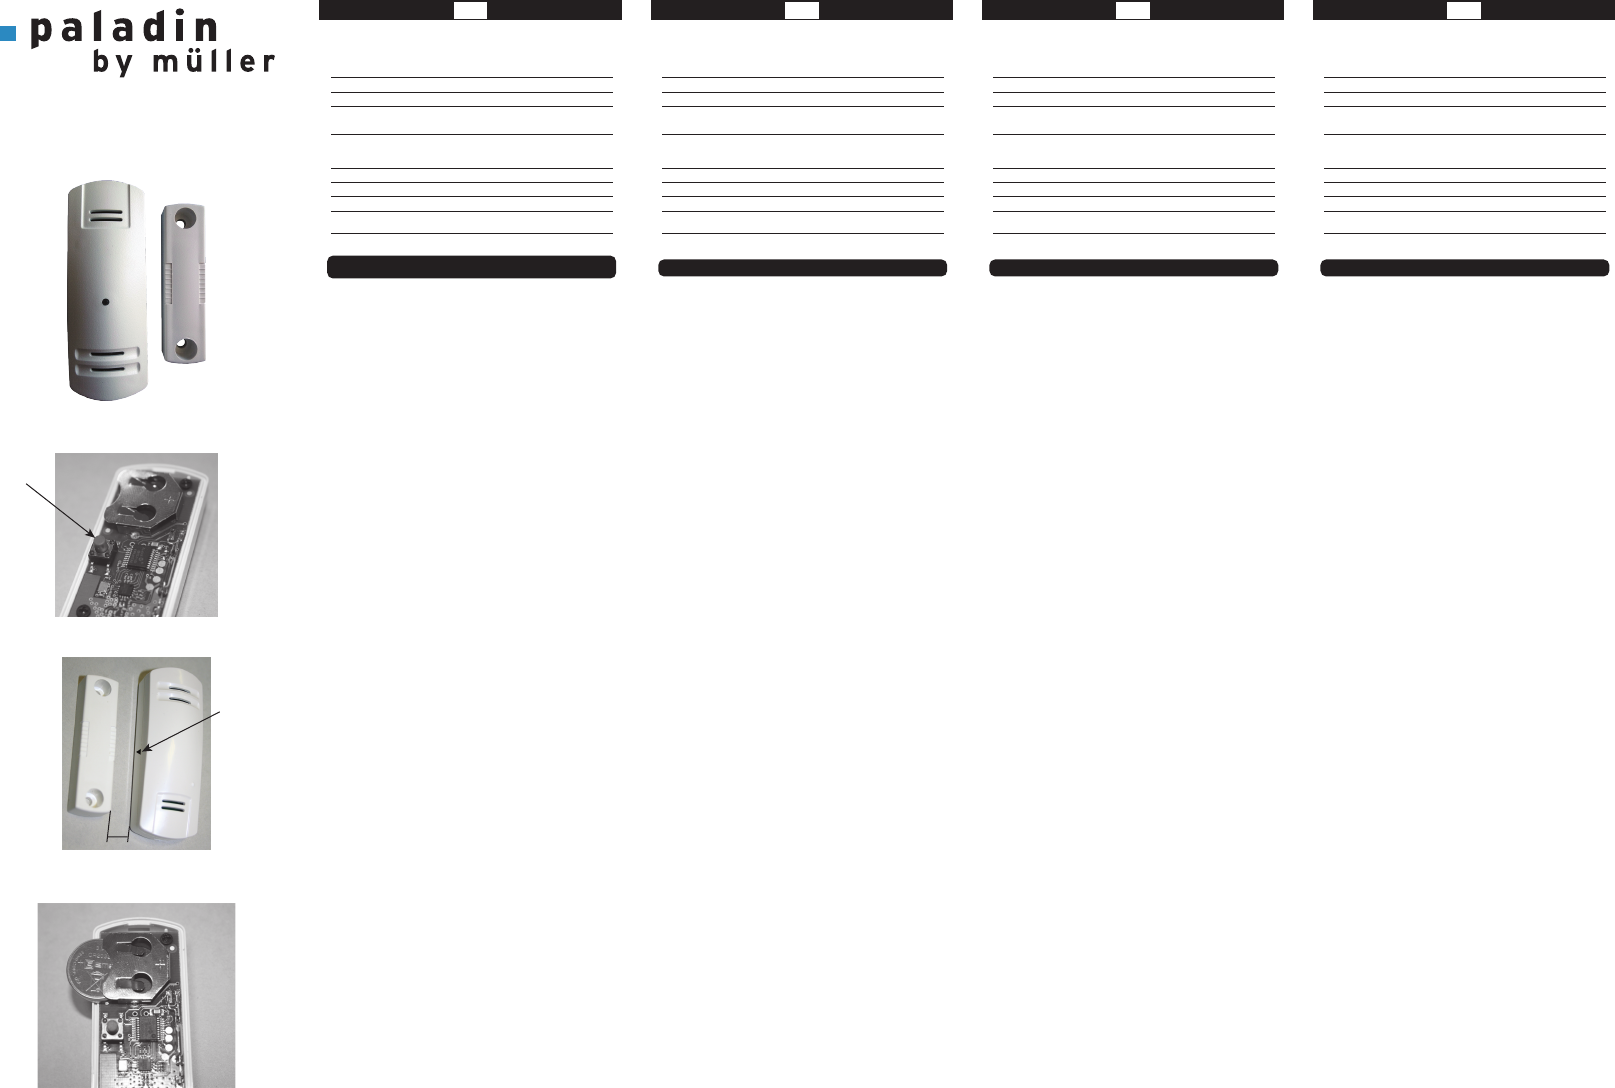
Abb. 2
Abb. 1
Abb. 3
<12mm
B
A
GB
WIRELESS DOOR / WINDOW
CONT
TECHNICAL DA
Power supply 2 batteries 3V CR2032 (included)
Battery life (esteemed) > 12 years
Radio-frequency
Codified transmission in 868,3MHz
with ERP>8mW an d acoverage of
100m (in the free field)
Mounting Fixed with adhesive or screws
Protection degree IP20
Working temperature -10ºC ~ +70ºC
Dimensions
Sensor: 78 x 28 x 23mm
Magnet: 60 x 16 x 12mm
Compatible with
DESCRIPTION
RF-KNX compatible device which detects and reports the opening and closing of
doors and windows.
The commissioning of the sensor is carried out via a pushbutton located inside of
the device (A).
Avoid using the transmitter close to radioelectric devices, microwaves,...
Leave a minimum distance of 2m between the transmitter and the receiver.
WORKING MODES
This sensor reports the opening or closing of doors or windows, via RF
the status of the door or window changes.
T
interval between transmissions.
INST
Fix the sensor to the door or window frame and the magnet directly to the edge of
the door or window.
The gap between the sensor and the magnet with the door or window closed must
not exceed 12mm (fig. 2):
1.- Open the front cover of the sensor with the help of a screwdriver.
2.- Fix the back cover of the sensor with screws in the desired place.
3.- Place the cover again.
4.- Fix the magnet using the supplied adhesive strips or with screws. The arrow of
the sensor (B) marks it detection area. Place it beside the magnet.
LINK PROCEDURE
T
1.- Set the RF actuator in link mode according to the instructions given by the
manufacturer.
2.- Press the link key once for more than 1 second.
3.- Check the correct link between the two devices in the actuator, according to
the instructions given by the manufacturer.
BA
Release the cover of the sensor with the help of a screwdriver inserting it into the
upper slot.
Remove the cover of the socle and remove the battery being careful with the
components of the printed circuit.
The 676410rf has a channel type CH_Battery_Status (Channel Code 0021h). This
channel allows to inform to a compatible actuator about this information.
When the battery is worned-down, the sensor will send every 15 minutes the
respective telegram and a “battery empty” message.
This function is optional. In order to link the sensor with a compatible actuator:
1.- Remove the battery from the 676410rf.
2.- Set the RF actuator in link mode, according to the instructions given by the
manufacturer. Press the link pushbutton of the 676410rf in order to discharge
the possible remaining battery charge in the product until it is empty
3.- Insert the battery again in the socle.
4.- Check the correct link between the two devices in the actuator, according to
the instructions given by the manufacturer.
ADVICES
Avoid using the device close to radioelectric devices, microwaves,...
A minimum distance of 2m must be maintained between the sensor and the linked
actuator.
May be used for interior installations in dry rooms only
Make sure the gap between the sensor and the magnet is less than 12mm when
the door or windows is closed.
This device is not suitable for security applications in alarm systems.
KNX-RF
- CH_Window_Door_Contact_Basic (0023h)
- CH_Battery_Status (0021h)
PULL THE PLASTIC FOIL OUT TO
DE
FUNK TÜR-/FENSTERKONT
TECHNISCHE DA
Stromversorgung 2 Batterien 3V CR2032 (im Lieferumfang enthalten)
Batterielebensdauer (geschätzt) > 12 Jahre
Funkfrequenz
Verschlüsselte Übertragung,
868,3MHz, ERP > 8 mW
Reichweite: 100 m (auf freiem Feld)
Montage Befestigung mit Klebestreifen oder Schrauben
Schutzart IP20
Betriebstemperatur -10ºC bis +70ºC
Abmessungen
Fühler: 78 x 28 x 23mm
Magnet: 60 x 16 x 12mm
Kompatibel mit
BESCHREIBUNG
Der RF-KNX-kompatible Melder erkennt, wenn Türen und Fenster geöffnet oder
geschlossen werden, und meldet entsprechende Zustandsänderungen über Funk.
Die Inbetriebnahme des Melders erfolgt durch Drücken der entsprechenden T
im Inneren des Geräts (A).
Verwenden Sie den Sender möglichst nicht in der Nähe von funktechnischen
Geräten, Mikrowellen etc.
Achten Sie darauf, dass der Abstand zwischen Sender und Empfänger mindestens
2 m beträgt.
ARBEITSWEISE
Der Melder übermittelt bei jeder Zustandsänderung an Türen oder Fenstern über
Funk, dass die Tür bzw
Für eine erhöhte Übertragungssicherheit wird jedes Signal in sehr kurzem Abstand
zweimal gesendet.
INST
Bringen Sie den Melder am Tür- oder Fensterrahmen und den Magneten direkt an
der Kante des Türblatts oder Fensterflügels an. Richten Sie Melder und Magnet
ordnungsgemäß aus.
Der Abstand zwischen Melder und Magnet darf bei geschlossener
geschlossenem Fenster höchstens 12mm betragen (Abb.2):
1.- Entfernen Sie die vordere Abdeckung mithilfe eines Schraubendrehers vom
Gehäuse des Melders.
2.- Befestigen Sie das Gehäuse des Melders mit Schrauben an der gewünschten
Stelle am Rahmen.
3.- Bringen Sie die vordere Abdeckung wieder an.
4.- Befestigen Sie den Magneten mithilfe der mitgelieferten Klebestreifen oder mit
Schrauben. Das Pfeilsymbol am Melder (B) zeigt an, in welchem Bereich die
Erfassung erfolgt. Der Magnet muss sich neben diesem Bereich befinden.
VERBINDUNGSHERSTELLUNG
Gehen Sie wie folgt vor, um den Melder mit einem RF-KNX-kompatiblen Aktor zu
verbinden:
1.- Bringen Sie den Funkaktor gemäß den Anweisungen des Herstellers in den
Verlinkungsmodus.
2.- Drücken Sie die Einlerntaste (A) und halten Sie diese für mehr als 1 Sekunde
lang gedrückt.
3.- Überprüfen Sie gemäß den Anweisungen des Herstellers, ob die V
zwischen den beiden Geräten im Aktor ordnungsgemäß hergestellt wurde.
BA
Führen Sie einen Schlitzschraubendreher oben in den Spalt zwischen der vorderen
Abdeckung und dem Gehäuse des Melders ein, um die vordere Abdeckung zu
lösen.
Entfernen Sie die vordere Abdeckung vom Gehäuse und entnehmen Sie vorsichtig
die Batterie. Achten Sie dabei darauf, die Bauteile auf der Leiterplatte nicht zu
beschädigen.
Der 676410rf verfügt über den Kanaltyp CH_Battery_Status (Channel Code
0021h). Über diesen Kanal kann ein kompatibler Aktor mit dieser Information
versorgt werden.
Ist die Batterie erschöpft, sendet der Melder alle 15 Minuten ein entsprechendes
Signal sowie die Meldung „Batterie leer“.
Diese Funktion ist optional. Gehen Sie wie folgt vor, um den Melder mit einem
kompatiblen Aktor zu verbinden:
1.- Entnehmen Sie die Batterie aus dem 676410rf.
2.- Bringen Sie den Funkaktor gemäß den Anweisungen des Herstellers in den
Verlinkungsmodus. Drücken Sie die Einlerntaste am 676410rf, bis das Produkt
vollständig frei von eventuell verbliebenen Restspannungen ist.
3.- Setzen Sie die Batterie wieder in das Gehäuse ein.
4.- Überprüfen Sie gemäß den Anweisungen des Herstellers, dass die V
zwischen den beiden Geräten im Aktor ordnungsgemäß hergestellt wurde.
HINWEISE
Verwenden Sie das Gerät möglichst nicht in der Nähe von funktechnischen
Geräten, Mikrowellen etc.
Achten Sie darauf, dass der Abstand zwischen dem Melder und dem damit
verbundenen Aktor mindestens 2 m beträgt.
Das Gerät darf ausschließlich in trockenen Innenräumen verwendet werden.
Stellen Sie sicher, dass der
geschlossener Tür bzw
Das vorliegende Gerät eignet sich nicht für die Einbindung in Alarmsysteme für
sicherheitstechnische Anwendungen.
KNX-RF
- CH_Window_Door_Contact_Basic (0023h)
- CH_Battery_Status (0021h)
ZIEHEN SIE DIE SCHUTZFOLIE HERAUS, UM DEN BA
HERZUSTELLEN
676 410 rf
ES
DETECTOR APERTURA
PUERT
ESPECIFICACIONES TÉCNICAS
T 2 baterías 3V CR2032 (incluídas)
Duración pila (estimada) > 12 años
Radio-frecuencia
Emisión codificada en 868,3MHz
con PRA>8mW y una penetración
de 100m (campo abierto)
Montaje Fijado mediante adhesivo o tornillos
Protección Ambiental IP20
Tª Funcionamiento -10ºC ~ +70ºC
Dimensiones
Sensor: 78 x 28 x 23mm
Imán: 60 x 16 x 12mm
Compatible con
KNX-RF
- CH_Window_Door_Contact_Basic (0023h)
- CH_Battery_Status (0021h)
DESCRIPCIÓN
Detector de apertura de puertas o ventanas, compatible con KNX-RF
por un sensor/transmisor y un imán.
Este dispositivo detecta que una puerta o ventana ha sido abierta o cerrada y
envía el correspondiente mensaje al actuador asociado.
El sensor dispone en su interior de un pulsador de enlace (A), el cual permite
realizar el enlace con otros dispositivos compatibles.
Evite el uso del producto cerca de equipos radioeléctricos y microondas.
Deje al menos una separación de 2m entre el emisor y su equipo receptor.
MODOS DE FUNCIONAMIENTO
El sensor emite de forma inalámbrica, vía RF
mismo momento en que se produce una apertura o cierre de la puerta o ventana
donde esté instalado.
Cada trama es enviada dos veces seguidas, lo que asegura mayor seguridad en la
transmisión.
INST
Fije el sensor en el marco de la puerta o ventana y el imán en la propia puerta o
ventana, de forma alineada y dejando una separación máxima de 12mm (fig. 2):
1.- Utilice un destornillador plano para abrir la tapa frontal, presionando la
muesca.
2.- Fije la tapa inferior, con dos tornillos, en la posición deseada.
3.- Vuelva a colocar la tapa frontal.
4.- Utilice un adhesivo de doble cara o dos tornillos para fijar el imán cerca del
sensor. La flecha del sensor (B) indica su zona de detección. Situarla siempre
al lado del imán.
PROCEDIMIENTO DE ENLACE
Para enlazar el sensor con un dispositivo actuador KNX-RF compatible, hay que
seguir los siguientes pasos:
1.- Colocar el dispositivo actuador en modo enlace, de acuerdo a las
instrucciones dadas por el fabricante.
2.- Accionar una vez el pulsador de enlace con una pulsación mayor de 1seg.
3.- Comprobar la aceptación del enlace por parte del dispositivo actuador, de
acuerdo a las instrucciones del fabricante del actuador.
CAMBIO DE BA
Se debe soltar la tapa del sensor con un destornillador plano, introduciéndolo en la
ranura superior.
Sacar la tapa del zócalo y proceder a retirar la batería gastada, teniendo en todo
momento cuidado de no dañar ningún componente del circuito impreso.
El sensor dispone de un canal del tipo CH_Battery_Status (Channel Code 0021h).
Este canal, permite informar al dispositivo actuador compatible del estado de la
batería.
Cuando la batería este gastada, cada 15 minutos el sensor de temperatura emitirá
además del correspondiente telegrama, un telegrama de batería gastada.
Su uso es opcional y para realizar el enlace del mismo con un actuador compatible
se han de seguir los siguientes pasos:
1.- Quitar la batería del sensor tal como se describe en el párrafo anterior.
2.- Colocar el dispositivo actuador en modo enlace de acuerdo a las instrucciones
dadas por el fabricante. Actuar sobre el pulsador de enlace 676 410 rf para
descargar la posible carga de batería en el producto.
3.- Introducir la batería en su zócalo.
4.- Comprobar la aceptación del enlace por parte del dispositivo actuador de
acuerdo a las instrucciones del fabricante del actuador.
RECOMENDACIONES
Evite el uso del dispositivo cerca de equipos radioeléctricos o microondas.
Deje al menos una separación de 2m entre el emisor y su equipo receptor
asociado.
Uso en instalaciones de interior y sin humedad.
Asegúrese de que la distancia entre el imán y el sensor no supere los 12mm
cuando la puerta o ventana esté cerrada.
No es un producto adecuado para sistemas de seguridad.
ACTIV
FR
CAPTEUR DE CONT
POUR PORTE / FENÊTRE
CARACTÉRISTIQUES TECHNIQUES
Alimentation 2 piles 3V CR2032 (incluses)
Durée de vie de la pile
(estimée) > 12 ans
Fréquence radio
Transmission codée à 868,3MHz avec
P
100 m (en champ libre)
Montage Fixation par adhésif ou vis
Degré de protection IP20
T -10ºC ~ +70ºC
Dimensions
Sensor: 78 x 28 x 23mm
Imán: 60 x 16 x 12mm
Compatible avec
KNX-RF
- CH_Window_Door_Contact_Basic (0023h)
- CH_Battery_Status (0021h)
DESCRIPTION
Appareil compatible RF-KNX qui détecte et consigne l’ouverture et la fermeture de
portes et fenêtres.
La mise en service du capteur s’effectue via un bouton-poussoir installé à l’intérieur
de l’appareil (A).
Évitez d’utiliser l’émetteur à proximité d’appareils radioélectriques, de
micro-ondes,...
Observez une distance minimale de 2m entre l’émetteur et le récepteur.
MODES OPÉRA
Le présent capteur consigne l’ouverture ou la fermeture de portes et fenêtres via
RF à chaque fois que le statut de la porte ou de la fenêtre change.
Afin d’augmenter la sécurité de transmission, chaque télégramme sera envoyé
deux fois avec un intervalle très court entre les transmissions.
INST
Fixez le capteur sur l’encadrement de porte ou de fenêtre et l’aimant directement
sur le bord de la porte ou de la fenêtre. Alignez-les correctement.
Lorsque la porte ou fenêtre est fermée, la fente entre le capteur et l’aimant ne doit
pas être supérieure à 12mm (fig. 2):
1.- Ouvrez le couvercle avant du capteur à l’aide d’un tournevis.
2.- Fixez le couvercle arrière du capteur à l’emplacement désiré à l’aide de vis.
3.- Remettez le couvercle en place.
4.- Fixez l’aimant à l’aide des bandes adhésives fournies ou de vis.
La flèche sur le capteur (B) indique sa zone de détection. Elle doit se trouver à
côté de l’aimant.
PROCÉDURE DE CONNEXION
Pour connecter le capteur à un actionneur compatible RF-KNX:
1.- Configurez l’actionneur RF en mode Connexion conformément aux instructions
du fabricant.
2.- Appuyez une fois sur la touche Connexion pendant plus d’une seconde.
3.- Contrôlez la connexion correcte entre les deux appareils à l’intérieur de
l’actionneur conformément aux instructions du fabricant.
REMPLACEMENT DE LA PILE
Retirez le couvercle du capteur à l’aide d’un tournevis. Insérez-le dans
l’emplacement du haut.
Retirez le couvercle du socle puis retirez la pile en faisant preuve de prudence au
niveau des composants du circuit imprimé.
Le 676 410 rf dispose d’un canal de type CH_Battery_Status (code canal 0021h).
Ce canal permet de transmettre cette information à un actionneur compatible.
Lorsque la pile est usée, le capteur envoie toutes les 15 minutes le télégramme
respectif ainsi qu’un message « pile vide ».
Cette fonction est optionnelle. Afin de connecter le capteur à un actionneur
compatible:
1.- Retirez la pile du 676 410 rf.
2.- Configurez l’actionneur RF en mode Connexion conformément aux instructions
du fabricant. Appuyez sur le bouton-poussoir connexion du 676 410 rf afin de
décharger l’éventuelle charge restante de la pile dans le produit jusqu’à ce
qu’elle soit vide.
3.- Réinsérez la pile dans le socle.
4.- Contrôlez la connexion correcte entre les deux appareils à l’intérieur de
l’actionneur conformément aux instructions du fabricant.
CONSEILS
Évitez d’employer l’appareil à proximité d’appareils radioélectriques, de
micro-ondes,...
Observez une distance minimale de 2 m entre le capteur et l’actionneur connecté.
Peut être utilisé dans les installations intérieures, uniquement dans les pièces
sèches.
Lorsque la porte ou la fenêtre est fermée, assurez-vous que la fente entre le
capteur et l’aimant est inférieure à 12mm.
Cet appareil ne convient pas aux applications de sécurité sur les systèmes
d’alarme.
POUR ACTIVER LA