This symbol was placed in accordance with the European Union Directive 2002/96 on the Waste
Electrical and Electronic Equipment (the WEEE Directive). If disposed of within the European Union,
this product should be treated and recycled in accordance with the laws of your jurisdiction
implementing the WEEE Directive.
© 2011 by NETGEAR, Inc. All rights reserved. NETGEAR and the NETGEAR logo are registered
trademarks of NETGEAR, Inc. in the United States and/or other countries. Other brand and product names
are trademarks or registered trademarks of their respective holders. Information is subject to change without
notice.
January 2011
Router Configuration
Set up internet connection
1. In your browser address field type http://
www.routerlogin.net and click Enter.
2. When the Welcome screen opens, click
Next. It will detect your type of internet
connection. Follow the prompts to
complete your router Internet connection.
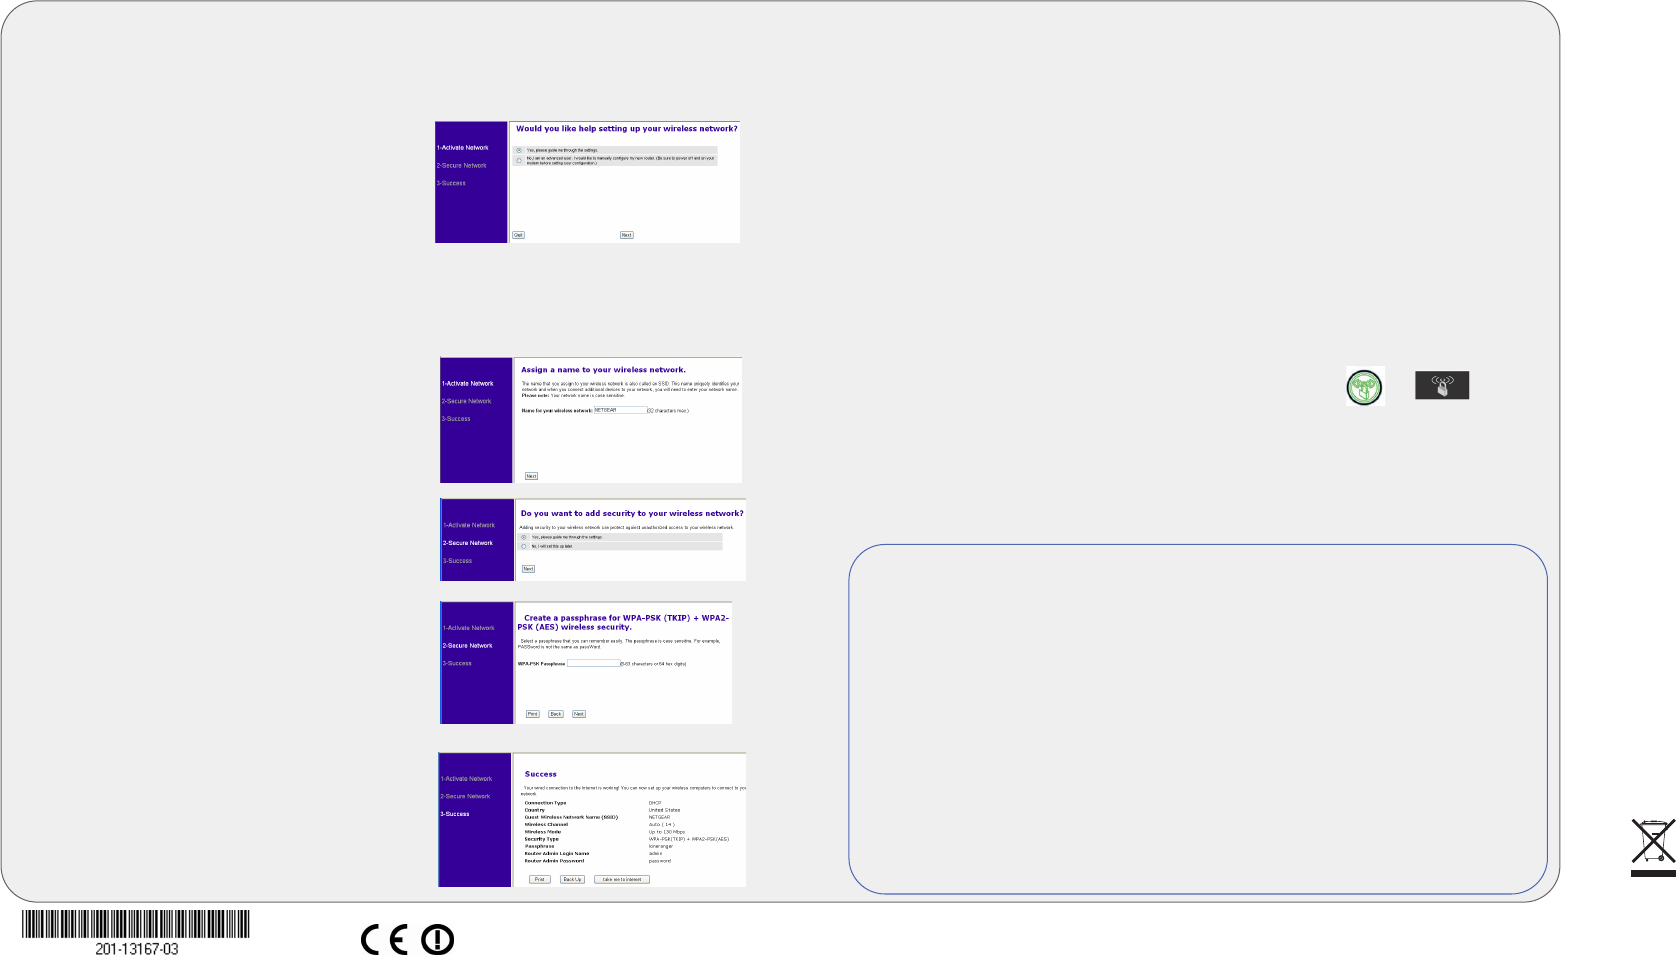
Set up wireless security
1. First, assign a name to your wireless
network. Choose a name (SSID) that is easy
to remember. You might want to write it
down in the area provided on the middle
panel. (Default is NETGEAR). Click Next.
2. Select the Yes option to add security then
select your security method. NETGEAR
recommends WPA-PSK [TKIP] + WPA2-PSK
[AES ].
3. Choose a Passphrase. You might want to
write it down in the area provided on the
middle panel. (Example: HomeNetwork).
Click Next.
Note: Both your network name (SSID) and
passphrase are case sensitive.
4. Review your network settings on the
Success page. You may want to print this
for your records. Click Next to apply all
settings and continue to follow instructions
in the next section.
Connect Wireless Devices to Your Router
1. Open the software that manages your wireless connections on the wireless
device that you want to connect to your router. (For example, on Windows XP, go
to Control Panel ->Network Connections, right click the wireless device
and select View Available Wireless Networks).
2. The wireless software will scan for all wireless networks in your area. Look for
and select the network name that you chose when you set up your router.
3. If your network is secured, you will be prompted for a Passphrase or network key.
Enter the Passphrase you selected and click Connect. You are now finished with
the installation.
Note: If your wireless device supports WPS (WiFi Protected Setup)—NETGEAR
calls this method Push 'N' Connect—you might be prompted to press a WPS
button on the router instead of entering a Passphrase. If so, go to Step 4.
4. Press the WPS button on the router. It will look similar to or .
5. Within 2 minutes, follow the wireless software instructions on the wireless device
to complete the WPS process. The device will then be connected to your router.
Repeat this process to add other wireless devices.
Note: Your network name, security method and passphrase must be the same on
all wireless devices connected to your router.
Enter your wireless information here:
Wireless Network Name (SSID) ________________________________
Wireless Security Passphrase __________________________________
If you forget your Passphrase, connect a computer to the router using an
Ethernet cable and log in to http://www.routerlogin.net and enter the
default User Name (admin) and Password (password).
Restore Factory Default: For some routers, you may need to reset the
device to its factory default first, then reconfigure your Passphrase. To restore
factory defaults, use a paper clip to press the recessed reset button on the back
until the Power/Test light blinks. This takes about 10 seconds. Release the
button and wait for the router to reboot. Log in with the default username is
(admin) and password (password). Note: Restoring factory defaults will erase
any customizations and you will lose any configurations saved to the device!
Technical Support
Thank you for selecting NETGEAR products.
After completing the setup and configuration, register your product at http://
www.NETGEAR.com/register. Registration is required before you can use our
telephone support service.
Warning: Do not install this device on top of any other electrical equipment or
install any other equipment on top of this device. Keep this device away from any
heat sources such as direct sunlight, heaters, radiators, or other A/V receivers or
devices that emit heat.
For complete DoC, please visit the NETGEAR EU Declarations of Conformity website
http://kb.netgear.com/app/answers/detail/a_id/11621
For GNU General Public License (GPL) related information, please visit
http://kbserver.netgear.com/kb_web_files/open_src.asp