0519
English - Description
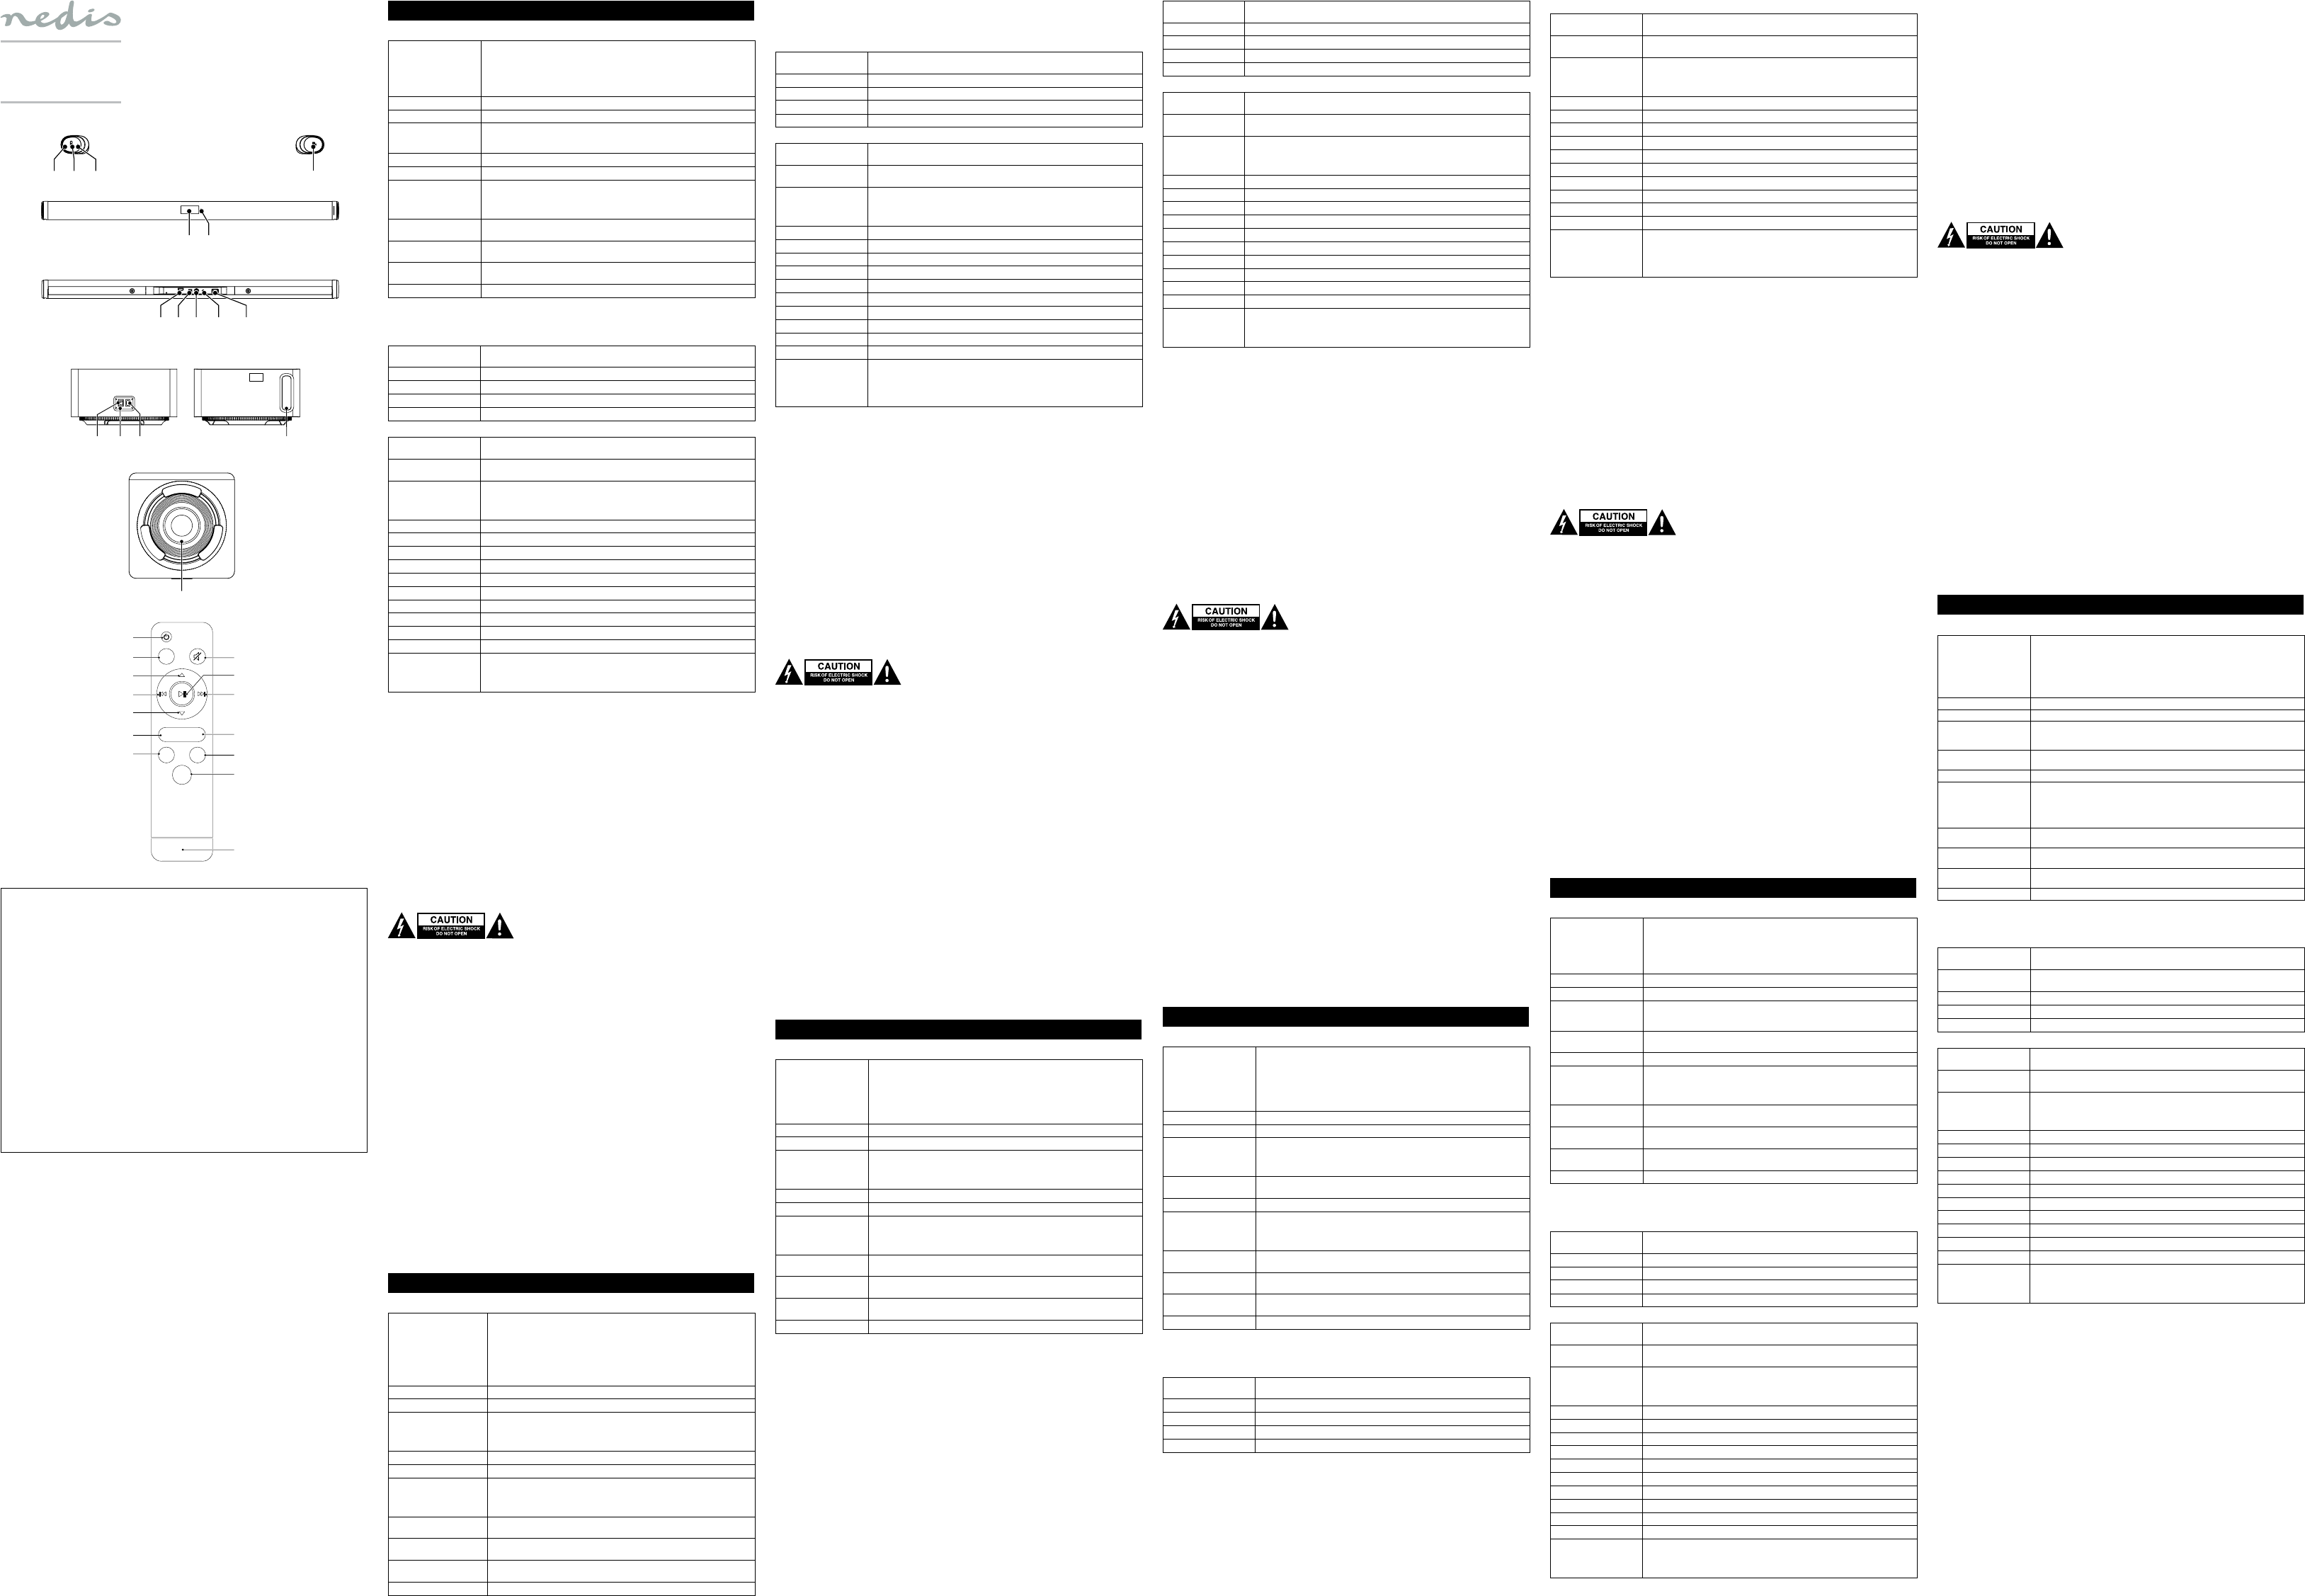
Soundbar (g. A1)
1. On/standby button
Mode button
• Press the button to switch on the devic
to standby mode.
Note: If the sound bar is idle and no input signals are being received f
the device will automatically switch to standby mode.
• When the device is switched on, press the button to select the mode: HDMI (with ARC)
/ Bluetooth / Optical / Coaxial / AUX / USB
The display shows the selected mode.
2. Volume + button • Press the button to increase the v
3. Volume - button • Press the button to decrease the v
4. Display
• The display shows the selected mode.
Note: T
being received for 5minutes
5. Remote control sensor • Point the remote c
6. USB port • Connect a USB device to the USB port.
7. HDMI output
(with ARC)
• Connect an HDMI cable to the HDMI output and to the
Note: "
HDMI output. T
that supports ARC and the HDMI cable also supports ARC.
8. Optical input
(digital)
• Connect an optical cable to the optical input and to the
9. Coaxial input
(digital)
• Connect a coaxial cable to the coaxial input and to the
10. AUX input (3.5 mm)
(analog)
• Connect an AUX cable to the A
11. AC input • Connect the power adapter to the AC input and to the wall socket.
Subwoofer (g
It is recommended to place the subwoofer in the v
achieve a good sound quality when you set the volume to a high level. If you plac
position, you will not achieve a good sound quality when you set the volume to a high level
12. On/o button
• T
• T
13. Subwoofer indicator • The indicator comes on when the subwoof
14. Bass port
15. Speaker
16. AC input • Connect the power adapt
Remote control (g
17. On/standby button
• Press the button to switch on the devic
• Press the button again to set the device t
18. Mode button
• Press the button to select the mode: HDMI (with ARC) / Bluetooth / Optical / Coaxial /
AUX / USB.
The display shows the selected mode.
19. Play/pause button
• Bluetooth: Press the button to pla
Note: If the speaker is already connected and you want to connect to a dier
press and hold the button for 3seconds to stop the curr
start pairing the new device.
20. Next button • Bluetooth: Press the button to pla
21. Previous button • Bluetooth: Press the button to pla
22. Volume + button • Press the button to increase the v
23. Volume - button • Press the button to decrease the v
24. Mute button • Press the button to mute or unmut
25. Bass + button
• Press the button to increase the bass
26. Bass - button
• Press the button to decrease the bass
27. Tr
• Press the button to increase the tr
28. Tr
• Press the button to decrease the tr
29. Equalizer button • Press the button to set the equalizer
30. Battery compartment
• Open the battery compartment.
• Insert the batteries (2x AAA, 1.5V
battery polarity (+/-) matches the polarity mark
• Close the battery compartment.
Pairing the speaker
• Switch on the device.
• Set the source to Bluetooth.
• Activate Bluetooth on your Bluetooth device
• Search for new devices on the Bluetooth device.
• Select the device:
• The Bluetooth device will conrm when the pairing is completed.
Safety
General safety
• Read the manual carefully before use. Keep the manual f
• The manufacturer is not liable for consequential damages or for damages to pr
observance of the safety instructions and improper use of the device.
• The device can be used by children from 8 y
disability, or lack of experience and knowledge if they are supervised or instructed on how to use the device in a safe way
and understand the hazards involved
be made by children without supervision.
• Only use the device for its intended purposes. Do not use the device f
• Do not use the device if any part is damaged or defective. If the device is damaged or defective, replace the device immediately
• The device is suitable for indoor use only
• The device is suitable for domestic use only
• Do not use the device in locations with high humidity, such as bathr
• Do not use the device near bathtubs, showers, basins or other v
Electrical safety
• T
• Disconnect the product from the mains and other equipment if a problem should occur
• Do not use the device if the mains cable or mains plug is damaged or defective. If the mains cable or mains plug is
damaged or defective, it must be replaced by the manufacturer or an authorised repair agen
• Before use, always check tha
• Do not move the device by pulling the mains cable. Make sure that the mains cable cannot bec
• Do not immerse the device, the mains cable or the mains plug in water or other liquids.
• Do not leave the device unattended while the mains plug is connected to the mains supply
• Do not use an extension cable.
Battery safety
• Use only the batteries mentioned in the manual.
• Do not use old and new batteries together
• Do not use batteries of dierent types or brands.
• Do not install batteries in reverse polarity.
• Do not short-circuit or disassemble the batteries.
• Do not expose the batteries to water
• Do not expose the batteries to re or excessiv
• Batteries are prone to leakage when fully discharged.
leaving the product unattended for longer periods of time.
• If liquid from the batteries comes into contact with skin or clothing, immediately rinse with fresh water
Cleaning and maintenance
W
• Before cleaning or maintenance, swit
device has cooled down completely
• Do not use cleaning solvents or abrasives.
• Do not clean the inside of the device.
• Do not attempt to repair the device. If the device does not operat
• Clean the device using a soft, damp cloth. Thor
Support
If you need further help or have comments or suggestions please visit www.nedis.com/support
Contact
NEDIS B.V
Nederlands - Beschrijving
Soundbar (g. A1)
1. Aan/standby-knop
Modusknop
• Druk op de knop om het apparaat in te schakelen. Houd de knop ingedrukt om het
apparaat in de standby-modus te zetten.
Let op: Als de soundbar inactief is en er gedurende ongeveer 15 minuten geen
ingangssignalen worden ontvangen, schakelt het apparaat automatisch naar de
standby-modus.
• Druk bij een ingeschakeld apparaat op de knop om de modus te selecteren:
HDMI (met ARC) / Bluetooth / Optisch / Coaxiaal / AUX / USB.
De display toont de
geselecteerde modus.
2. Volume + knop • Druk op de knop om het volume te verhogen.
3. Volume - knop • Druk op de knop om het volume te verlagen.
4. Display
• De display toont de geselecteerde modus.
Let op: De display gaat automatisch uit als het apparaat inactief is en er gedurende
5minuten geen ingangssignalen worden ontvangen. Druk op één van de knoppen om
de display te verlichten.
5. Afstandsbedieningssensor • Richt de afstandsbediening op de afstandsbedieningssensor
6. USB-poort • Sluit een USB-apparaat aan op de USB-poort.
7. HDMI-uitgang
(met ARC)
• Sluit een HDMI-kabel aan op de HDMI-uitgang en op de TV.
Let op: "
naar de HDMI-uitgang. De ARC-functie kan alleen worden ingeschakeld als het apparaat
is aangesloten op een TV die ARC ondersteunt en de HDMI-kabel ook ARC ondersteunt.
8. Optische ingang
(digitaal)
• Sluit een optische kabel aan op de optische ingang en op de TV of een ander
audio-apparaat.
9. Coaxiale ingang
(digitaal)
• Sluit een coaxkabel aan op de coaxiale ingang en op de TV of een ander audio-
apparaat.
10. AUX-ingang (3,5 mm)
(analoog)
• Sluit een AUX kabel aan op de AUX
apparaat.
11. AC-ingang • Sluit de stroomadapter aan op de AC-ingang en op het stopcontact.
Subwoofer (g
Het wordt aanbevolen om de subwoof
gericht, om een goede geluidskwaliteit te verkrijgen wanneer u het volume op een hoog niveau instelt. Als u de subwoof
in de horizontale (liggende) positie plaatst, verkrijgt u geen goede geluidskwaliteit wanneer u het volume op een hoog
niveau instelt.
12. Aan/uit-knop
• Zet de schakelaar in de stand "ON" om het apparaat in te schakelen.
• Zet de schakelaar in de stand "OFF" om het apparaat uit te schakelen.
13. Subwooferindicator • De indicator gaat branden wanneer het subwoofer op de soundbar is aangeslot
14. Bass-poort
15. Speaker
16. AC-ingang • Sluit de stroomadapter aan op de AC-ingang en op het stopcontact.
Afstandsbediening (g. B)
17. Aan/standby-knop
• Druk op de knop om het apparaat in te schakelen.
• Druk nogmaals op de knop om het apparaat in standby-modus te zetten.
18. Modusknop
• Druk op de knop om de modus te selecteren: HDMI (met ARC) / Bluetooth / Optisch /
Coaxiaal / AUX / USB
De display toont de geselecteerde modus.
19. Afspelen/pauze-knop
• Bluetooth: Druk op de knop om de track af te spelen of tijdelijk te stoppen.
Let op: Houd, als de speaker reeds is aangesloten en u v
ander apparaat, de knop 3seconden ingedrukt om de huidige Bluetooth-verbinding te
stoppen en het koppelen van het nieuwe apparaat te starten.
20. Volgende-knop • Bluetooth: Druk op de knop om de volgende track af te spelen.
21. Vorige-knop • Bluetooth: Druk op de knop om de vorige track af te spelen.
22. Volume + knop • Druk op de knop om het volume te verhogen.
23. Volume - knop • Druk op de knop om het volume te verlagen.
24. Dempknop • Druk op de knop om het geluid te dempen of weer in te schakelen.
25. Bass + knop
• Druk op de knop om de bass (lage tonen) te verhogen.
26. Bass - knop
• Druk op de knop om de bass (lage tonen) te verlagen.
27. Tr
• Druk op de knop om de hoge tonen te verhogen.
28. Tr
• Druk op de knop om de hoge tonen te verlagen.
29. Equalizerknop • Druk op de knop om de equalizer in te stellen.
30. Batterijcompartiment
• Open het batterijcompartiment.
• Plaats de batterijen (2x AAA, 1,5V) in het batterijcompar
dat de polariteit van de batterij (+/-) met de polariteitsmarkeringen in het
batterijcompartiment overeenkomt.
• Sluit het batterijcompartiment.
De speaker koppelen
• Schakel het apparaat in.
• Stel Bluetooth als bron in.
• Activeer Bluetooth op uw Bluetooth-apparaat.
• Zoek naar nieuwe apparaten op het Bluetooth-apparaa
• Selecteer het apparaat:
• Het Bluetooth-apparaat geeft een bevestiging als het koppelen is voltooid.
V
Algemene veiligheid
• Lees voor gebruik de handleiding zorgvuldig door
• De fabrikant is niet aansprakelijk voor gevolgschade of voor schade aan eigendommen of personen veroorzaakt door
het niet naleven van de veiligheidsinstructies en door verkeerd gebruik van het apparaat.
• Het apparaat kan worden gebruikt door kinderen vanaf 8 jaar en door personen met een lichamelijke, zintuiglijke,
geestelijke of motorische beperking of zonder de benodigde ervaring en kennis indien ze onder toezicht staan of
instructies krijgen over hoe het apparaat op een veilige manier kan worden gebruikt alsook de gevaren begrijpen die
met het gebruik samenhangen. Kinderen mogen niet met het apparaat spelen. Reiniging en onderhoud mogen niet
worden uitgevoerd door kinderen, tenzij zij onder t
• Gebruik het apparaat uitsluitend voor de beoogde doeleinden. Gebruik het apparaat niet voor andere doeleinden dan
beschreven in de handleiding.
• Gebruik het apparaat niet als een onderdeel beschadigd of defect is.
onmiddellijk.
• Het apparaat is uitsluitend geschikt voor gebruik binnenshuis. Gebruik het apparaat niet buitenshuis
• Het apparaat is uitsluitend geschikt voor huishoudelijk gebruik. Gebruik het apparaat niet voor commerciële doeleinden.
• Gebruik het apparaat niet op plaatsen met een hoge luchtvochtigheid, zoals badkamers en zwembaden.
• Gebruik het apparaat niet in de buurt van badkuipen, douches, wastafels of andere voorzieningen die water bevatten.
Elektrische veiligheid
• Dit product mag voor onderhoud uitsluitend door een erkende technicus worden geopend om het risico op elektrische
schokken te verkleinen.
• Koppel het product los van het stopcontact en van andere apparatuur als zich problemen voor
• Gebruik het apparaat niet als het netsnoer of de netstekker beschadigd of defect is. Indien het netsnoer of de netstekker
beschadigd of defect is, moet het onderdeel door de fabrikant of een erkend servicecentrum worden vervangen.
• Controleer voor gebruik altijd of de netspanning ov
• Verplaats het apparaat niet door aan het netsnoer te tr
• Dompel het apparaat, het netsnoer of de netstekker niet onder in water of andere vloeistoen.
• Laat het apparaat niet onbeheerd achter terwijl de netstekker op de netvoeding is aangesloten.
• Gebruik geen verlengsnoer
Batterijveiligheid
• Gebruik alleen de in de handleiding vermelde batterijen.
• Combineer geen oude en nieuwe batterijen.
• Gebruik geen batterijen van verschillende typen of merken.
• Installeer batterijen niet met omgekeerde polariteit.
• Veroorzaak geen kortsluiting van de batterijen. Haal de batterijen niet uit elkaar
• Stel de batterijen niet bloot aan water
• Stel de batterijen niet bloot aan vuur of extreme hitte.
• Volledig ontladen batterijen kunnen gaan lekken.
onbeheerd achterlaat om schade aan het product te voorkomen.
• Indien vloeistof uit de batterij in contact komt met de huid of kleding, onmiddellijk spoelen met vers water
Reiniging en onderhoud
W
• Schakel voordat u reinigings- en onderhoudswerkzaamheden gaat uitvoer
stopcontact en wacht tot het apparaat volledig is afgekoeld
• Gebruik geen reinigingsmiddelen of schuurmiddelen.
• Reinig niet de binnenzijde van het apparaat.
• Probeer het apparaat niet te r
• Reinig het apparaat met een zachte, vochtige doek. Droog het apparaat g
Support
Breng voor hulp of als u een opmerking of suggestie heeft een bezoek aan www.nedis.com/support
Contact
NEDIS B.V
Deutsch - Beschreibung
Soundbar (Abb
1. Ein-/Standby-
Modustaste
• Drücken Sie zum Einschalten des Geräts auf die
T
Hinweis: W
Eingangssignale empfangen werden, schaltet das Gerät automatisch in den Standb
• Wenn das Gerät eingeschaltet ist, drücken Sie die
HDMI (mit ARC) / Bluetooth / Optisch / Koaxial / AUX / USB.
Auf dem Display wird der
ausgewählte Modus angezeigt.
2. Lautstärke + Taste • Drücken Sie auf die T
3. Lautstärke - Taste • Drücken Sie auf die T
4. Display
• Auf dem Display wird der ausgewählte Modus angezeigt.
Hinweis: Die Anzeige erlischt automatisch, wenn das Gerät nich
Minuten lang keine Eingangssignale empfangen werden. Drücken Sie eine der
das Display zu beleuchten.
5. Fernbedienungssensor • Richten Sie die Fernbedienung auf den F
6. USB-Anschluss • Schließen Sie ein USB-Gerät an den USB-Anschluss an.
7. HDMI-Ausgang
(mit ARC)
• Verbinden Sie ein HDMI-Kabel mit dem HDMI-Ausgang und dem
Hinweis: "
den HDMI-Ausgang. Die ARC-F
Fernseher angeschlossen ist, der ARC unterstützt, und das HDMI-Kabel auch ARC unterstützt.
8. Optischer Eingang
(digital)
• Verbinden Sie ein optisches Kabel mit dem optischen Eingang und dem
einem anderen Audiogerät.
9. Koaxialeingang
(digital)
• Verbinden Sie ein Koaxialkabel mit dem Koaxialeingang und dem
anderen Audiogerät.
10. AUX-Eingang (3,5 mm)
(analog)
• Verbinden Sie ein A
Audiogerät.
11. AC-Eingang • Verbinden Sie den Adapter mit dem A
Subwoofer (
Es wird empfohlen, den Subwoof
um eine gute Klangqualität zu erreichen, wenn Sie die Lautstärke auf einen hohen W
in die horizontale (liegende) Position bringen, erreichen Sie keine gute Klangqualität, wenn Sie die Lautstärke auf einen
hohen Wert einstellen.
12. Ein-/Aus-
• Um das Gerät einzuschalten, stellen Sie den Schalter auf Position "ON"
• Um das Gerät auszuschalten, stellen Sie den Schalter auf Position "OFF"
13. Subwoofer-Anzeige • Die Anzeige leuchtet auf
14. Bass-Önung
15. Lautsprecher
16. AC-Eingang • Verbinden Sie den Adapter mit dem A
Fernbedienung (
17. Ein-/Standby-
• Drücken Sie zum Einschalten des Geräts auf die
• Drücken Sie erneut auf die T
18. Modustaste
• Drücken Sie auf die T
/ Koaxial / AUX / USB.
Auf dem Display wird der ausgewählte Modus angezeigt.
19. Wiedergabe/P
T
• Bluetooth: Drücken Sie auf die T
Hinweis: W
anderen Gerät herstellen möchten, halten Sie die
aktuelle Bluetooth-V
20. Weiter- • Bluetooth: Drücken Sie auf die T
21. Zurück- • Bluetooth: Drücken Sie auf die T
22. Lautstärke + Taste • Drücken Sie auf die T
23. Lautstärke - Taste • Drücken Sie auf die T
24. Stummschalttaste • Drücken Sie auf die
25. Bässe + Taste
• Drücken Sie auf die T
26. Bässe - Taste
• Drücken Sie auf die T
27. Höhen + Taste
• Drücken Sie auf die T
28. Höhen - Taste
• Drücken Sie auf die T
29. Equalizer- • Drücken Sie die T
30. Batteriefach
• Önen Sie das Batteriefach.
• Setzen Sie die Batterien (2x AAA, 1,5V
Polarität der Batterien (+/-) mit den P
• Schließen Sie das Batteriefach.
Koppeln des Lautsprechers
• Schalten Sie das Gerät ein.
• Schalten Sie die Quelle auf Bluetooth.
• Aktivieren Sie die Bluetooth-F
• Suchen Sie auf dem Bluetooth-Gerät nach neuen Geräten.
• Wählen Sie das Gerät: "SPSB420BK"
• Das Bluetooth-Gerät bestätigt, wenn die Kopplung vollzogen ist.
Sicherheit
Allgemeine Sicherheit
• Lesen Sie die Bedienungsanleitung vor dem Gebrauch genau durch. Bitte bewahr
späteren Bezugnahme auf
• Der Hersteller ist nicht schadensersatzpichtig für Folgeschäden, Sachschäden oder P
Nichtbeachtung der Sicherheitshinweise und durch unsachgemäße Handhabung des Gerätes entstanden sind
• Das Gerät darf von Kindern ab 8 Jahren sowie von Personen mit eingeschränkten phy
oder motorischen Fähigkeit
beaufsichtigt oder in den sicheren Gebrauch des Geräts eingewiesen wurden und die damit verbundenen Gefahren
verstehen. Kinder dürfen nicht mit dem Gerät spielen. Die Reinigung und Pege seitens des Benutzers darf nur von
Kindern durchgeführt werden, wenn diese beaufsichtigt werden.
• Verwenden Sie das Gerät nur bestimmungsgemäß.
beschriebenen Zweck.
• Verwenden Sie das Gerät nicht, falls ein
Sie es unverzüglich.
• Das Gerät eignet sich nur zur V
• Das Gerät eignet sich nur für den Hausgebrauch.
• Verwenden Sie das Gerät nicht an Orten mit hoher Feuchtigkeit wie beispielsw
• Verwenden Sie das Gerät nicht in der Nähe von Badewannen, Duschen, Becken oder anderen Behältnissen, die
enthalten.
Elektrische Sicherheit
• Um die Gefahr eines elektrischen Schlags zu verringern, sollte dieses Produkt bei erforderlichen Servicearbeiten
ausschließlich von einem autorisierten T
• Bei Problemen trennen Sie das Gerät bitte v
• Verwenden Sie das Gerät nicht, falls das Netzkabel oder der Netzstecker beschädigt oder defekt ist. Ist das Netzkabel
oder der Netzstecker beschädigt oder defekt, muss das Netzkabel oder der Netzstecker vom Hersteller oder einem
autorisierten Service
• Vergewissern Sie sich stets v
Geräts übereinstimmt.
• Bewegen Sie das Gerät nicht durch Ziehen am Netzkabel. Achten Sie darauf
• T
• Lassen Sie das Gerät nicht unbeaufsichtigt, während der Netzstecker mit dem Str
• Verwenden Sie kein
Batteriesicherheit
• Verwenden Sie ausschließlich die in dieser Anleitung genannten Batterien.
• Verwenden Sie keine alten und neuen Batterien zusammen.
• Verwenden Sie nicht Batterien unterschiedlicher
• Setzen Sie die Batterien nicht mit vertauschter Polarität ein.
• Schließen Sie die Batterien nicht kurz und zerlegen Sie sie nicht.
• Setzen Sie die Batterien keinem W
• Setzen Sie die Batterien keinem Feuer oder übermäßiger Hitze aus.
• Batterien neigen dazu, auszulaufen, wenn Sie vollständig en
vermeiden, entfernen Sie die Batterien, wenn das P
• Falls Batt
Wasser fort.
Reinigung und Pege
W
• Schalten Sie das Gerät vor der Reinigung oder Pege aus, ziehen Sie den Netzstecker aus der
Sie, bis sich das Gerät vollständig abgekühlt hat.
• Verwenden Sie keine Lösungs- oder Scheuermittel.
• Reinigen Sie das Gerät nicht von innen.
• Versuchen Sie nicht, das Gerät zu r
• Reinigen Sie das Gerät mit einem weichen feuchten
trockenen T
Hilfe
Wenn Sie weiter
support
Kontakt
NEDIS B.V
Español - Descripción
Barra de sonido (g. A1)
1. Botón de encendido/
espera
Botón de modo
• Pulse el botón para encender el dispositivo
poner el dispositivo en modo de espera.
Nota: Si la barra de sonido está inactiva y no se reciben señales de entrada durante
aproximadamente 15 minutos
• Cuando el dispositivo esté encendido
(con ARC) / Bluetooth / Óptico / Coaxial / AUX / USB
La pantalla muestra el modo
seleccionado.
2. Botón volumen + • Pulse el botón para aumentar el volumen.
3. Botón volumen - • Pulse el botón para disminuir el volumen.
4. Pantalla
• La pantalla muestra el modo seleccionado.
Nota: La pantalla se apagará automáticamente si el dispositivo está inactivo y no se
reciben señales de entrada durante 5 minutos
la pantalla.
5. Sensor del mando a
distancia
• Apunte el mando a distancia hacia el sensor del mando a distancia.
6. Puerto USB • Conecte un dispositivo USB al puerto USB.
7. Salida HDMI
(con ARC)
• Conecte un cable HDMI a la salida HDMI y a la TV
Nota: "
salida HDMI. La función ARC solo puede activarse cuando el dispositivo está conectado a
una TV que admite ARC y el cable HDMI también es compatible con ARC.
8. Entrada óptica
(digital)
• Conecte un cable óptico a la entrada óptica de la
9. Entrada coaxial
(digital)
• Conecte un cable coaxial a la entrada coaxial de la
10. Entrada AUX (3,5 mm)
(analógica)
• Conecte un cable AUX a la entrada A
11. Entrada CA • Conecte el adaptador de alimentación a la entrada CA y a la toma de pared.
Subwoofer (g
Se recomienda colocar el subwoofer en la posición v
una buena calidad de sonido cuando ajuste el volumen a un nivel alto
(recostada), no logrará una buena calidad de sonido cuando ajuste el volumen a un niv
12. Botón de encendido/
apagado
• Para encender el dispositivo
• Para apagar el dispositivo
13. Indicador de subwoofer • El indicador se enciende cuando el subwoofer se conecta a la barra de sonido.
14. Puerto de graves
15. Altavoz
16. Entrada CA • Conecte el adaptador de alimentación a la entrada CA y a la toma de pared.
Mando a distancia (g. B)
17. Botón de encendido/
espera
• Pulse el botón para encender el dispositivo
• Pulse de nuevo el botón para poner el dispositivo en modo en esper
18. Botón de modo
• Pulse el botón para seleccionar el modo: HDMI (con ARC) / Bluetooth / Óptico / Coaxial
/ AUX / USB.
La pantalla muestra el modo seleccionado.
19. Botón de reproducción/
pausa
• Bluetooth: Pulse el botón para repr
Nota: Si el altavoz ya está conectado y desea conectarse a un dispositivo diferen
y mantenga pulsado el botón durante 3 segundos para detener la cone
actual y empezar a vincular el nuevo dispositivo.
20. Botón siguiente • Bluetooth: Pulse el botón para repr
21. Botón anterior • Bluetooth: Pulse el bot
22. Botón volumen + • Pulse el botón para aumentar el volumen.
23. Botón volumen - • Pulse el botón para disminuir el volumen.
24. Botón Silencio • Pulse el botón para silenciar o quitar la silenciación del sonido.
25. Botón de graves +
• Pulse el botón para aumentar los grav
26. Botón de graves -
• Pulse el botón para disminuir los grav
27. Botón de agudos +
• Pulse el botón para aumentar los agudos.
28. Botón de agudos -
• Pulse el botón para disminuir los agudos.
29. Botón del ecualizador • Pulse el botón para ajustar el ecualizador
30. Compartimento de
las pilas
• Abra el compartimento de las pilas.
• Introduzca las pilas (2x AAA 1,5 V) en el compartimento de las pilas. Asegúrese de
que la polaridad de las pilas (+/-) coincida con las marcas de polaridad del interior del
compartimento de las pilas.
• Cierre el compartimento de las pilas.
Emparejamiento del altav
• Encienda el dispositivo.
• Ajuste la fuente a Bluetooth.
• Active el Bluetooth en su dispositivo Bluetooth.
• Busque nuevos dispositivos en el dispositivo Bluetooth.
• Seleccione el dispositivo:
• El dispositivo Bluetooth conrmará cuando haya nalizado el emparejamient
Seguridad
Seguridad general
• Lea el manual detenidamente antes del uso
• El fabricante no es responsable de daños consecuentes o de daños en la propiedad o en las personas causados por no
seguir estas instrucciones de seguridad y por un uso inadecuado de este dispositivo.
• El dispositivo puede ser utilizado por niños a partir de los 8 años y por personas con una discapacidad física, sensorial,
mental o motora, o que no tengan experiencia ni conocimientos, sin son supervisados o instruidos en el uso del
dispositivo de forma segura y entienden los riesgos implicados. Los niños no pueden jugar c
no podrán realizar la limpieza ni el mantenimiento reservado al usuario a menos que cuenten con supervisión.
• Utilice el dispositivo únicamente para su uso previsto
el manual.
• No utilice el dispositivo si alguna pieza ha sufrido daños o tiene un defecto. Si el dispositiv
defecto, sustitúyalo inmediatamente
• El dispositivo sólo es apto para uso en interiores. No utilic
• El dispositivo sólo es apto para uso doméstico
• No utilice el dispositivo en lugares con un nivel alto de humedad
• No utilice el dispositivo cerca de bañeras, duchas
Seguridad eléctrica
• Para reducir el peligr
reparación.
• Desconecte el producto de la toma de corriente y de los otros equipos si ocurriera algún problema.
• No utilice el dispositivo si el cable de red o el enchufe de red está dañado o es def
de red está dañado o es defectuoso, éste debe ser sustituido por el fabricante o un servicio técnico autorizado
• Antes del uso, compruebe siempr
dispositivo.
• No mueva el dispositivo tirando del cable de red. Asegúr
• No sumerja el dispositivo, el cable de red o el enchuf
• No deje el dispositivo desatendido cuando el enchufe de red esté c
• No utilice un cable alargador
Seguridad de las pilas
• Utilice únicamente las pilas mencionadas en el manual.
• No use conjuntamente pilas nuevas y usadas.
• No utilice pilas de distintos tipo o marcas.
• No instale las pilas con la polaridad invertida.
• No cortocircuite ni desmonte las pilas.
• No exponga las pilas al agua.
• No exponga las pilas al fuego ni a un calor excesivo
• Las pilas tienden a tener fugas cuando están totalmente descargadas. P
cuando no vaya a utilizar el producto durante periodos prolongados de tiempo
• Si el líquido de las pilas entra en contacto con la piel o la ropa, lave inmedia
Limpieza y mantenimiento
¡Advertencia!
• Antes de la limpieza o el mantenimiento
hasta que el dispositivo se haya enfriado totalmente.
• No utilice disolventes de limpieza ni productos abrasivos
• No limpie el interior del dispositivo.
• No intente reparar el dispositivo
• Limpie el dispositivo con un paño suave humedecido
Apo
Si necesita ayuda adicional o si tiene comentarios o sugerencias, visite www
Contacto
NEDIS B.V
Français - Description
Barre audio (g. A1)
1. Bouton marche/veille
Bouton mode
• Appuyez sur le bouton pour allumer l'appareil. Appuy
pour mettre l'appareil en mode veille.
Note : Si la barre audio est en inactive et aucun signal d'entrée n'
15 minutes, l'appareil passe automatiquement en mode v
• Si l'appareil est en marche, appuyez sur le bouton pour sélectionner le mode : HDMI (avec
ARC) / Bluetooth / Optique / Coaxial / AUX / USB.
L
2. Bouton volume + • Appuyez sur le bouton pour augmenter le volume
3. Bouton volume - • Appuyez sur le bouton pour réduire le volume
4. Achage
• L
Note : L
n'est reçu pendant 5minutes. Appuy
5. Capteur de
télécommande
• Pointez la télécommande en dir
6. Port USB • Connectez un appareil USB au port USB.
7. Sortie HDMI
(avec ARC)
• Connectez un câble HDMI à la sortie HDMI et à la TV.
Note : "
la sortie HDMI. La fonction ARC peut être activée uniquement si l'appareil est connecté à
une TV et avec câble HDMI tous deux compatibles ARC.
8. Entrée optique
(numérique)
• Connectez un câble optique à l'entrée optique et à la
9. Entrée coaxiale
(numérique)
• Connectez un câble coaxial à l'entrée coaxiale et à la
10. Entrée AUX ( 3,5 mm)
(analogique)
• Connectez un câble AUX à l'entr
11. Entrée CA • Connectez l'adaptateur électrique à l'entrée CA et à la prise murale.
Subwoofer (g
Il est recommandé de placer le subwoofer à la v
de la qualité acoustique lorsque vous réglez le volume à un niv
vous n'assurez pas le summum de la qualité acoustique lorsque vous r
12. Bouton marche/arrêt
• Pour allumer l'appareil, positionnez l'int
• Pour éteindre l'appar
13. Indicateur de subwoofer • L
14. Port de graves
15. Haut-parleur
16. Entrée CA • Connectez l'adaptateur électrique à l'entrée CA et à la prise murale.
T
17. Bouton marche/veille
• Appuyez sur le bouton pour allumer l'appareil.
• Appuyez à nouveau sur le bouton pour mettre l'appareil en mode v
18. Bouton mode
• Appuyez sur le bouton pour sélectionner le mode : HDMI (avec ARC) / Bluetooth /
Optique / Coaxial / AUX / USB
L
19. Bouton lecture/pause
• Bluetooth : Appuyez sur le bouton pour lire ou mettre en pause la pist
Note : Si le haut-parleur est déjà connecté et vous souhaitez le connecter à un autre
appareil, appuyez sur le bouton sans le relâcher pendan
connexion Bluetooth active et démarrer l'appariement avec le nouvel appar
20. Bouton suivant • Bluetooth : Appuyez sur le bouton pour lire la piste suivant
21. Bouton précédent • Bluetooth : Appuyez sur le bouton pour lire la piste pr
22. Bouton volume + • Appuyez sur le bouton pour augmenter le volume
23. Bouton volume - • Appuyez sur le bouton pour réduire le volume
24. Bouton silence • Appuyez sur le bouton pour couper le son ou le rétablir
25. Bouton Graves +
• Appuyez sur le bouton pour augmenter les gra
26. Bouton Graves -
• Appuyez sur le bouton pour réduire les gr
27. Bouton Aigus +
• Appuyez sur le bouton pour augmenter les aigus.
28. Bouton Aigus -
• Appuyez sur le bouton pour réduire les aigus
29. Bouton égaliseur • Appuyez sur le bouton pour régler l'égaliseur
30. Compartiment de pile
• Ouvrez le compartiment de pile.
• Insérez les piles (2x AAA, 1,5V
polarité des piles (+/-) correspond aux repères indiqués dans le compartiment de pile.
• Fermez le compartiment de pile.
Appariement du haut-parleur
• Allumez l'appareil.
• Réglez la source sur Bluetooth.
• Activez le Bluetooth de votre appareil Bluet
• Recherchez de nouveaux appareils sur l'appareil Bluetooth.
• Sélectionnez l'appareil :
• L
Sécurité
Sécurité générale
• Lisez attentivement le manuel avant usage
• Le fabricant décline toute responsabilité pour les dommages ou blessur
consignes de sécurité et d'une utilisation inappropriée de l'appareil.
• Cet appareil peut être utilisé par des enfants 8 ans ou plus et des personnes présentant un handicap ph
mental ou moteur
d'instructions sur l'usage de cet appareil en toute sécurité et de compréhension des risques impliqués. L
doivent pas jouer avec l'appareil
• Utilisez l'appareil uniquement pour son usage prévu. N'utilisez pas l'appareil à d'autres ns que celles décrites dans le manuel.
• N'utilisez pas l'appareil si une pièce quelconque est endommagée ou défectueuse. Si l'appareil est endommagé ou
défectueux, remplacez-le immédiatement.
• L
• L
• N'utilisez pas l'appareil dans des endroits très humides, ainsi les salles de bains et piscines
• N'utilisez pas l'appareil à proximité d'une baignoir
Sécurité électrique
• Pour réduire le risque de choc électrique, ce pr
réparation s'impose.
• Débranchez l'appareil et les autres équipements du secteur s'il y a un problème.
• N'utilisez pas l'appareil si le cordon d'alimentation ou la che secteur est endommagé ou défectueux. Si le cordon
d'alimentation ou la che secteur est endommagé ou défectueux, il doit être remplacé par le fabricant ou par un
réparateur agréé
• Avant toute utilisation, vériez que la tension du secteur corr
• Ne déplacez pas l'appareil en le tirant par le cordon d'alimentation. A
s'enchevêtre pas.
• N'immergez pas l'appareil, le cordon d'alimenta
• Ne laissez pas l'appareil sans surveillance si la che secteur est branchée.
• N'utilisez aucune rallonge.
Sécurité des piles
• Utilisez uniquement les piles mentionnées dans le manuel.
• N'utilisez jamais des piles usées avec des piles neuves.
• N'utilisez pas des piles de marques ou de types diérents.
• N'installez pas les piles selon une polarité inversée.
• Ne court-circuitez et ne démontez pas les piles.
• N'exposez pas les piles à l'eau.
• N'exposez pas les piles au feu ou à une chaleur excessiv
• Les piles chargées à fond ont tendanc
l'appareil sans surveillance pendant des périodes prolongées.
• Si du liquide s'échappant des piles entre en contact avec la peau ou les v
Nettoyage et entr
Av
• Avant le nettoyage ou l'
l'appareil refroidisse complètement.
• N'utilisez pas de solvants ni de produits abrasifs.
• Ne nettoyez pas l'intérieur de l'appareil.
• Ne tentez pas de réparer l'appareil
• Nettoyez l'appareil av
Support
Si vous avez des commentaires
Contact
NEDIS B.V
Italiano - Descrizione
Soundbar (g. A1)
1. Pulsante di accensione/
standby
Pulsante modalità
• Premere il pulsante per ac
impostare il dispositivo in modalità standby
Nota: Se la soundbar è inattiva e non riceve segnali in ingresso per circa 15 minuti, il
dispositivo passa automaticamente in modalità standby
• Se il dispositivo è acceso, pr
(con ARC) / Bluetooth / Ottico / Coassiale / AUX / USB.
Sul display viene visualizzata la
modalità selezionata.
2. Pulsante volume + • Premere il pulsante per aumen
3. Pulsante volume - • Premere il pulsante per diminuire il volume
4. Display
• Sul display viene visualizzata la modalità selezionata.
Nota: Il display si spegne automaticamente se il dispositivo è inattivo e non ric
in ingresso per 5minuti. Premer
5. Sensore del
telecomando
• Puntare il telecomando sul r
6. Porta USB • Collegare un dispositivo USB alla porta USB.
7. Uscita HDMI
(con ARC)
• Collegare un cavo HDMI all'uscita HDMI e alla
Nota: "
all’uscita HDMI. La funzione ARC può essere abilitata solo quando il dispositivo è collegato
a una TV in grado di supportare la funzionalità ARC, con un cavo HDMI anch
di supportare la funzionalità ARC.
8. Ingresso ottico
(digitale)
• Collegare un cavo ottico all’
9. Ingresso coassiale
(digitale)
• Collegare un cavo coassiale all’
audio.
10. Ingresso AUX (3,5 mm)
(analogico)
• Collegare un cavo A
11. Ingresso CA • Collegare l'adattatore di alimentazione all’
Subwoofer (g
Si consiglia di posizionare il subwoofer in posizione v
del suono quando si imposta il volume su un livello alto
qualità del suono quando si imposta il volume su un livello alto
12. Pulsante di accensione/
spegnimento
• Per accendere il dispositiv
• Per spegnere il dispositiv
13. Indicatore del
subwoofer
• L
14. Porta dei toni bassi
15. Altoparlante
16. Ingresso CA • C
T
17. Pulsante di accensione/
standby
• Premere il pulsante per ac
• Premere nuovamen
18. Pulsante di modalità
• Premere il pulsante per selezionar
Coassiale / AUX / USB
Sul display viene visualizzata la modalità selezionata.
19. Pulsante di
riproduzione/pausa
• Bluetooth: Premere il pulsant
Nota: Se l'altoparlante è già collegato e si desidera collegare un dispositiv
premuto un pulsante per 3 secondi per interromper
l’accoppiamento di un nuov
20. Pulsante successivo • Bluetooth: Premere il pulsante per riprodurre il brano successiv
21. Pulsante precedent • Bluet
22. Pulsante volume + • Premere il pulsante per aumen
23. Pulsante volume - • Premere il pulsante per diminuir
24. Pulsante muto • Premere il pulsante per silenziare l'audio o per attivarlo.
25. Pulsante bassi +
• Premere il pulsante per aumentar
26. Pulsante bassi -
• Premere il pulsante per diminuir
27. Pulsante acuti +
• Premere il pulsante per aumentar
28. Pulsante acuti -
• Premere il pulsante per diminuir
29. Pulsante equalizzatore • Premere il pulsante per impostar
30. Vano batterie
• Aprire il vano batterie.
• Inserire le batterie (2x AAA, 1,5V
batterie (+/-) corrisponda a quella indicata nel vano batterie.
• Chiudere il vano batterie.
Acc
• Accendere il dispositivo
• Impostare la sorgente su Bluetooth.
• Attivare la modalità Bluetooth sul dispositivo Bluetooth.
• Cercare i nuovi dispositivi sul dispositivo Bluet
• Selezionare il dispositivo:
• Il dispositivo Bluetooth confermerà l'operazione al termine della fase di acc
SP SB
Soundb
AUX IN
COAX
OPTICAL
AC IN ~
HDMI OUT
TO TV ( ARC)
3 1 2 6
7 8 9 10 11
4 5
A1
13 14
15
16
A2
MODE
EQ
('99
('99
TREBLE
-
+
17
18
22
21
23
28
26
24
19
20
27
25
29
30
B
Specifications:
• RMS: 135 W (45
• Peak power: 405
• Speaker channels: 2.1
• Bluetooth version: 5.0
• Frequency range: 2402 - 2480MHz
• M2 dBm
• Subwoofer size: 6.5”
• Tweeter siz 4 x 2”
• Connections: O
(with ARC)
• DisplayLED
• S100-240V ~ 50/60Hz (45W
• Subwoofer Po100-240V ~ 50/60H