The mr Safe SD-100 smok
alarm
a built-in When smoke reaches
preset
alarm
evacuat
TECHNICAL
• Smoke sensor: Phot
• Audible alarm: ≥85 dB (3 m)
• Power: DC 3V (CR123A), Lithium ba
• Operaon curr - ≤50 mA (alarm)
• Hush me: Appro
• T°C~40 °C
• Humidity: ≤95% RH non-condensing
• Baery lif
• Dimensions: φ82 x 50.5 mm
• W
P
2x mr Safe SD-100 phot
2x Mounng plate
2x Screw kit
2x Double-sided sck
2x Magnec mounng set
1x User
P
1. TEST / HUSH buon
2. LED indicator
INST
• When
least 300 mm awa1
• It
10 m.
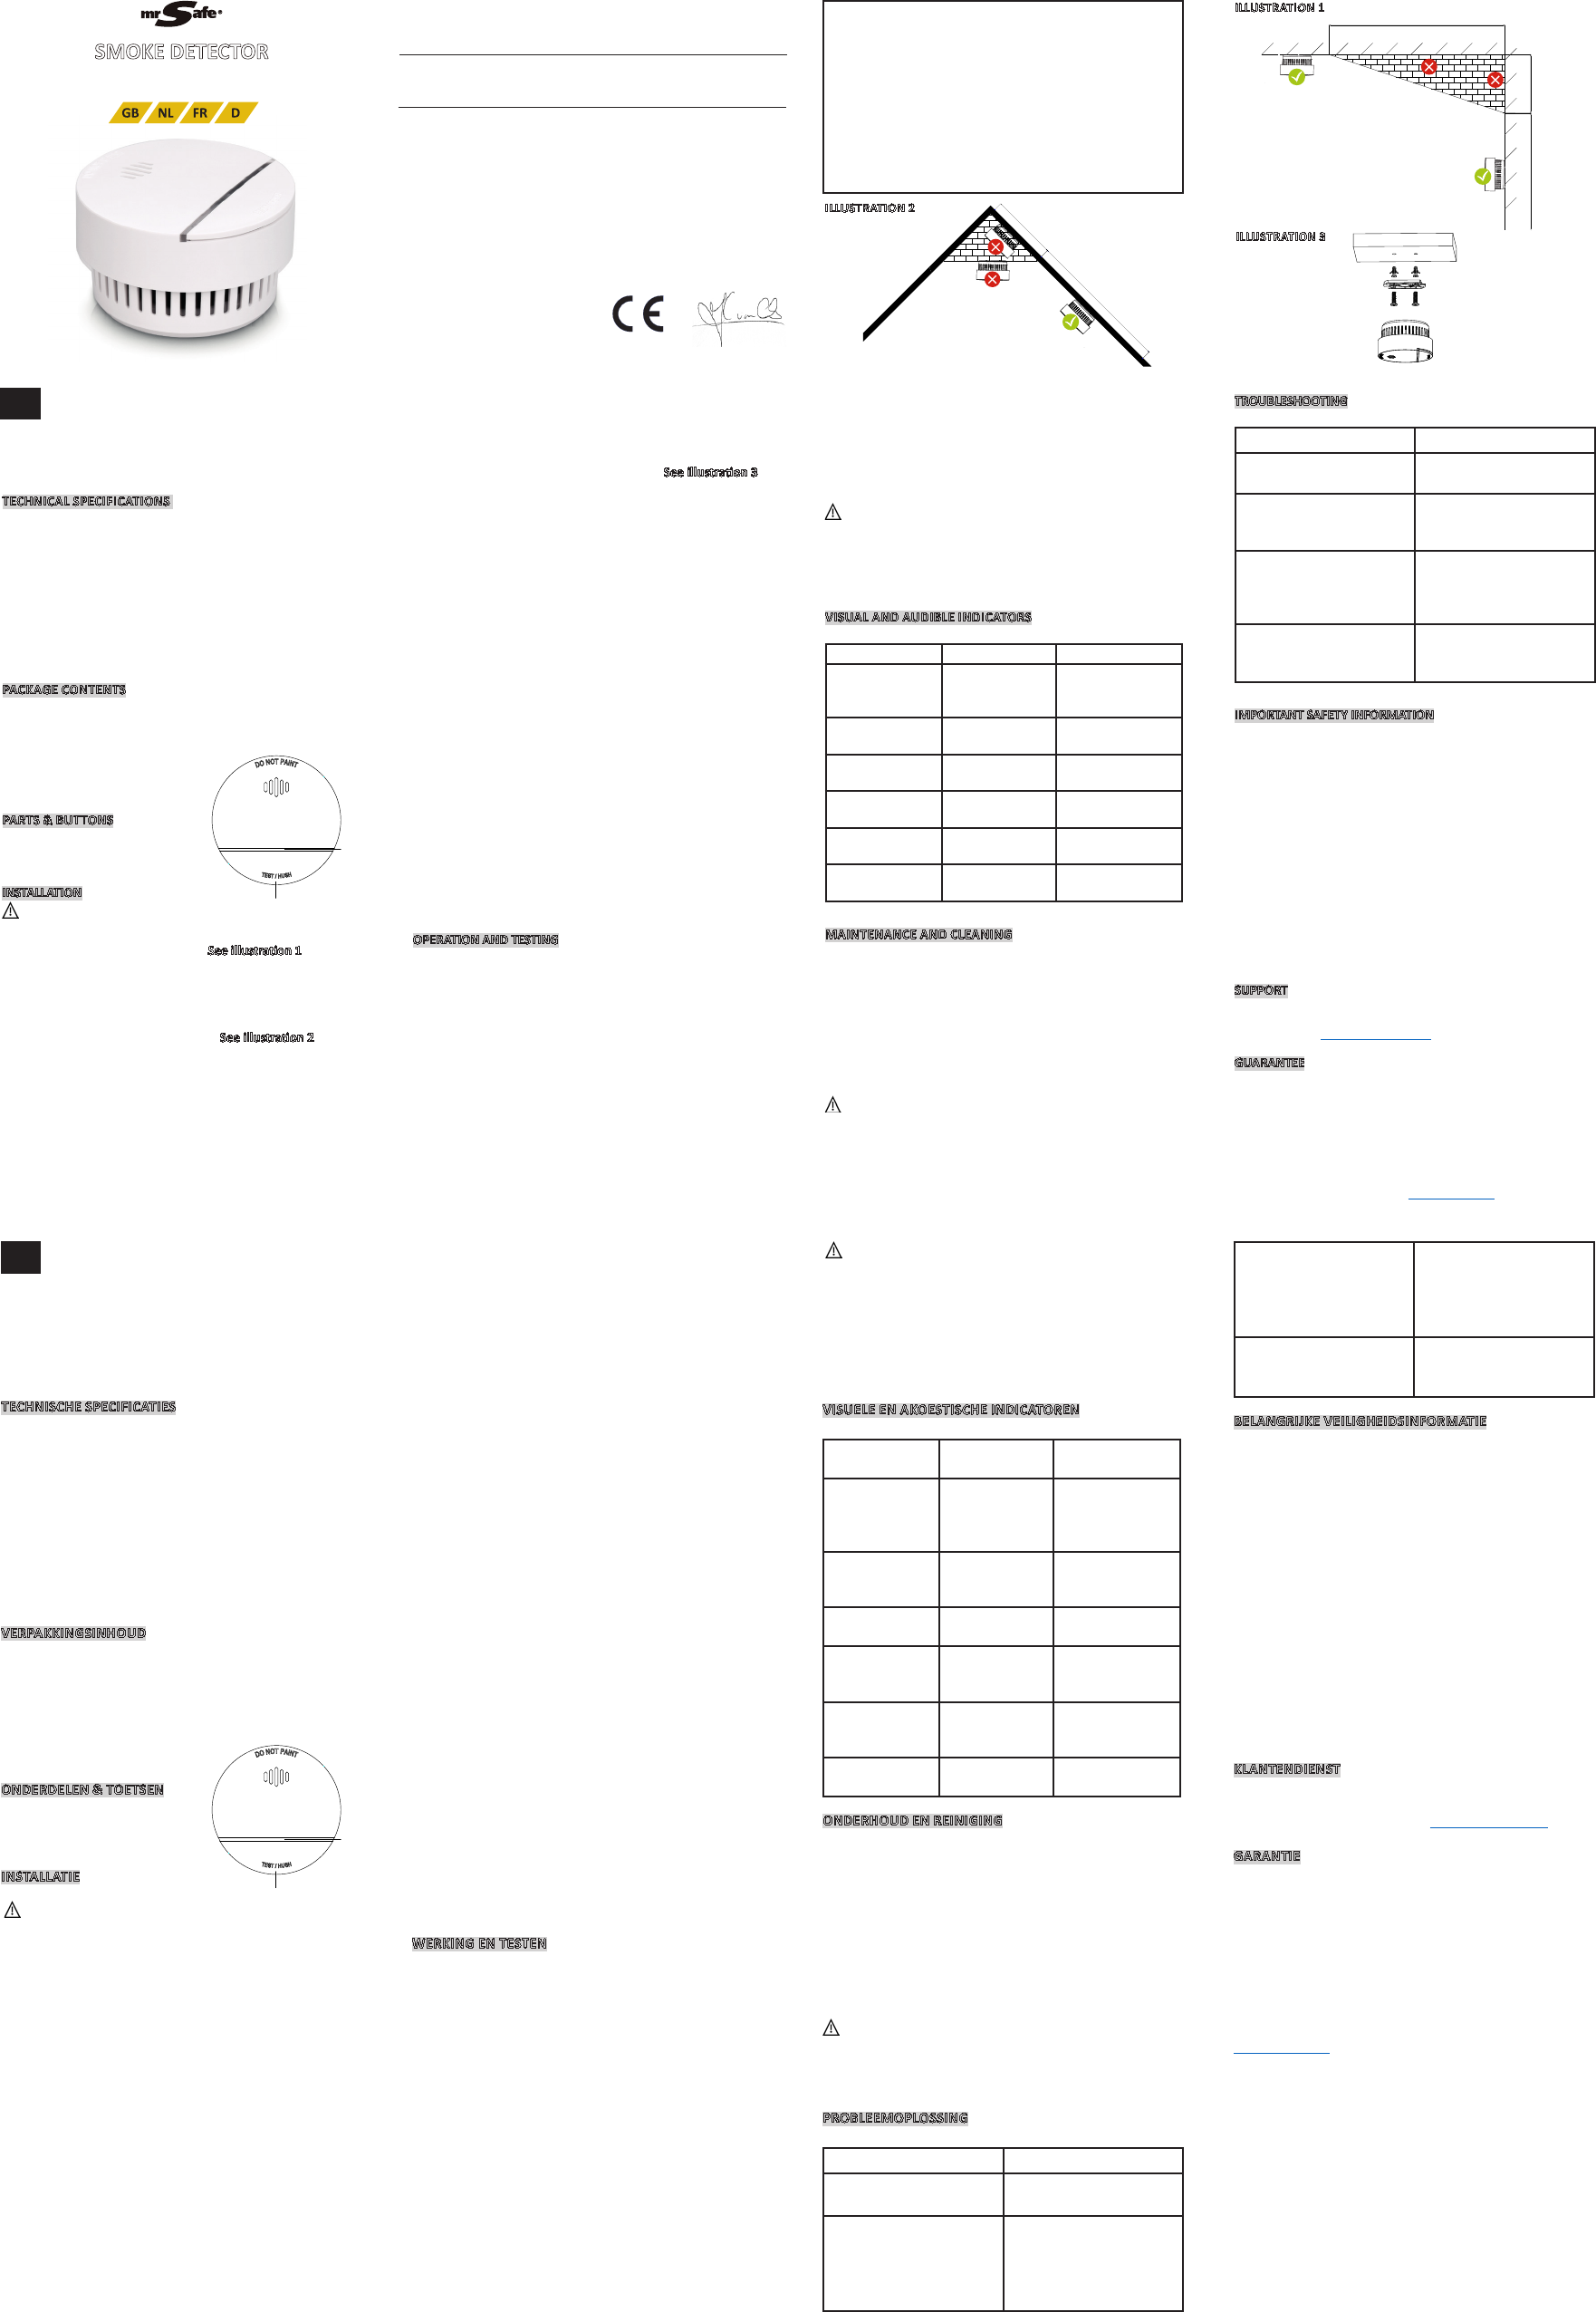
• When ins sloping r smok must be
placed
less
top if the gradien2
• Befor mounng the alarm you have to acvate SD-100
Smoke
the
• Do NOT ins
» High-humidity areas such as kitchens, and bathr
» Next to air outlets, f
» Dusty
» High-tempera
» Places with dicult access,
test funcon;
» Within 1.5m from lamps;
» Next to door
» The tops of rooms with sloping r
other dead-air spaces.
1. Twis
2. Choose a suitable mounng locaon (wall or ceiling). Using
the mounng plate pr
holes.
3. Insert the provided screw through the mounng plate,
aligning
plate.
4. Securely
not overght
5. Acvate the alarm by pressing the TEST buon f
Release the
smoke alarm is no
6. Fix the smoke alarm int
7. Aer installaon, press the TEST buon to test again. See
“OPERA
1. Choose a suitable mounng locaon (wall or ceiling). Make
sure to inst
2. Thoroughly clean the mounng locaon using a dry r
3. Remove the adhesive f
sck
4. Twis
5. Remove the adhesive
the alarm alr
alarm
the surface f
6. Acvate the smok
Alternavely you may choose to use the magnec moun
instead. These can be ins
• unit pressing TEST for
10 seconds unl the
• T unit to ensure proper funconing. When
pressing the TEST
to
If no sound is heard, this may indic
may not TROUBLESHOOTING”
for soluons.
• : The alarm is oper
tesng is complete. When pr
the unit sounds a loud 85db pulsang alarm unl the air is
cleared.
• T
alarm by pressing the TEST buon when non-emergency
smoke causes nuisance alarms. The LED indicat
every 5 seconds to remind y
si automacally resume normal
funconality a
•
TEST
unit
o
• Do NO
the
structural r
• It is recommended to use a s
• It is recommended to t
Smoke or r
detected
3 blinks
synchr
audible alarm
3 long beeps,
repeang
Normal operaon Blink once every
60 seconds
None
TEST buon pr Blink with each
alarm
3 long beeps
Smoke alarm Hush Blink once every 5
seconds
None (smoke alarm
silenced)
Low baery Blink once every
60 seconds
Chirp every 60
seconds
Fault mode 2 blinks every 50
seconds
2 chirps every 50
seconds
This unit was designed to be as maintenance-free as possible.
There are a f
properly
• T
• T
surface with a so brush or cloth each month.
• If you are not going t
me, and in
box.
• DO NOT P
• The ba
TRY T
TROUBLESHOO
Smoke alarm does not
respond.
Please check whether the
alarm is acvat
Red LED
emits one beep every 60
seconds.
Baery is low PLEASE
DEACTIV
REPLACE IMMEDIA
Red LED
emits two beeps every 50
seconds.
The alarm is malfunconing.
PLEASE DEACTIV THE
ALARM AND REPLACE
IMMEDIA
Nuisance alarms triggered in-
termiently
• Clean smoke alarm.
• Move smoke alarm to a
new locaon.
• Photoelectric smoke alarms can reduce the likelihood of
disaster but they cannot guarantee 100% safety mr Safe
can NO
including incidental and/or consequenal damages arising out
of the fact that the signal fr
triggered by smok
• T security use the smoke alarms
correctly
manual.
• Keep the
and test them at leas
• Replace the smok
properly
• Alway be awar of potenal haz develop safety
consciousness
whenever and where
SUPPORT
For informaon, return
please contact: support@mr
GUARANTEE
Copyright Saf
Group
and outstanding cus
this product agains
a of the original
the product. The condions of this guar extent
of r of mr Safe® under this guarantee can be
downloaded from our websitwww.
ILLUSTRA
ILLUSTRA
500 mm
1000 mm
100 mm
200 mm
Ceilling
Wall
GB
De mr Safe SD-100 r
ak
rook. De r
W
bereikt, stuurt het alarm opsche en luide ak
alarmsignalen uit om u te waarschuwen onmiddellijk
e
uw lokale br
TECHNISCHE
Rooksensor: F
Ak
V
Bedrijfsstr
Duurjd “Hush”-funce: Ca. 10 minuten
T
V
Levensduur van de ba
Afmengen: φ82 x 50,5 mm
Gewicht: 94 g
2x mr Safe SD-100 f
2x Montageplaa
2x Schroef
2x Dubbelzijdige sck
2x Magnesche montag
1x Gebruik
1.
2.
INST
De installae moe
• Bij installae
minste
.
• Het is raadzaam om meer
wanneer de afs
• Bij installa tegen hellende daken moet de rookmelder
ongeveer
als
verwijderd van het dak als de helling groter is dan 30 °.
.
• Voor
100 rookmelder t dez goed
werk gedurende 10 seconden op de TEST
totdat he
• Installeer uw SD-100 rookmelder NIET
» In ruimtes met hoge luchtvochgheid, zoals k en
badkamer
» Naast luchtuitla ven en centrale
verwarming;
» In stoge, vuile locaes of loc
» In loc
locaes;
» In moeilijk
is om de tesunce t
» Binnen een afstand v
» Naast deuren of ramen;
» In de nok van kamers me
de kamer of andere plaa
1.
2. een geschikte montag (muur of plafond).
Gebruik de
mark
3. Steek de meegelev
en lijn de ribben op de schr
montageplaa
4. de montageplaat stevig aan de muur of het
plafond. Niet t
5. het alarm door gedurende 10 sec de
TEST
LED-indicaelampje oplicht. Uw r
6.
7.
te
• Kies
ervoor dat u alleen op een plat oppervlak installeert.
• Reinig de montageloc
• Verwijder de
sck
• Draai de rookmelder in de mont
• Verwijder de
sck met het alarm al bevesg op de montageplaa
Plaats de rookmelder op de geko locae. Druk de
rookmelder enk
• Acveer de rookmelder
Als alternaef kunt u
Dez
• :
op de
oplicht. Het appar
• : T het alarm om zek van een g
werking. Wanneer u op de TE drukt, hoort u
2x 3 luide pieptonen om aan te geven dat de SD-100
rookmelder werkt. u geen geluid hoort, kan
dit betekenen dat uw rookmelder niet correct werkt.
Raadpleeg “PROBLEEMOPLOSSING ” v
• : Het alarm werkt nadat het is geacveerd en
de test werd volt Wanneer verbr
worden w
van 85 dB tot
• Pauz jdelijk uw
rook
niet hinderlijke alarmen v Het
LED-indicaelampje
herinneren
na 10 minute
• : Bij normaal gebruik, houd de TEST
gedurende 10 seconden ingedrukt, tot het LED-
indicaelampje knippert. Het apparaat piept 2x. Uw
rookmelder is nu uitgeschak
brand.
• T uw alarm NIET me een open vlam. Dit k de
rookmelder beschadigen of br
ontbranden en een s
• Het wordt aanbevolen om een
gebruik
• Het wordt aanbevolen om uw rookmelder wek te
testen
Rook of br
gedetect
Knippert 3x,
gesynchr
niseerd met
hoorbaar alarm
3x lange pieptonen,
herhalend
Normale werking Knippert
eenmaal om de
60 seconden
Geen
TEST
indrukk
Knippert bij elk
alarm
3x lange bieptonen
“Hush”-funce Knippert
eenmaal om de 5
seconden
Geen (geluidsignaal
gedempt)
Lage
baerijcapacit
Knippert
eenmaal om de
60 seconden
Pieptoon om de 60
seconden
Foutmodus Knippert 2x om
de 50 seconden
2 pieptonen om de
50 seconden
Dit toestel is ontworpen om zo onderhoudsvrij mogelijk te
zijn.
• T
• Reinig het oppervlak v de rookmelder elk maand
met een zachte borst of een doek om een
rookgev
• Als
demonteer deze dan,
gesloten doos.
• SCHILDER UW ROOKMELDER NIET
• De
PROBEER DE BA
Rookmelder r Controleer of het alarm is
geacveer
Rode LED knippert en
het alarm laa om de 60
seconden een piep horen.
Baerij is bijna leeg.
GELIEVE HET ALARM
TE DEACTIVEREN EN
ONMIDDELLIJK TE
VERV
Rode LED knippert en het
alarm laat
twee piepjes horen.
Het alarm is defect.
GELIEVE HET ALARM
TE DEACTIVEREN EN
ONMIDDELLIJK TE
VERV
Rookmelder gaat af zonder
aanwijsbare r
• Reinig de rookmelder
• Plaats de rookmelder
een andere locae.
• Foto-elektrische rookmelder
verkleinen, maar z kunnen geen 100% veiligheid
gar
voor verlies en/
incidentele en/
dat
door rook of vuur
• Gebruik de rookmelders correct om een
veiligheid te garander Installeer alle rookmelders
precies volgens de
• Houd de rookmelders schoon, laat geen s
test z
• Verv de rookmelders onmiddellijk als ze niet goed
werk
• Wees u aljd bewust van mogelijk
veiligheidsbewustzijn en neem preven
om gevar
Neem voor meer informae, technische vrag en
retourverzsupport@mrsaf
GARANTIE
Copyright © mr Safe. mr Safe® is een geregistr
handelsmerk van TE-Group NV
superieure productkw uitstek
Daarom garandeert mr
in materiaal en v
twee (2) jaar vanaf de oorspronk aankoopdatum van
het
van mr
kunnen wor
www
NL
HerebyPar la présente,
Company /Entreprise:
Address: / Adresse:
declare that the fdéclare que le disposif suivant :
Product name / Nom du produit:
Product type / T
conforms with the following saf requiremen of the direcves 2014/30/
EU, 2011/305/EU, 2011/65/EU, 2015/863/EU, 1907/2006/EU. Conformity is
guarant the CE-s product has been t
standards and
the EU conformity av at following address:
hp://www
est conforme aux exigences de sécurité suivantes des direcves 2014/30/EU,
2011/305/EU, 2011/65/EU, 2015/863/EU, 1907/2006/EU. La conformité est
garane par le symbole CE. Ce produit a été testé par rapport aux normes et
spécicaons suivantes, appliquant les valides en 2019. texte
complet de la déclaraon UE de conformit est disponible à l’ internet:
hp://www
EN 50130-4:2011
EN14604:2005/A
IEC 62321:2015
TE-Group NV
Kapelsestr
mr Safe SD-100
Smoke Det
J. V
Kapellen, July
ECT
Quick Re
mrSafe/SD-100/06-2019/V01
• Nominal acv
me) and performance under re c
• Oper
• T
• Dur
resistance
• Dur
• Dur
• Dur
• Dur
1.