AGarde
B Rivet de
C Interrupteur
D Bouton d’éjection
E Bloc moteur
F Paire de
Accessoires (selon
G Paire de
H T
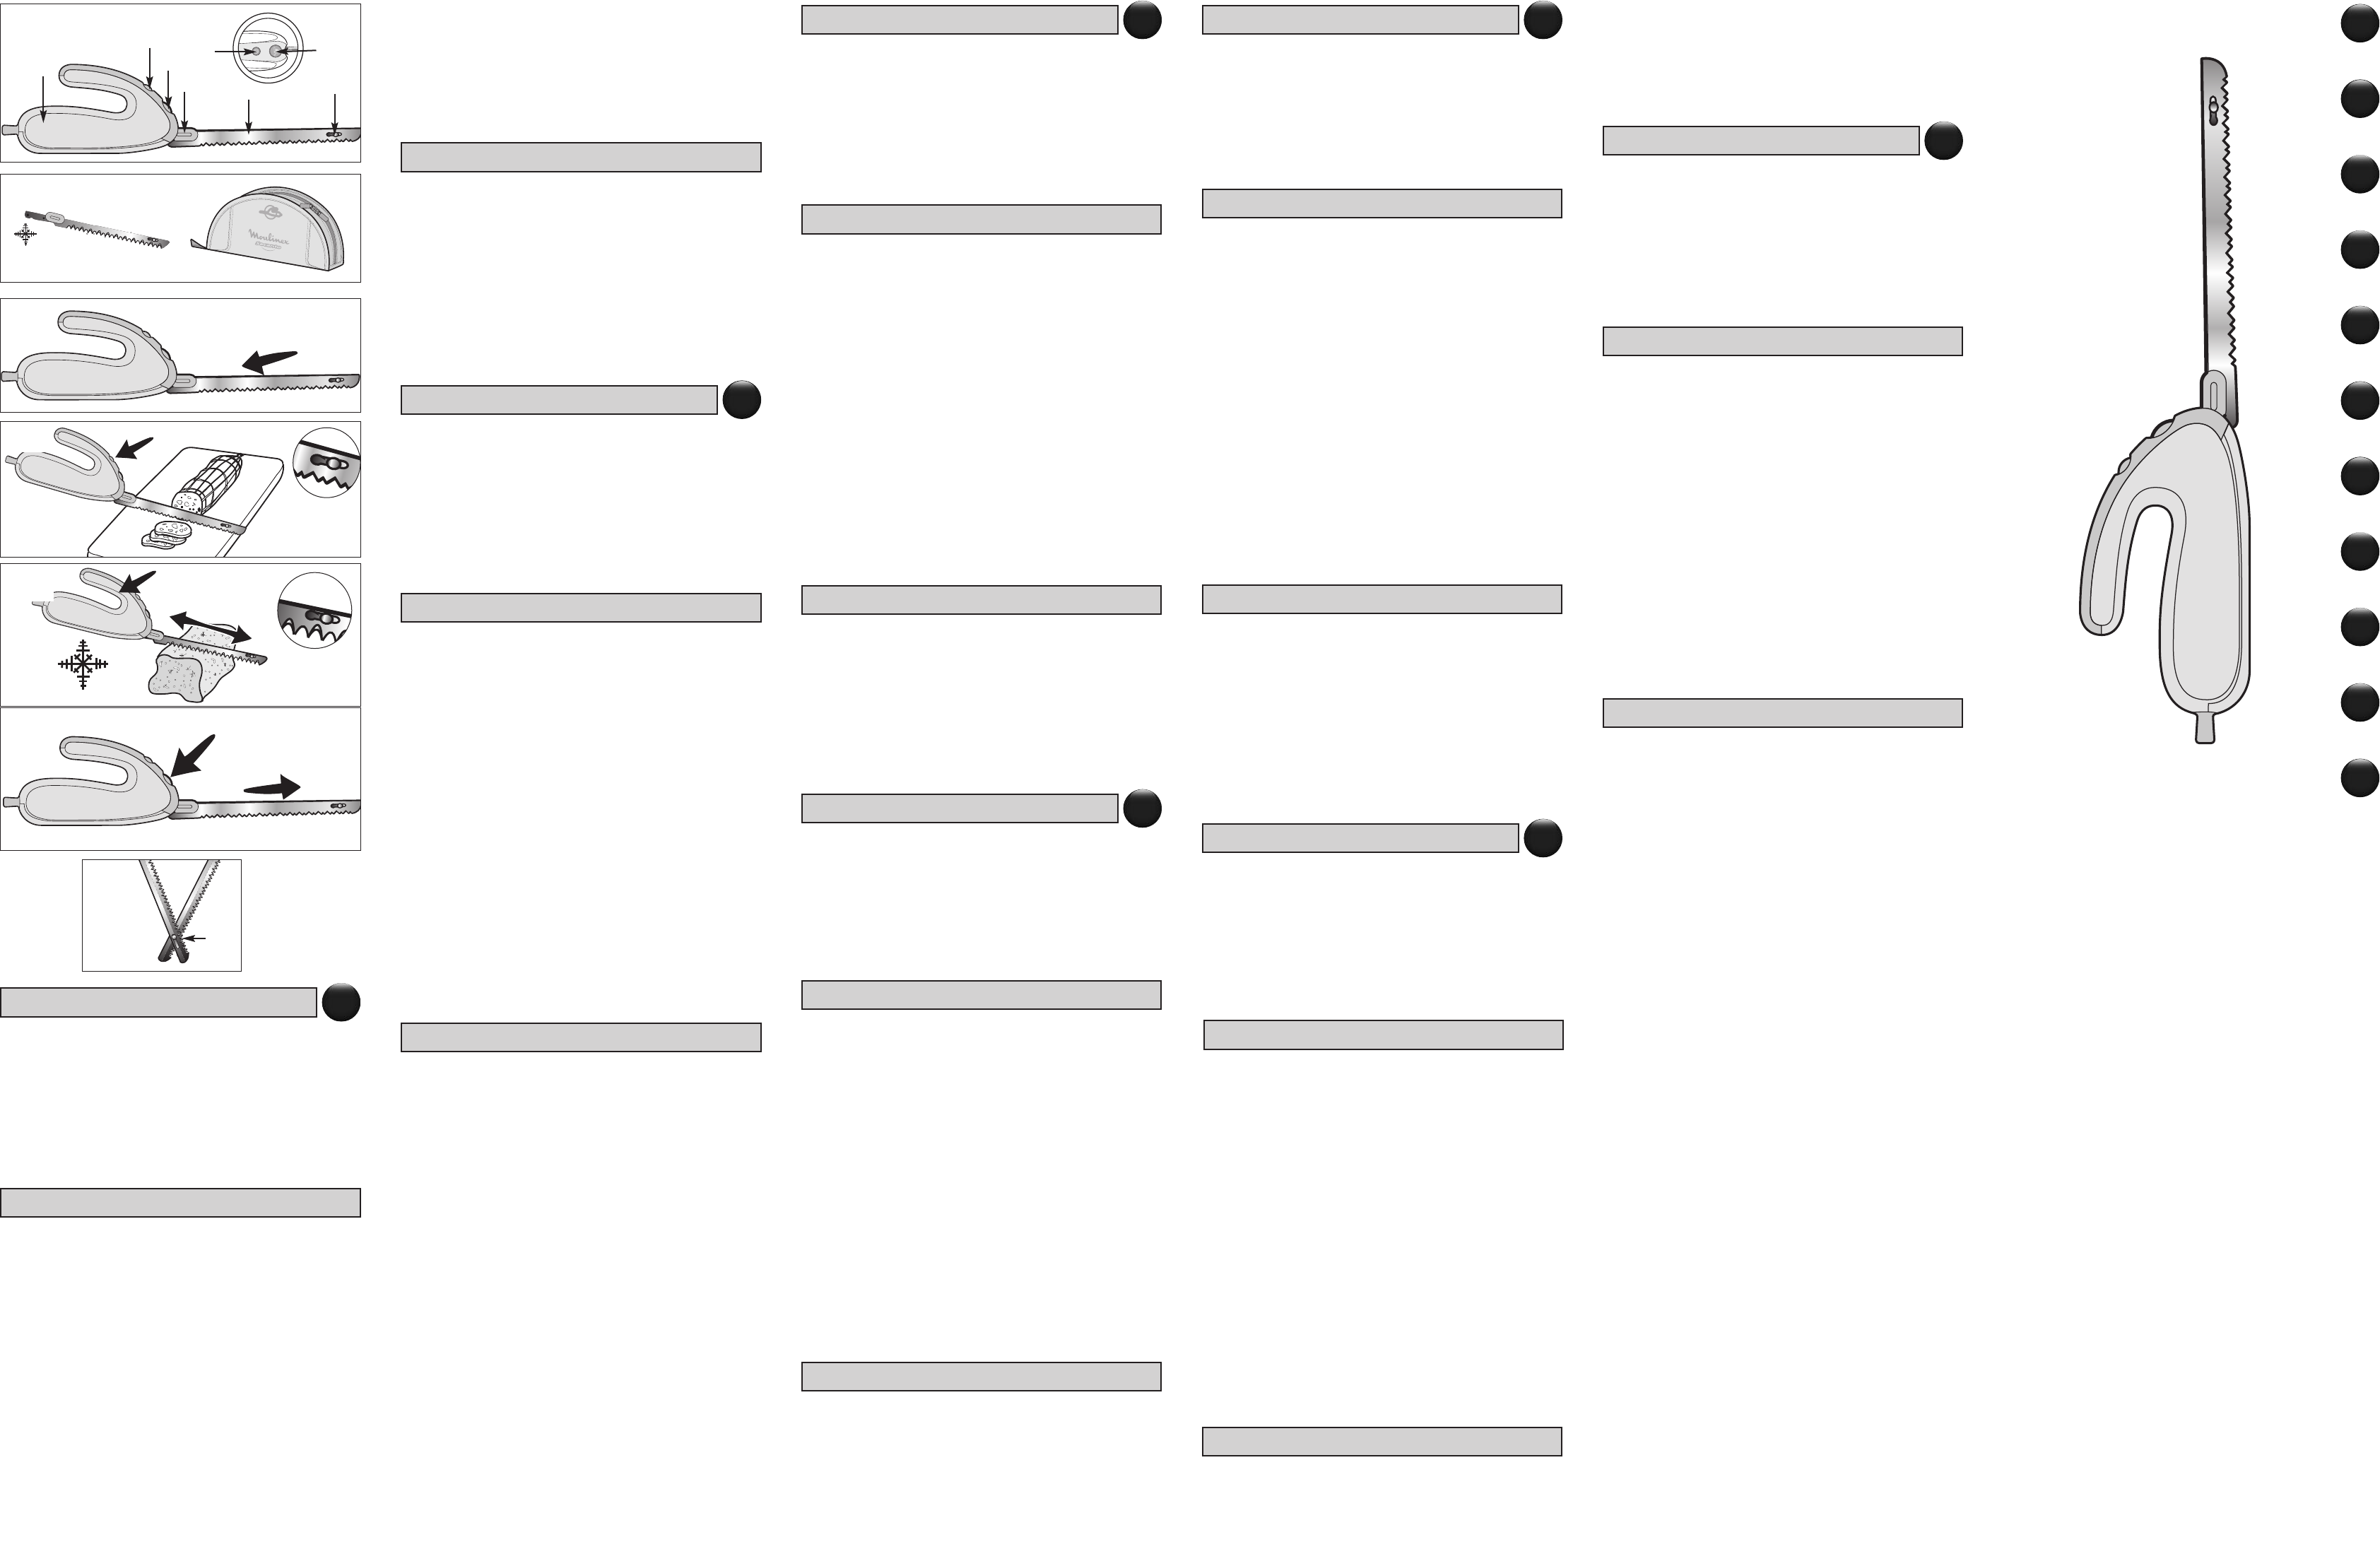
1 L
tection (tranchant
bloc moteur (E) et (A) jusqu’au
(clic audible) (fig.1). Ensuite,
tection des
Attention :
vous les
2 Pour trancher
Branchez l’appareil.
teur (C) .
(fig.2). Commencez
allant vers
face de
3 Pour trancher
(selon modèle)
- Spécialement étudiées
des aliments
Description
Mise
A
B
F
C
Fig 1
Fig 2
Fig 3
E
D
Fig 4
B
C
D
G
H
Fig 5
D
C
A Protección de
B Remache de
C Interruptor funcionamiento
D Botón de
E Bloque motor
F 2 hojas
Accesorios (según
G 2 hojas
H Estuche para
1 Con DESCONECTy
tección (hoja
bloque motor (E) y (A) hasta
queo (clic (fig.1) .
de protección
Atención: las
al manipularlas.
2 Para
Conectar el
tor (C) . (fig.2).
Comenzar a
hacia abajo.
NUNCA
3 Para
dos (fig.3)
Conectar el
tor (C) .
cortar y
Están especialmente
lar
4 Para DESCONECTel aparato;
botón de (D) de (A) y
tirando de (fig.4).
- Tiempo de funcionamiento
- T
extraer el (B) del orificio (fig.5) . Lavarlas
caliente a
se pueden
juntas deslizando
- Las protecciones (A) deben
a poner
-
-
- (H) (según
A Portalama
B Rivetto
C Interruttore
D Pulsante
E Bblocco
F Paio
Accessori (secondo
G Paio di
H Astuccio
1 Con DISINSERITO e
astuccio di
mente nel (E) e (A) fino al
per bloccarle (fig.1) . Successivamente,
l’astuccio di
Attenzione: le
un’estrema attenzione
2 Per i (fig.2):
Collegare l’apparecchio
mendo l’interruttore (C) . Appoggiar
re premendo (fig.2). Iniziare
crosta, verso
alla superficie
3 Per
(secondo i
Collegare l’apparecchio
mendo l’interruttore (C) . Appoggiare le lame
da tagliare
taglio. Appositamente studiate per
menti con
4 Per DISINSERIRE l’apparecchio; premere
sante di (D) delle lame (A) e tira-
re per (fig.4) .
-
- Afferrare le
do il (B) dall’occhiello (fig.5). Lavarle con
detersivo per
seguito, riagganciare
l’una nell’apertura (fig.1) ; (A) devono
all’esterno. Riporre
-
mente.
-
immerso nell’acqua.
- (H) (
D
escripción
U
tilización
Limpieza
Descrizione
udvendigt. Kom
- Rengør
- Apparatet
vand.
- Sæt (afhængigt af
model)
A Blade
B Blade
C ON/OFF
D Blade
E Motor
F Pair
Accessories (according
G Frozen
H Storage
1 First
blades are
then introduce (E) and
protections (A) until (fig.1) .
Next, carefully
Caution: the
handling them.
2 T
Plug in (C).
Place the (fig.2) .
frimly from
should remain
bones.
3
to
Plug in (C) .
blades on
wards to
in particular
4 T
ejection button (D) while (A) and
to remove (fig.4).
-
-
remove the (B) from the (fig.5) .
with added
washer
on one (fig.1) , with
tions (A) on the
cover
-
-
- (according
- Branchez
(C).
- Posez les
mouvement de
4 Pour démonter ; appuyez
sur le (D) des lames (A) et
tirez pour (fig.4).
- T
- Prendre
les, pour (B) de ( Fig . Lavez-
les à
pouvez également
deux lames
l’autre , (A) doivent
Remettre les
- Nettoyez
ment.
- L
l’eau.
- Ranger (H) (
AMesserheft
B Klingenniete
C Ein-/Ausschalter
D Klingenauswurftaste
E Motorblock
F Paar
Zubehör (je
G: Paar
H: Schutzhülle
1 Bei die Klingen
Schutzetui (Schneide (E)
einführen und (A) drücken, bis
rasten (Abb. . Anschließend vorsichtig das
Klingen abnehmen.
Achtung: Die
Handhabung der
2 Schneiden
Das Gerät
Ein-/Ausschalter (C) einschalten. Die
legen und (Abb. 2). Schneiden Sie
Lebensmittel energisch
Klingen bleiben p
z
3 Schneiden mit
Modell):
- Das Gerät
Ein-/Ausschalter (C) einschalten. Die
legen und
Spezielle Klingen
Nahrungsmitteln mit
4 Zum Herausnehmen
die Auswurftaste (D) der (A) halten
die Klingen (Abb. 4).
- Maximale
- Die (B) aus
dem Loch (Abb. 5) .
heißem Wasser und
auch in
Klingen wieder
die Öffnung (A) müs-
sen sich
stecken.
- Das
nen.
- Das
W
- Das (je
Nettoyage
Beschreibung
V
NC00123420
FR
DE
ES
IT
NL
D
EN
SV
NO
PT
EL
FR
DE
Reinigung
ES
Utilizzo
IT
Pulizia
A Meshouder
B Klinknagel
C Aan /
D Eject-knop
E Motorblok
F Universeel
Accessoires (afhankelijk
G Speciaal
H Opberghoes
1 De s UIT , de
mesjes zitten
stop de (E) en druk
meshouders (A) tot ze (fig.1).
V
Opgelet :
gebruik.
2
Doe de
op de (C) te drukken.
voedsel en (fig.2) .
van de
aan het
3
(afhankelijk van
Doe de
op de (C) te drukken.
diepvriesproduct en
den te
het snijden
(brood, vlees,...).
4 Haal de STEKKER van UIT HET als
u de (D) van
mesjes door (A) samen
motorblok (fig.4) te verwijderen.
-
-
elkaar los (B) uit de (fig.5) te halen.
ze in
Haak de
van het
de meshouders (A) moeten
den. De
-
goed af.
-
de kraan.
- (afhankelijk
van het
A Beskyttelsesled til
B Nitte til
C Tænd/sluk-knap
D Udløsningsknap til
E Motordel
F Et par
Tilbehør (afhængigt
G Et par særlige
H Opbevaringskasse
1 Apparatet
beskyttelseshylster (knivsæg
ind i (E) og tryk (A) ind, indtil
gerne fastlåses (fig. . Fjern
kyttelseshylsteret fra
Vigtigt :
stor påpasselighed.
2 Skæring
T
(C). Anbring klingerne på
nedad (fig.2) .
madproduktet. Klingerne
aldrig på
3
T(C) .
Anbring klingerne
klingerne frem
cielt udarbejdet
madprodukter med
4 AFBRapparatet, når
ningsknappen til (D) og tag (A)
og fjern (fig.4).
- Maksimal
- Fjern de
dem fra (B) ud (fig.5) . Rengør
klingerne med
komme klingerne
men ved
anden klinge (fig.1) . Beskyttelsesleddene (A) skal
Gebruik
Schoonmaken
Beschrijving
NL
Beskrivelse
D
Anvendelse
Rengøring
D
escription
Use
Cleaning
EN