wwwwww..iimmggssttaaggeelliinnee..ccoomm
MMX-11USB
Order No. 20.2840
2-Channel Audio Mixer
Please read these operating instructions care-
fully prior to operation and keep them for later
reference.
1 Applications
This miniature mixer with USB interface is de-
signed for universal applications, e. g. for audio
recordings on the computer. It is equipped with
2 input channels: 1 × mono with mic / line input;
1 × stereo with line input. The mixed signal is
sent to a 3.5 mm jack and the USB port. The
USB port is also suited as an input to transfer
audio data from the computer to the mixer.
The mixer is supplied with power via the
power supply unit provided or, when connected
to a computer, via the USB connection.
2 Safety Notes
The units (mixer and power supply unit) corre-
spond to all relevant directives of the EU and are
therefore marked with
.
G
The units are suitable for indoor use only. Pro-
tect them against dripping water and splash
water, high air humidity and heat (admissible
ambient temperature range: 0 – 40 °C).
G
Do not operate the mixer and immediately dis-
connect the power supply unit from the socket
1. if one of the units is visibly damaged,
2. if a defect might have occurred after a unit
was dropped or suffered a similar accident,
3. if malfunctions occur.
In any case the units must be repaired by
skilled personnel.
G
For cleaning only use a dry, soft cloth; never
use water or chemicals.
G
No guarantee claims for the units and no lia-
bility for any resulting personal damage or
material damage will be accepted if the units
are used for other purposes than originally in-
tended, if they are not correctly connected or
operated, or if they are not repaired in an ex-
pert way.
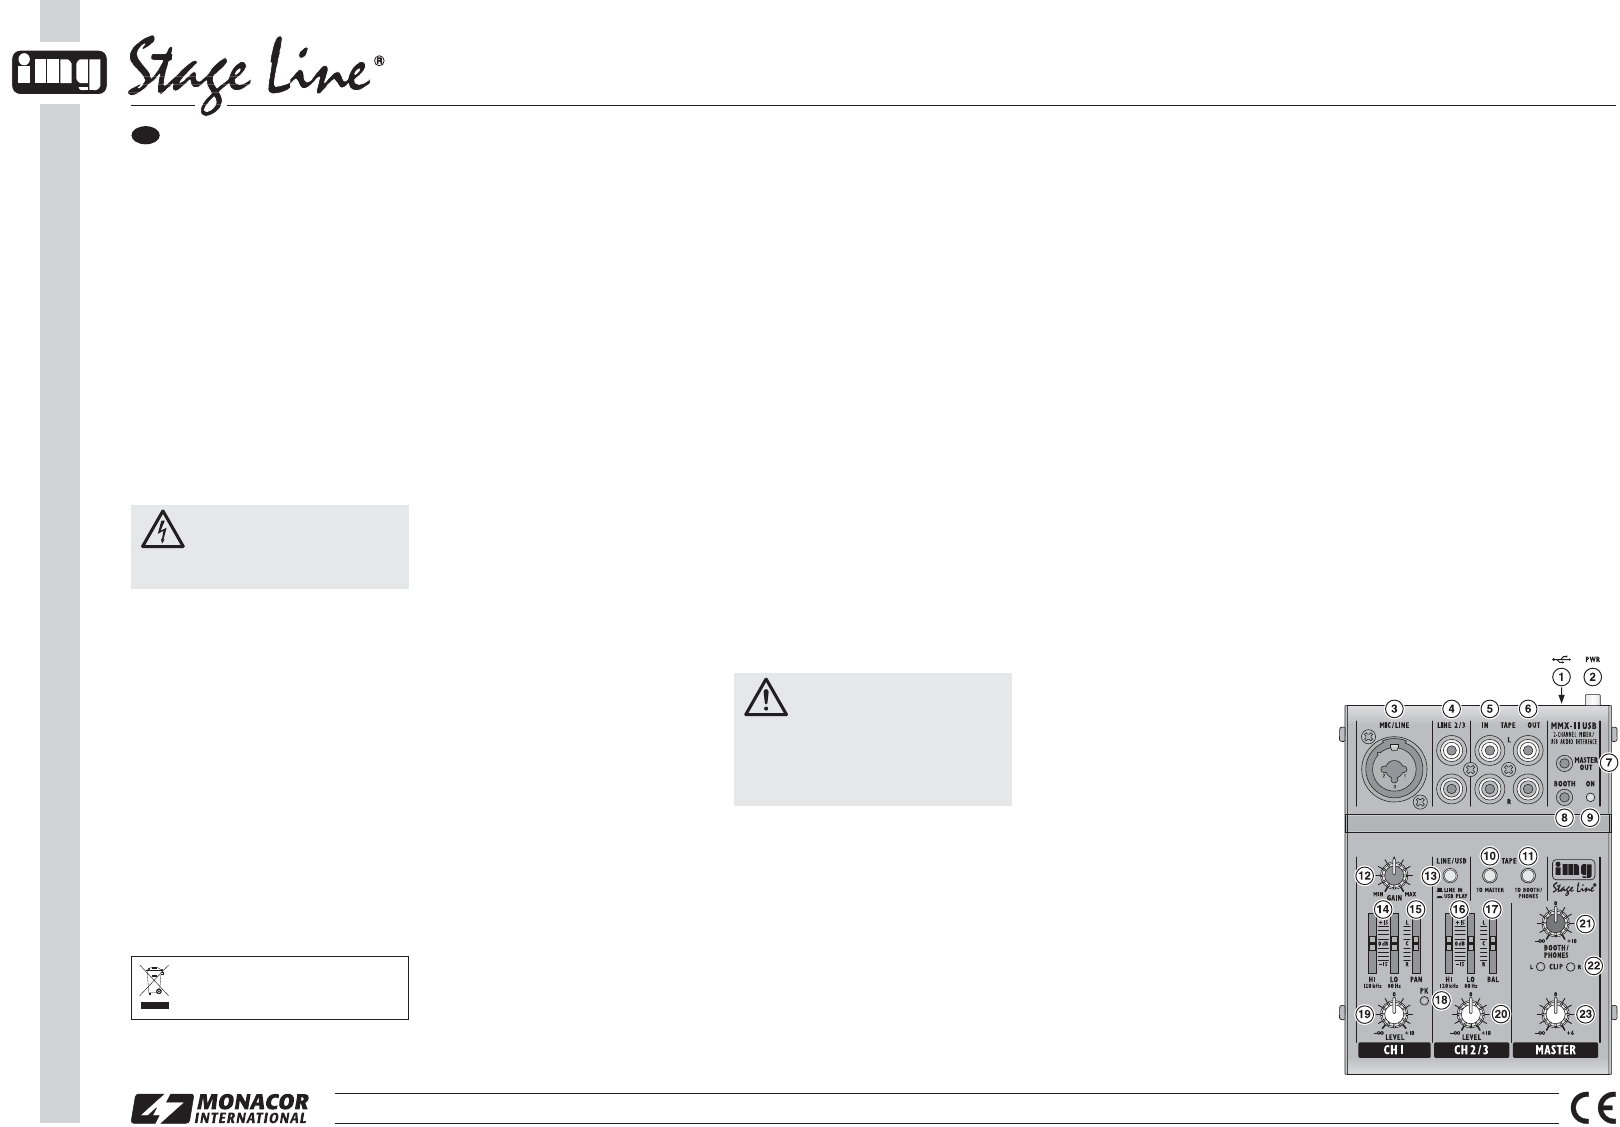
3 Setting the Mixer into Operation
Prior to connecting / disconnecting and prior to
switching on, always turn back the output con-
trols (21, 23) to the left stop.
1) Connect a microphone or a mono audio
source with line signal level to the combined
jack MIC / LINE (3) of the mono channel:
– Connect a microphone via a balanced XLR
plug. A 20 V phantom power is available at
the XLR jack (for operating a condenser
microphone using this phantom power).
Caution: Do not connect any microphone
with unbalanced output; it may be dam-
aged by the phantom power!
– Connect a unit with line level (e. g. receiver
of a wireless microphone system) via a
6.3 mm plug. The 6.3 mm jack is balanced.
To connect units with unbalanced output,
use 2-pole 6.3 mm plugs.
2) Connect a stereo audio source with line sig-
nal level (e. g. CD player) to the RCA jacks
LINE 2 / 3 (4) of the stereo channel (white =
left channel; red = right channel).
3) Connect a stereo recorder to the RCA jacks
TAPE: Connect its output to the input TAPE IN
(5) and its input to the output TAPE OUT (6).
These jacks may also be used for other
units with line level, e. g. to connect a player
(CD player or MP3 player) to TAPE IN or an
amplifier to TAPE OUT.
4) For monitoring purposes, connect stereo
headphones (impedance ≥ 8 Ω) or the ampli-
fier of a small monitor system to the 3.5 mm
stereo jack BOOTH (8).
5) The stereo output MASTER OUT (7) provides
the output signal adjusted with the MASTER
control (23). To connect, for example, an am-
plifier or a second mixer to this output, use a
3.5 mm plug.
6) When operating the mixer without a com-
puter, use a USB cable to connect the power
supply unit provided to the USB port (1), then
connect the power supply unit to a mains
socket (230 V~ / 50 Hz) [operation with a com-
puter
chapter 3.1].
Always disconnect the power supply unit
from the socket when the mixer is not in use
for a longer period of time; even when the
mixer has been switched off, the power sup-
ply unit will have a low power consumption.
7) To switch on, press the button PWR (2); the
power LED ON (9) lights up. To switch off,
disengage the button.
3.1 Operation with a computer
When operating the mixer with a computer,
either use the audio software supplied with the
operating system or audio software installed
additionally.
1) Start the computer. Use a USB cable to con-
nect the USB port (1) to a USB connection on
the computer. The computer will recognize
the switched-on mixer as a USB audio device
for audio input and audio output.
Note: If the computer fails to recognize the mixer
as an USB audio device, install the drivers required
(default drivers of the operating system), e. g. by
means of the original CD of the operating system.
If necessary, restart the computer after installing
the drivers.
2) Call up the replay/recording program and
make the settings required for audio repro-
duction via the mixer or audio recording from
the mixer (
manual of the program). The
mixer can then be operated as described in
chapter 4.
If no audio recording or audio reproduction is
possible, check the system settings of the com-
puter to find out if the USB interface has been
selected for audio input or audio output.
Hint: If the mixer is connected to both a computer and
to units earthed via their mains cable (e. g. amplifiers),
hum interference may occur due to ground loops.
To eliminate this interference, use a ground isolator
(e. g. FGA-30 from MONACOR) to connect the mixer
to the corresponding unit.
4 Operation
1) Use the button LINE / USB (13) to select the
input signal assigned to channel 2/3: button
disengaged = input signal of the jacks LINE
2/3 (4); button engaged = input signal of the
USB jack (1).
Note: For recordings via the USB port, please take
into account that there is a risk of feedback if the
recording signal of the computer is assigned to
channel 2 / 3 as an input signal.
2) For the basic setting, first set the controls
– LEVEL (19, 20) to the left stop
– HI, LO (14, 16), PAN (15) and BAL (17) to
mid-position
– GAIN (12) and MASTER (23) to mid-posi-
tion
Feed an audio signal to channel 1. Turn up
the control LEVEL (19) until the audio signal
can be heard well and it is possible to adjust
its sound with the controls HI and LO (14). If
you have to turn up the control LEVEL very
far, turn up the control GAIN (12) to increase
the input gain. However, if the LED PK (18)
lights up for a longer period of time, turn back
the control GAIN accordingly. The LED PK
should briefly flash for signal peaks only.
Turn back the control LEVEL of channel 1.
Feed an audio signal to channel 2 / 3 and turn
up its control LEVEL (20) until it is possible to
adjust the sound with the controls HI and LO
(16).
3) After the basic setting, use the controls
LEVEL to mix the signals of channels 1 and
2/3 in the volume ratio desired or to fade
them in or out individually. When a channel is
not used, always turn back its control LEVEL
to the left stop.
4) For channel 1, use the control PAN (15) to
place the mono signal in the stereo sound.
For channel 2 / 3, use the control BAL (17) to
adjust the balance of the stereo signal.
5) To add the signal of the input TAPE IN (5) to
the audio mix, press the button TAPE TO
MASTER (10).
Note: When a recording is made via the output
TAPE OUT (6) and at the same time reproduced
via the input TAPE IN, make sure that the button
TAPE TO MASTER is disengaged; otherwise,
there will be feedback.
6) Use the control MASTER (23) to adjust the
level of the output signal sent to the jacks
MASTER OUT (7), TAPE OUT (6) and the
USB port (1). If one of the overload LEDs
CLIP (22) lights up, turn back the control
MASTER or any channel control (19, 20)
turned up too far. Make sure that the button
TAPE TO BOOTH / PHONES (11) is disen-
gaged so that the LEDs CLIP will be able to
respond to the output signal [
item 7
below].
7) Use the button TAPE TO BOOTH / PHONES
(11) to select the signal assigned to the mon-
itor output BOOTH (8): button disengaged =
output signal; button engaged = signal of the
input TAPE IN (5). The overload LEDs CLIP
(22) respond to the signal selected for the
monitor function. Use the control BOOTH /
PHONES (21) to adjust the monitoring vol-
ume.
5 Specifications
Sensitivity / impedance
Mic: . . . . . . . . . . 0.5 mV/1.6 k
Ω
(gain min.: 80 mV)
Line, channel 1: . 2 mV/10 k
Ω
(gain min.: 550 mV)
Line, channel 2/ 3: 150 mV/10 k
Ω
Tape: . . . . . . . . . 420 mV/ 7 k
Ω
Output level: . . . . . 6 V max. (Master, Booth, Tape)
Headphone
impedance: . . . . . . ≥ 8
Ω
USB interface: . . . . USB 2.0 (Full Speed), type B port
Frequency range: . 20 – 20 000 Hz
THD: . . . . . . . . . . . < 0.05 %
S / N ratio: . . . . . . . . 81 dB (A weighted)
Phantom power: . . +20 V (XLR), permanent
Power supply: . . . . via USB port (5 V
/ 500 mA) of the
computer or via power supply unit
provided and connected to 230 V~ /
50 Hz
Dimensions, weight: 102 × 45 × 140 mm, 430 g
Suitable operating systems for data transfer via USB
interface:
Windows 2000, Windows XP
or subsequent
Windows
versions,
Mac OS 9.0.4
or later,
Mac OS X
Windows is a registered trademark of Microsoft Corporation in
the USA and other countries.
Mac OS is a registered trademark of Apple Computer, Inc. in
the USA and other countries.
Subject to technical modification.
WARNING: Never adjust the audio
system and the headphones to a
very high volume. Permanent high
volumes may damage your hearing! Your ear
will get accustomed to high volumes which do
not seem to be that high any more after some
time. Therefore, do not further increase a high
volume after getting used to it.
If the units are to be put out of operation
definitively, take them to a local recycling
plant for a disposal which is not harmful to
the environment.
WARNING: The power supply unit
uses dangerous mains voltage.
Leave servicing to skilled person-
nel. Inexpert handling or modification may re-
sult in electric shock.
MONACOR INTERNATIONAL GmbH & Co. KG • Zum Falsch 36 • 28307 Bremen • Germany. Copyright
©
by MONACOR INTERNATIONAL. All rights reserved. A-1474.99.01.11.2013
®
GB