S3
S3
■
CHARACT E R I S T I C S
1. Analogue & d igital time displays: Hour,
Minute, Second, Month, Date and day of the
week.
2. Automatic calendar:
The calendar automati-
cally adjusts the dates and months from the
year of 2000 to 2049.
3. Daily alarm and hourly chime:
The alarm
can be set to sound at the designated time
on a 24-hour basis and the chime can be set
to sound every hour on the hour with a single
beep.
4. Second time zone: Time in a different time
zone can be displayed.
5. Countdown timer:
The countdown timer can
be set up to 23 hours 59 minutes and 59 sec-
onds.
6. St o pwa tch:
The sto pwatch c an measure
up to 23 hours 59 minutes and 59 seconds in
1/100-second increments. Split time measure-
ment is available.
7. Selection of 12 or 24-hour format: The time
display format in either 12-hour indication or
24-hour indication can be selected.
8. Animation dots are displayed:
Animation
dots are displayed in both 12 and 24-hour for-
mat and can be selected in either fast flashing
or slow flashing.
9. EL backlight: The built-in electro-luminescent
(EL) backlight illuminates the display for easy
viewing in darkness.
■
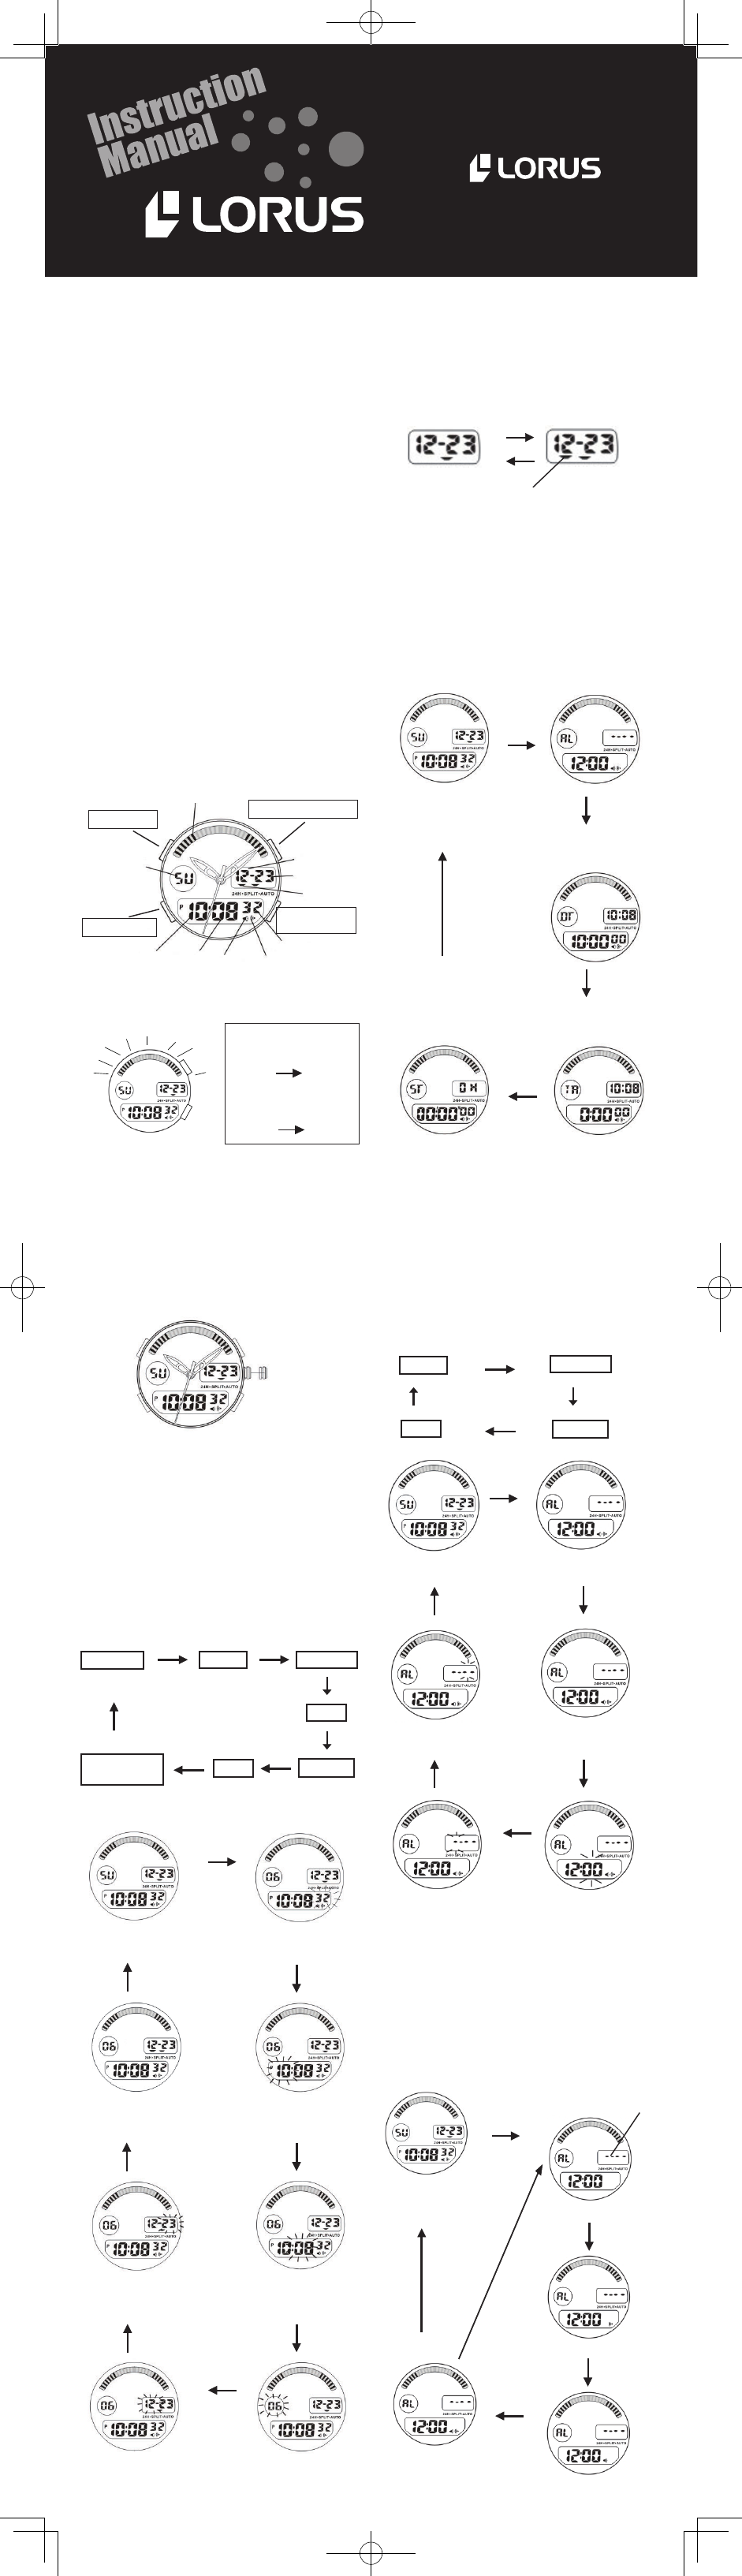
L C D D I S P L AY A N D B U T T O N S
F U N C T I O N
■
H O W T O S E T N O R M A L T I M E /
C A L E N D A R
■
H O W T O S E T A L A R M T I M E
* P r e s s S 1 o r S 2 t o
switch from fast to
slow flashing.
(fast
slow)
* Press any key to
switch
from slow to
fast flashing.
(slow
fast)
1.
Press S3 button to show the NORMAL TIME
mode.
2. Press S4 button to begin setting procedure.
The seconds digit starts flashing.
3. Press S1 button to set SECONDS setting.
4. Press S3 button to move on to HOURS setting.
* Selection of the digits to be adjusted is made
in the following order by pressing S3 button
and then pressing S1 button.
5. Press S3 button after completing the setting.
■
H O W T O C H A N G E T H E D I S P L A Y
M O D E
* Animation dots are displayed in both 12 and
24-hour format.
■
S E T T I N G T H E T I M E ( A N A L O G U E )
1. Pull the crown out one step, the second hand
will stop.
2. Set the correct time by turning the crown.
3. Push the crown back to the original position.
The watch will start running again.
* The analogue indication and digital display of
the time setting can be adjusted separately.
- Multi-function digital watch with 12 or 24
animation dots.
“ S T ” m e a n s
“ Stopwatch”
1. From NORMAL TIME mode,
press S3 button
once into ALARM mode.
2. Press S4 button to begin setting procedure.
The hours digit starts flashing.
3. Press S1 button to set HOURS setting.
4. Press S3 button to move on to MINUTES setting.
* Selection of the digits to be adjusted is made
in the following order by pressing S3 button
and then pressing S1 button.
5.
Press S3 button after completing the setting.
*
Press S3 button to show the
NORMAL TIME
mode.
* If the NORMAL TIME mode is shown already on
the display, skip the above operation.
*
Press S3 button to change the display mode in
the following order.
SECONDS
DATE
YEAR
12/ 2 4 -H O U R
FORMAT
MONTH
MINUTESHOURS
S3
S3
S3
S2
S3S3
* Day of week will change automatically based on
date changing.
“ ----- ” means
“Daily Alarm”
DATE
MONTH
MINUTES
HOURS
S3
S3
S3
S3
S4 (SET)
HOURS
DAY O F
WEEK
CHIME
SIGNAL
DATE
MINUTES
SECONDS
24HOUR
FORMAT
ALARM
SIGNAL
S3 (MODE)
S2 (RESET/
LIGHT)
ANIMAT I O N D OT S
MONTH
S1 (STA R T / S TO P )
S2
S1
S4
S3 S2
S1
CROWN
NORMAL TIME
MINUTES SETTING BY
PRESSING S1
HOURS SETTING BY
PRESSING S1
SECONDS SETTING
BY PRESSING S1
S4
S3
S3
S3
YEAR SETTING BY
PRESSING S1
S3
MONTH SETTING BY
PRESSING S1
DATE SETTING BY
PRESSING S1
S3
12/24-HOUR
FORMAT
S3
NORMAL TIME
“DT”means
“Dual Time”
S3
“AL” means
“Daily Alarm”
“TR” means
“ Timer”
S3
S3
S3
S3
ALARM MODE
S4
HOURS SETTING BY
PRESSING S1
MINUTES SETTING BY
PRESSING S1
S3
MONTH SETTING BY
PRESSING S1
DATE SETTING BY
PRESSING S1
Engagement/Disengagement of ALARM &
CHIME
* With each press of S2 button, the ALARM and
CHIME can be engaged or disengaged in
the following order. The ALARM signal and/or
CHIME signal appear or disappear on the dis-
play accordingly.
* The ALARM can be set only in one time zone.
* If month and date are set, it will alarm once.
S2
S2
S3
S3
S2
PRESS S3
1 T I M E
NORMAL TIME
• The time display format in either 12-hour indi-
cation or in 24-hour indication can be selected
by pressing S2 button. Under the 12-hour indi-
cation format, no mark appears on the display.
Under the 24-hour indication format, “ -” mark
appears under the date indicator.
• The calendar automatically adjusts the dates
and months from the year of 2000 up to 2049.
S3
PRESS S3
1 T I M E
NORMAL TIME
S2
ALARM ON
CHIME ON
ALARM/
CHIME ON
S2
RESET
12-hour 24-hour
S2
24-hour format indication
Selection of 12-hour/24-hour format
ALARM MODE