trademark of Little Tikes in the U.S. and other countries. All logos, names, characters,
likenesses, images, slogans, and packaging appearance are the property of Little
Tikes. Please keep this address and packaging for reference since it contains
important information. Contents, including specications and colors, may vary from
photos depicted on package. Instructions included. Please remove all packaging
including tags, ties & tacking stitches before giving this product to a child.
12
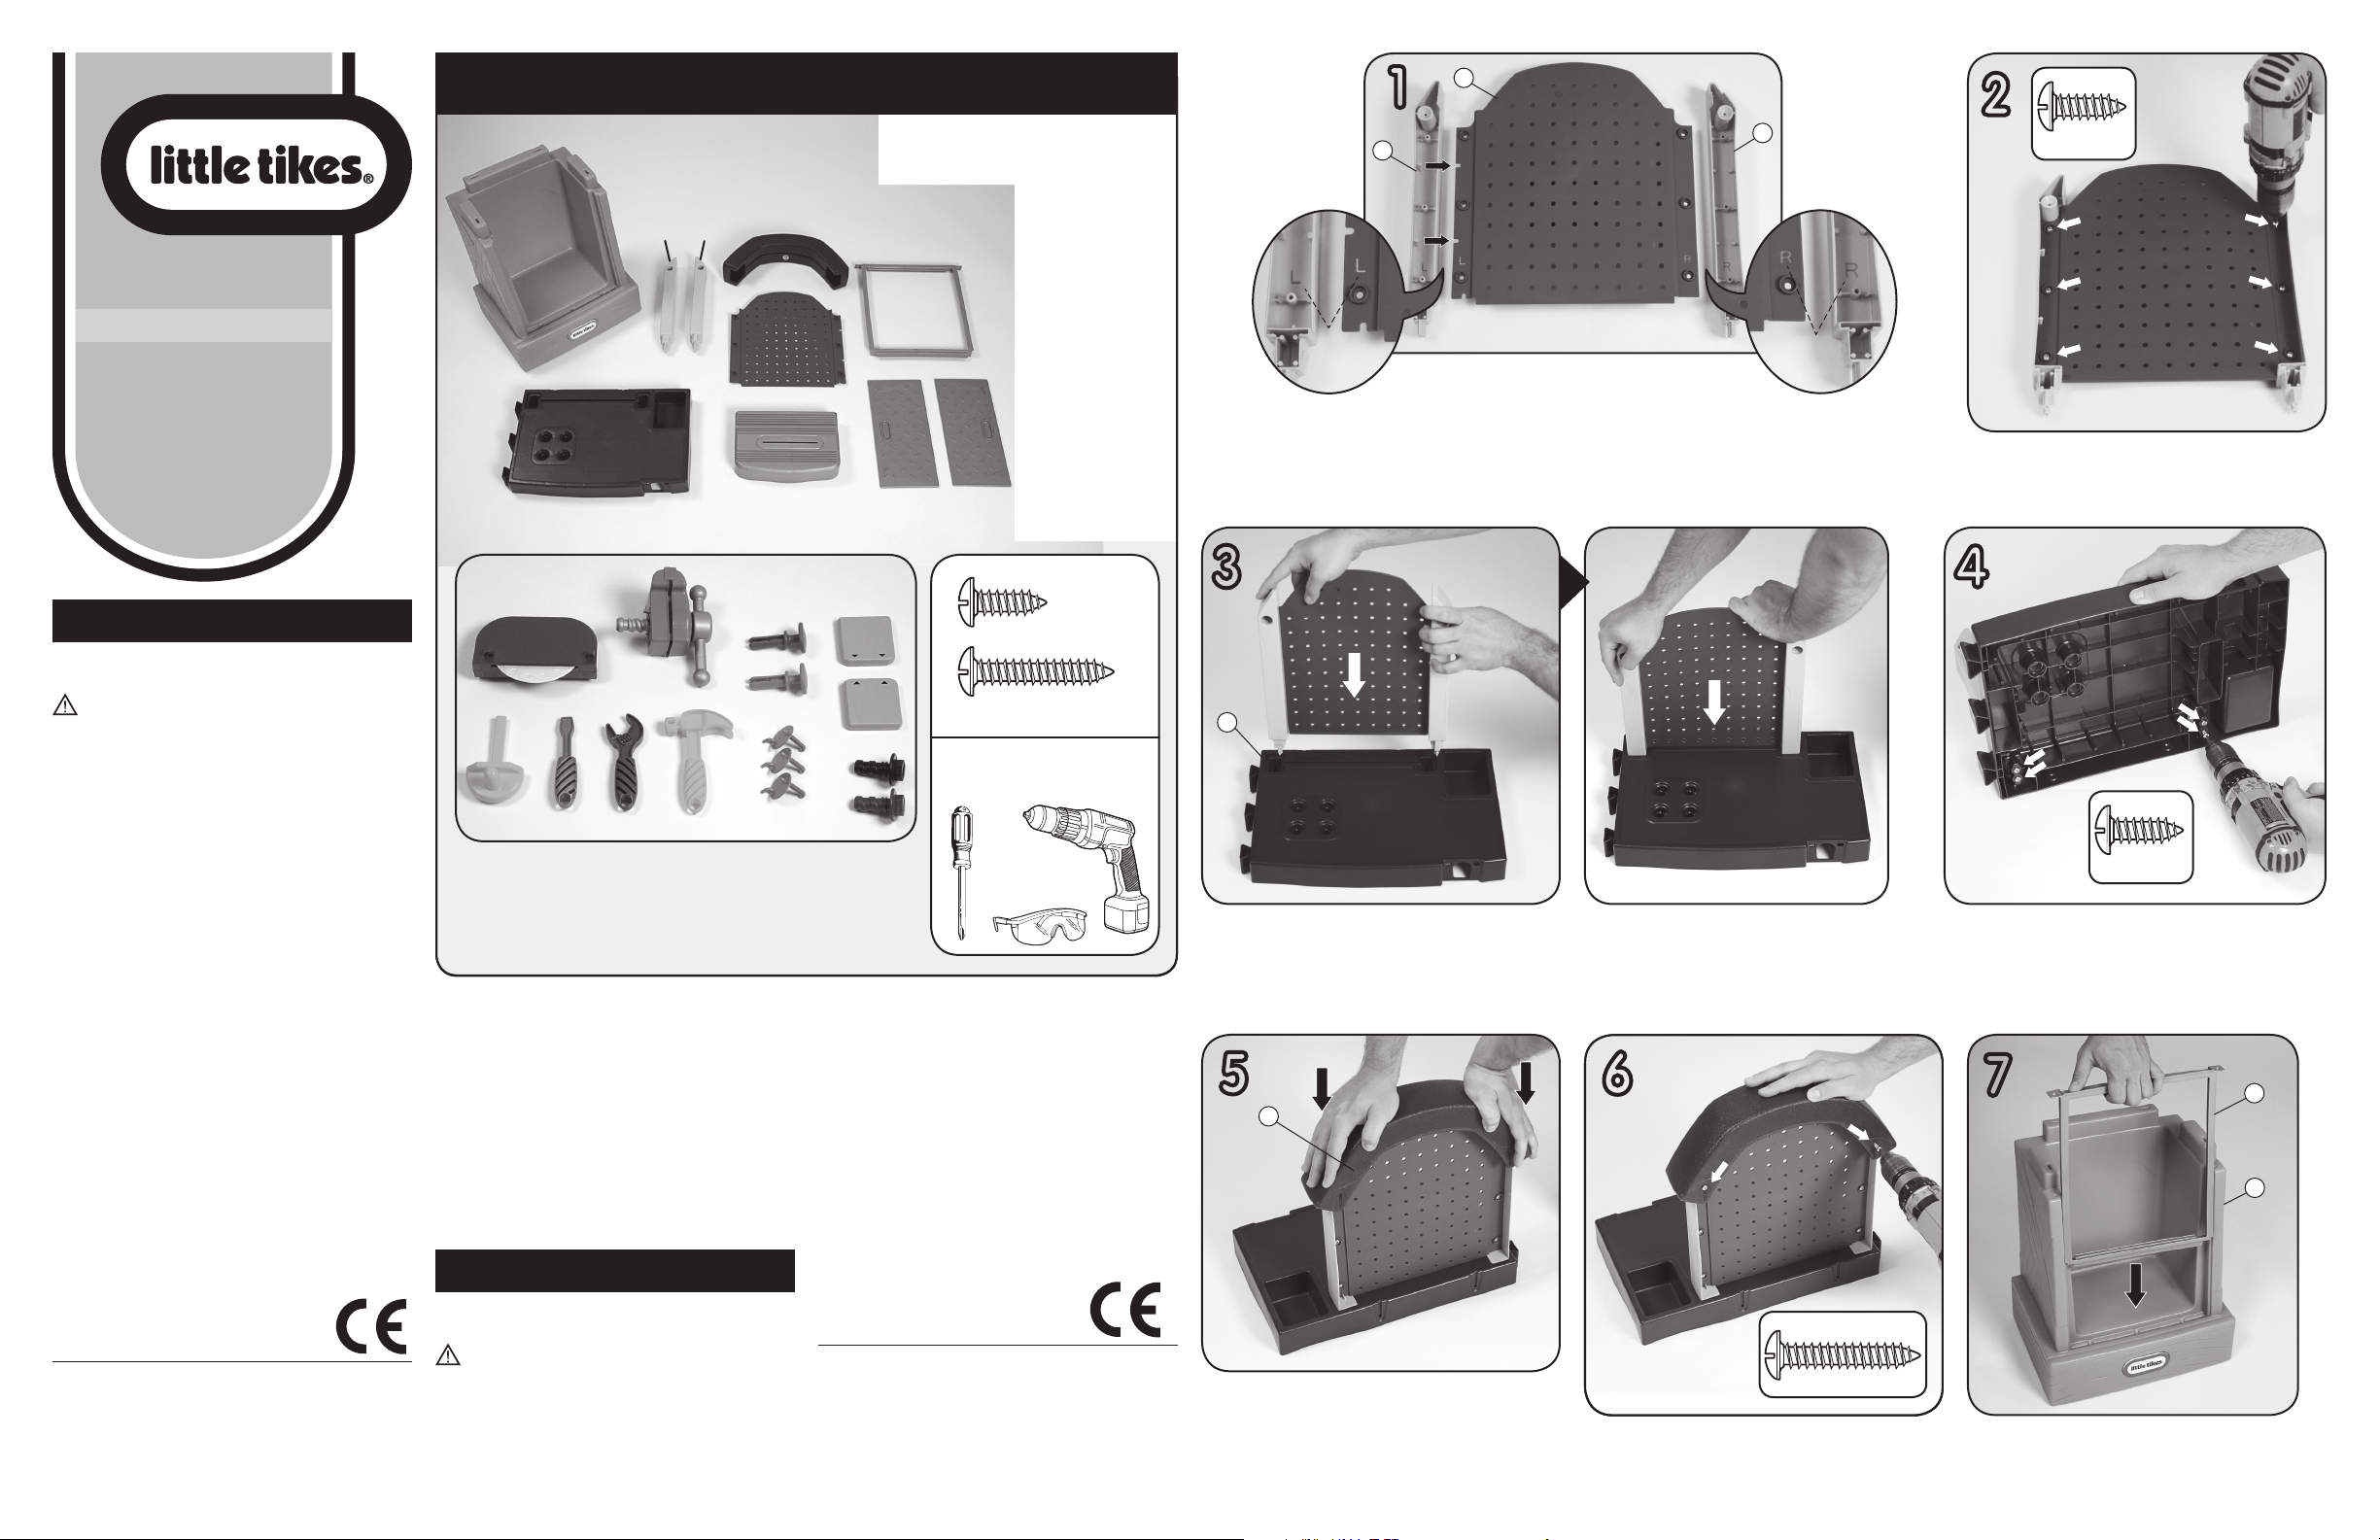
Faites correspondre le support de tableau à chevilles (F) marqué « L » (gauche) au « L » moulé sous l'arrière du tableau à chevilles (B). Alignez les fentes et assemblez.
Répétez pour le support de tableau à chevilles () marqué « R » (droite).
Haga coincidir el soporte del tablero perforado (F) marcado con una “L” (que signica “izquierdo”) con la “L” marcada detrás del tablero (B). Alinee las muescas y ensámblelo.
Repita este paso con el soporte del tablero perforado () marcado con una “R” (que signica “derecho”).
1/2" Screw
Vis de 1.27 cm
Tornillo de 1.27 cm
T x17
J. Saw / Scie / Sierra
K. Vise / Étau / Prensa
L. Nails (2) / Clous (2) / Clavos (2)
M. Wood (2) / Bois (2) / Maderas (2)
N. Screws (2) / Vis (2) / Tornillo (2)
O. Hooks (3) / Crochets (3) / Ganchos (3)
P. Hammer / Marteau / Martillo
Q. Wrench / Clé / Llave
R. Screwdriver / Tournevis / Destornillador
S. Miter / Onglet / Ingletadora
3
Secure using screws (T x6) in 6 locations shown.
Fixez avec 6 vis (T) aux 6 emplacements indiqués.
Fíjelo con 6 tornillos (T) en los 6 lugares indicados.
D
M x2JK
Turn assembled workshop table onto its side. Secure using screws (T x4) in 4
locations shown.
Tournez l'établi assemblées sur son côté. Fixez avec 4 vis (T) aux 4 emplacements indiqués.
Coloque la mesa del taller armada sobre un lado. Fíjela con 4 tornillos (T) en los 4 lugares
indicados.
LIMITED WARRANTY
The Little Tikes Company makes fun, high quality toys. We warrant to the original
purchaser that this product is free of defects in materials or workmanship for one year
* from the date of purchase (dated sales receipt is required for proof of purchase). At
the sole election of The Little Tikes Company, the only remedies available under this
warranty will be either replacement of the defective part of the product or refund
the purchase price of the product. This warranty is valid only if the product has been
assembled and maintained per the instructions. This warranty does not cover abuse,
accident, cosmetic issues such as fading or scratches from normal wear, or any other
cause not arising from defects in material and workmanship. *The warranty period is
three (3) months for daycare or commercial purchasers.
U.S.A and Canada: For warranty service or replacement part information, please
visit our website at www.littletikes.com, call 1-800-321-0183 or write to: Consumer
Service, The Little Tikes Company, 2180 Barlow Road, Hudson, OH 44236, U.S.A. Some
replacement parts may be available for purchase after warranty expires—contact us
for details.
Outside U.S.A. and Canada: Contact place of purchase for warranty service. This
warranty gives you specic legal rights, and you may also have other rights, which
vary from country/state to country/state. Some countries/states do not allow
the exclusion or limitation of incidental or consequential damages, so the above
limitation or exclusion may not apply to you.
FRANÇAIS
TIKES TOUGH™ ATELIER
Ages: 2 ans et plus
Prière de conserver le reçu comme preuve d’achat.
AVERTISSEMENT:
UN ADULTE DOIT EFFECTUER L’ASSEMBLAGE.
• Conserver ces instructions à titre de référence.
• Avant l’assemblage du produit, ce paquet contient des
petites pièces de matériel qui peuvent présenter un risque
d’étouement, et des bords et des arrondis tranchants. Tenir
hors de portée des enfants avant l’assemblage complet.
• La surveillance par un adulte est recommandée. Ne laisser
jamais un enfant sans surveillance.
• Ce produit n’est conçu que pour une utilization
domestique et familiale, à l’intérieur et l’extérIeur.
• Ce produit est destiné à des enfants de 2 ans et plus.
• Ne laissez pas les enfants grimper, s’asseoir, jouer ou
se mettre debout sur la surface de la table. De tels
comportement peuvent rendre la table instable.
• Il est recommandé de se protéger les yeux lors du
montage en portant des lunettes de sécurité.
ÉLIMINATION
• Le démontage et l’élimination de l’appareillage doivent
s’eectuer de manière à ce que des pièces de petites
dimensions ou tranchantes ou d’autres éléments ne
représentent aucune source de dangers lors de la mise au
rebut.
SERVICE CONSOMMATEURS
www.littletikes.fr
Little Tikes
MGA Entertainment
klantenservice@mgae.com
Tel : +31 (0)20 354 8024
Fax : +31 (0)20 659 8034
Imprimé aux Etats-Unis.
B. Pegboard
Tableau à chevilles
Tablero perforado
C. Arch / Arc / Arco
D. Saw table / Table de coupe
Mesa de la sierra
E. Pegboard support - right
Support du tableau à
chevilles – droite
Soporte del tablero
perforado – derecho
F. Pegboard support - left
Support du tableau à
chevilles – gauche
Soporte del tablero
perforado – izquierdo
G. Door track
Glissière de porte
Carril de la puerta
H. Doors (2) / Portes (2)
Puertas (2)
I. Workshop table
Établi / Mesa del taller
G
C
SR
56
www.littletikes.com
www.littletikes.co.uk
www.littletikes.fr
www.littletikes.nl
www.littletikes.pl
621628
XIM621628-1R1 - 1/12
QP
L x2
O x3
N x2
Adult assembly required / Le montage devra être effectué par un adulte /
Debe ser armado por un adulto
H x2
I
E
(right)
B
F
(left)
4
B
F
E
Match pegboard support (F) marked “L” (for left) to the “L” molded in the
back of pegboard (B). Align the notches and assemble. Repeat for pegboard
support (E) marked “R” (for right).
1/2" Screw (1.27 cm)
T x6
Insert assembled pegboard into workshop table (I).
Insérez le tableau à chevilles assemblé dans l'établi (I).
Inserte el tablero perforado armado en la mesa del taller (I).
Press until you feel it snap into place.
Appuyez jusqu'à ce qu'il s'emboîte en place.
Empújelo hasta que sienta que haya encajado.
Attach arch (C) to the top of assembled pegboard. Press into place.
Fixez l'arc (C) sur le haut du tableau à chevilles assemblé. Emboîtez en place.
Coloque el arco (C) encima del tablero perforado armado. Empújelo para asentarlo en
su lugar.
I
C
Secure using screws (U x2) in 2 locations shown.
Fixez avec 2 vis (U) aux 2 emplacements indiqués.
Fíjelo con 2 tornillos (U) en los 2 lugares indicados.
7
Slide door track (G) downward into workshop base (A) as shown.
Faites coulisser la glissière de porte (G) vers le bas dans la base de l'atelier (A) comme
indiqué.
Deslice hacia abajo el carril de la puerta (G) en la base del taller (A) tal y como se muestra.
Libble takes abuse of its services very seriously. We're committed to dealing with such abuse according to the laws in your country of residence. When you submit a report, we'll investigate it and take the appropriate action. We'll get back to you only if we require additional details or have more information to share.
Product:
Forumrules
To achieve meaningful questions, we apply the following rules:
First, read the manual;
Check if your question has been asked previously;
Try to ask your question as clearly as possible;
Did you already try to solve the problem? Please mention this;
Is your problem solved by a visitor then let him/her know in this forum;
To give a response to a question or answer, do not use this form but click on the button 'reply to this question';
Your question will be posted here and emailed to our subscribers. Therefore, avoid filling in personal details.
Register
Register getting emails for Little tikes 621628 Tikes Tough Workshop at:
new questions and answers
new manuals
You will receive an email to register for one or both of the options.
Get your user manual by e-mail
Enter your email address to receive the manual of Little tikes 621628 Tikes Tough Workshop in the language / languages: English, German, Dutch, French, Italian, Polish, Spanish as an attachment in your email.
The manual is 5.64 mb in size.
You will receive the manual in your email within minutes. If you have not received an email, then probably have entered the wrong email address or your mailbox is too full. In addition, it may be that your ISP may have a maximum size for emails to receive.
The manual is sent by email. Check your email
If you have not received an email with the manual within fifteen minutes, it may be that you have a entered a wrong email address or that your ISP has set a maximum size to receive email that is smaller than the size of the manual.
The email address you have provided is not correct.
Please check the email address and correct it.
Your question is posted on this page
Would you like to receive an email when new answers and questions are posted? Please enter your email address.