Green, permanentlyAll dened and active SIP accounts (outgoing)
were successfully registered
Red, permanentlyNot all of the dened and active SIP accounts
were registered (possibly still in process)
Red or green,
inverse ashing
Number of currently used lines
(connecting or connected)
eETH 1 - ETH 4
Green, orange offNo networking device connected
Green, permanentlyConnection to network device operational,
no data trafc
Green, ickeringData transmission
Orange off1000 Mbps
Orange, permanently10 / 100 Mbps
dWAN 1 / WAN 2
Green, orange offNo networking device connected
Green, permanentlyConnection to network device operational,
no data trafc
Green, ickeringData transmission
Orange off1000 Mbps
Orange, permanently10 / 100 Mbps
bRESET
Reset buttonshort press > Restart the device
long press > Reset the device
*) The additional power LED statuses are displayed in 5-seconds rotation
if the device is congured to be managed by the LANCOM Management
Cloud.
This product contains separate open-source software components which
are subject to their own licenses, in particular the General Public License
(GPL). The license information for the device rmware (LCOS) is available
on the device‘s WEBcong interface under “Extras > License information“.
If the respective license demands, the source les for the corresponding
software components will be made available on a download server upon
request.
acebfd
4
Please observe the following when setting up the device
AThe mains plug of the device must be freely accessible.
AFor devices to be operated on the desktop, please attach the adhesive rubber
footpads
ADo not rest any objects on top of the device and do not stack multiple devices
A Keep the ventilation slots on the side of the device clear of obstruction
AMount the device into a 19” unit in a server cabinet using the provided screws and mounting brackets.
Pay attention to the “R” and “L” marks on the brackets for accurate mounting.
a
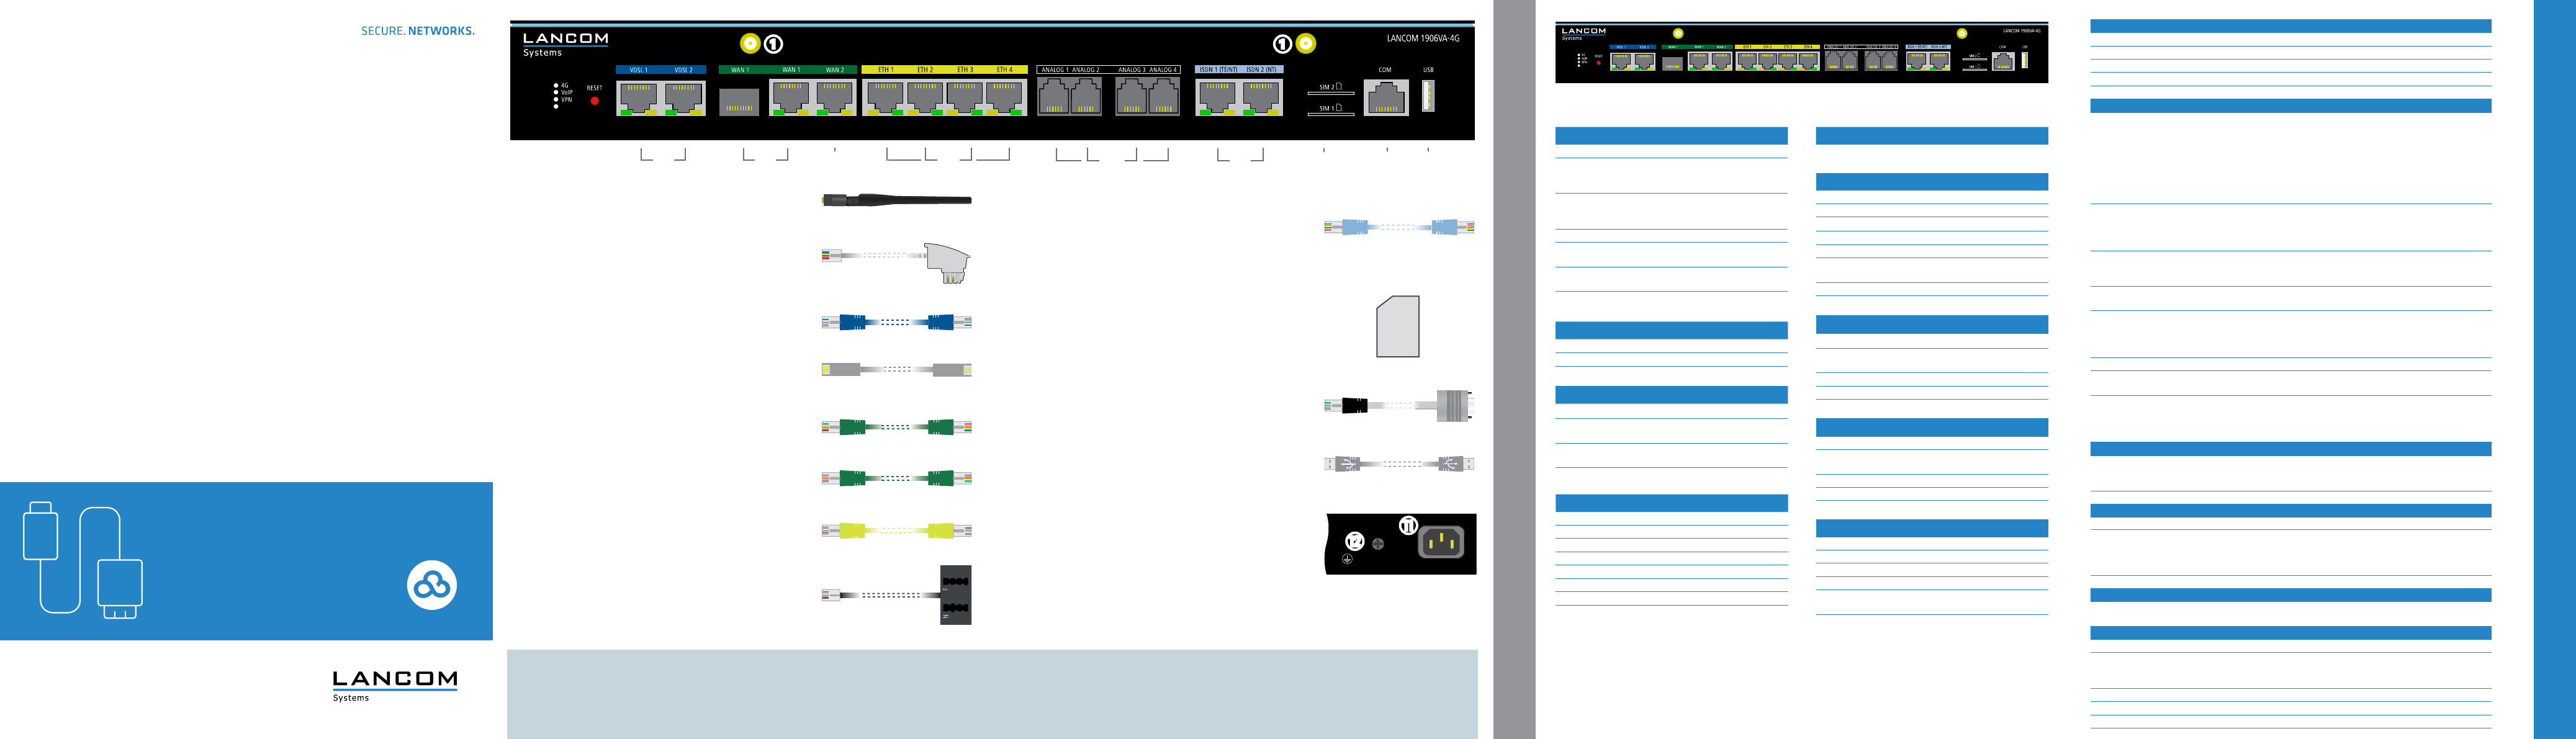
4G / LTE antenna connectors
Connect the supplied cellular antennas to the connectors
at the front of the device.
b
VDSL / ADSL interfaces*
If required, use the supplied DSL cables for the IP-based line to con-
nect each VDSL / ADSL interface to a separate provider’s telephone
socket. For more information, please contact your Internet service
provider.
*For operation with over POTS devices please use the enclosed DSL
cables with the dark blue plugs.
c
WAN 1 interfaces (SFP / TP combo port)
Insert a suitable SFP module (e.g. 1000Base-SX or 1000Base-LX)
into the SFP port. Choose a cable compatible with the SFP module
and connect it as described in the module’s documentation. SFP
modulel and cable are not included.
If desired, alternatively connect the WAN 1 TP interface to a WAN
modem using an ethernet cable.
d
WAN 2 interface (TP)
Connect the WAN 2 interface to a WAN modem using an Ethernet
cable.
e
Ethernet interface
Use the cable with the kiwi-colored connectors to connect one of
the interfaces ETH 1 to ETH 4 to your PC or a LAN switch.
f
Analog interfaces
Connect analog terminal devices to the analog interfaces either
directly via RJ11 or with the help of the enclosed TAE adapters.
g
ISDN interfaces
ISDN 1: Internal (NT) or external (TE) ISDN bus.
This feature is controlled by LCOS.
ISDN 2: Internal (NT) ISDN-bus.
A 100-Ohm resistor for line termination is
switchable in LCOS.
h
SIM card slots
Slide the SIM card(s) into slot SIM1 or SIM2 using the marker
to ensure that the card is the right way round. Ensure that the
SIM card clicks into place on insertion. To remove the card from
the device, press the card lightly into the device.
Let go to release the SIM card from the slot.
SIM
i
Conguration interface
Use the included serial conguration cable to connect the serial
interface (COM) to the serial interface of the device you want to
use for conguring / monitoring.
j
USB interface
You can use the USB interface to connect a USB printer or a
USB storage device.
k
l
Power connector and grounding point (device back side)
Supply power to the device via the power connector. Please
use the IEC power cable supplied (separately available for WW
devices).
ATTENTION: High touch current possible! Connect to earth
before connecting the power supply.
Warning! High touch current.
Connect to earth before
connecting the power supply.
h
i
j
c
d
b
e
f
POWER
11
g
POWER
K
L
LANCOM 1906VA-4G
Quick Reference Guide
Cloud-ready
Need help? Post your question in this forum.
Report abuse
Libble takes abuse of its services very seriously. We're committed to dealing with such abuse according to the laws in your country of residence. When you submit a report, we'll investigate it and take the appropriate action. We'll get back to you only if we require additional details or have more information to share.
Product:
Forumrules
To achieve meaningful questions, we apply the following rules:
First, read the manual;
Check if your question has been asked previously;
Try to ask your question as clearly as possible;
Did you already try to solve the problem? Please mention this;
Is your problem solved by a visitor then let him/her know in this forum;
To give a response to a question or answer, do not use this form but click on the button 'reply to this question';
Your question will be posted here and emailed to our subscribers. Therefore, avoid filling in personal details.
Register
Register getting emails for Lancom 1906VA-4G at:
new questions and answers
new manuals
You will receive an email to register for one or both of the options.
Get your user manual by e-mail
Enter your email address to receive the manual of Lancom 1906VA-4G in the language / languages: English as an attachment in your email.
The manual is 0,49 mb in size.
You will receive the manual in your email within minutes. If you have not received an email, then probably have entered the wrong email address or your mailbox is too full. In addition, it may be that your ISP may have a maximum size for emails to receive.
If you have not received an email with the manual within fifteen minutes, it may be that you have a entered a wrong email address or that your ISP has set a maximum size to receive email that is smaller than the size of the manual.
The email address you have provided is not correct.
Please check the email address and correct it.
Your question is posted on this page
Would you like to receive an email when new answers and questions are posted? Please enter your email address.