Green / orange, blinkingConguration password not set. Without a
conguration password, the conguration
data in the device is unprotected.
1x green inverse
blinking*
Connection to the LMC active, pairing OK,
device not claimed
2x green inverse
blinking*
Pairing error, resp.
LMC activation code not available
3x green inverse
blinking*
LMC not accessible, resp.
communication error
fVPN
OffVPN connection inactive
Green, permanentlyVPN connection active
Green, blinkingEstablishing VPN connections
eETH
OffNo networking device attached
Green, permanentlyConnection to network device operational,
no data trafc
Green, ickeringData transmission
SETTING UP AND CONNECTING THE DEVICE
TECHNICAL DATA
bWLAN
OffNo Wi-Fi network dened or Wi-Fi module
deactivated. The Wi-Fi module is not
transmitting beacons.
Green, permanentlyAt least one Wi-Fi network is dened and
Wi-Fi module activated. The Wi-Fi module
is transmitting beacons.
Green, inverse ashingNumber of ashes = number of connected
Wi-Fi stations and P2P wireless connec-
tions, followed by a pause (default).
Alternatively the frequency of the ashing
can indicate signal strength over the
dened P2P link or the signal strength
between the access point and the device
operating in client mode.
Green, blinkingDFS scanning or other scan procedure
c4G
OffCellular interface disabled
Green,permanentlyConnection to cellular network active
Green, ickeringCellular data transmission
Orange, permanentlyLogon to cellular network successful
Orange, blinkingLogging on to cellular network
Red, permanentlyHardware error/module unavailable
Red / green, blinkingSIM card error (PIN)
Red / orange, blinkingUploading module rmware
dSIGNAL
OffNo cellular reception
Green, permanentlyGood signal strength,
greater than or equal to -70 dB
Orange, permanentlyMedium signal strength,
eld strength between -86 and -71 dB
Orange, blinkingLow signal strength,
eld strength less than -87 dB
**) Please respect the restrictions which apply in your country when setting up an antenna system (in particular the
antenna gain and transmission power). For information about calculating the correct antenna setup, please refer to
www.lancom-systems.com.
This product contains separate open-source software components which are subject to their own licenses, in particular
the General Public License (GPL). The license information for the device rmware (LCOS) is available on the device‘s
WEBcong interface under “Extras > License information“. If the respective license demands, the source les for the
corresponding software components will be made available on a download server upon request.
When working with separately purchased antennas, please ensure you
do not exceed the maximum permissible transmission power. The system
operator is responsible for adhering to the threshold values.
Antennas are only to be attached or changed when the device is switched
off. Mounting or demounting antennas with the device switched on may
cause the destruction of the 4G or WLAN modules!
*) The additional power LED statuses are displayed in 5-seconds
rotation if the device is congured to be managed by the LANCOM
Management Cloud.
LANCOM 1780EW-4G+
4G
SIGNAL
ETH 2
Power
ETH 1
WLAN
VPN
acebfd
LANCOM 1780EW-4G+
Quick Reference Guide
Cloud-ready
MODEM
SIM
efgh
aacbc
a
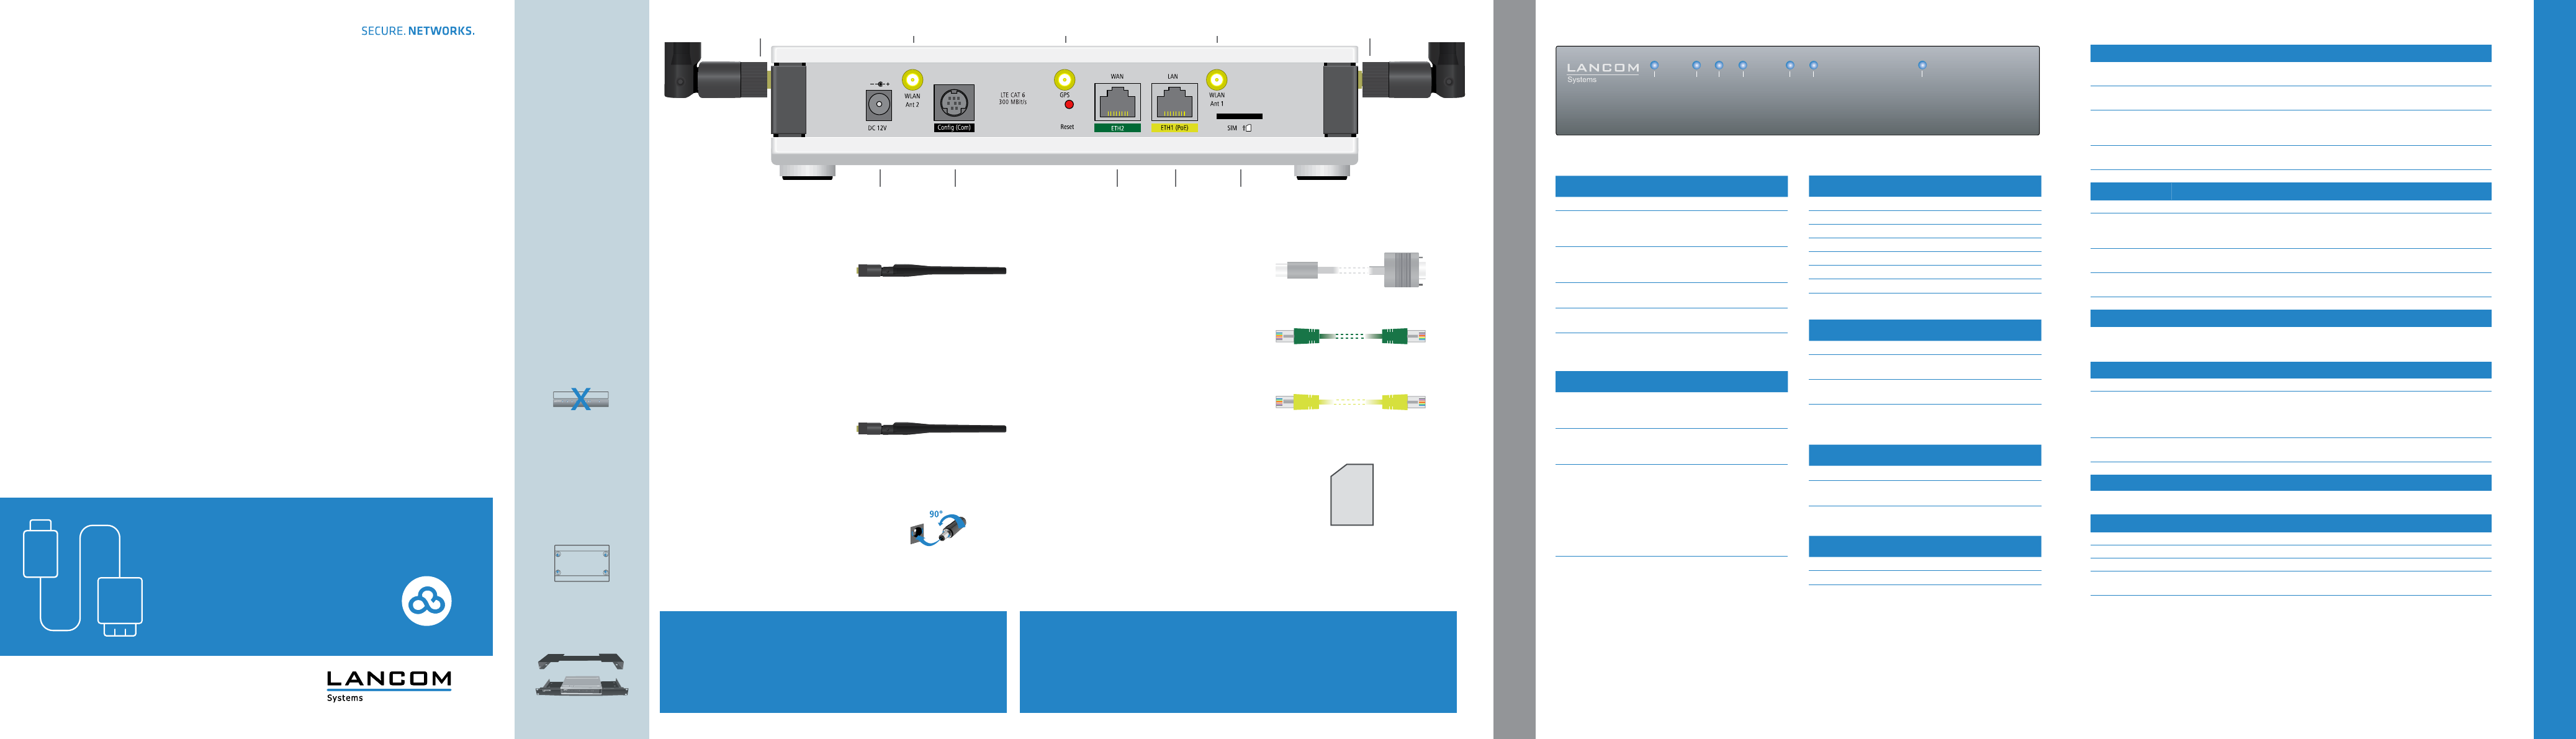
LTE / 4G antennas
Connect the two supplied cellular
antennas to the connectors located
at the device‘s sides.
b
GPS antenna (optional)
Connect the GPS antenna (free of
charge) to the connector GPS
(see included voucher).
c
WLAN antennas
Screw the two supplied WLAN anten-
nas onto the connectors WLAN Ant 1
and WLAN Ant 2. The desired MIMO
behaviour can be congured under
> Physical WLAN Settings
> Radio
> Antenna grouping
d
Power
When connecting the cable to the
device, turn the bayonet connector
90° clockwise until it clicks into place.
Use only the supplied power adapter.
e
Serial interface
Conguring the device via the serial interface
requires a serial conguration cable
(available as an accessory).
f
WAN interface
Use the cable with the green-colored con-
nectors to connect the interface ETH2 to your
WAN modem.
g
Ethernet interface
Use the cable with the kiwi-colored connectors
to connect the interface ETH1 (PoE) to your PC
or a LAN switch.
h
Optional: SIM card
Slide the SIM card into the slot using the
marker to ensure that the card is the right way
round. Ensure that the SIM card clicks into
place on insertion. To remove the card from
the device again, press the card lightly into
the device. Let go to release the SIM card from
the slot.
SIM
d
5
The SIM card is only to be inserted or removed when the device is switched off.
Inserting or removing the SIM card with the device switched on may cause the destruction of
the 4G module!
5
4
Need help? Post your question in this forum.
Report abuse
Libble takes abuse of its services very seriously. We're committed to dealing with such abuse according to the laws in your country of residence. When you submit a report, we'll investigate it and take the appropriate action. We'll get back to you only if we require additional details or have more information to share.
Product:
Forumrules
To achieve meaningful questions, we apply the following rules:
First, read the manual;
Check if your question has been asked previously;
Try to ask your question as clearly as possible;
Did you already try to solve the problem? Please mention this;
Is your problem solved by a visitor then let him/her know in this forum;
To give a response to a question or answer, do not use this form but click on the button 'reply to this question';
Your question will be posted here and emailed to our subscribers. Therefore, avoid filling in personal details.
Register
Register getting emails for Lancom 1780EW-4G plus at:
new questions and answers
new manuals
You will receive an email to register for one or both of the options.
Get your user manual by e-mail
Enter your email address to receive the manual of Lancom 1780EW-4G plus in the language / languages: English as an attachment in your email.
The manual is 0,52 mb in size.
You will receive the manual in your email within minutes. If you have not received an email, then probably have entered the wrong email address or your mailbox is too full. In addition, it may be that your ISP may have a maximum size for emails to receive.
If you have not received an email with the manual within fifteen minutes, it may be that you have a entered a wrong email address or that your ISP has set a maximum size to receive email that is smaller than the size of the manual.
The email address you have provided is not correct.
Please check the email address and correct it.
Your question is posted on this page
Would you like to receive an email when new answers and questions are posted? Please enter your email address.