EspañolNederlands Italiano
901-2004-00
ABC
DE
s
d
2
0
0
v Docking
St
a
t
i
on
w
i
t
h V
ideo
2
1
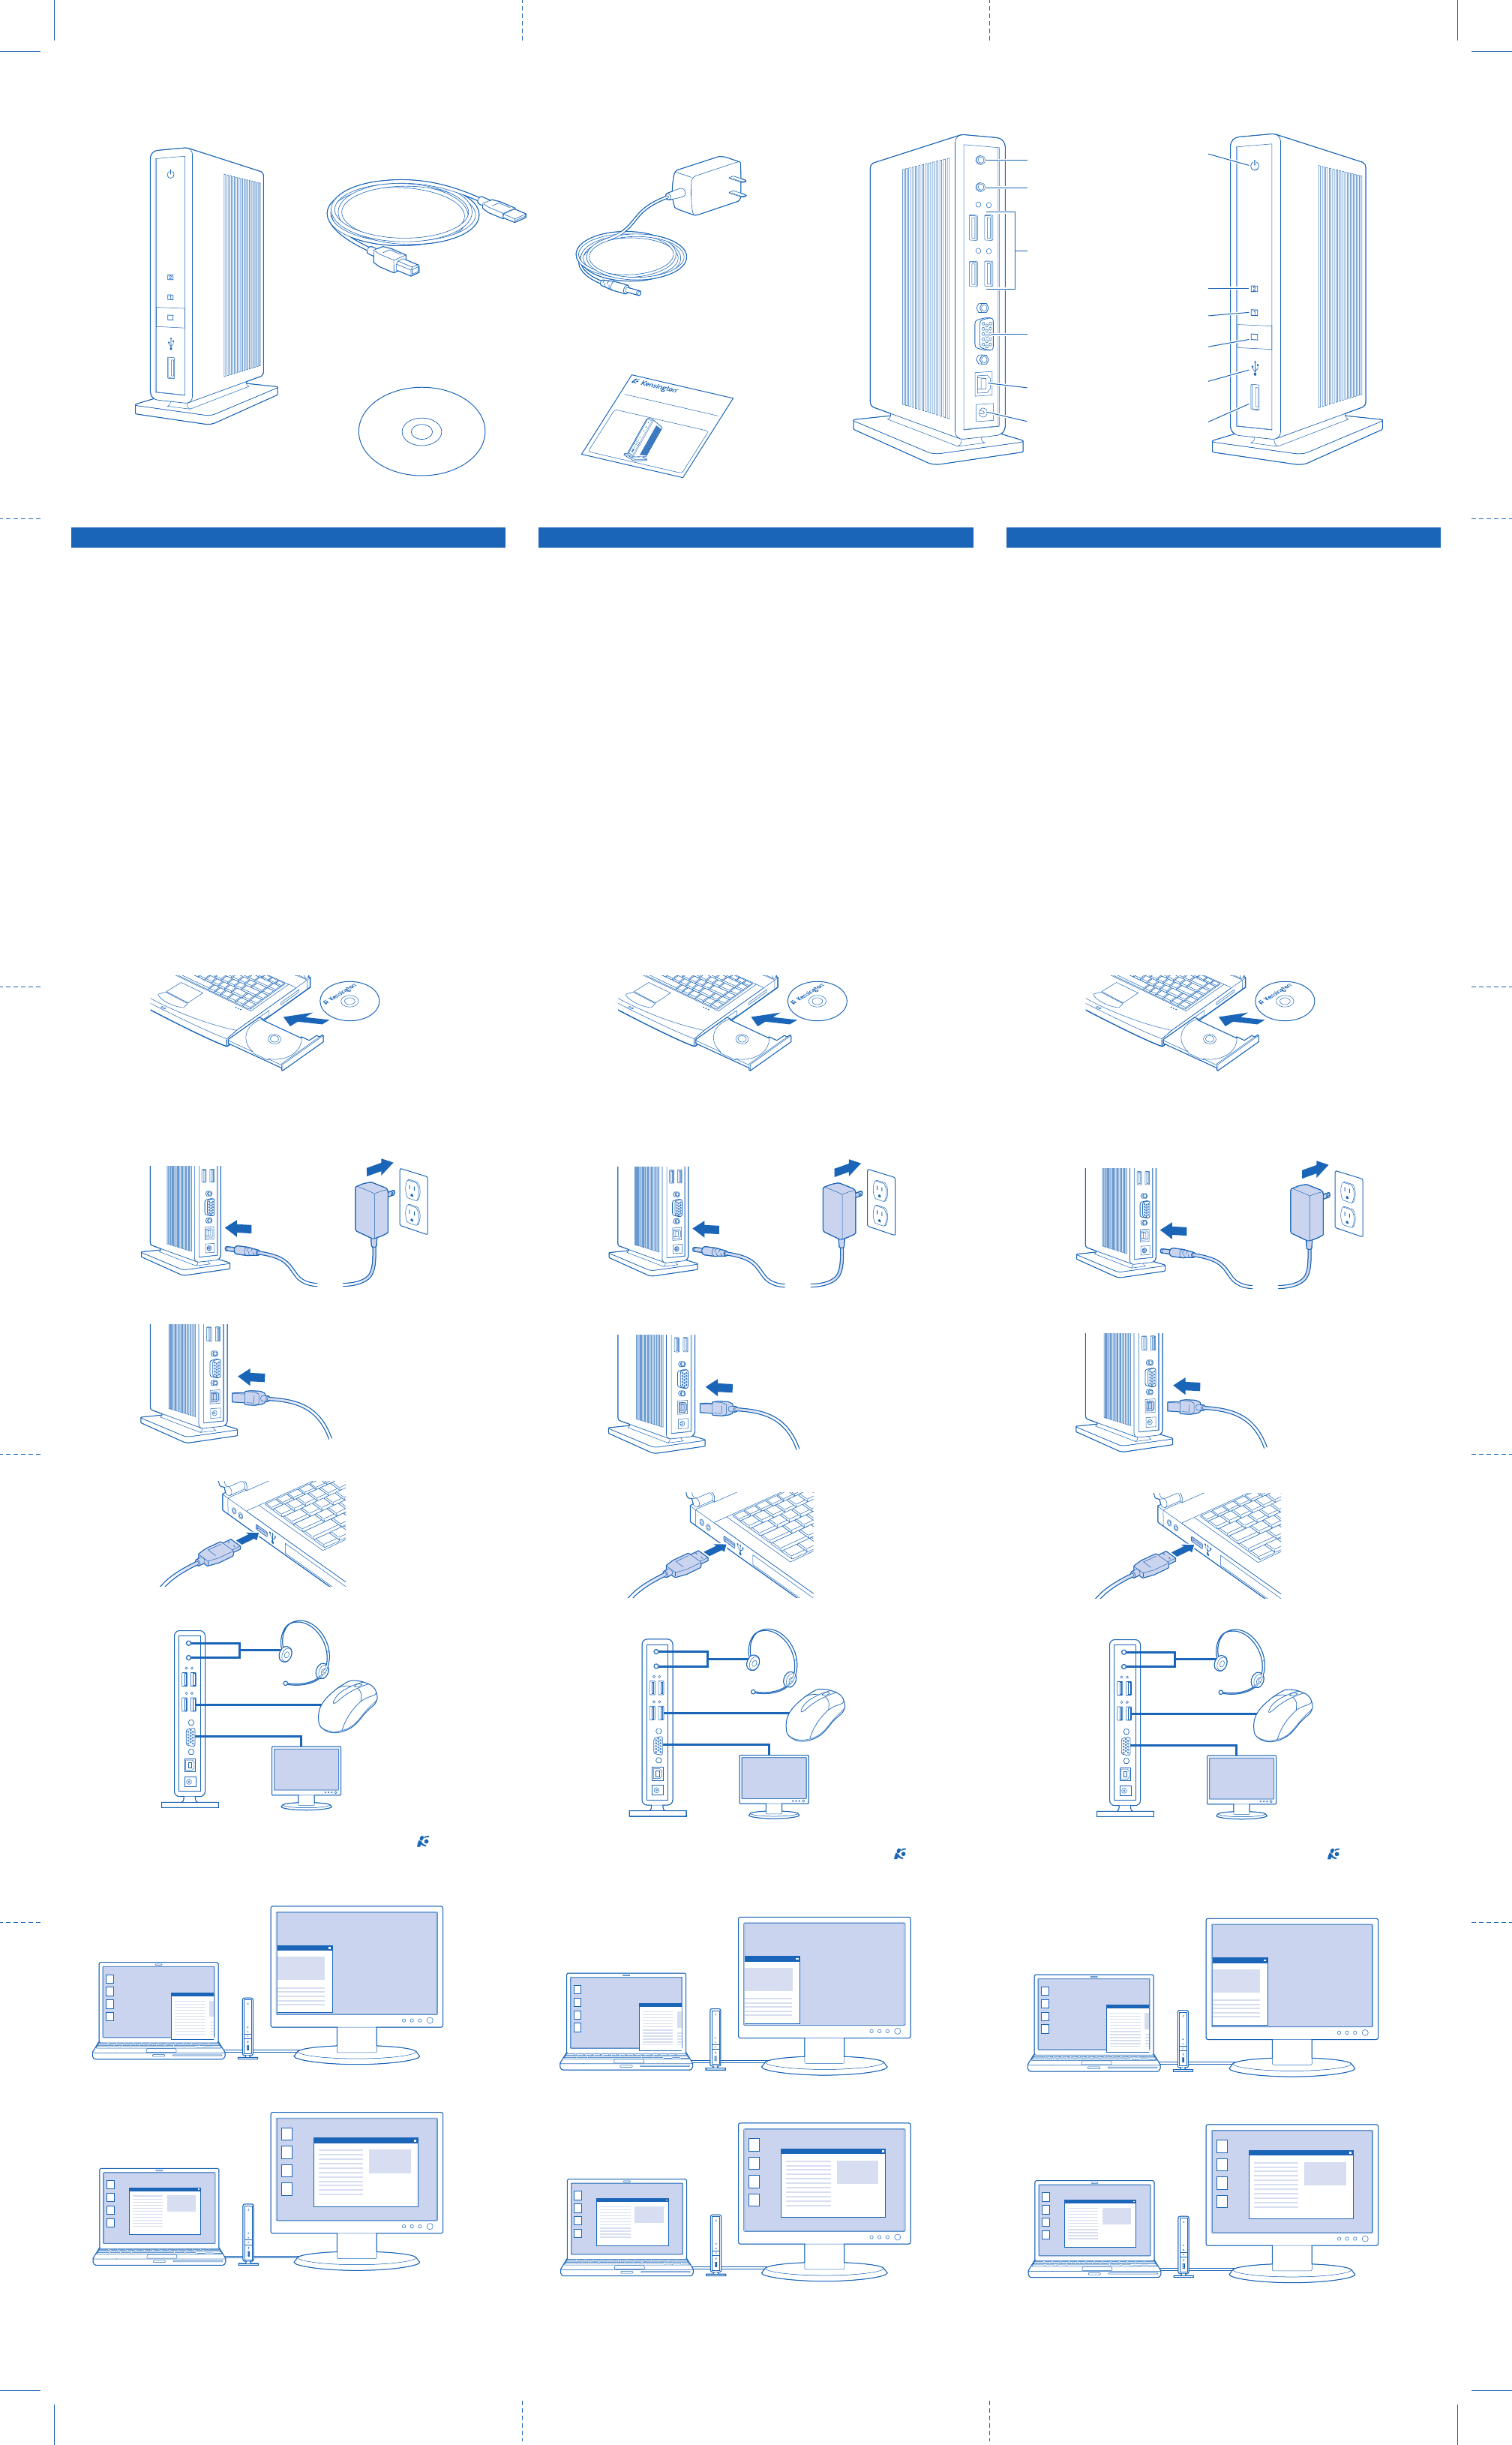
Inhoud
A. sd200v-dockingstation met video voor notebooks
B. USB 2.0-kabel
C. Voedingsadapter
D. Software-installatie-CD en handleiding
E. Snelstartgids
Onderdelen
Achterzijde
F. Stereo audio-uitgang
G. Microfooningang
H. 4 USB 2.0-poorten met statusindicatielampjes
I. VGA-video-uitgang
J. USB-upstreamconnector
K. Aansluiting voedingsadapter
Voorzijde
L. Voedings-/verbindingsindicatielampje
M. Indicatielampje weergavemodus 2
N. Indicatielampje weergavemodus 1
O. Button DualView
P. USB-verbindingslampje (voor)
Q. USB 2.0-poort
Dockingstation installeren en verbinden
1 Plaats de CD in het notebook.
2 Volg de aanwijzingen op het scherm.
Opmerking: tijdens de installatie krijgt u mogelijk enkele seconden een blanco
scherm. Dit is een normaal onderdeel van het installatieproces.
3 Start het notebook opnieuw op, indien hierom wordt gevraagd.
4 Sluit de voedingsadapter aan op het dockingstation en een stopcontact.
5 Sluit de USB 2.0-kabel aan op de USB-upstreamconnector op het dockingstation.
6 Sluit de USB 2.0-kabel aan op de USB-poort op het notebook.
7 Sluit apparatuur—muizen, monitor, enz.—aan op het dockingstation.
8 (Optioneel) Als de monitor wordt aangesloten, past u de weergave-instellingen aan:
a Klik met de rechtermuisbutton op het Kensington-pictogram in het
systeemvak.
b Selecteer Extended (DualView) (Uitgebreid (DualView)) of Clone (Kloon).
c Selecteer de gewenste schermresolutie.
9 (Optioneel) Ga voor de gedetailleerde handleiding naar Start/Alle
programma's/sd200v.
Extended mode (Dualview) (Uitgebreid (DualView))
Modus Clone (Kloon)
Contenuto
A. Dock di espansione sd200v per notebook con video
B. Cavo USB 2.0
C. Alimentatore di corrente
D. CD di installazione del software e Manuale di istruzioni
E. Guida veloce
Componenti
Lato posteriore
F. Uscita audio stereo
G. Ingresso del microfono
H. 4 porte USB 2.0 con spie di stato di funzionamento
I. Uscita video VGA
J. Connettore upstream USB
K. Jack dell'alimentatore di corrente
Lato anteriore
L. Spia di alimentazione/connessione
M. Spia 2 della modalità di visualizzazione
N. Spia 1 della modalità di visualizzazione
O. Pulsante DualView
P. Spia anteriore di stato della connessione USB
Q. Porta USB 2.0
Installazione e collegamento del dock di espansione
1 Inserire il CD nel notebook.
2 Seguire le istruzioni visualizzate sullo schermo.
Nota: durante l'installazione lo schermo del notebook può restare nero per alcuni
secondi. Si tratta di una parte normale del processo d'installazione.
3 Riavviare il notebook se richiesto.
4 Collegare l'alimentatore di corrente al dock di espansione e alla presa a muro.
5 Collegare il cavo USB 2.0 al connettore upstream USB presente sul dock di
espansione.
6 Collegare il cavo USB 2.0 alla porta USB del notebook.
7 Collegare le periferiche (mouse, tastiera, monitor e così via) al dock di espansione.
8 (Opzionale) Se il monitor è connesso, modificare le impostazioni del display.
a Fare clic con il pulsante destro del mouse sull'icona Kensington nella barra
di sistema.
b Selezionare Estesa (DualView) o Clonazione.
c Selezionare la risoluzione desiderata per lo schermo.
9 (Opzionale) Per visualizzare il Manuale di istruzioni dettagliato, andare su
Start/Tutti i programmi/sd200v.
Modalità estesa (Dualview)
Modalità di clonazione
Contenido
A. Replicador de puertos sd200v con video para portátil
B. Cable USB 2.0
C. Adaptador de alimentació
D. CD de instalación de software y Manual de instrucciones
E. Guía de inicio rápido
Components
Parte trasera
F. Salida de audio estéreo
G. Entrada de micrófono
H. 4 puertos USB 2.0 con indicadores luminosos de estado
I. Salida de vídeo VGA
J. Conector de la fuente de datos USB
K. Clavija del adaptador de alimentación
Parte frontal
L. Indicador luminoso de alimentación/ conexión
M. Indicador luminoso de modo de visualización 2
N. Indicador luminoso de modo de visualización 1
O. Botón DualView
P. Indicador de estado de conexión USB frontal
Q. Puerto USB 2.0
Instalación y conexión del replicador de puertos
1 Inserte el CD en el equipo.
2 Siga las instrucciones que aparecen en pantalla.
Nota: durante la instalación es posible que se vaya la imagen de la pantalla del
portátil. Esto forma parte del proceso normal de instalación.
3 Reinicie el portátil si se le pide.
4 Una el adaptador de alimentación al replicador de puertos y a la toma de pared.
5 Conecte el cable USB 2.0 al conector de la fuente de datos USB del replicador
de puertos.
6 Una el cable USB 2.0 al puerto USB del portátil.
7 Conecte dispositivos: ratones, monitor, etc. al replicador.
8 (Opcional) Si el monitor está conectado, ajuste los parámetros de visualización:
a Haga clic con el botón derecho en el icono de Kensington de la barra
de tareas.
b Seleccione Extendido (DualView) o Clon.
c Seleccione la resolución de pantalla deseada.
9 (Opcional) Para ver el Manual de instrucciones detallado, vaya a Inicio/Todos los
programas/sd200v.
Modo extendido (DualView)
Modo clon
F
G
H
I
J
K
L
M
N
O
P
Q