Contents
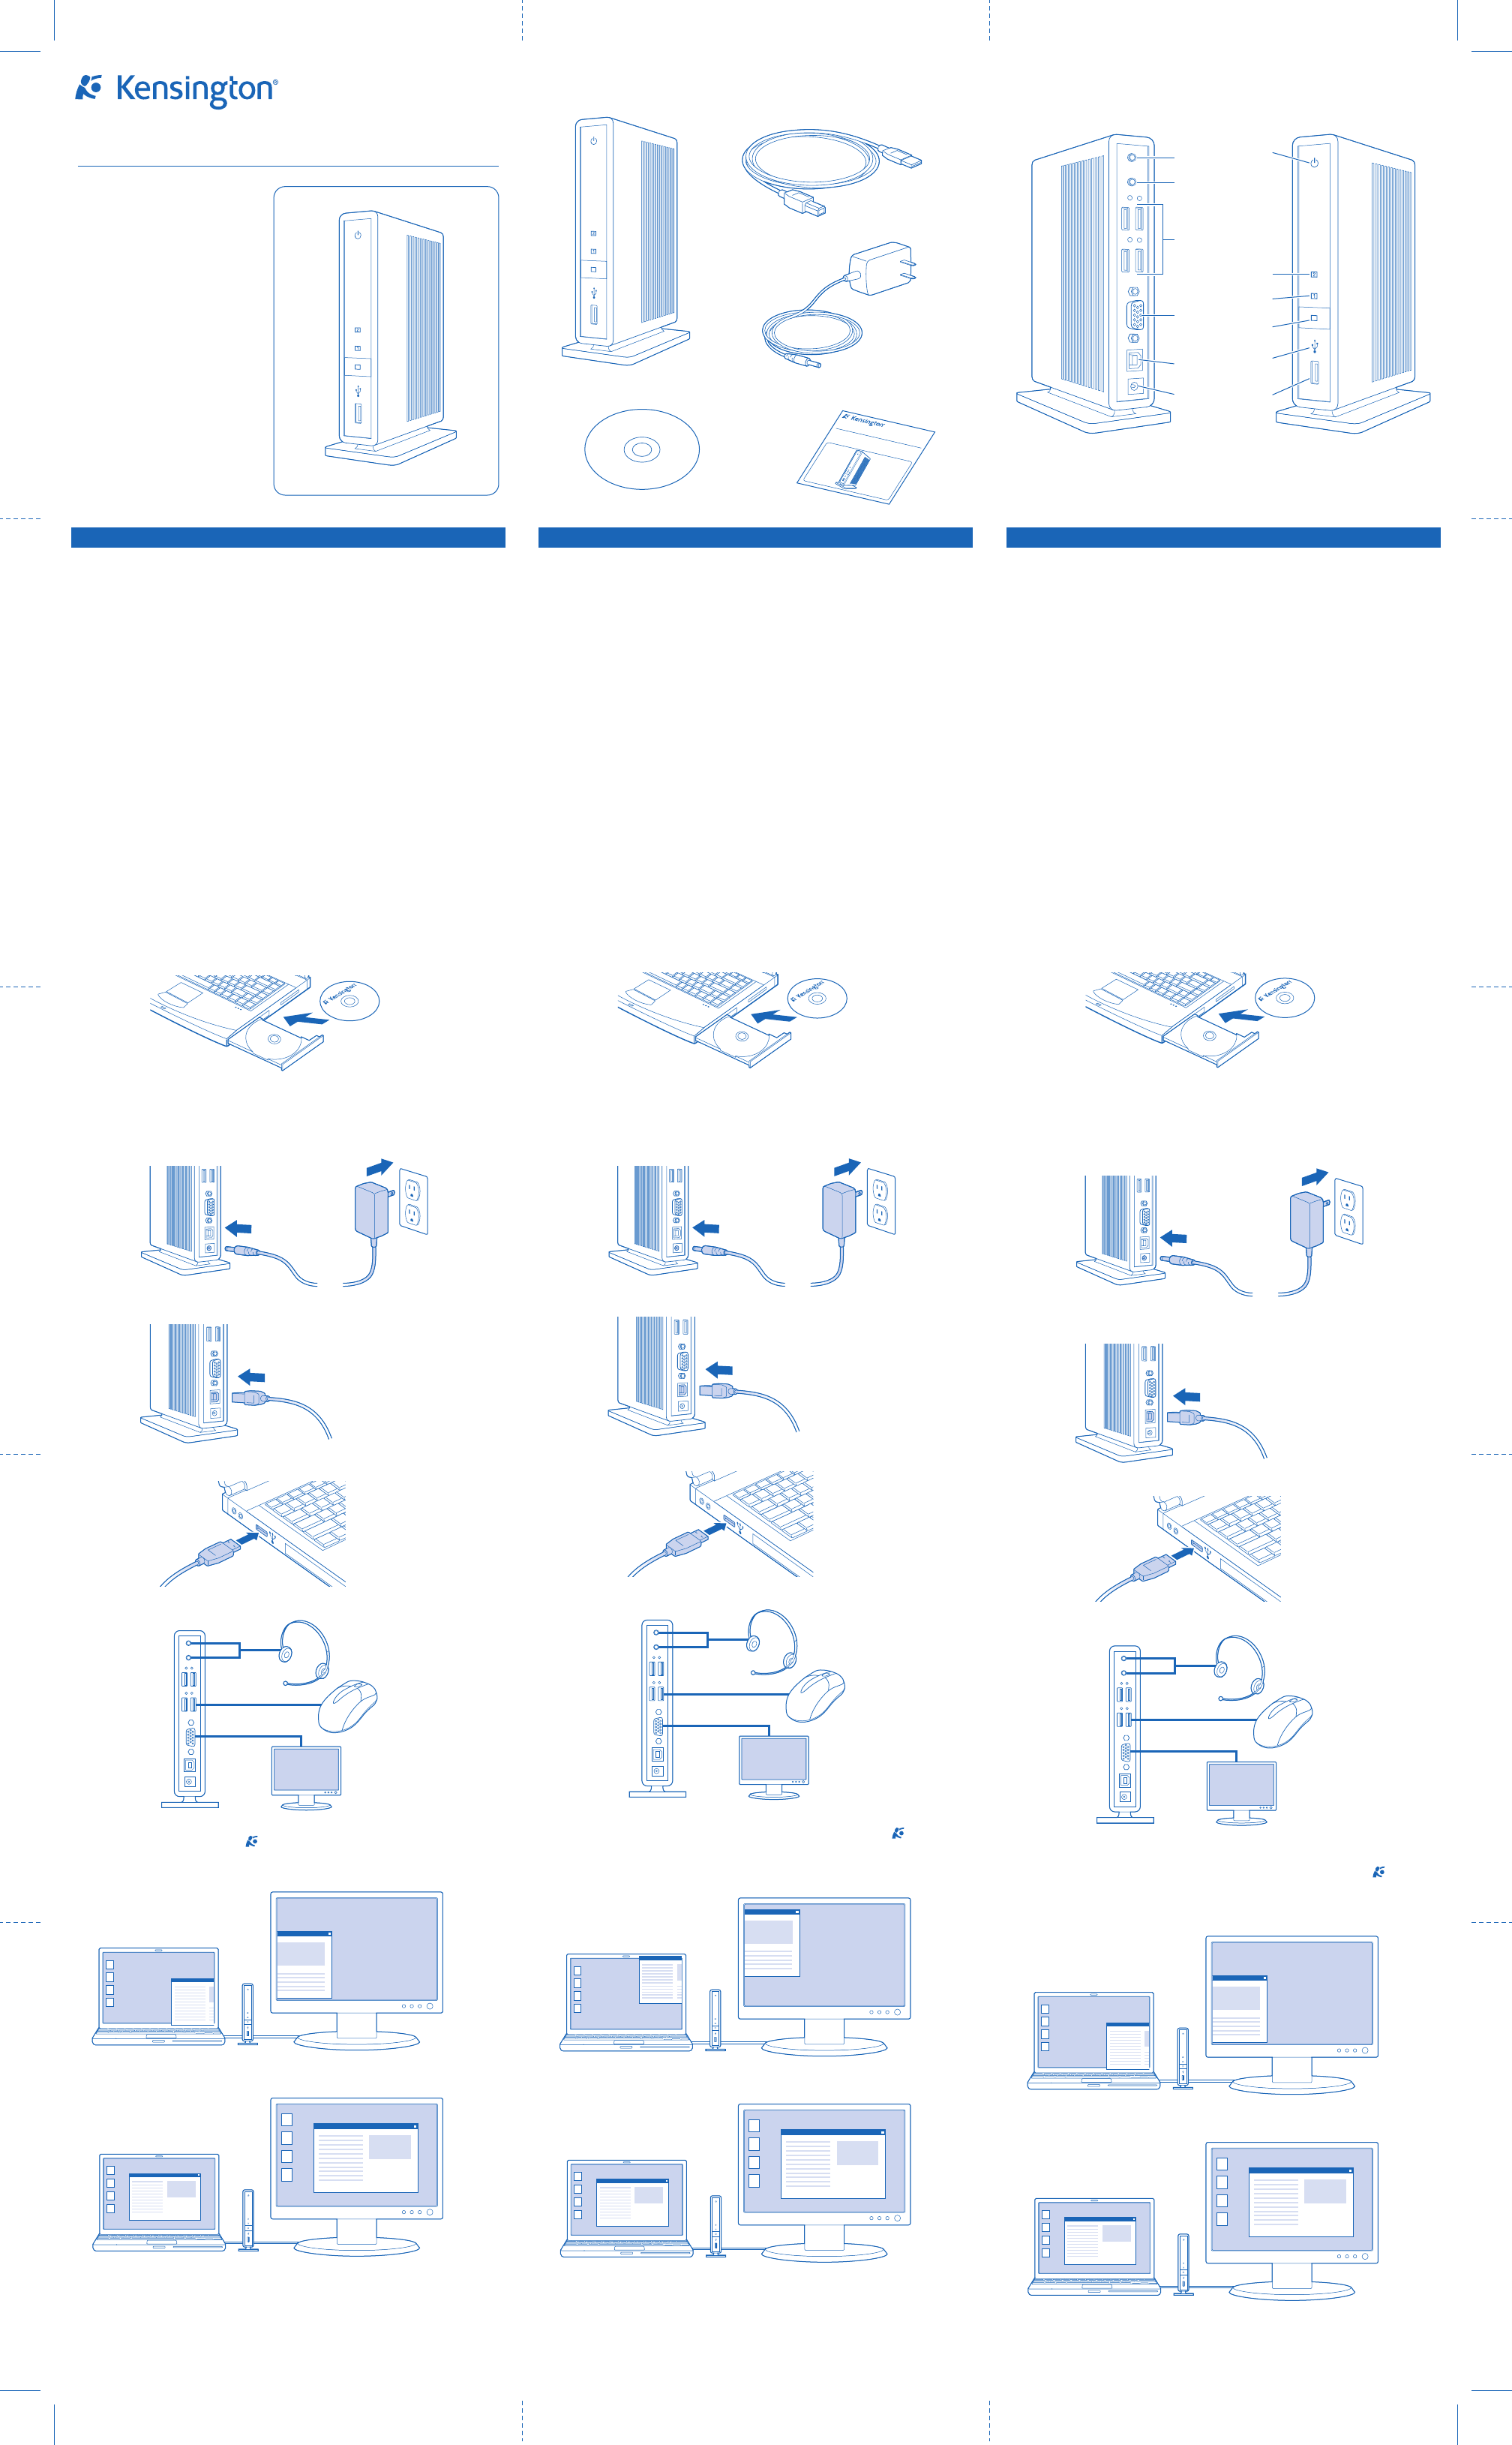
A. sd200v Notebook docking station with video
B. USB 2.0 cable
C. Power adapter
D. Software Installation CD and Instruction Guide
E. Quick Start Guide
Components
Back
F. Stereo audio output
G. Microphone input
H. 4 USB 2.0 ports with status indicator lights
I. VGA video output
J. USB upstream connector
K. Power adapter jack
Front
L. Power/connection indicator light
M. Display mode indicator light 2
N. Display mode indicator light 1
O. DualView button
P. Front USB connection status light
Q. USB 2.0 port
Set Up and Connect Docking Station
1 Insert CD into notebook.
2 Follow onscreen instructions.
Note: During the installation, notebook screen may go blank for a few seconds.
This is a normal part of the installation process.
3 Reboot notebook if prompted.
4 Attach power adapter to docking station and to working wall outlet.
5 Attach USB 2.0 cable to USB upstream connector on docking station.
6 Attach USB 2.0 Cable to USB port on notebook.
7 Connect devices—mice, monitor, and so on—to docking station.
8 (Optional) If monitor is connected, adjust display settings:
a Right-click Kensington icon in taskbar.
b Select Extended (DualView) or Clone.
c Select desired screen resolution.
9
(Optional) To view detailed Instruction Guide, go to Start/All Programs/sd200v.
QUICK START GUIDE
GUIDE DE DEMARRAGE RAPIDE
KURZANLEITUNG
SNELSTARTGIDS
GUIDA VELOCE
MANUAL DE INICIO RÁPIDO
sd200v Notebook docking station with video
English Français Deutsch
AB
DE
C
Extended mode (Dualview)
Clone mode
s
d2
00v N
o
t
e
boo
k d
ock
ing
s
t
atio
n
with
v
ide
o
F
G
H
I
J
K
L
M
N
O
P
Q
Mode Etendue (Dualview)
Mode Clone
Inhalt
A. sd200v Notebook-Dockingstation mit Video
B. USB 2.0-Kabel
C. Netzteil
D. Software-Installations-CD und Bedienungsanleitung
E. Kurzanleitung
Komponenten
Rückseite
F. Stereo-Audioausgang
G. Mikrofoneingang
H. 4 USB-2.0-Schnittstellen mit Statusanzeigen
I. VGA-Videoausgabe
J. Vorgeschalteter USB-Anschluss
K. Netzteilbuchse
Vorderseite
L. Strom-/Verbindungs-Indikatoranzeige
M. Indikatoranzeige 2 für Anzeigemodus
N. Indikatoranzeige 1 für Anzeigemodus
O. Taste “DualView”
P. Statusanzeige für Front-USB-Anschluss
Q. USB 2.0-Schnittstelle
Einrichten und Verbinden der Dockingstation
1 Legen Sie die CD in das Notebook ein.
2 Befolgen Sie die Anweisungen auf dem Bildschirm.
Hinweis: Während der Installation ist auf dem Notebook-Bildschirm möglicherweise
für einige Sekunden keine Anzeige mehr zu sehen. Dies ist bei der Installation normal.
3 Starten Sie das Notebook neu, wenn Sie dazu aufgefordert werden.
4 Verbinden Sie das Netzteil mit der Dockingstation und einer funktionstüchtigen
Steckdose.
5 Stecken Sie das USB 2.0-Kabel mit dem vorgeschaltetem USB-Anschluss an der
Dockingstation.
6 Stecken Sie das USB 2.0-Kabel in die USB-Schnittstelle des Notebooks.
7 Verbinden Sie Geräte – Maus, Bildschirm usw. – mit der Dockingstation.
8 Optional) Passen Sie die Anzeigeeinstellungen an, wenn ein Monitor
angeschlossen ist:
a Klicken Sie mit der rechten Maustaste auf das Kensington Symbol in
der Taskbar.
b Wählen Sie Erweitert (DualView) oder Klon.
c Wählen Sie die gewünschte Bildschirmauflösung.
9 (Optional) Um detaillierte Informationen in der Bedienungsanleitung anzuzei-
gen, wählen Sie Start/Alle Programme/sd200v.
Erweiterter Mode (Dualview)
Klonmodus
Contenu
A. Station d'accueil avec vidéo sd200v pour ordinateur portable
B. Câble USB 2.0
C. Alimentation
D. CD d'installation du logiciel et Guide d'instructions
E. Guide de démarrage rapide
Composants
Arrière
F. Sortie audio stéréo
G. Entrée microphone
H. 4 ports USB 2.0 avec voyants lumineux d'état
I. Sortie vidéo VGA
J. Connecteur USB
K. Prise pour alimentation
Avant
L. Voyant lumineux d'alimentation/connexion
M. Voyant lumineux du mode d'affichage 2
N. Voyant lumineux du mode d'affichage 1
O. Bouton DualView
P. Voyant d'état de la connexion USB avant
Q. Port USB 2.0
Installation et connexion de la station d'accueil
1 Insérez le CD dans votre ordinateur portable.
2 Suivez les instructions apparaissant à l'écran.
Remarque : pendant l'installation, l'écran de votre ordinateur portable risque
d'être vide pendant quelques secondes. Ceci est normal.
3 Redémarrez l'ordinateur lorsque vous y êtes invité.
4 Branchez l'alimentation sur la station d'accueil et sur une prise de courant.
5 Connectez le câble USB 2.0 au connecteur USB sur la station d'accueil.
6 Branchez le câble USB 2.0 au port USB sur votre ordinateur portable.
7 Connectez les périphériques—souris, moniteur, etc.—à la station d'accueil.
8 (Facultatif) Si vous connectez un moniteur, réglez les paramètres d'affichage :
a Cliquez avec le bouton droit de la souris sur l'icône Kensington dans la
barre des tâches.
b Sélectionnez Etendue (DualView) ou Clone.
c Sélectionnez la résolution d'écran souhaitée.
9 (Facultatif) Pour afficher le guide d'instructions détaillé, sélectionnez
Démarrer/Tous les programmes/sd200v.