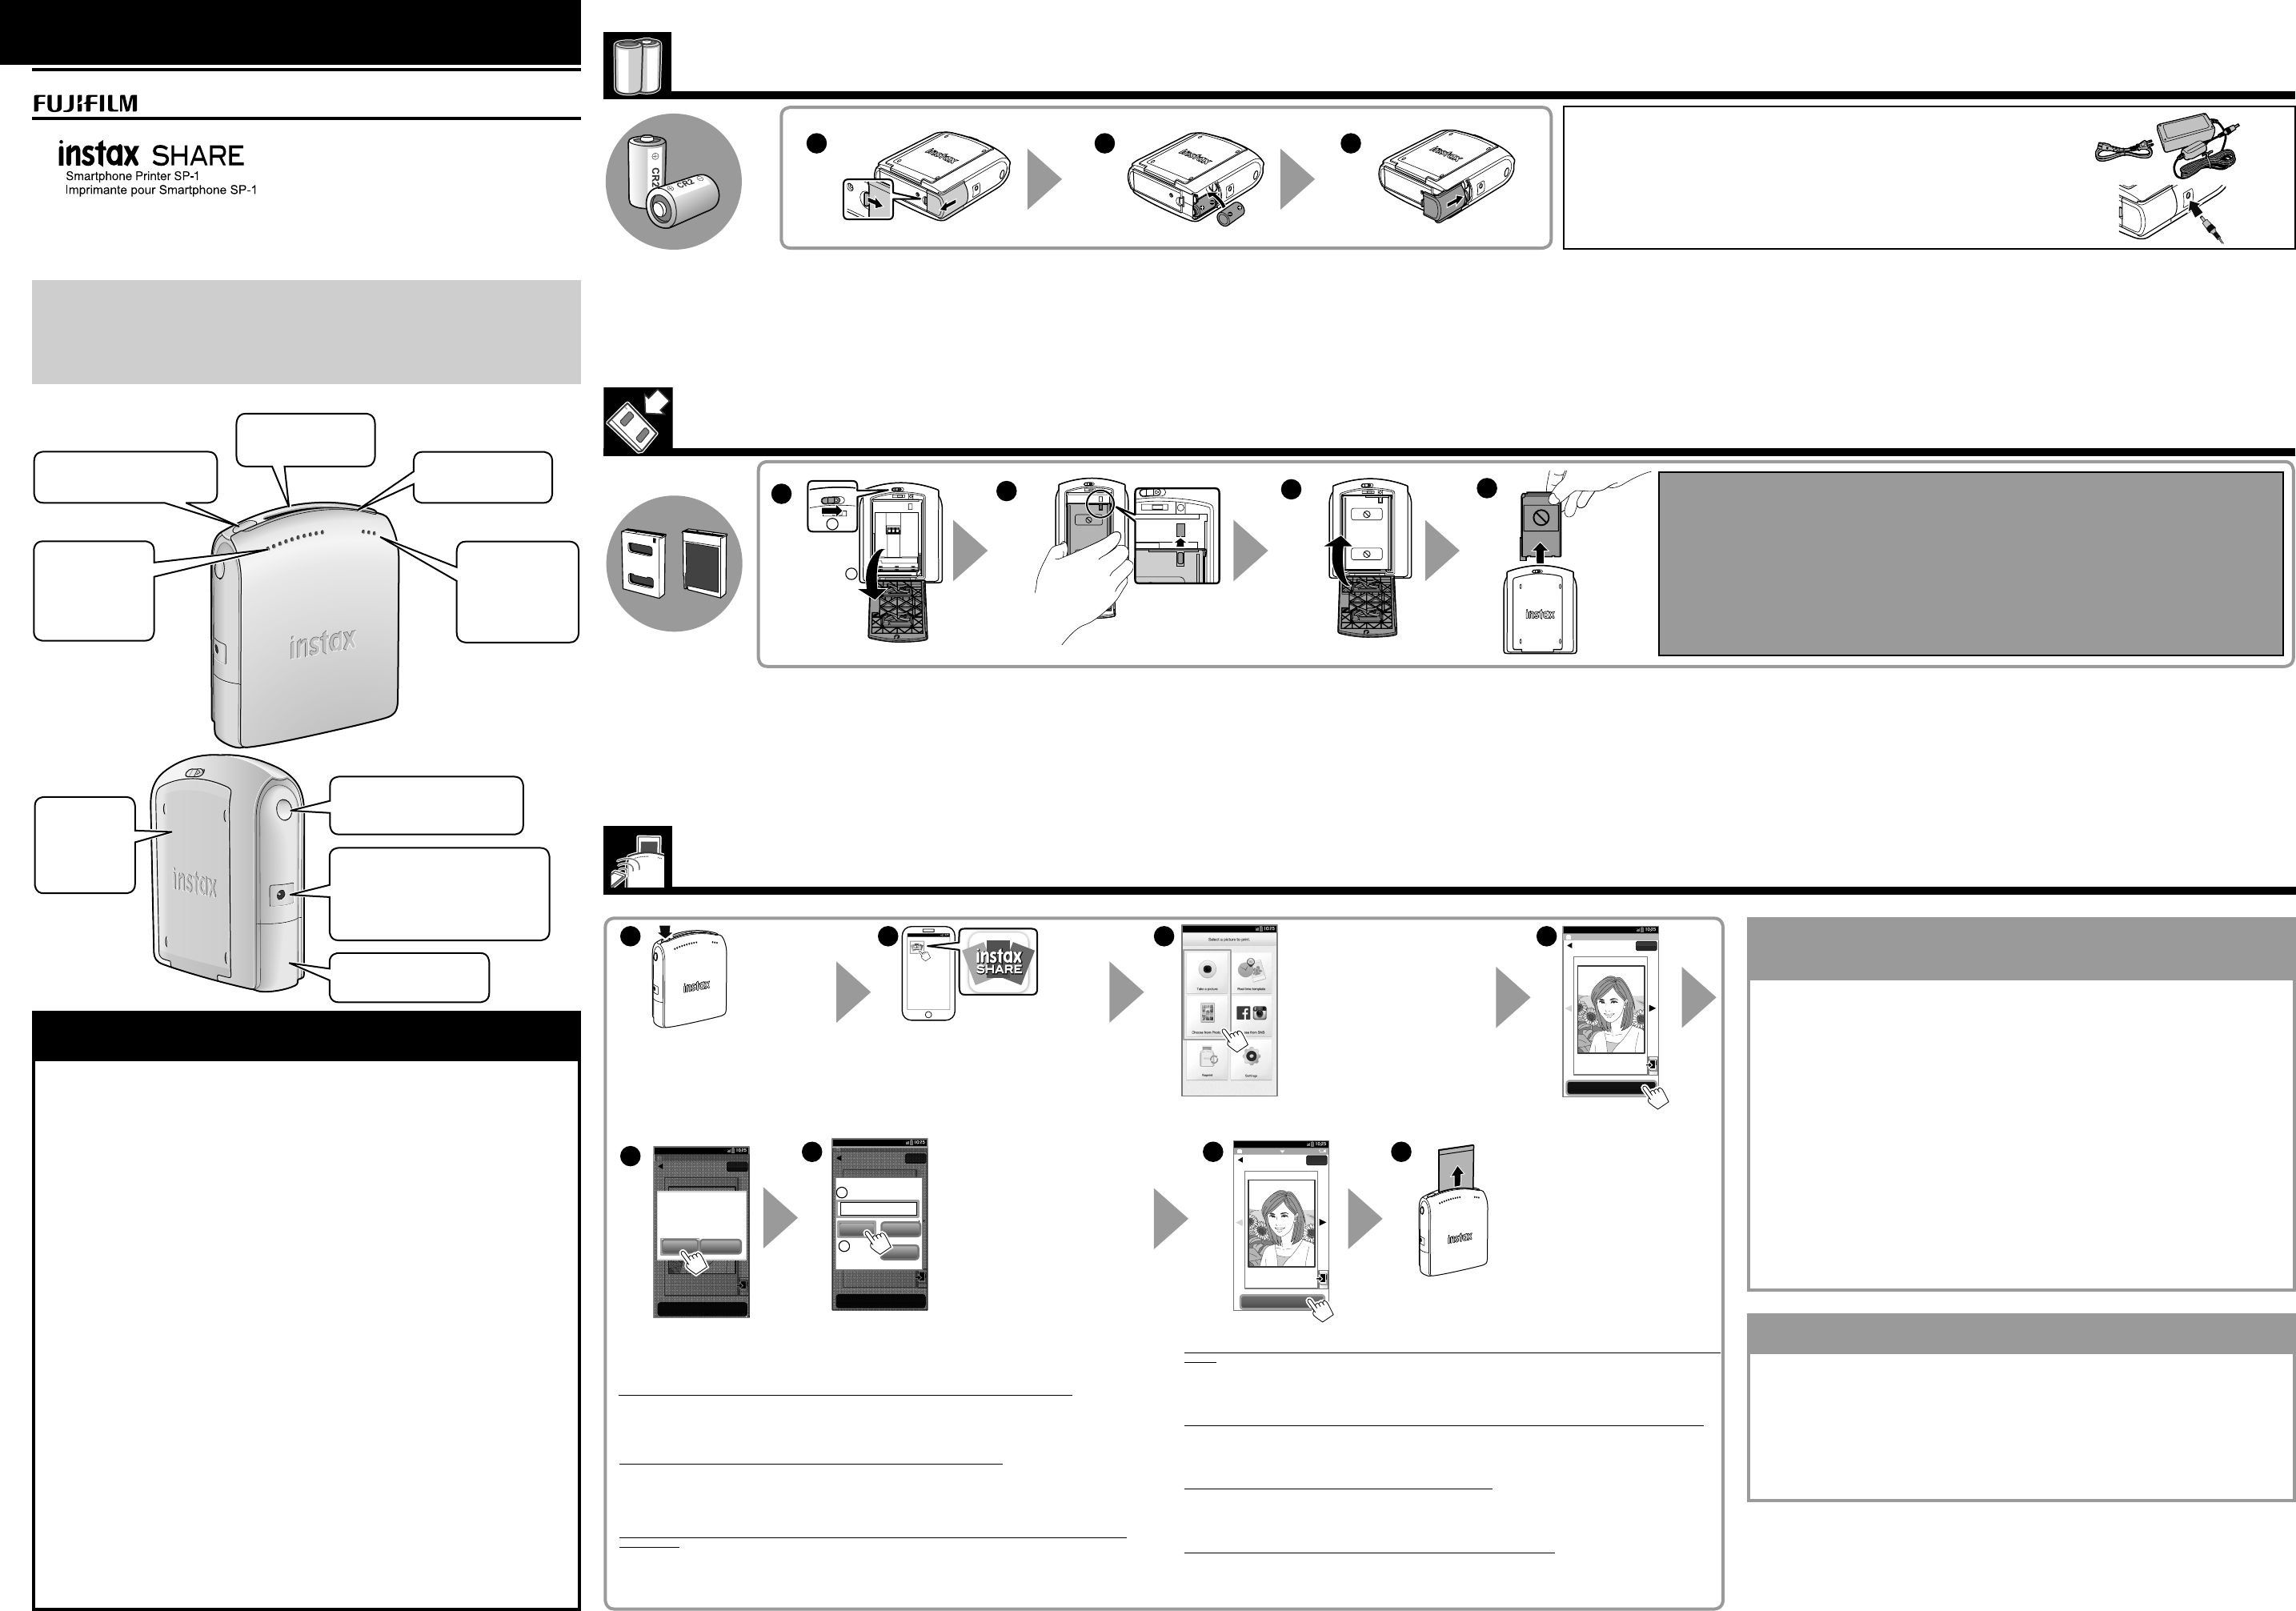
•If multiple printers are detected in the step 5, select the printer to connect to from the list.
•You can connect up to 8 devices to the printer. However, you cannot print an image from another device while printing is in progress.
•The color of the print may seem different from that displayed on your device.
•The printer name (SSID) is located on the bottom of the printer.
•If you tap ”Settings” on the screen in the step 6, the “Settings” screen is displayed. You can specify the password on the screen.
•To reset the password to the factory default (1111), turn the printer on while holding the REPRINT button.
•Wenn mehrere Drucker in Schritt 5 erkannt werden, wählen Sie den anzuschließenden.
•Sie können bis zu 8 Geräte am Drucker anschließen. Sie können aber nicht ein Bild von einem anderen Gerät drucken, während der Druck läuft.
•Die Farbe des Prints kann sich von der auf Ihrem Gerät angezeigten leicht unterscheiden.
•Der Druckername (SSID) befindet sich auf der Unterseite des Druckers.
•Wenn Sie in Schritt 6“Einstellungen” auf dem Bildschirm antippen, erscheint die “Einstellungen”-Bildschirmansicht. Sie das Passwort auf dem
Bildschirm festlegen.
•Zum Rücksetzen des Passworts auf die werkseitige Standardeinstellung (1111) schalten Sie den Drucker ein, während Sie die REPRINT-Taste
gedrückt halten.
•Si plusieurs imprimantes sont détectées à l’étape 5, sélectionnez l’imprimante à connecté dans la liste.
•Vous pouvez connecter un maximum de 8 appareils à l’imprimante. Cependant, vous ne pouvez pas imprimer une image d’un autre appareil
pendant que l’impression est en cours.
•La couleur de l’impression peut sembler différente de ce qui est affiché sur votre appareil.
•Le nom de l’imprimante (SSID) est situé sur le dessous de l’imprimante.
•Si vous touchez “Réglages” sur l’écran à l’étape 6, l’écran “Réglages” est affiché. Vous pouvez spécifier le mot de passe sur l’écran.
•Pour réinitialiser le mot de passe au réglages par défaut de l’usine (1111), mettez l’imprimante sous tension tout en maintenant enfoncée la touche
REPRINT.
•Si se detectan múltiples impresoras en el paso 5, seleccione de la lista la impresora que desea conectar.
•Se pueden conectar hasta 8 dispositivos a la impresora. Sin embargo, no es posible imprimir una imagen desde otro dispositivo mientras se está imprimiendo.
•El color de la imagen impresa puede verse diferente de la que aparece en su dispositivo.
•El nombre de la impresora (SSID) está indicado en la parte inferior de la impresora.
•Si toca “Ajustes” en la pantalla del paso 6, aparecerá la pantalla “Ajustes”. Puede especificar la contraseña en la pantalla.
•Para restablecer la contraseña al ajuste predeterminado de fábrica (1111), encienda la impresora mientras mantiene pulsado el botón REPRINT.
•如果在步驟 5 中檢測到多個打印機,請從列表中選擇要連接的打印機。
•您最多可以連接 8 個設備至打印機。但是,您無法在打印過程中打印另一個設備的圖像。
•打印稿的顏色可能與您設備上顯示的顏色不同。
•打印機名稱(SSID)位於打印機底部。
•如果您在步驟 6 中輕觸畫面上的“設定”,則“設定”畫面顯示。您可以在該畫面上指定密碼。
•想要將密碼重置為出廠默認值(1111),按住重新打印按鈕的同時開啟打印機。
•5단계에서 복수의 프린터가 검색되면, 연결할 프린터를 리스트에서 선택하십시오.
•프린터에 최대 8대의 기기를 연결할 수 있습니다. 단, 프린트 중에는 다른 기기에서 프린트할 수 없습니다.
•프린트된 사진의 색과 기기에서 표시되는 색이 다를 수 있습니다.
•프린터명 (SSID)은 프린터 아래쪽에 있습니다.
•6단계 화면에서 “설정”을 터치하면, “설정” 화면이 표시됩니다. 화면에서 비밀번호를 설정할 수 있습니다.
•비밀번호를 공장출하 상태 (1111)로 되돌리려면, REPRINT 버튼을 누르면서 프린터를 켜십시오.
iOSの端末の無線LAN設定/Wireless LAN setup for iOS devices/WLAN-Setup für
iOS-Geräte/Réglage réseau sans fil pour périphériques iOS/Configuración de LAN
inalámbrica para dispositivos iOS/iOS 設備的無線 LAN 設定/iOS 기기에서 무선 LAN
설정
iOSの端末をご使用の場合は、以下の手順で無線LANの設定を行ってください。
1.
ご
使用の端末の「設定」メニューで、「Wi-Fi」を「オン」にする
2. 「ネットワークを選択」から、接続するネットワーク名(プリンター名)をタップする
When you are using an iOS device, follow the procedure below to perform wireless LAN setup.
1. Select “ON” for “Wi-Fi” in the “Settings” menu of your device.
2.
T
ap the network name (printer name) under “Choose a Network”.
Wenn Sie ein iOS-Gerät verwenden, folgen Sie den unten beschriebenen Schritten, um das WLAN-Setup auszuführen.
1.
S
chalten Sie “WLAN” im Menü “Einstellungen” Ihres Geräts ein.
2. Tippen Sie auf den Netzwerk-Namen (Druckernamen) unter “Netzwerk wählen”.
Quand vous utilisez un périphérique iOS, suivez la procédure ci-dessous pour réaliser le réglage réseau sans fil.
1. Activez le réglage “Wi-Fi” dans le menu “Réglages” de votre périphérique.
2.
T
ouchez le nom du réseau (nom de l’imprimante) dans “Choisissez un réseau”.
Cuando utilice un dispositivo iOS, utilice el siguiente procedimiento para realizar la configuración de LAN inalámbrica.
1.
A
ctive “Wi-Fi” en el menú “Ajustes” de su dispositivo.
2. Toque el nombre de la red (nombre de la impresora) en “Elija una red”.
Libble takes abuse of its services very seriously. We're committed to dealing with such abuse according to the laws in your country of residence. When you submit a report, we'll investigate it and take the appropriate action. We'll get back to you only if we require additional details or have more information to share.
Product:
Forumrules
To achieve meaningful questions, we apply the following rules:
First, read the manual;
Check if your question has been asked previously;
Try to ask your question as clearly as possible;
Did you already try to solve the problem? Please mention this;
Is your problem solved by a visitor then let him/her know in this forum;
To give a response to a question or answer, do not use this form but click on the button 'reply to this question';
Your question will be posted here and emailed to our subscribers. Therefore, avoid filling in personal details.
You will receive an email to register for one or both of the options.
Get your user manual by e-mail
Enter your email address to receive the manual of Fujifilm SP-1 - Instax SHARE Smartphone Printer in the language / languages: English, German, French, Spanish as an attachment in your email.
The manual is 3,66 mb in size.
You will receive the manual in your email within minutes. If you have not received an email, then probably have entered the wrong email address or your mailbox is too full. In addition, it may be that your ISP may have a maximum size for emails to receive.
Others manual(s) of Fujifilm SP-1 - Instax SHARE Smartphone Printer
If you have not received an email with the manual within fifteen minutes, it may be that you have a entered a wrong email address or that your ISP has set a maximum size to receive email that is smaller than the size of the manual.
The email address you have provided is not correct.
Please check the email address and correct it.
Your question is posted on this page
Would you like to receive an email when new answers and questions are posted? Please enter your email address.