5
• Switch off your
lawnmower, wait
until the blade has
stopped rotating and
disconnect from the
mains electricity
supply BEFORE
adjusting the cutting
height.
• REMEMBER the blade continues to rotate after
the machine is switched off.
• Rotating blades can cause injury.
1. Height of cut is adjusted by raising or lowering the
four wheels.
2. Pull the adjustment lever (P), away from the loca-
tion slots and move it to the selected position.
• REMEMBER all 4 wheels must be adjusted to
the same height.
3. When cutting long grass the machine cutting height
should be set to its highest setting, i.e. the blade is
furthest away from the grass.
4. Adjust the height of cut to suit the condition of your
lawn, for long grass use a high cut and vice verse.
To Produce a Striped Effect on Your Lawn
1. You may find it necessary to try different cutting
heights to find out which setting will achieve the
best stripe on your lawn.
2. The ability of the lawnmower to produce an effective
stripe will depend on the grass type and condition.
3. Cut all awkward places first before mowing the
main part of your lawn in a regular up and down
sequence.
Adjusting the Cutting Height
P
Always handle the blade with care - sharp edges could cause injury. USE
GLOVES. Renew your metal blade after 50 hours mowing or 2 years
whichever is the sooner - regardless of condition. If the blade is cracked
or damaged replace it with a new one. Never use a blade bolt if the insu-
lated head is damaged cracked or missing.
• Disconnect from the mains before removing or fitting the blade and fan.
Removing the Blade and Fan (See Pic Q)
1. To remove the blade bolt, hold the fan firmly and with the spanner provided
loosen the blade bolt by turning it anti-clockwise.
2. Remove the blade bolt, blade, fan and fan insert.
3. Inspect for damage and clean as necessary.
Fitting the Blade and Fan
1. Fit the fan and fan insert onto the motor shaft.
2. Fit the blade onto the fan ensuring that the tabs locate into the fan.
3. Re-assemble blade bolt through blade and fan.
4. Hold the fan firmly and tighten blade bolt firmly with the spanner provided.
Do not over tighten.
5. Do not use a longer spanner.
Removing and Fitting the Blade and Fan
Q
Fan
insert
Blade
bolt
Blade
Fan
Tabs
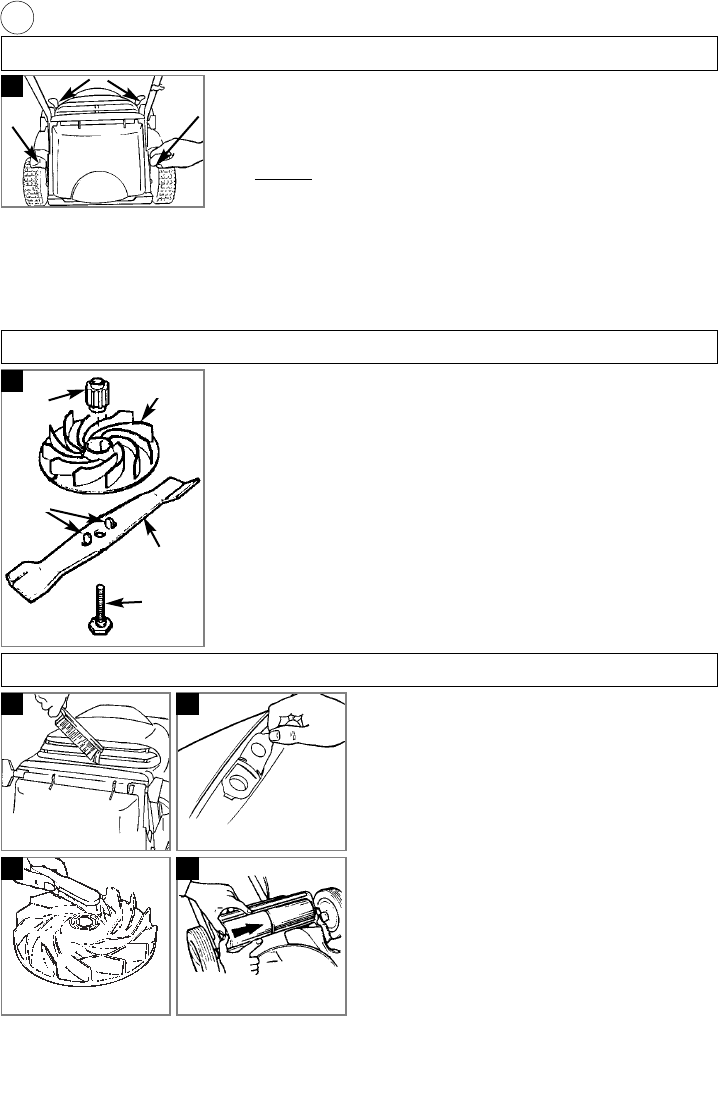
Caring for your Lawnmower
Cleaning
• IMPORTANT - It is very important that you keep
your lawnmower clean. Grass clippings left in any of
the air intakes or under the deck could become a
potential fire hazard.
1. Remove grass from under the deck with brush.
2. Using a soft brush - remove grass clippings from all
air intakes, the discharge chute and the grass
box.(R1)
3. Lift the grass collection indicator cover, remove ball
and brush clean - replace ball and cover after clean-
ing.(R2)
4. Remove the blade, see removing & fitting the
blade & fan, to gain access to the fan and clean with
a soft brush.(R3)
5. The rear rollers can be removed for cleaning.(R4)
6 Wipe over the surface of your lawnmower with a dry
cloth.
• IMPORTANT - Never use water for cleaning your
lawnmower. Do not clean with chemicals, including
petrol, or solvents - some can destroy critical plastic
parts.
At the End of the Mowing Season
1. Replace blade, bolts, nuts or screws, if necessary.
2. Clean your lawnmower thoroughly.
3. Make sure that the electric cable is coiled properly.
R1 R2
R3 R4
Storing your Lawnmower
Slacken the knobs securing the upper handle and fold the
upper handle over the lower handle. Ensure cable is not
trapped between handles or around handle knobs. Store in
a dry place where your lawnmower is protected from dam-
age.