USING THE SAW
BEFORE OPERATING
• Check the voltage on the saw corresponds with your
power supply voltage and that the plug and lead are in
good condition.
• Check you have the correct type of saw blade for the
machine and that it is mounted correctly. Do not use
parts other than supplied with the machine to make the
blade fit properly.
• Check you have a blade suitable for the material being cut
and that it is in good condition.
• Check the band saw cover is closed and secured.
• Run idle for 30 seconds - if there is any abnormal vibra-
tion or other fault. Switch off, inspect and rectify before
continuing
OPERATION
Plug into a suitable mains supply and switch on.
To switch the saw ON
Push in the green button.
To switch OFF
Push in the red button.
Note: This saw has an NVR (no volt release) switch and will
automatically switch off if the mains supply is interrupted or
disconnected.
CUTTING
The saw will give best results cutting up to 85mm (3.3") thick-
ness. Do not cut workpieces thicker than this.
• Place the workpiece on the table without the blade
touching it and switch ON.
• Using gentle pressure, move the workpiece along the
line of cut, keep the workpiece in firm contact with the
table. The blade cuts on a continuously downward
stroke.
• Let the saw do the cutting, undue pressure will overload
the saw resulting in overheating and broken blades.
• When the cut is finished, switch off and withdraw the
workpiece when the blade has stopped moving.
DURING USE
• Push the workpiece gently onto the blade.
• Tight radius cuts require narrow saw blades.
• Check material for foreign bodies. For example check
for pins, nails screws etc.
• Apply suitable lubricant, when cutting metal.
• Do not use water as a lubricant/coolant.
• Keep the workpiece on the surface of table.
• Use constant gentle pressure.
• If the blade seizes in the cut, switch off and open the cut
with a suitable tool before pulling the workpiece out.
Never switch the saw on with the blade jammed.
• Regularly inspect the blade during use (switch off first) for
signs of damage or wear and replace when required.
• Keep the band saw cover closed. Never operate this saw
with the cover open or unsecured.
• Switch the machine off before removing the plug from
the mains socket.
• Wear personal protection equipment. Use a suitable
dust mask and glasses plus other items as required.
• Be careful. Keep your hands away from the blade.
MAINTENCE, CARE AND REPAIR
Switch off and unplug the machine before carrying
out any cleaning, adjusting or changing blades.
CLEANING
Do not use flammable liquids to clean the saw, they will
damage the casing and are a fire risk.
Clean with a soft brush or a cloth.
FAULTS
Switch OFF immediately at the mains plug and
remove the plug when:
• The plug or cable is damaged.
• The switch on the machine is defective.
• The motor runs hot.
• You smell or see smoke caused by scorched insula-
tion in the machine.
The saw overheats
• Use less pressure.
• Clean ventilation slots.
• Defective motor.
Take to your Ferm dealer.
The saw does not work when switched on
• Damaged/faulty plug, switch or power lead.
Take to your Ferm dealer for repair.
The saw wanders off the cut line
• Worn blade.
Replace blade.
• Blade tension wrong.
Readjust.
The saw makes a lot of noise and does not run
smoothly
• The carbon brushes are worn; take to your Ferm
dealer for replacement.
The blade does not move with the motor running
• Blade tension wrong.
Readjust.
• Blade off the wheels.
Reinstall blade.
• Broken blade.
Replace.
The blade does not cut in a straight line
• Blunt blade.
Replace.
• Blade guides need adjusting.
Adjust as described.
• Put less feed pressure on the workpiece.
The blade does not cut or cuts very slowly
• Blunt blade.
Replace blade.
• Wrong type of blade for the material being cut.
See ‘selecting blades’.
• Blade installed the wrong way round.
Reverse blade direction.
Ferm 7
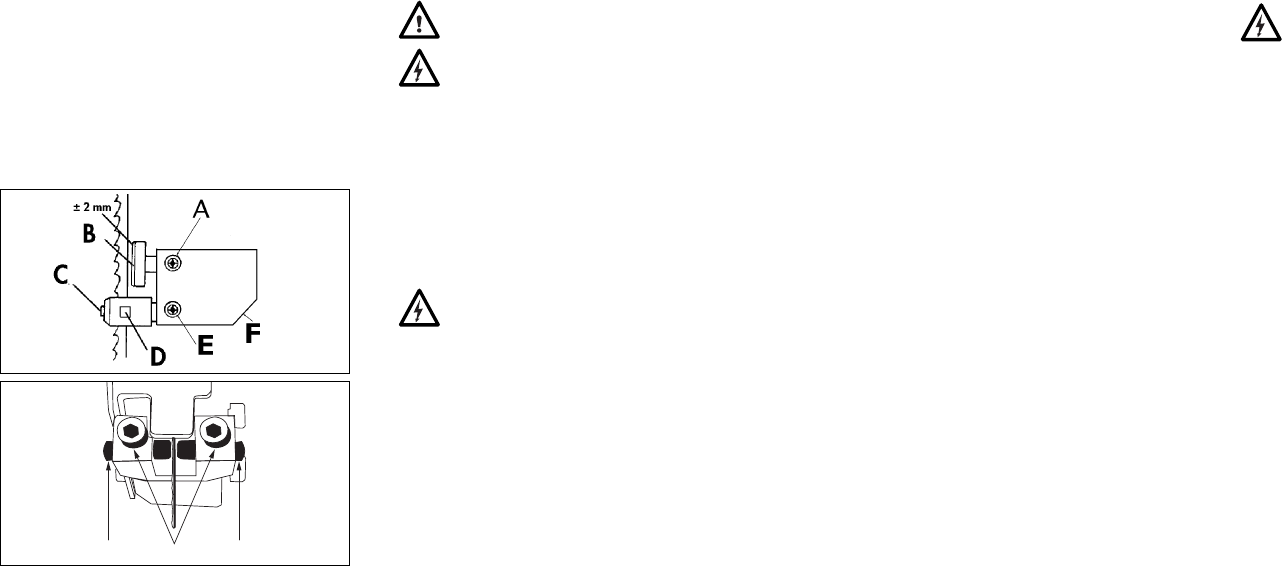
It is important that these adjustments are correct. The
upper/lower thrust bearing support the blade and the
saw will only work efficiently when the blade is suppor-
ted by both of them.
To adjust the blade guides
• Loosen the Allen bolts (A in Fig 10) with the 3mm
wrench.
• Move both guides (B) evenly towards the blade –
make sure they are as close as possible without
touching the blade.
• Tighten the bolts to secure.
• Replace saw table as previously described.
SELECTING SAW BLADES
The saw takes a 1425mm (56") continuous blade - 6mm
(1/4") wide, and 0.4mm (1/64") thick. The choice of blade
depends on the dimension and material being cut.
In general choose thinner (front to back) for tight turns
and thicker for straight cutting.
Broadly there are three tooth forms available:
Hook/Raker
Removes material quickly
Standard
Gives clean cuts but will clog more easily.
Skip
Fast cutting in soft materials
They all have various sets and TPI (teeth per inch) depen-
ding on the use.
The band saw is a very versatile saw which can undertake
a broad range of cutting jobs, for this reason it is very
important to use the right blade for the job – consult the
Helpline or a blade supplier for advice on specific requi-
rements. With the right adjustments and blade it is a very
successful tool.
ADJUSTING THE UPPER BLADE GUARD
Do not use this machine without the guards moun-
ted.
Make sure the saw is switched OFF and unplugged
from mains.
Refer to parts illustration below.
• Loosen knob B shown in Fig 8.
• Slide the guard to the desired position.
Note: The guard should be as close as possible to the
workpiece but not touching it.
• Tighten the knob to secure.
FITTING THE FENCE AND MITRE GUIDE
To fit the fence
Make sure the saw is switched OFF and unplugged
from mains.
• Take the fence assembly and undo the adjustment by
revolving the clamp lever.
• Fit the fence by hooking the rear claw over the rear
edge of the table.
• With the fence flat on the surface of the table and
parallel to the blade adjust the clamping action by
revolving the clamp one turn at a time then clamping
the fence until it grips tightly against the front edge of
the table.
• The clamp adjustment is correct when the fence is
tightly clamped and cannot be moved sideways easily.
Note: Both parts of the front claw must engage with the
front edge of the table for the fence to be secure.
To fit and adjust the mitre guide
• Fit the mitre guide by sliding it into the dovetail gro-
ves on either side of the table.
• To adjust the angle, loosen the knob and rotate the
guide to the desired angle (maximum 45o either
side).
Note: The angle on the guide is for indication
only. For accurate angles test on a piece of scrap first and
readjust as necessary.