GUARANTEE
The guarantee conditions can be found on the separately
enclosed guarantee card.
We declare under our sole responsibility that this
product is in conformity with the following
standards or standardized documents
EN61029-1, prEN61029-2-5
EN55014-1, EN61000-3-2,
EN61000-3-3, EN55014-2
in accordance with the regulations:
98/37/EEC
73/23/EEC
89/336/EEC
from 01-05-2001
GENEMUIDEN NL
W. Kamphof
Quality department
CE
ı
DECLARATION OF CONFORMITY
(
UK
)
Ferm 9
BEFORE USING THE BAND SAW
The saw is for bench use only. Do not use outdoors.
This saw is intended for use on wood, wood derived
products, plastics and soft materials/metals.
This saw must be fully assembled before use.
ASSEMBLING/MOUNTING THE BAND SAW
Make sure the saw is switched OFF and unplugged
from mains.
Refer to parts illustration.
Installing the foot
• Fasten the foot to the band saw base with the four M8
nuts/bolts and washers provided.
• Make sure the long legs of the foot are on the motor
side. Tighten the bolts securely.
Fixing the band saw
The saw should be placed on a level stable non-slip sur-
face; make sure there is enough room round the machine
to operate and service it easily.
• Position the machine and mark the fixing holes with a
pencil. Drill suitable diameter holes.
• Secure the machine with suitable bolts/nuts/washers
through the four holes in the footplate.
• Route the mains cable well away from the saw, ens-
ure that it cannot get caught in moving parts or the
workpiece.
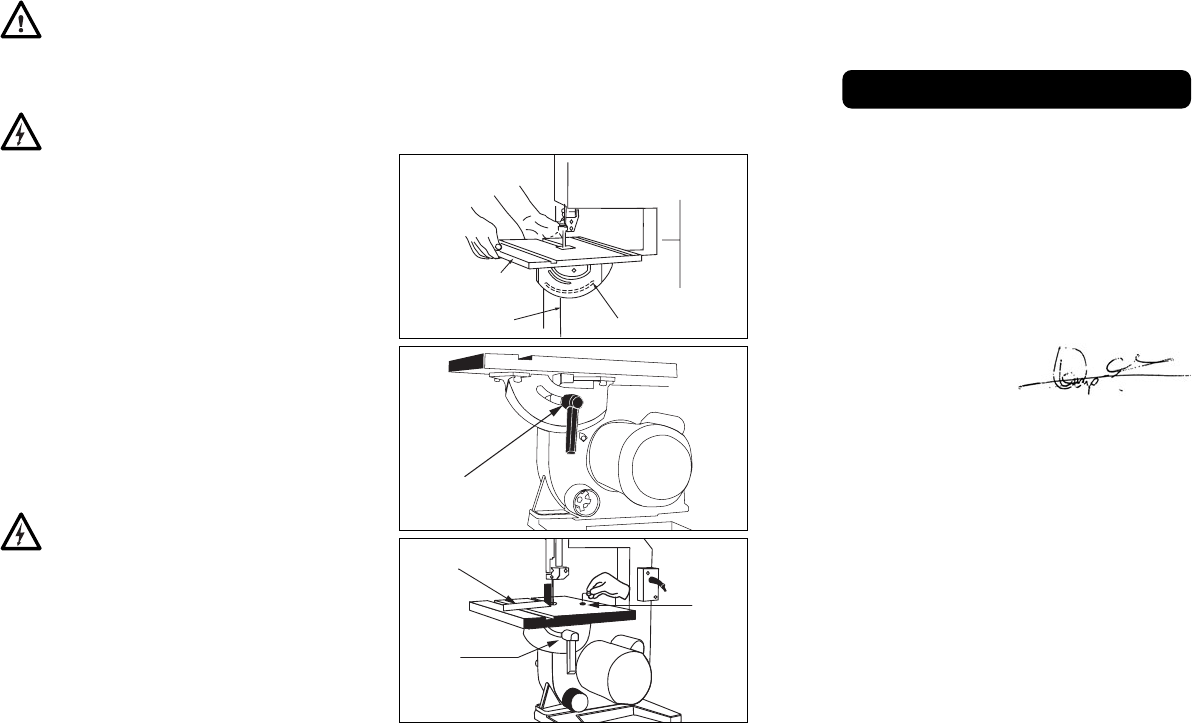
Installing the band saw table
Make sure the saw is switched OFF and unplugged
from mains.
Refer to figs 1,2,3 below
• Remove the nut and butterfly bolt from the end of the
saw slot in the table.
• Put the table onto the saw as shown in Fig 1. Make
sure the groove on the back of the quadrant (C in Fig
1)) fits onto the raised curved lug on the saw body.
• Take the adjusting lever assembly (A in Fig 2)) and
remove the Allen screw and spring with the 4mm
wrench supplied, remove the laver.
• Screw the bolt part of the adjusting lever assembly
with the large washer attached into the threaded
hole in the saw body - hand tight.
• Reassemble the lever, bolt and spring and tighten
with the wrench.
• Tighten the table adjusting screw fully with the lever.
Note: The lever can be pulled out and turned to set it in
the best operating position
Reinstall and tighten the bolt and butterfly nut in the saw
table.
Check the table is square
With the blade guard (4 in parts illustration) raised,
check the angle of the blade to the table with a small set-
square.
• If it isn’t square, from under the table loosen the
adjusting screw lock nut. Loosen the clamp (B) then
adjust the table angle by turning the table adjusting
screw with the 3mm wrench as shown in Fig 3.
• Tighten clamp lever (B) and check the angle again –
readjust a necessary.
• When the table is set at 90 degrees to the blade tigh-
ten the table clamp and set the red quadrant indicator
finger by loosening its screw then lining it up with the
0 degrees mark on the table quadrant (C in Fig 3). The
angles indicated on the quadrant are for indication
only, always check setting by cutting and measuring
on scrap before cutting the job.