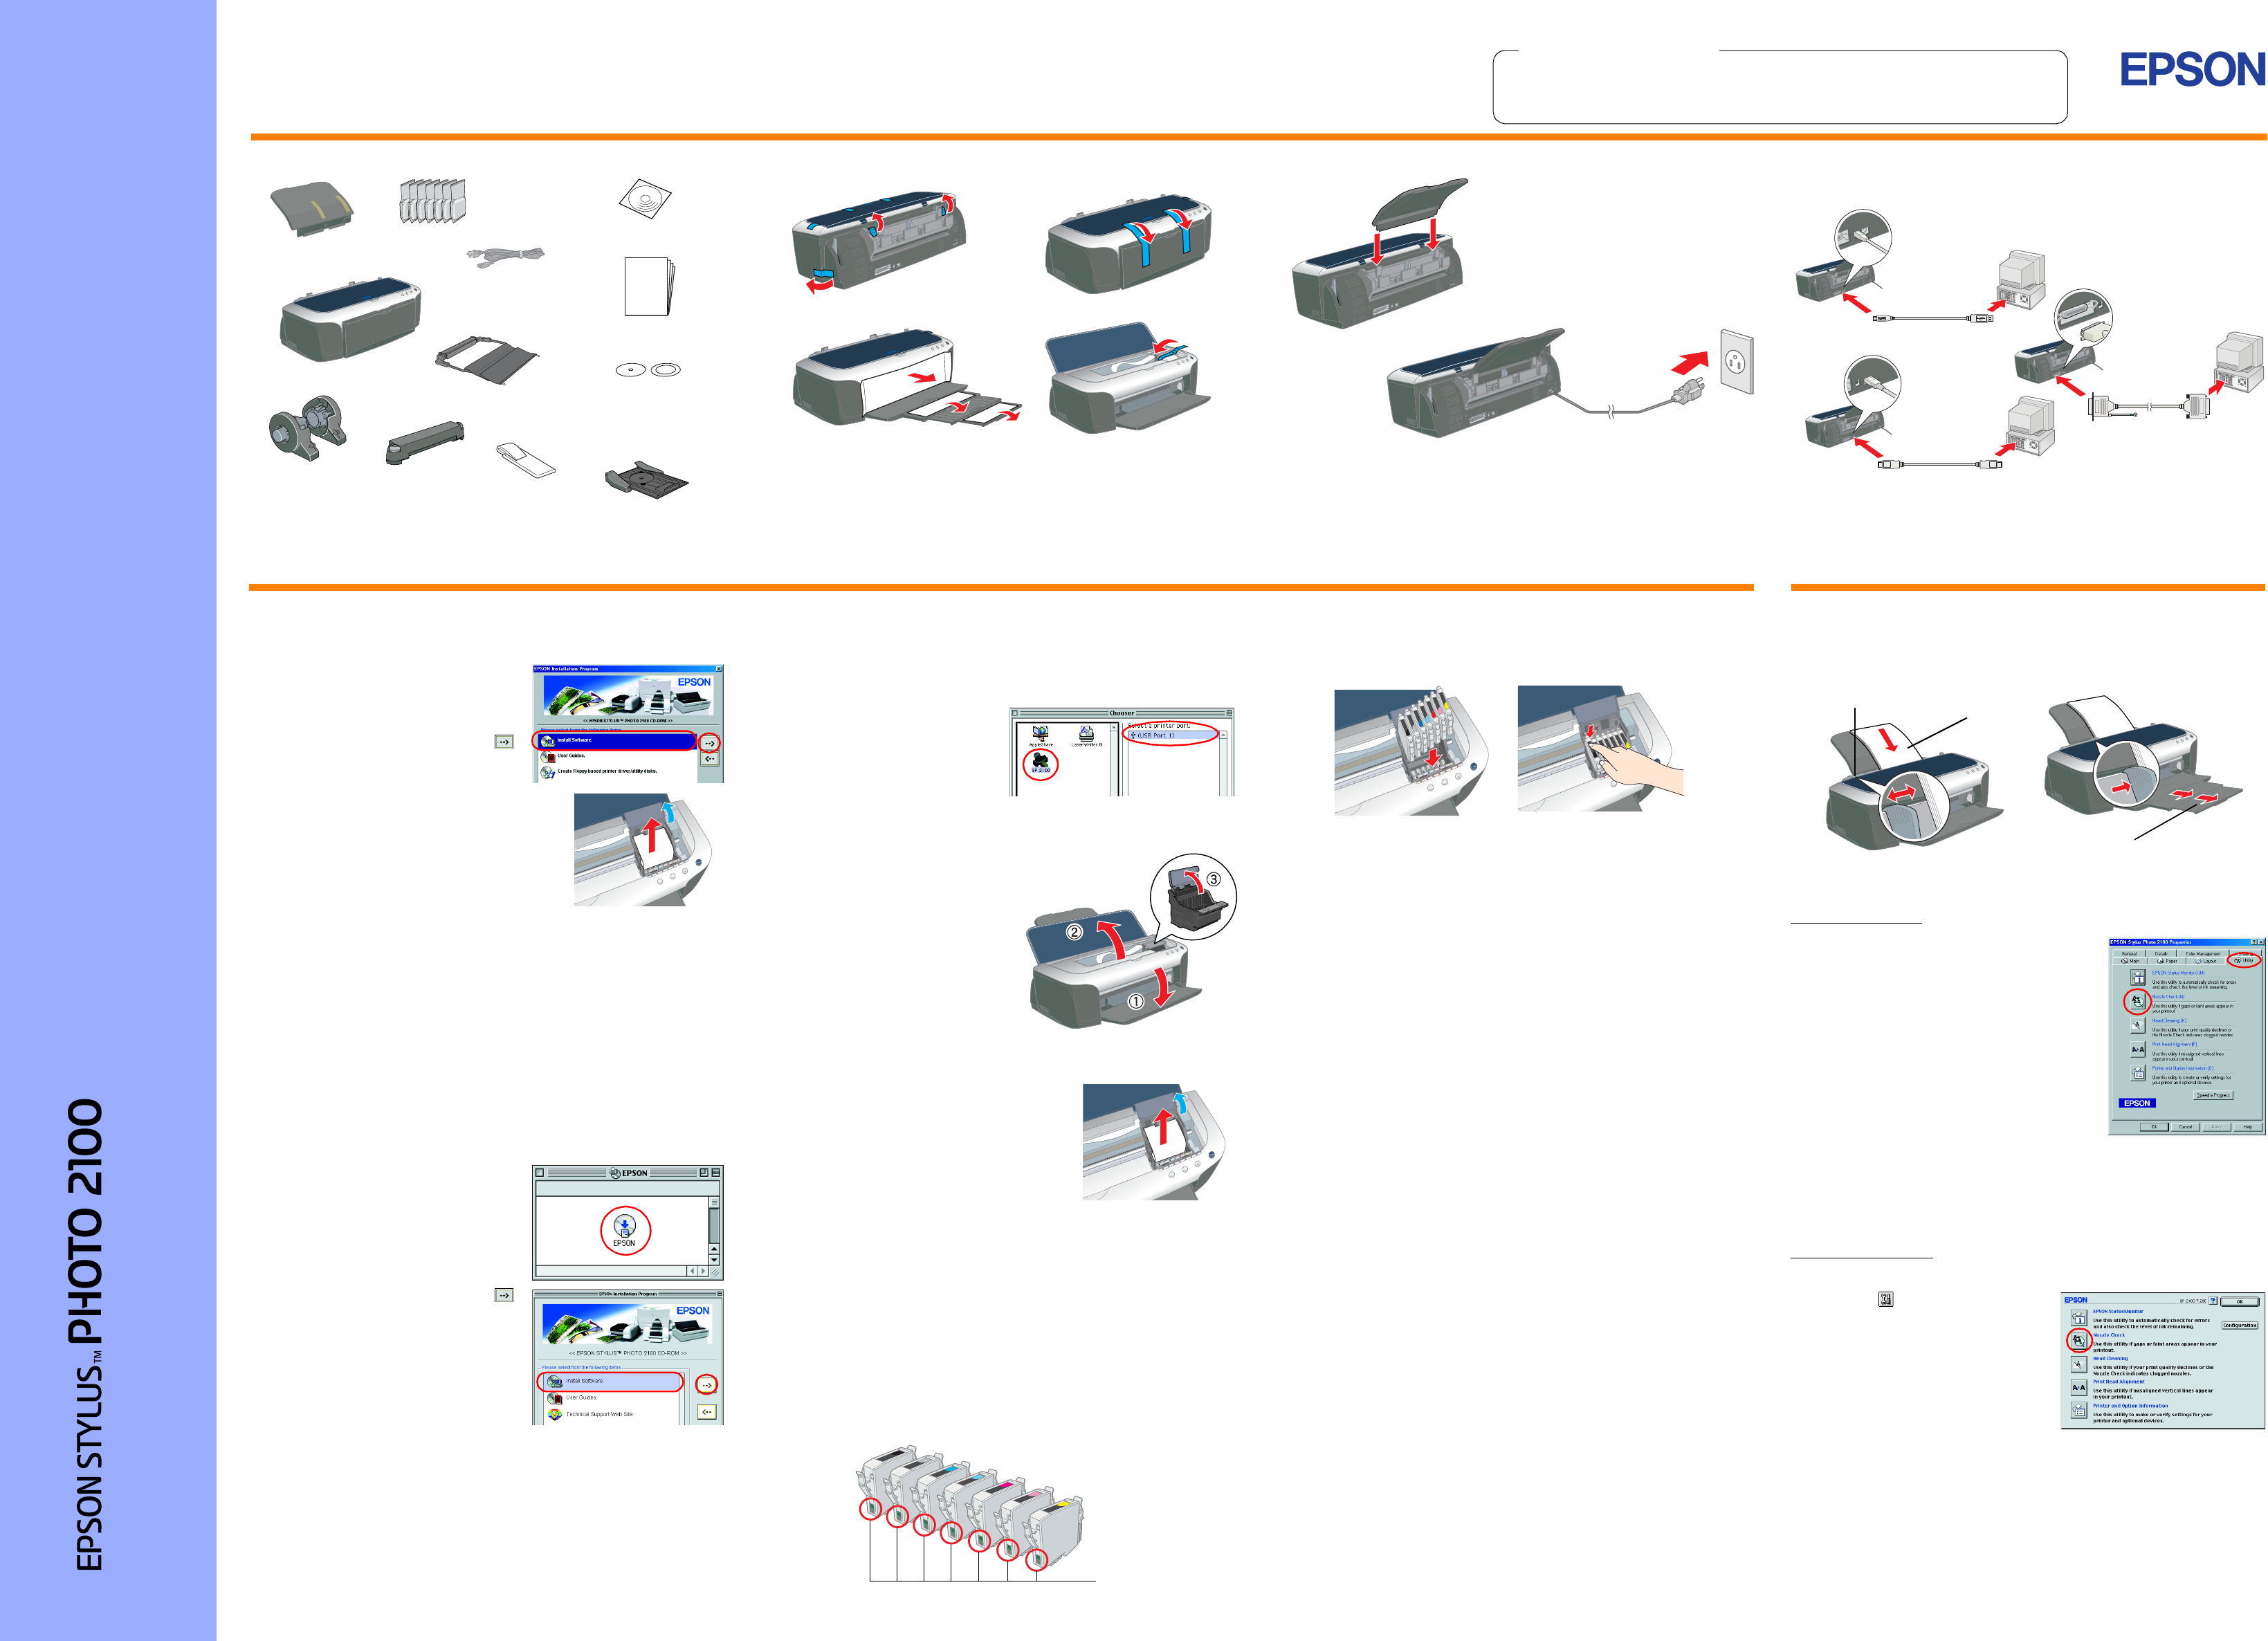
1.Unpack2.Remove protective materials3.Attach the printer parts
c
Caution:
If the printer comes on when you plug in the power cord, turn off the
printer by pressing down the Ppower button until the printer lights
go out.
4.Connect the printer
Connect the printer cable to the ports on the computer and the printer.
The contents may vary in
certain locations.
Power cord may
come attached in
some countries.
Setup
Be careful not to throw out the
8 cm CD-R support and the
CD-R print position check disk
paper support
ink cartridges
printer
photo catcher
printer software &
online guide CD-ROM
roll paper holder
automatic roll
paper cutter
cleaning kit
CD-R print position
check disk
8 cm CD-R
support
CD-R tray
IEEE 1394
Parallel
USB
Print quality is determined by the driver settings and the paper. See the online Reference Guide for details on driver settings and available media. Also visit the EPSON Web Site for the latest information.
Setup
Read the Safety Instructions on the back of this sheet when setting up and using this printer.
English
Color Ink Jet Printer
c
Cautions must be observed to
avoid damage to your
equipment.
Notes contain important information
and useful tips on the operation of your
printer.
Cautions and Notes
Installing the Printer Software and the Ink Cartridges
For Windows
1.Make sure that printer is off.
2.Insert the printer software CD in the
CD-ROM drive. If the Installer dialog
box does not appear, double-click
SETUP.EXE in the CD-ROM.
3.Select Install Software, and click .
4.Follow the on-screen instructions.
Note:
❏Remove the protective material under the
cartridge cover before installing ink
cartridges.
❏If the Setup utility does not start, press the
Ppower button on the printer and follow
the instructions in the Macintosh section of
this sheet, beginning from “ 3. Install the
ink cartridges.”
When ink cartridge installation is complete, proceed to “Load paper and
check the print head nozzles” on this sheet.
For Macintosh
1.Install the printer software
c
Caution:
Turn off all virus protection programs before you install the printer
software.
1.Make sure that printer is off, then turn on your Macintosh and insert the
printer software CD in the CD-ROM drive.
2.Double-click the EPSON icon.
3.Select Install Software, and click.
4.Follow the on-screen instructions.
2.Select the printer
After you have installed the printer software, you need to select your printer.
1.Press the Ppower button to turn on the printer. The print head moves
to the ink cartridge installation position.
2.Choose Chooser from the Apple
menu. Then, select the icon for
your printer and the port that your
printer is connected to.
3.Close the Chooser.
3.Install the ink cartridges
1.Lower the output tray, then open the
printer cover and the cartridge
cover.
c
Caution:
Do not move the print head by
hand, as this may damage the
printer.
Note:
For best results, shake the ink
cartridge four or five times before
opening the package.
2.Remove the protective material under the
cartridge cover before installing ink
cartridges.
3.Remove the new ink cartridges from their protective bag.
c
Caution:
❏Be careful not to break the hook on the side of the cartridge
when you remove it from the protective bag.
❏Do not shake the ink cartridge after removing from the bag;
this can cause leakage.
❏Do not remove or tear the label on the cartridge; this can
cause leakage.
❏Do not touch the green IC chip on the side of the cartridge.
Doing so may prevent normal operation and printing.
4.Place the ink cartridges vertically into the cartridge holders. Without
applying excessive force, push the ink cartridges down until they click
into place. To place them vertically, install the ink cartridges from one
end.
Note:
Install all ink cartridges. The printer will not work unless all cartridges
are installed properly.
5.Close the cartridge cover and the printer cover.
6.Press the
Hink button. The printer moves the print head and begins
charging the ink delivery system. This process takes about one and a
half minutes. While charging, the Ppower light and the ink lights flash
and the printer produces a variety of mechanical sounds. This is normal.
c
Caution:
❏Do not turn the power off during the ink charging process.
❏Do not load paper until ink charging is complete.
Note:
If the ink end error occurs after the print head moves to its home position,
the ink cartridge may not be installed properly. Press the Hink button
again, and reinstall the ink cartridge until it clicks into place.
When the ink charging process is finished, the Ppower light stops flashing
and remains on.
The ink cartridges packaged with your printer are partly used during initial
setup. In order to produce high quality printouts, the print head in your printer
will be fully charged with ink. This one-off process consumes a quantity of
ink and subsequent cartridge sets will last for their full rated life.
Make sure that the computer is turned on. Load paper into the sheet feeder
making sure that the side of the paper that you wish to print onto is facing
up and that the right edge of the paper is against the right edge guide. Next,
slide the left edge guide so that it is against the left edge of the paper.
Once paper is loaded, follow these steps to check the print head nozzles.
For Windows users
1.Click the Start button, point to Settings, and
click Printers.
2.For Windows Me, 98, and 95 users, select
your printer, then click Properties on the File
menu. Then click Utility tab.
For Windows XP and 2000 users, select your
printer, then click Printing Preferences on
the File menu. Then click Utility tab.
For Windows NT 4.0 users, select your
printer, then click Document Defaults on
the File menu. Then click Utility tab.
3.Click the Nozzle Check button, and follow
the on-screen instructions.
4.When you are finished, click OK to close the Properties dialog box.
Your printer is now set up and ready to use.
For Macintosh users
1.Select Page Setup in the Finder’s File menu.
2.
Click the utility icon.
3.Click the Nozzle Check button, and
follow the on-screen instructions.
4.When you are finished, click OK to
close the utility dialog box. Then click
OK to close the Page Setup dialog
box.
Your printer is now set up and ready to
use.
Do not touch this part.
printable side up
left edge guide
output tray extension
4021354-00
xxx
Load paper and check
the print head nozzles
Need help? Post your question in this forum.
Report abuse
Libble takes abuse of its services very seriously. We're committed to dealing with such abuse according to the laws in your country of residence. When you submit a report, we'll investigate it and take the appropriate action. We'll get back to you only if we require additional details or have more information to share.
Product:
Forumrules
To achieve meaningful questions, we apply the following rules:
First, read the manual;
Check if your question has been asked previously;
Try to ask your question as clearly as possible;
Did you already try to solve the problem? Please mention this;
Is your problem solved by a visitor then let him/her know in this forum;
To give a response to a question or answer, do not use this form but click on the button 'reply to this question';
Your question will be posted here and emailed to our subscribers. Therefore, avoid filling in personal details.
Register
Register getting emails for Epson Stylus Photo 2100 at:
new questions and answers
new manuals
You will receive an email to register for one or both of the options.
Get your user manual by e-mail
Enter your email address to receive the manual of Epson Stylus Photo 2100 in the language / languages: English as an attachment in your email.
The manual is 0,66 mb in size.
You will receive the manual in your email within minutes. If you have not received an email, then probably have entered the wrong email address or your mailbox is too full. In addition, it may be that your ISP may have a maximum size for emails to receive.
If you have not received an email with the manual within fifteen minutes, it may be that you have a entered a wrong email address or that your ISP has set a maximum size to receive email that is smaller than the size of the manual.
The email address you have provided is not correct.
Please check the email address and correct it.
Your question is posted on this page
Would you like to receive an email when new answers and questions are posted? Please enter your email address.