1.Make sure the following items are included and not damaged. If any
items are missing or damaged, contact your EPSON dealer
immediately.
For the Perfection 1260 Photo
The Perfection 1260 Photo comes with the film adapter which is also
available as an option for the Perfection 1260.
2.Remove the packing tape from your scanner, but leave the yellow
sticker in place until instructed to remove it.
m
Installing the Software
The scanner software CD-ROM contains the EPSON TWAIN driver, software, and electronic manuals.
You must install the software BEFORE connecting the scanner to your computer.
1.Insert the scanner software CD-ROM into the CD-ROM or DVD drive.
Macintosh users:
After inserting the CD-ROM, the EPSON
folder appears on the desktop. (If the
EPSON folder does not appear,
double-click the EPSON icon on the
desktop.) Double-click the EPSON icon
inside the folder.
2.The EPSON Installation Program dialog
box appears. Select Install Software
and click .
Note for Windows users:
If the EPSON Installation Program
dialog box does not appear,
double-click the My Computer icon.
Click the CD-ROM icon, then select
Open from the File menu. Double-click
Setup. exe.
3.Follow the on-screen instructions until all of the software is installed.
When a message appears informing you that installation is complete,
click OK.
4.Restart your computer if a message appears instructing you to do so.
Note for MacOS X users:
The software will be installed for use in the Classic mode.
After you finish installing the scanner software, read the next section to set
up your scanner.
Setting Up the Scanner
1.Remove the yellow sticker from the
back of the scanner.
2.Slide the transportation lock
all the way to the right.
3.Connect the power cord
and AC adapter, as shown.
4.Connect the AC adapter to
the DC inlet on the back of
the scanner.
5.Plug the other end of the
power cord into an
electrical outlet.
The scanner turns on and
the ] Start button comes on
green.
c
Caution:
❏It is not possible to change the AC adapter's input or output
voltage. If the label on the AC adapter does not show the
correct voltage, contact your dealer. Do not plug in the
power cord.
❏Whenever you unplug the scanner, wait at least 10 seconds
before plugging it back in. Rapidly plugging and unplugging
the scanner can damage it.
Note:
This scanner does not have a power button. It turns on when you
connect the AC adapter and then plug in the power cord.
6.Connect the square connector on the USB cable to the USB port on the
back of the scanner. Connect the other end of the USB cable to any
available USB port on your computer or USB hub.
7.Open the document cover and make
sure the fluorescent lamp on the
carriage comes on. This signifies that
the scanner is ready for use.
Note:
❏To turn off the scanner, unplug the
power cord from the electrical
outlet.
❏The scanner may not work properly
if you use a USB cable other than
the one supplied by EPSON, or if you connect to the computer
through more than one hub.
❏The fluorescent lamp turns off if you do not use the scanner for about
15 minutes.
AC adapter
power cord
scanner
software CD
USB cable
The contents may vary in certain locations.
scanner
film adapterfilm holders
Important!
Leave the yellow sticker
in place until you are
instructed to remove it.
The appearance of dialog boxes on
this sheet may differ slightly from those
on your screen.
transportation lock
DC inlet
power cord
AC adapter
USB port
Connect this end of the USB cable
to your computer.
carriage
(in the home position).
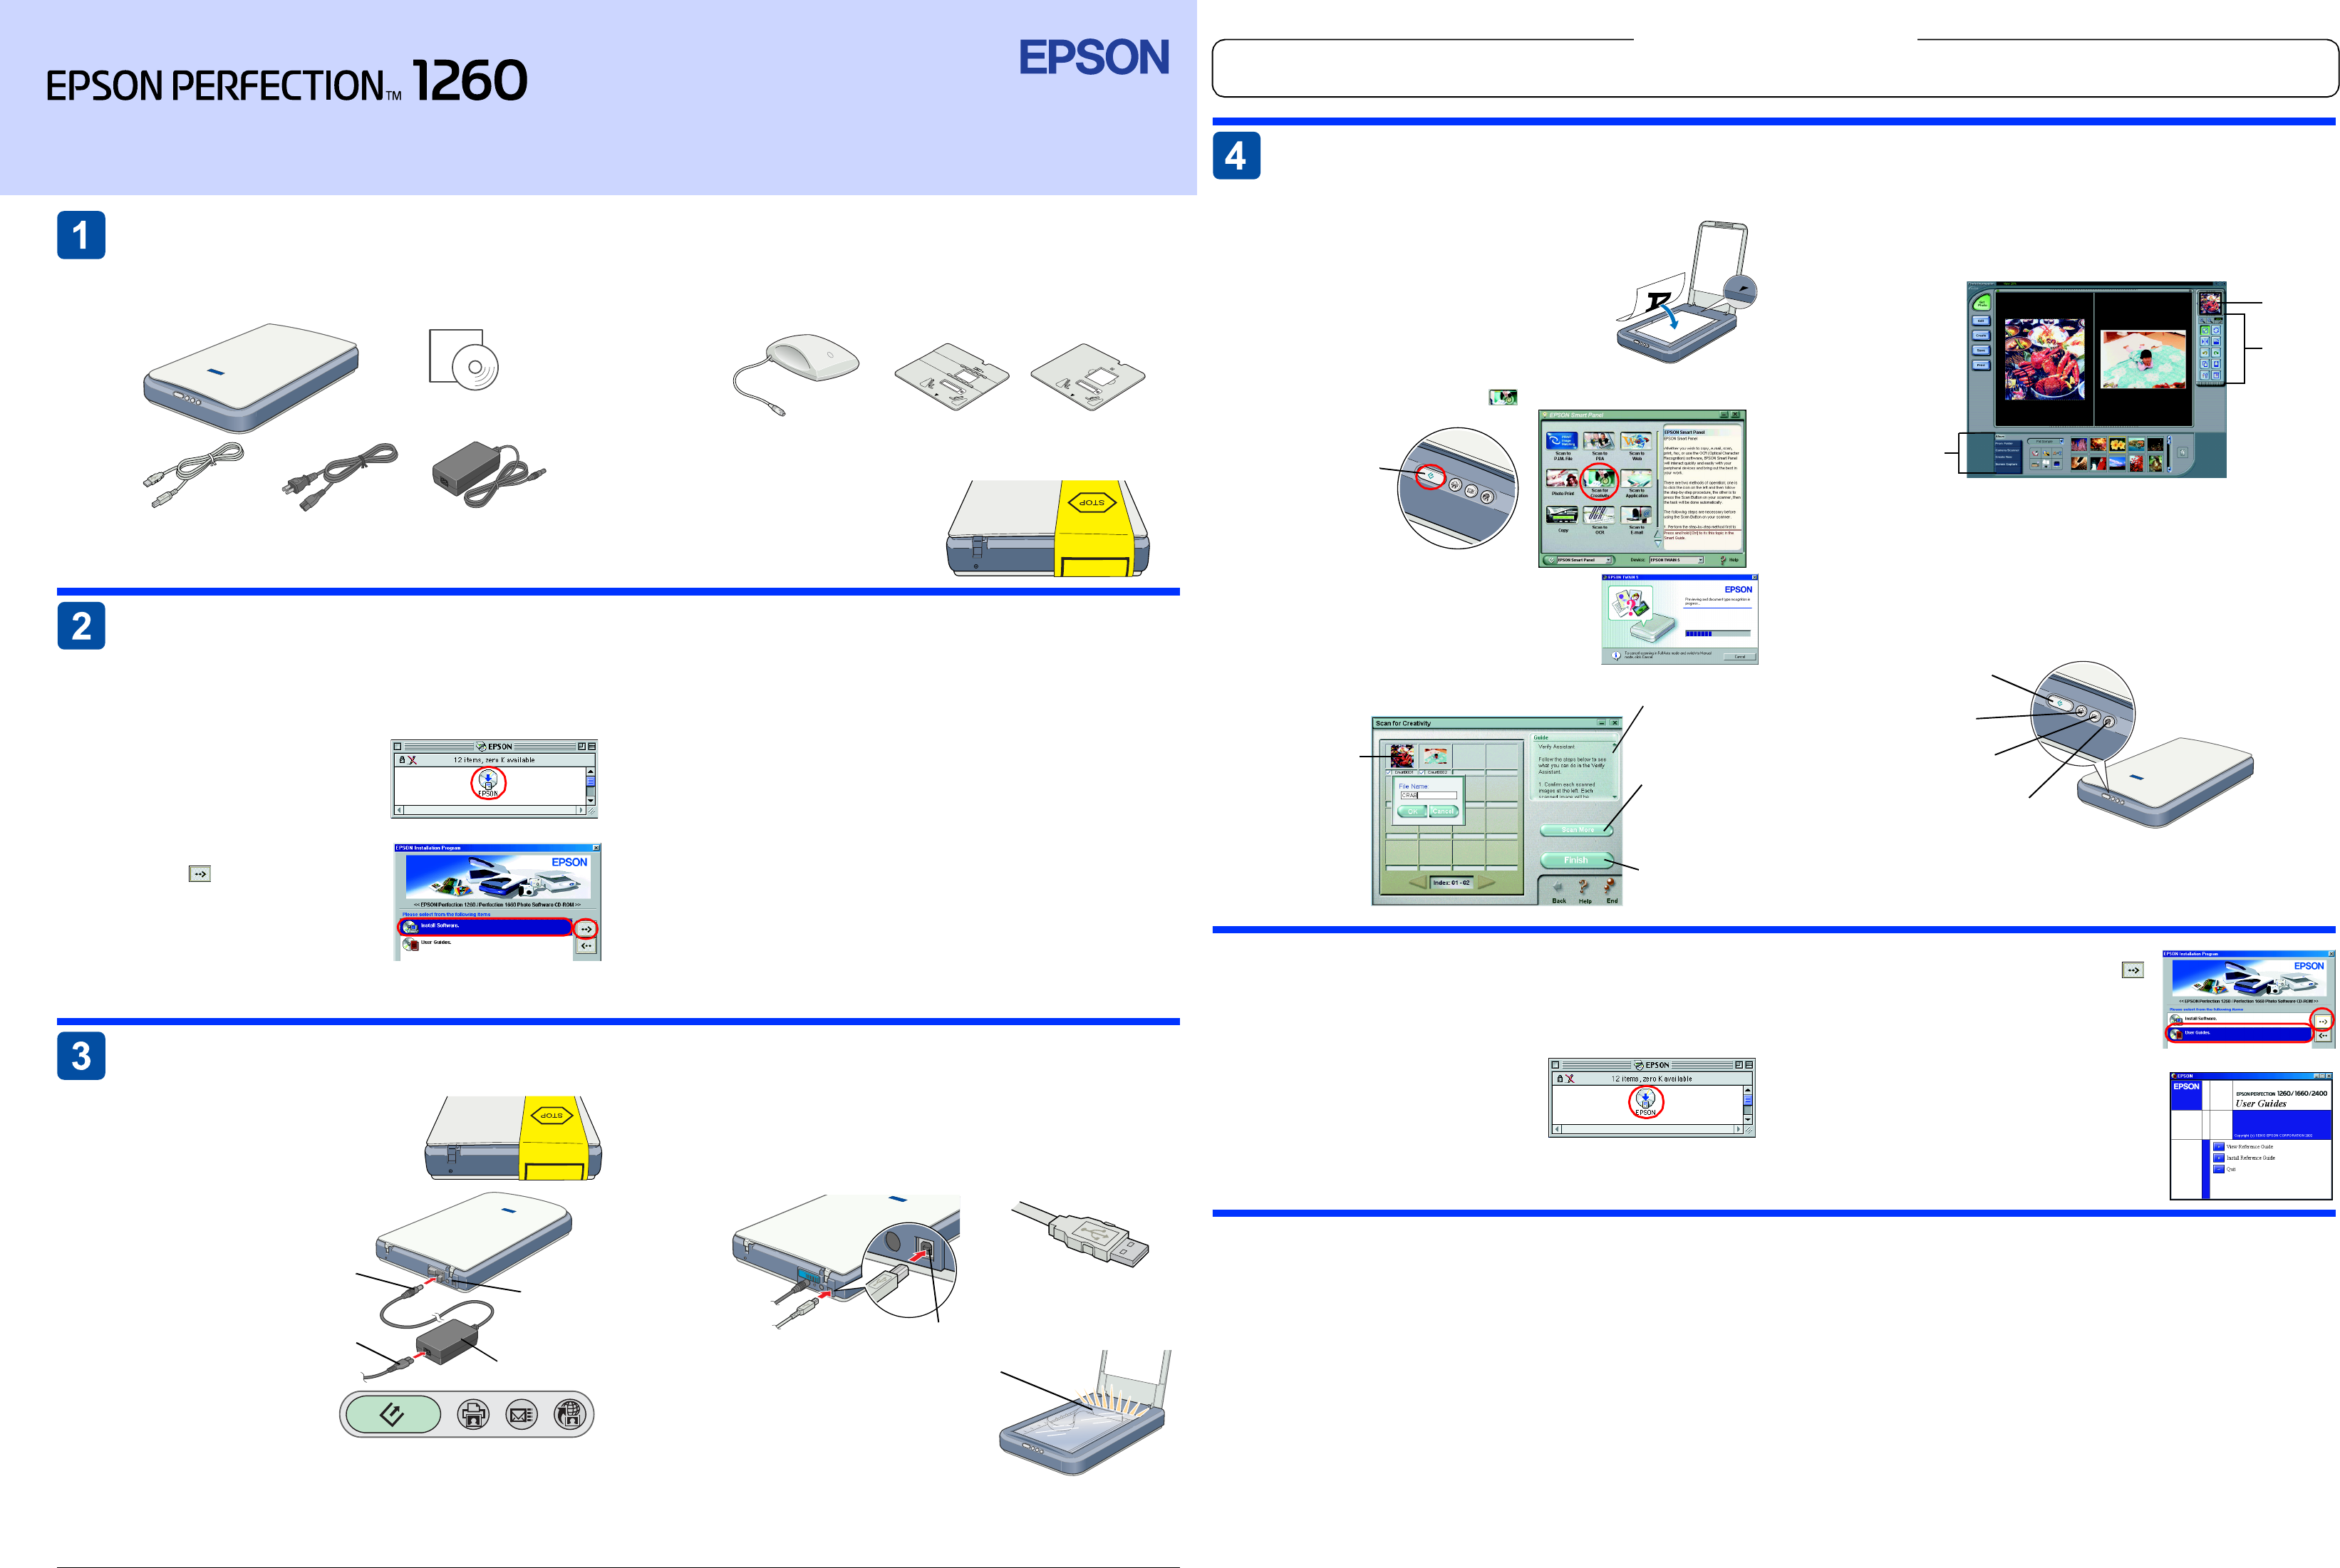
Your First Scan
To scan using the] Start button and EPSON Smart Panel, follow these steps.
1.Open the document cover and place your
document face down on the document table.
Align the center of the document with the
alignment mark. Then close the document
cover.
2.Press the] Start button on the scanner. After EPSON Smart Panel
automatically opens, click the Scan for Creativity icon.
A progress meter appears on the screen and
your photo is automatically scanned.
3.After your photo is scanned, the Scan for
Creativity dialog box opens. If you want to
scan another photo, place it on the
document table, close the document cover,
then click Scan More. Otherwise, click Finish.
4.ArcSoft™ PhotoImpression™ automatically opens and your scanned
images appear on the screen. Select the image you want to use. You
can edit your image, use it in a PhotoImpression template for calendars
or greeting cards, save it, or print it.
Note:
For help with PhotoImpression, click the question mark in the upper right
corner of the screen.
Using the Scanner Buttons
The scanner buttons work with EPSON Smart Panel to provide shortcuts to
common scanning functions. You can use them to automatically scan and
print a photo, to attach a photo to e-mail, or to scan and upload photos
to an EPSON photo sharing site on the Web. For more information, see the
Reference Guide included on the scanner software CD-ROM, and the
electronic EPSON Smart Panel Help.
Note for Mac OS X users:
You can use the scanner buttons only when in the Classic mode.
Viewing the Reference Guide
To learn more about your scanner, see the EPSON Perfection
1260/1660/2400 Reference Guide.
1.Insert the scanner software CD-ROM into the CD-ROM or DVD drive. If
the CD has not been removed since installing the software, remove it
and then insert it again.
Macintosh users:
After inserting the CD-ROM, the EPSON
folder appears on the desktop. (If the
EPSON folder does not appear,
double-click the EPSON icon on the
desktop.) Double-click the EPSON
icon inside the folder.
2.The EPSON Installation Program dialog box
appears. Select User Guides and click .
Note for Windows users:
If the EPSON Installation Program dialog box
does not appear, double-click the My
Computer icon. Click the CD-ROM icon,
then select Open from the File menu. Then,
double-click Setup. exe.
3.To view the Reference Guide, click View
Reference Guide. To copy the Reference
Guide to your computer, click Install
Reference Guide.
Safety Instructions
Read all these instructions and save them for later reference. Follow all warnings and instructions
marked on the scanner.
c
Caution:
Be sure AC power cord meets the relevant local safety standards.
❏Place the scanner close enough to the computer for the interface cable to reach it easily. Do not
place or store the scanner or the AC adapter outdoors, near excessive dirt or dust, water, heat
sources, or in locations subject to shocks, vibrations, high temperature or humidity, direct sunlight,
strong light sources, or rapid changes in temperature or humidity. Do not use with wet hands.
❏Place the scanner and the AC adapter near an electrical outlet where the power cord can be
easily unplugged.
❏Power-supply cords should be placed to avoid abrasions, cuts, fraying, crimping, and kinking. Do
not place objects on top of power-supply cords and do not allow the AC adapter, or allow
power-supply cords to be stepped on or run over. Be particularly careful to keep all power-supply
cords straight at the ends and the points where they enter and leave the transformer.
❏Use only the AC adapter model A171B/E that comes with your scanner. Using any other adapter
could cause fire, electrical shock, or injury.
❏The AC adapter is designed for use with the scanner with which it was included. Do not attempt
to use it with other electronic devices unless specified.
❏Use only the type of power source indicated on the AC adapter's label, and always supply power
directly from a standard domestic electrical outlet with the AC power cord that meets the relevant
local safety standards.
❏Avoid using outlets on the same circuit as photocopiers or air control systems that regularly switch
on and off.
❏If you use an extension cord with the scanner, make sure the total ampere rating of the devices
plugged into the extension cord does not exceed the cord's ampere rating. Also, make sure the
total ampere rating of all devices plugged into the electrical outlet does not exceed the electrical
outlet's ampere rating. Do not place multiple loads on the electrical outlet.
❏Never disassemble, modify, or attempt to repair the AC adapter, power cord, scanner, and option
by yourself except as specifically explained in the scanner's guides.
❏Do not insert objects into any openings as they may touch dangerous voltage points or short out
parts. Beware of electrical shock hazards.
❏Unplug the scanner and the AC adapter, and refer servicing to qualified service personnel under
the following conditions:
The power cord or plug is damaged; liquid has entered the scanner or the AC adapter; the scanner
or the AC adapter has been dropped or the case damaged; the scanner or the AC adapter does
not operate normally or exhibits a distinct change in performance. (Do not adjust controls that
are not covered by the operating instructions.)
❏Unplug the scanner and the AC adapter before cleaning. Clean with a damp cloth only. Do not
use liquid or aerosol cleaners.
If you are not going to use the scanner for a long period, be sure to unplug the AC adapter from the
electrical outlet.
For United Kingdom, Singapore, and Hong Kong users:
Replace fuses only with fuses of the correct size and rating.
For United Kingdom users:
The following safety information applies to the AC adapter.
w
Warning:
Refer to the rating plate for the voltage and check that the appliance voltage corresponds to the supply
voltage.
Important: The wires in the mains lead fitted to this appliance are coloured in accordance with the
following code:
Blue - Neutral
Brown - Live
If you have to fit a plug:
As the colours of the mains lead of this appliance may not match the coloured markings used to
identify the terminals in a plug, please observe the following:
❏The blue wire must be connected to the terminal in the plug marked with the letter N.
❏The brown wire must be connected to the terminal in the plug marked with the letter L.
❏If damage occurs to the plug, replace the cord set or consult a qualified electrician.
Start button
Instructions for using
the Smart Panel
application appear
here.
To scan another
photo, place it on the
scanner and then
click Scan More.
Click Finish when
you are finished
scanning.
Scanned images
appear here.
Click a file name
if you want to
change it.
selected
image
editing
tools
This section
changes based on
what is selected
above.
Start
Copy
Scan to E-mail
Scan to Web
Setup
Color Image Scanner
English
c
Cautions must be observed to avoid damage to your
equipment.
Notes contain important information and useful tips on the operation
of your scanner.
Warnings, Cautions, and Notes
w
Warnings must be followed carefully to avoid bodily
injury.
All rights reserved. No part of this publication may be reproduced, stored in a retrieval system, or transmitted in any form or by any means, electronic, mechanical, photocopying, recording, or otherwise, without the prior written permission of SEIKO EPSON
CORPORATION. The information contained herein is designed only for use with this EPSON scanner. EPSON is not responsible for any use of this information as applied to other scanners. Neither SEIKO EPSON CORPORATION nor its affiliates shall be
liable to the purchaser of this product or third parties for damages, losses, costs, or expenses incurred by the purchaser or third parties as a result of: accident, misuse, or abuse of this product or unauthorized modifications, repairs, or alterations to this product,
or (excluding the U.S.) failure to strictly comply with SEIKO EPSON CORPORATION's operating and maintenance instructions.
SEIKO EPSON CORPORATION shall not be liable for any damages or problems arising from the use of any options or any consumable products other than those designated as Original EPSON Products or EPSON Approved Products by SEIKO EPSON
CORPORATION. SEIKO EPSON CORPORATION shall not be held liable for any damage resulting from electromagnetic interference that occurs from the use of any interface cables other than those designated as EPSON Approved Products by SEIKO
EPSON CORPORATION. EPSON is a registered trademark of SEIKO EPSON CORPORATION. Microsoft and Windows are registered trademarks of Microsoft Corporation.
General Notice: Other product names used herein are for identification purposes only and may be trademarks of their respective owners. EPSON disclaims any and all rights in those marks.
4025679-00
XXX
Need help? Post your question in this forum.
Report abuse
Libble takes abuse of its services very seriously. We're committed to dealing with such abuse according to the laws in your country of residence. When you submit a report, we'll investigate it and take the appropriate action. We'll get back to you only if we require additional details or have more information to share.
Product:
Forumrules
To achieve meaningful questions, we apply the following rules:
First, read the manual;
Check if your question has been asked previously;
Try to ask your question as clearly as possible;
Did you already try to solve the problem? Please mention this;
Is your problem solved by a visitor then let him/her know in this forum;
To give a response to a question or answer, do not use this form but click on the button 'reply to this question';
Your question will be posted here and emailed to our subscribers. Therefore, avoid filling in personal details.
Register
Register getting emails for Epson perfection 1260 photo at:
new questions and answers
new manuals
You will receive an email to register for one or both of the options.
Get your user manual by e-mail
Enter your email address to receive the manual of Epson perfection 1260 photo in the language / languages: English as an attachment in your email.
The manual is 1,23 mb in size.
You will receive the manual in your email within minutes. If you have not received an email, then probably have entered the wrong email address or your mailbox is too full. In addition, it may be that your ISP may have a maximum size for emails to receive.
The manual is sent by email. Check your email
If you have not received an email with the manual within fifteen minutes, it may be that you have a entered a wrong email address or that your ISP has set a maximum size to receive email that is smaller than the size of the manual.
The email address you have provided is not correct.
Please check the email address and correct it.
Your question is posted on this page
Would you like to receive an email when new answers and questions are posted? Please enter your email address.