DerELROProTür-Fenster-KontaktAP55MA11 ist ein Zubehör für die Alarmanlage ELRO 10-ZONEN
PRO ALARMANLAGEAP5500. Dieser besteht aus 2 Teilen, dem Sensor und dem Magneten.Hierbei
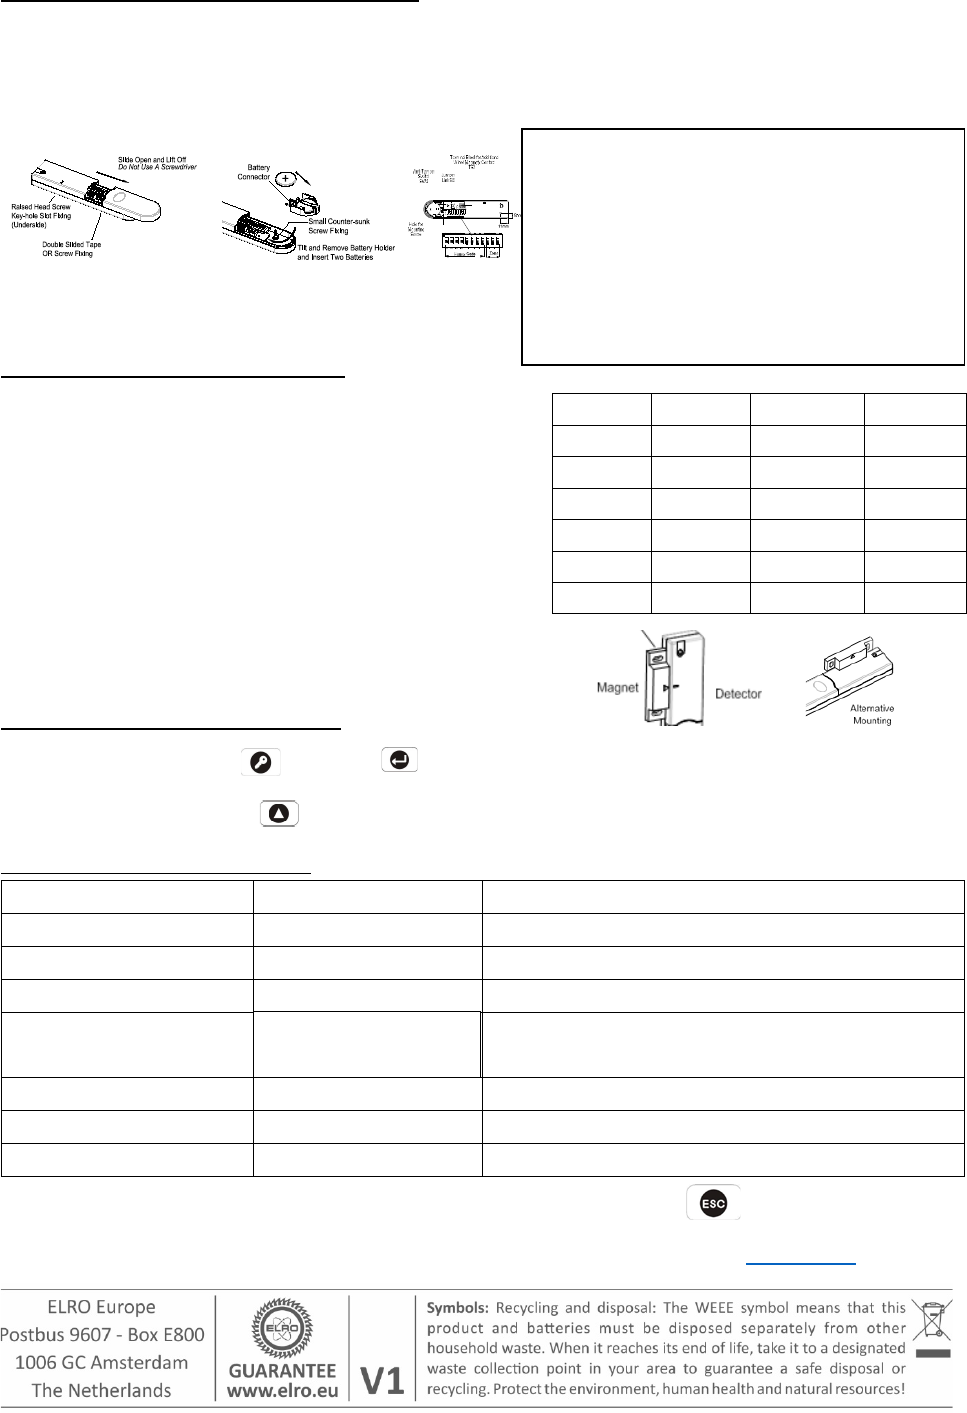
sollte der Magnet stets am sich bewegenden Part der Tür oder des Fensters montiert werden.
Den Tür-Fenster-Kontakt montieren:
Stellen Sie sicher, dass der Funkkontakt an der angedachten
Montagestelle Besteht, indem Sie vor der endgültigen
Montage einen Test durchführen.Dieser wird beim Tür-
Magnet Kontakt durch Öffnen des Gerätes und somit
Auslösen des Sabotagealarms herbeigeführt.Entfernen Sie
den Batteriehalter und montieren Sie den Sensor, entweder
mit dembeigelegten Klebeband oder den Schrauben und
Dübeln. Setzen Sie den Magnetenauf den beweglichen Teil
der Tür / des Fensters maximal 10 Millimeter vom Sensorent-
fernt. Stellen Sie sicher, dass der Pfeil auf dem Magnetenauf
die Markierung desSensors zeigt und auf diese ausgerichtet ist.
ProgramminganderAlarmzentrale:
1.Drücken Sie dann x x x x (x x x x ist das Standard Master Passwort), im Display
erscheint nun “1.USER SETUP”.
USER SETUP. Drücken Sie , bis : “3. ZONE SETTING”. erscheint.Nun wählen sie:
Zone Setup (für Zone 1-10; Merke: Zone 7-10 sind verkabelte Zonen und werden i.d.R. nicht genutzt);
geben Sie die Zonen Nummern ein, die sie den Sensoren zugewiesen haben!
2.Dann verlassen sie den Programmier Modus durch klicken der Taste , bi sim Display
die Anzeige: “DISARM READY” erscheint.
Detailliertere InformationenzurELRO PRO ALARMANLAGEAP5500 finden sie aufwww.elro.eu
Schalter 9Schalter10Schalter 11
Zone 1OFFOFFOFF
Zone 2OFFOFFON
Zone 3OFFONOFF
Zone 4OFFONON
Zone 5ONOFFOFF
Zone 6ONOFFON
Name
Standard: kein Name
Sie können den Zonen Namen geben, z.B. “Garage”’
Type
Standard: Intruder
Sie können auch andere Typen wählen
Final Exit
Standard: OFF
Reduziert die Ausgangsverzögerung auf 5s Rest
Chime
Standard: OFF
Hier können Sie die Klingel Funktion aktivieren
Entry Delay Zone 1
Zone 2-10
Wenn Sie die Zone zum Ausschalten
der Anlage durchqueren: Aktivieren!
Part-Arm 1
Standard: OFF
Für Einordnung in Teilscharf 1: ON
Part-Arm 2
Standard: OFF
Für Einordnung in Teilscharf 2: ON
Walk Through
Standard: OFF
Bei ON löst diese Zone keinen Alarm aus!
O
E
1 2 3 4
Öffnen sie den Sensor, entnehmen sie den
Batteriehalter und legen sie die mitgelieferten
2x CR2032 Batterien in der angegebenen
Polung ein.Die Schalter Nr. 1-8 sind für den
Hauscode, der bei allen Assessoires gleich
eingestellt sein muss.Mit den Schaltern Nr. 9-
11 legen sie fest, in welcher Zone der Sensor
registriert wird(siehe Tabelle).
Notieren sie
die Zonen-Nr. Am Gerät.
Standard: ON, 30s
Standard: OFF
Need help? Post your question in this forum.
Report abuse
Libble takes abuse of its services very seriously. We're committed to dealing with such abuse according to the laws in your country of residence. When you submit a report, we'll investigate it and take the appropriate action. We'll get back to you only if we require additional details or have more information to share.
Product:
Forumrules
To achieve meaningful questions, we apply the following rules:
First, read the manual;
Check if your question has been asked previously;
Try to ask your question as clearly as possible;
Did you already try to solve the problem? Please mention this;
Is your problem solved by a visitor then let him/her know in this forum;
To give a response to a question or answer, do not use this form but click on the button 'reply to this question';
Your question will be posted here and emailed to our subscribers. Therefore, avoid filling in personal details.
Register
Register getting emails for Elro AP55MA at:
new questions and answers
new manuals
You will receive an email to register for one or both of the options.
Get your user manual by e-mail
Enter your email address to receive the manual of Elro AP55MA in the language / languages: German as an attachment in your email.
The manual is 0,3 mb in size.
You will receive the manual in your email within minutes. If you have not received an email, then probably have entered the wrong email address or your mailbox is too full. In addition, it may be that your ISP may have a maximum size for emails to receive.
If you have not received an email with the manual within fifteen minutes, it may be that you have a entered a wrong email address or that your ISP has set a maximum size to receive email that is smaller than the size of the manual.
The email address you have provided is not correct.
Please check the email address and correct it.
Your question is posted on this page
Would you like to receive an email when new answers and questions are posted? Please enter your email address.