2
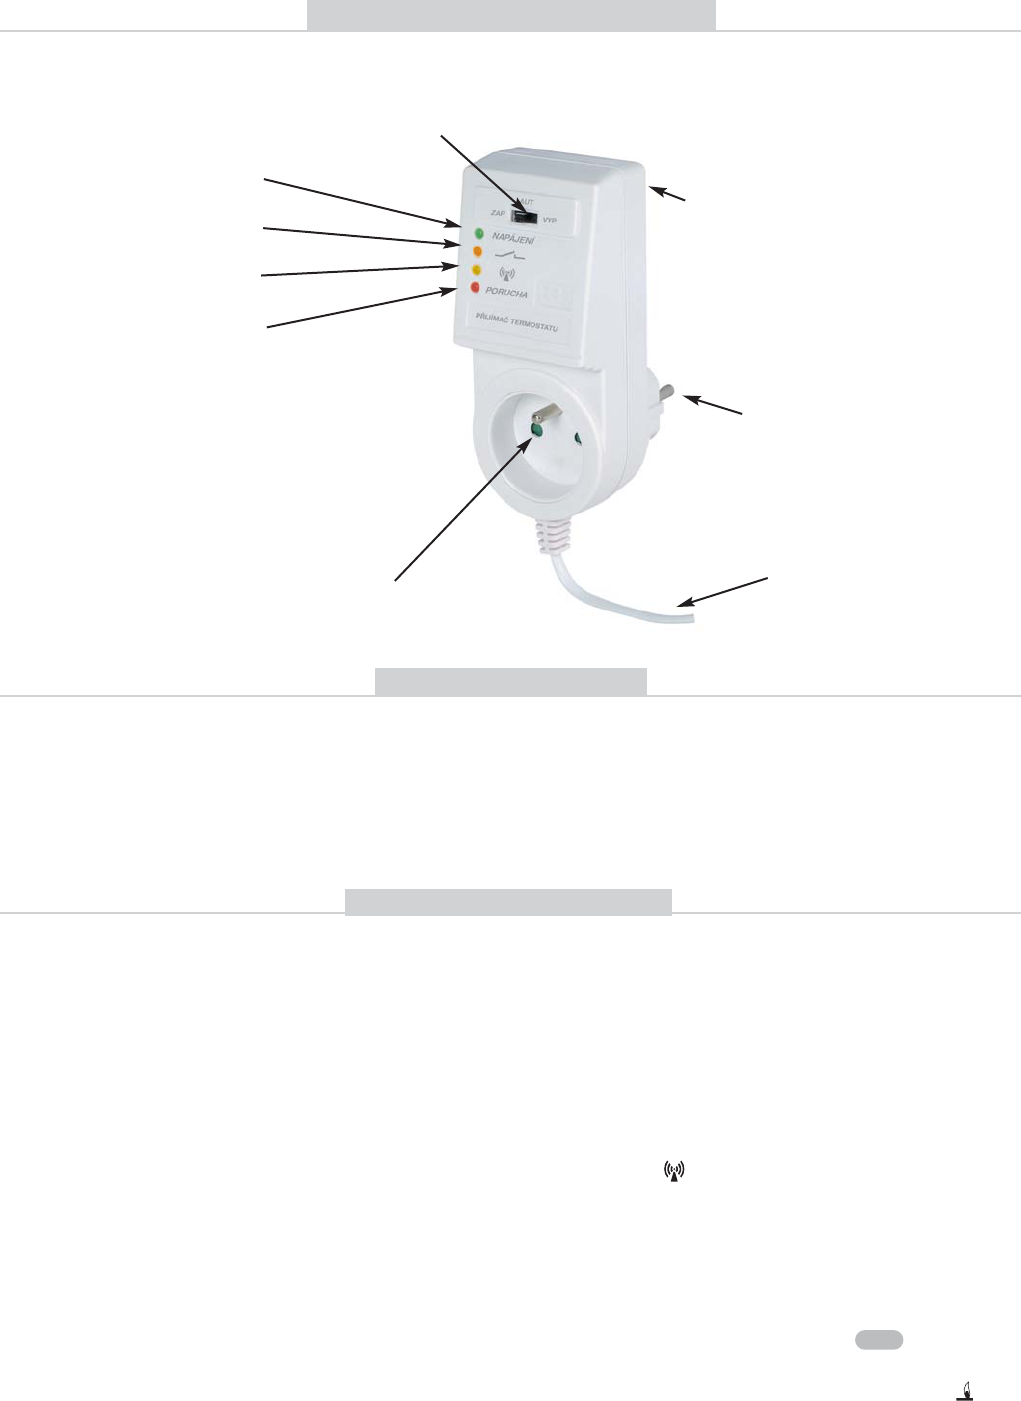
BPT37 DESCRIPTION- receiver
potential-free (floating)
contact output for
boiler connection
power supply
230 V/50 Hz
FUNCTION BUTTON
INDICATING LEDs:
GREEN LIT
- indication of mains connection
ORANGE LIT
- relay closed
YELLOW
YELLOW BLINKING
- signal received
RED BLINKING
- empty E-EPROM memory
RED LIT
- FAILURE (if no signal from the transmitter is
detected within approx. 6 hours, it switches
to the “2-min-ON / 8-min-OFF” mode.)
YELLOW
YELLOW+RED BLINKING ALTERNATELY
- code learning mode
YELLOW
YELLOW+RED BLINKING SIMULTANEOUSLY
- code has been learned
THERMOSTAT LOCATION
We recommend that the installation be done by a person with suitable qualifications in electrical engineering!
Incompetent interference or damage voids the guarantee for the product!
1. Switch off the main circuit breaker.
2. Connect the boiler to the potential-free contact outputs (use the room thermostat
terminals – 2 wires).
3. Connect the receiver to the 230 V/ 50 Hz mains.
4. Switch on the main circuit breaker; the green diode lights up on the receiver; the receiver
is ready for operation.
CODE LEARNING (use if the receiver memory has been erased – the red diode blinks):
1, Press the receiver’s “FUNCTION BUTTON” for about 1.5 sec; the yellow and red LEDs start blinking
alternately; and the receiver awaits the code (“learning mode”).
2, Push the “TEST” button on the receiver; the signal sending sign appears on the display.
3, Receipt of the code in the receiver is indicated by simultaneous blinking of the yellow and red diodes;
thus the code has been learnt.
4, After receipt of the code, the output relay is switched several times to verify the correct functioning
of BPT37.
TESTING CORRECT CONNECTION:
On completion of the installation, test the correct connection by pushing the button on
the transmitter.
The boiler will be tested automatically. It switches ON and OFF several times, and the ,
sign appears on the transmitter display; the orange diode on the receiver indicates that the
relay is closed.
Test
SWITCHING FUNCTIONS:
AUT - pworking according to program
ON - permanently switched on
OFF - permanently switched off
through-way socket
for connection
of another device
short press:
start of the code learning mode
long press:
memory clearing
(preset code erased + RESET)
The transmitter must be located as far from interference sources (TV, PC, etc.) as possible; it must not be
placed on a metal base.
For its location, take the thermal properties of the place into account. Owing to bad signal reception,
install the receiver as far from large metal objects as possible (at least 0.5 m).
The receiver is functional immediately after connection to 230 V/ 50 Hz – the GREEN LED lights up.
The output switching contact is galvanically isolated from the control unit.
During installation, make sure that no heavy-current lines run along the thermostat.
INSTALLATION PROCEDURE