614616
8
Zoom out
Zoom in
Previous page
1/9
Next page
8
ENGLISH
6
X-EFFECT
If the separately sold DN-2100F and DN-2600F players are connected below, they can be started using the source input fader (Ch.
fader) or Crossfader.
The below function can be started using the source input fader (Ch. fader) or Crossfader by setting it with CD PLAYER.
Sampler (DN-2600F), Hot Start Brake Platter (DN-2100F and DN-2600F), Hot Start (DN-2100F and DN-2600F)
Sampler (DN-2600F) Hot Start (DN-2100F and DN-2600F)
(1) Selecting the mode
The sound for the Sampler is recorded with the
DN-2600F.
When the sound is recorded, the adjacent green
indicator lights.
Press the SAMP. button.
1
2
Set the Hot Start 1 and/or 2 point of the CD player.
When set the Hot Start point, the adjacent orange
indicator lights.
Press the H/S 1, 2 button.
1
2
Hot Start Brake Platter (DN-2100F and DN-2600F)
Press the H/S BRAKE button, and the adjacent
orange indicator lights.
1
The function for the Brake stop is done by using
Crossfader and source input fader. (Ch. fader) Ch Fader
must be set and left in the up position.
The indicator of H/S 1, 2 and SAMP. change automatically if Assign switches are changed to CH-1 or CH-2.
Channel Fader Start
Turn on the Ch. fader start switch.
Move the source input fader (Ch.
fader) of CH-1 or CH-2 control all
the way to the bottom.
When you want to start the
player, move up the source input
fader (Ch. fader) and the CD
player will begin playing.
NOTES:
Channels selected with the Crossfader Assign A, B
switches and the Crossfader Start A, B buttons cannot
be started with the source input fader (Ch. fader).
Ch. Fader Start and Cross Fader Start for the same
source will not operate simultaneously. You must select
from either one. If both Ch. Fader and Cross Fader
switches are ON, priority will be the cross fader.
1
2
3
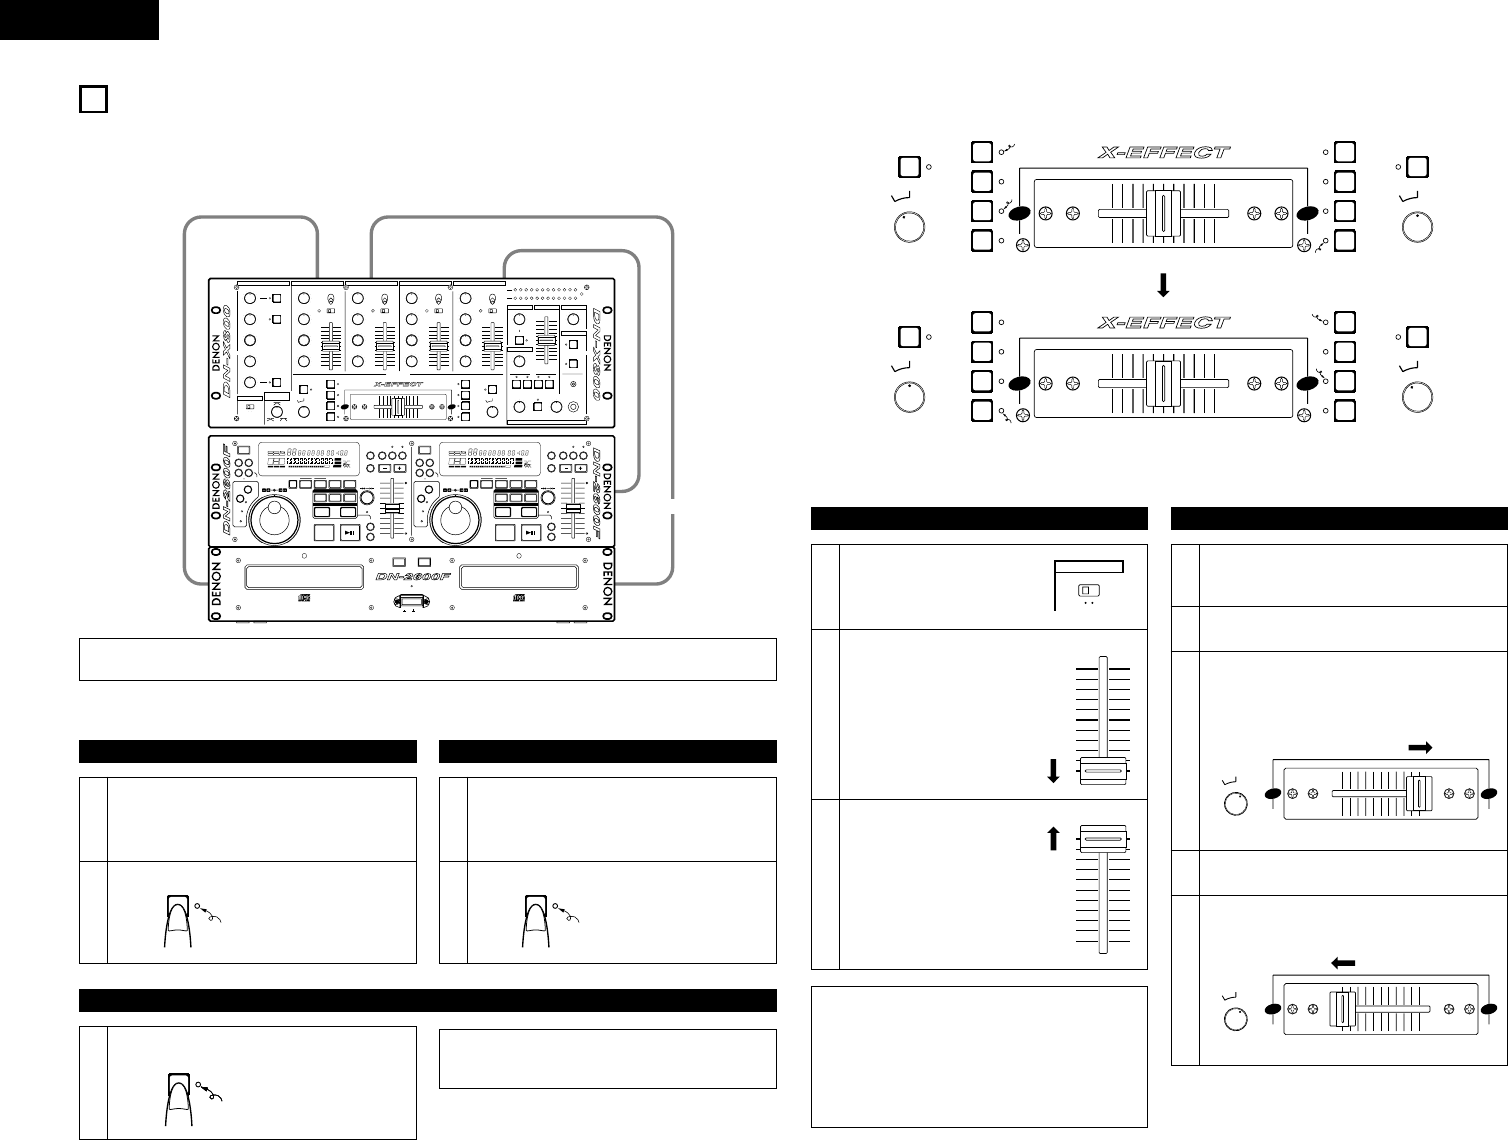
Using the Crossfader Assign A B switches, select
the channel (CH-1 or CH-2) that the CD player is
connected.
Press the Crossfader Start A, B buttons of the
channel connected to the CD player to be controlled.
Slide the Crossfader all the way in direction opposite
the source you want to start. ( In the following
example, startup is done with the CD player
connected to CH-1 set to Assign A. )
Use the Crossfader Contour control to control the
cross fader startup curve.
1
2
3
4
Crossfader Start
When the Crossfader is slid in the opposite direction
as in 3, CD player will begin.
5
(2) Starting with Fader Start
BA
DIGITAL
+10dB
+10dB-26dB
-26dB
-26dB +10dB
+10dB
+10dB-26dB
-26dB
-26dB +10dB
+10dB
+10dB-26dB
-26dB
-26dB +10dB
+10dB
+10dB
+10dB-26dB
-26dB
-26dB
SUB WOOFER
MAXMIN
FREQ.
MIC
PWR
MASTERZONE
10
8
6
4
2
0
LEVEL
100
CUE/PGM
PHONES
100
LEVEL
PGM
PAN
CUE
STEREO
4
MIN
GAIN
MAX
3
MAX
HI
LOW
MID
MIN
2
MAXMIN
HIHI
LOW
MID
1
MAXMIN
GAIN
HI
LOW
MID
+10dB
+10dB
+10dB-26dB
-26dB
-26dB
HI
LOW
MID
100
100
MAIN MIC
MID
LOW
GAIN
+830113571520-10 5
R
PGM
CUE
L
+-853101357101520
ON/OFF
MIC POST
ON/OFF
AUX MIC
ON/OFF
CROSSFADER
CONTOUR
ASSIGN A
OFF
3
2
1
4
SAMP.
H/S 2
H/S 1
LINE2DIGITAL1
PH1/LN1 PH2/LN3
DIGITAL2
PH3/LN5
LINE6DIGITAL3
LINE7
DIGITAL4 LINE8
10
8
6
4
2
0
10
8
6
4
2
0
10
8
6
4
2
0
ASSIGN B
H/S 1
SAMP.
H/S 2
3
2
1
4OFF
10
8
6
4
2
0
EFFECT LOOP
BOOTH
METER
100
LEVEL
CUE
CH 4CH 3CH 2CH 1
L-CUE
R-PGMMONO
MIC
MAIN
LINE4
GAIN
CH FADER START
ON OFF
X
CROSS
FADER
START A
CROSS
START B
FADER
H/S
BRAKE
X
DJ MIXER
H/S
BRAKE
RESET
CH FADER START CH FADER START CH FADER STARTCH FADER START
CONT.
SINGLE
REPEAT
PITCH %
NEXT TR
ELAPSED
REMAIN
TOTAL
fsm
GO
PROG.
MEMO
BRAKE
PLAT-S
PLAT-H
LOOP
A1 B
A2 B
EXIT
LOCK
FULL
D.OUT
DIGI-S
SAMP
EFFECT
LOOP
RVS
EOM
CONT.
SINGLE
REPEAT
PITCH %
NEXT TR
ELAPSED
REMAIN
TOTAL
fsm
GO
PROG.
MEMO
BRAKE
PLAT-S
PLAT-H
LOOP
A1 B
A2 B
EXIT
LOCK
FULL
D.OUT
DIGI-S
SAMP
EFFECT
LOOP
RVS
EOM
1 2
POWER
OFFON
OPEN/CLOSEOPEN/CLOSE
21
ON/OFF
PLAY/WRITE
FLG
PITCH
RELOOP
EXIT/
STOP
RVBFIL
BA
LOOP
TAP
REVERSE
START
NEXT TR.
K
E
Y
BEN
D
EFFECT
SEARCH
D
I
G
I
-
S
K
E
Y
BE
ND
D
I
G
I
-
S
TIME
END MON.
CONT./SINGLE
SEARCH SCAN
LOOP
PRESET
MODE
DATA MASTER
PUSH ENTER
KEYMEMO
PITCH BEND
BRAKE PITCH
PROGRAM
REMOTE CONTROL UNIT RC-46
0%
START
NEXT TR.
EFFECT
SEARCH
CONT./SINGLE
TIME
END MON.
SEARCH
LOOP
SCAN
CUE
RVBFIL
TAP
STOP
B
LOOP
A
REVERSE
PLAY/PAUSE
FLG
ON/OFF
PLAY/WRITE
MODE
PITCH
DATA MASTER
PRESET
PUSH ENTER
EXIT/
RELOOP
KEYMEMO BRAKE
PROGRAM
END MON.
PITCH BEND
PITCH
0%
PLAY/PAUSE
CUE
CUE
2
CUE
1
21 12
OPEN/
CLOSE
OPEN/
CLOSE
CH1
Input jack
CH2
Input jack
X-EFFECTS jack
CD1
Output jack
CD2
Output jack
RCA cord
RCA cord
3.5 mm stereo mini cord
RC Expansion jack
DN-X800
DN-2600F
SAMP.
Flashing
H/S 1
Flashing
H/S
BRAKE
Lit
Lit
Lit
Lit
Lit
Lit
Lit
BA
ASSIGN A
OFF
3
2
1
4
SAMP.
H/S 2
H/S 1
ASSIGN B
H/S 1
SAMP.
H/S 2
3
2
1
4OFF
X
CROSS
FADER
START A
CROSS
START B
FADER
H/S
BRAKE
X
H/S
BRAKE
BA
ASSIGN A
OFF
3
2
1
4
SAMP.
H/S 2
H/S 1
ASSIGN B
H/S 1
SAMP.
H/S 2
3
2
1
4OFF
X
CROSS
FADER
START A
CROSS
START B
FADER
H/S
BRAKE
X
H/S
BRAKE
CH FADER START
ON OFF
10
8
6
4
2
0
CH FADER START
10
8
6
4
2
0
CH FADER START
BA
ASSIGN A
OFF
3
2
1
4
X
BA
ASSIGN A
OFF
3
2
1
4
X
NOTE:
Use the analog inputs/outputs when the DN-2600F and the DN-2100F are moved by X-EFFECT.
8


Need help? Post your question in this forum.

Forumrules


Report abuse

Libble takes abuse of its services very seriously. We're committed to dealing with such abuse according to the laws in your country of residence. When you submit a report, we'll investigate it and take the appropriate action. We'll get back to you only if we require additional details or have more information to share.

Product:

For example, Anti-Semitic content, racist content, or material that could result in a violent physical act.

For example, a credit card number, a personal identification number, or an unlisted home address. Note that email addresses and full names are not considered private information.

Forumrules

To achieve meaningful questions, we apply the following rules:

Register

Register getting emails for Denon DN-X800 at:


You will receive an email to register for one or both of the options.


Get your user manual by e-mail

Enter your email address to receive the manual of Denon DN-X800 in the language / languages: English as an attachment in your email.

The manual is 0,91 mb in size.


You will receive the manual in your email within minutes. If you have not received an email, then probably have entered the wrong email address or your mailbox is too full. In addition, it may be that your ISP may have a maximum size for emails to receive.

The manual is sent by email. Check your email

If you have not received an email with the manual within fifteen minutes, it may be that you have a entered a wrong email address or that your ISP has set a maximum size to receive email that is smaller than the size of the manual.

The email address you have provided is not correct.

Please check the email address and correct it.

Your question is posted on this page

Would you like to receive an email when new answers and questions are posted? Please enter your email address.


Info