17
Before operating your machine, you need to set up the
speaker configuration and the delay time from the listening
position to each speaker.
Note
It is not necessary to set the parameters again once you have
completed the setup unless you change the speaker
configuration.
1. Press SPK SETUP to display the Front,
Center and Rear speaker configuration.
The front, center and rear speaker
configuration appears in the machine's
display.
FL-CS-RS
2. Press
repeatedly to select “xL”
(LARGE : when large- wideband-
speakers are connected), “xS” (SMALL :
when small with limited bass signal
handling-speakers are connected) or
N(NONE:when no speaker is connected).
FL-CN-RS : Front Large - Center None - Rear Small
FL-CS-RN : Front Large - Center Small - Rear None
FL-CN-RL : Front Large - Center None - Rear Large
FL-CS-RL : Front Large - Center Small - Rear Large
FL-CL-RN : Front Large - Center Large - Rear None
FL-CL-RL : Front Large - Center Large - Rear Large
FL-CL-RS : Front Large - Center Large - Rear Small
FL-CS-RS : Front Large - Center Small - Rear Small
FS-CN-RS : Front Small - Center None - Rear Small
FS-CS-RN : Front Small - Center Small - Rear None
FS-CS-RS : Front Small - Center Small - Rear Small
3. Press ENTER to display the Subwoofer
speaker configuration.
The subwoofer speaker configuration
appears in the machine's display.
SUB W-Y
5. Press ENTER
4. Press
to select either
“SUB W-Y”(yes : when a subwoofer is
connected) or “SUB W-N”(no : when no
subwoofer is connected).
1. Press DELAY.T to select speaker
configuration(Center or Rear Delay Time).
3. Press ENTER.
The normal display appears.
If headphones are connected, remove the headphones.
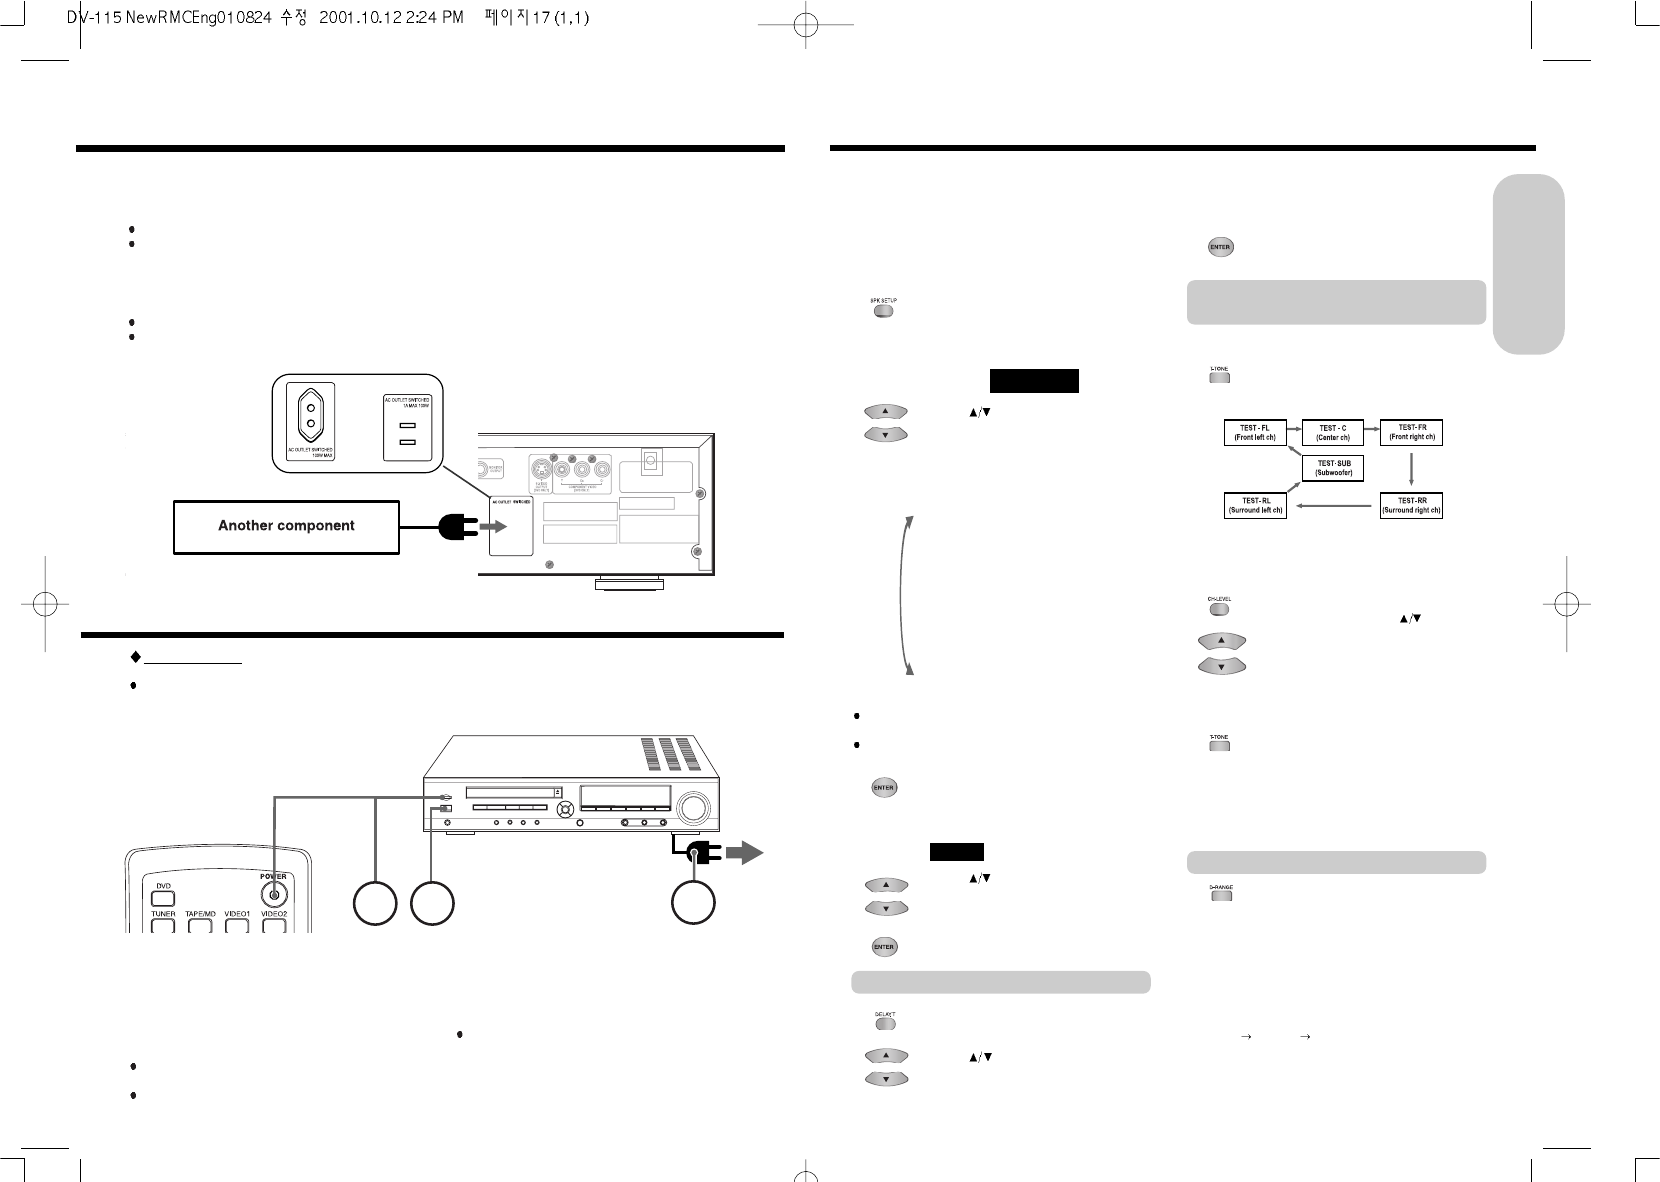
1. Press T-TONE.
Each speaker emits the test tone (pink
noise) in the following order:
Note
The speaker whose configuration is set to “N”(None) will be
skipped.
3. When you have completed the
adjustment, press ENTER.
2. Press CH-LEVEL repeatedly to select
the speaker, then press
to raise or
lower the volume level until you have an
equal volume balance with the other
speakers at your listening position.
The volume level can be adjusted between
-15 and +15dB.
1. When selected Dolby Digital,
press D-RANGE repeatedly to select
dynamic range.
DYNR 0.0 : Maximum dynamic range
DYNR 0.5 : Standard dynamic range
DYNR 1.0 : Minimum dynamic range
Adjusting Surround Speaker's Delay Time
Adjusting Each Speaker's Relative
Volume Balance – Test Tone
Adjusting Dynamic Range
Speaker Setup
2. Press repeatedly to enter the delay
time your listening position and one of
the speakers.
4. Repeat step 2~3 to adjust other
speaker’s volume balance.
To cancel the test tone, press T-TONE.
Note :
The level of Dynamic Range Reduction may differ depending on
the DVD video.
The Dynamic Range function operates when the sound is
DOLBY DIGITAL Surround.
If you play a movie at low volume at night, set this function to
“DYNR 0.0
DYNR 0.5 DYNR 1.0” to narrow the dynamic
range of the sound and make it easier to hear.
Note :
If satellite speakers connected to the machine, select Small
speaker configuration.
If you select “FS”(front small), the configuration of the
subwoofer speakers is automatically set to “Y”(Yes).
The delay time can be adjusted between in
the following order:
when Dolby digital - Center 0~5ms / Rear 0~15ms
when Dolby Pro Logic - Rear 15~30ms
16
Connecting to AC OUTLET on the Rear Panel
Connecting the Power/Turning on the machine
Before connecting
Turning on the machine may cause a momentary power surge, which might interfere with other
electrical equipment such as computers. If this happens, use a wall outlet on a different circuit.
1. Connect the power cord to a wall outlet.
2. Press the POWER switch to switch on the main power.
The machine enters standby mode.
The STANDBY indicator lights up.
Notes
The buttons on the remote controller don't operate if the
POWER switch is set to OFF.
To switch off the main power, press the POWER switch again.
3. Press STANDBY/ON on the machine or POWER ON on
the remote controller.
The machine turns on. The STANDBY indicator goes off.
Note
To turn off the machine, press STANDBY/ON on the machine,
or POWER STANDBY on the remote controller. The machine
enters standby mode. Be sure to set the volume to minimum
before turning off the machine.
You can connect the power cord of another audio/video component to the AC outlet
(AC OUTLET SWITCHED:1A Max 100W) on the rear panel of the machine.
The power supply to AC OUTLET stops:
When the main power of the machine is switched off or
When the machine is in standby mode.
Using this function, you can turn on and turn off the audio/video component connected to AC OUTLET with this
machine if you leave the component's power switch on.
Before connecting
Make sure that the power supply voltage and frequency of the component to be connected match the voltage and frequency.
Make sure that the power consumption of the component to be connected does not exceed the power supply capacity
indicated on the label above the AC outlet.
Getting Started
AC OUTLET : Option