S-T
gedrückt halten um die
T
Einstellungen wer
nicht beeinflusst.
T
Sensor
Hier können Sensor
dem Computer gekoppelt
werden.
S um Einstellung zu öffnen
S um eine Sensor-ID S S
S auszuwählen
S um die Sensor-ID neu zu
S koppeln. Die ID-Nummer
S des Sensors erscheint.
M um zurück ins S S S S
S Hauptmenü zu gelangen
W
Hier kann der Computer auf
die Werkseins
zurückgesetzt wer
werden all
Computer gelöscht.
S um Einstellung zu öffnen
um Nein oder Ja S S S
S auszuwählen
S zum Bestätigen
Gesamtwerte
Hier können die Gesamtwerte
betrachtet und auch
eingestellt wer
S um Einstellung zu öffnen
um zum nächsten W
S gelangen
S um den Wert anzuwähl
S um den Wert einzus
S zum Bestätigen
M um zurück ins S S S S
S Hauptmenü zu gelangen
Höhe
S um Einstellung zu öffnen
um Aktuelle Höhe, S S
S Starthöhe1 oder S S S
S Starthöhe2 zum S S S
S Einstell
S zum Bestätigen
um den Wert einzus
S zum Bestätigen
M um zurück ins S S S S
S Hauptmenü zu gelangen
Radgr
S um Einstellung zu öffnen
um Rad 1 oder Rad 2 S S
S auszuwählen
S zum Bestätigen
um Reifenliste oder S S
S Manuelle EinstS
S auszuwählen
S zum Bestätigen
um Reifen zu wähl
S den Radumfang manuell
S einzugeben
S zum Bestätigen
Einheiten
S um Einstellung zu öffnen
um Einheit auszuwählen
S zum Bestätigen
Datum
S um Einstellung zu öffnen
um Datum einzustell
S zum Bestätigen
Der Computer verfügt über eine
Schnellauswahlfunktion der Höhe.
Hier kann die Aktuelle Höhe,
Starthöhe1 oder Starthöhe 2
ausgewählt wer
S und für 3 Sekunden gedrückt
halten um die Höhenauswahl zu
öffnen.
um die gewünschte Höhe
auszuwählen.
S zum Bestätigen.
Die W
im Einstellungsmenü bearbeitet
wer
Höhenauswahl
Uhrzeit
S um Einstellung zu öffnen
S um 12/24h Anzeige
S auszuwählen
S zum Bestätigen
um Uhrzeit einzustell
S zum Bestätigen
Sprache
S um Einstellung zu öffnen
S um Sprache auszuwählen
S zum Bestätigen
M-T
gelangen bzw
Mit den T
Um in die ausgewählte Einstellung zu gelangen die S -T
Mit den T
S-T
Ist die Einstellung v
Mit der M -T
wer
Ohne Reaktion schließt sich das Menü nach einer Minute automatisch.
-TS-T
M M
M-T
/ Uhrzeit
Signalempf
/ Zeigt gewählte Geschwindigkeitseinheit
/ Zeigt gewähltes Rad 1 oder Rad 2
Batteriewarnung
V
Durchschnittsgeschwindigk
T
Bike Modus
Höhen Modus
Dauerschleif
-T
Bike Modus Höhen Modus Dauerschleif
Durchschnittsgeschwindigk
Maximalgeschwindigkeit
Streck
F
Stoppuhr
T
Streck
F
Höhenmeter ber
Höhenmeter ber
Aktuelle Steigung
Durchschnittliche St
Maximale Steigung ber
Durchschnittliche St
Maximale Steigung ber
Maximale Höhe
Höhenmeter ber
Höhenmeter ber
Im Dauerschleif
die wichtigsten F
Sekunden weiter
beliebigen T
beendet.
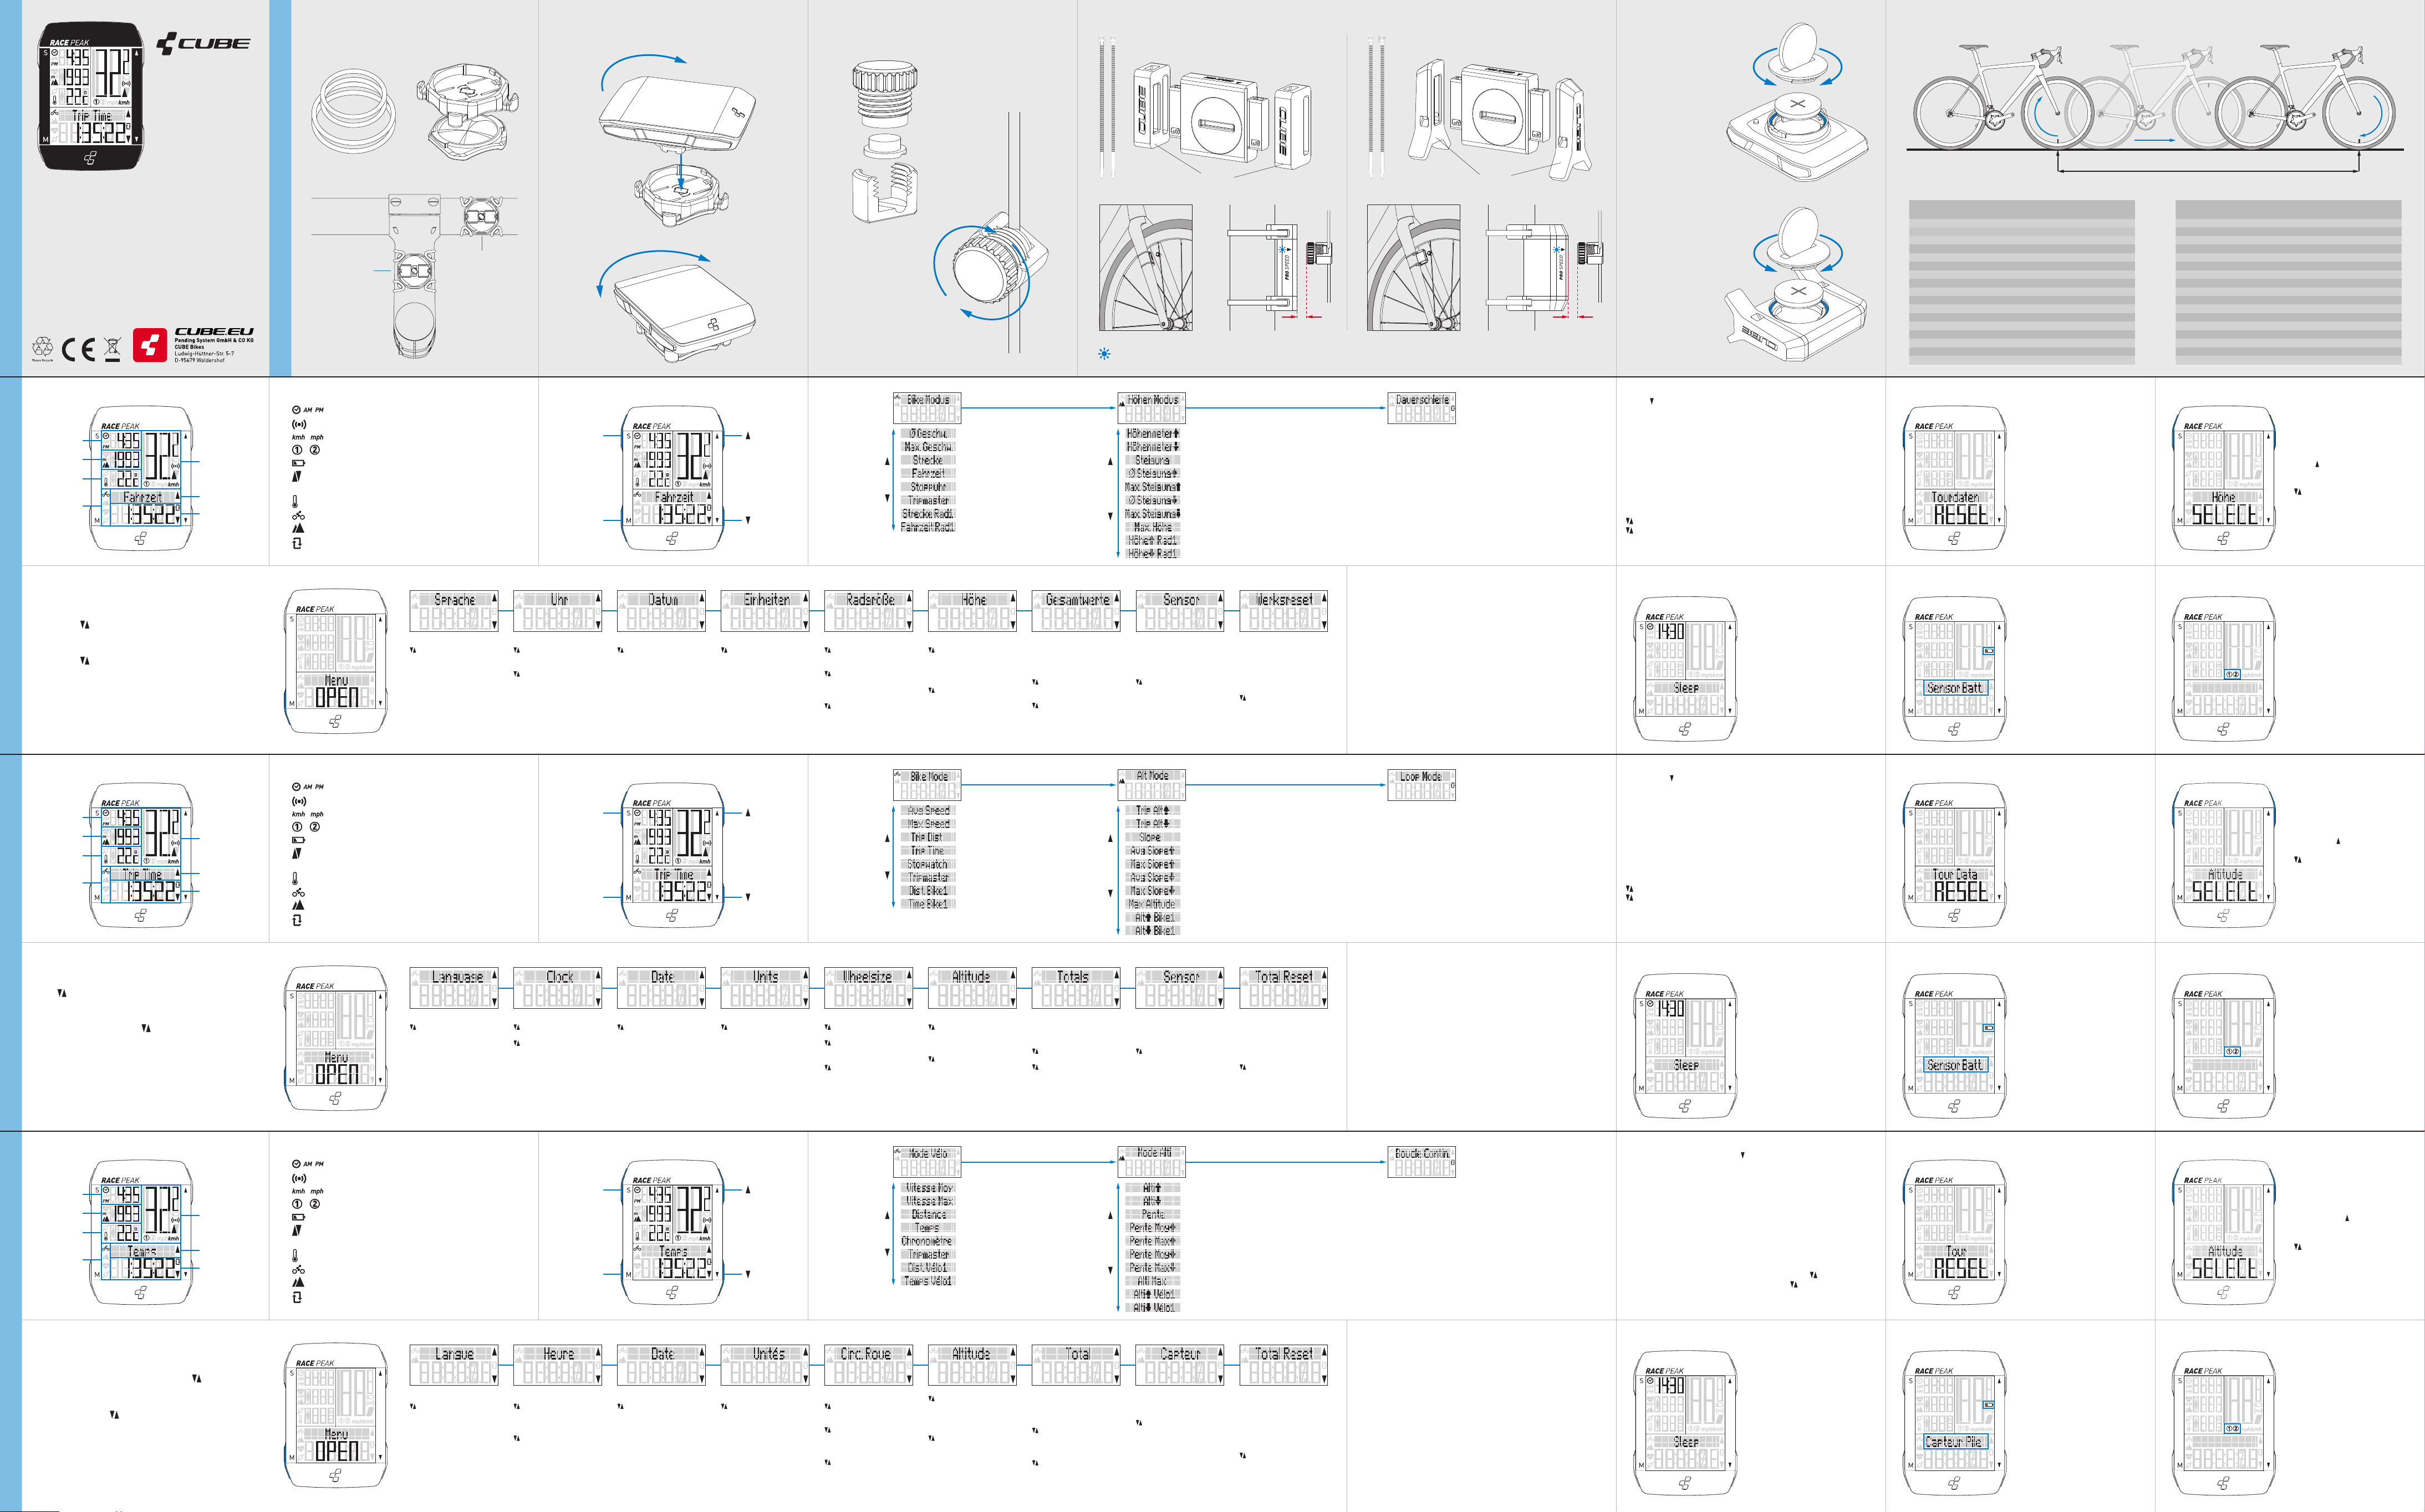
Um neue Sensoren (z.B. für Rad2) mit dem Comput
öffnen Sie das Hauptmenü und wählen „Sensor“.
Geschw
Geschw
WS -T
drücken. Der Computer sucht nun nach Sensor
der Sensor in der Nähe und aktiviert ist. Aktivier
durch Be
Koppeln wird die ID-Nummer des Sensor
Achtung: Dieser V
gestört wer
Sensoren im Umkr
DEUTSCH
MONT
Display
Bedienungsanleitung
Instruction manual
Montage Computerhalterung /
Installation of computer brack
Montage Computer /
Mounting computer
Computer einstellen
Icons T
Sensoren koppeln
Funktionen
Ausgewählte
Funktion
Aktuelle
Geschwindigkeit
Uhrzeit
Aktuelle Höhe
T
Modus
Die Bedienungsanleitung ist Bes
Hinweise zur Sicherheit, Montage und Entsor
Benutzung des Produkts mit all
Benutzen Sie das Produkt nur wie beschrieben und für die angegebenen
Einsatzbereiche. Händigen Sie all
an Dritte mit aus.
The instruction manual is part of this pr
information on safety
important that you familiarise y
instructions. Use the pr
indicated application ar
it with all the documentation.
Lenker / Handl
V
W
wählten F
Lock
Unlock
Die Sensorkontr
The sensor indicator light signals the corr
Achtung: Montieren Sie den Sensor auf der V
Attention: Mount the sensor on the fr
Option A Option B
Montage Sensor + Magnet / Mounting sensor + magnet
T T
max. 5 mm max. 5 mm
Montage Speichenmagnet /
Installation of spoke magnet
Lock
Achtung:
Beim Batteriewechsel gehen
KEINE gespeicherten Daten
verlor
Verw
CR2032 3V Batterien.
Stellen Sie sicher
Dichtungsring korr
platziert ist.
Wichtig:
Nach einem Wechsel der
Sensor-Batterie, muss der
Sensor mit dem Computer
neu gekoppelt wer
Attention:
When battery is rNO
saved data gets los
Use only CR2032 3V batteries.
Make sur
ring is placed corr
Important:
After changing the sensor
battery
paired again with the
computer
Batteriewechsel / Change battery
Open Close
Open Close
Der Computer verfügt über einen
Vibrationssensor
rung und Signal schaltet der
Computer nach 6 Minuten in den
Ruhemodus und zeigt die Uhrzeit
an. Durch erneut
kehrt der Computer in den
Betriebsmodus zurück.
F
Schlafmodus (Sleep), erwacht
dieser erst wieder dur
Drücken einer beliebiegen T
Ruhe-/ Schlafmodus
Ist die Batterie des Computer
schwach, blinkt das Batteriesymbol
auf
Ist die Batterie des Sensors
schwach, blinkt die Sensorkontr
leuchte nach dem Aufwachen r
auf
Batt.“.
Ersetzen Sie möglichst bald die
schwache Batterie.
Batteriewarnung
Reifengrößen-T
ETRTO
ETRTO
Umfang / Cir
Hintergrundbel
M und gleichzeitig drück
auszuschalten. Die Beleuchtung is
beliebige T
Stoppuhr
S drücken um die Stoppuhr zu s
S für 3 Sekunden gedrückt halten um die Stoppuhr zu null
T
Der T
Um den T
und halten die M -T
um vorwärts oder rückwärts auszuwählen. S zum Bes
um den Ausgangswert einzustellS zum Bestätigen
S für 3 Sekunden gedrückt halten um den T
Ausgangswert zurückzusetzen.
Der Computer besitzt eine
automatische Raderkennung. Der
Computer wechselt automatisch
auf die Einstellungen des Rads
von dem ein Sensorsignal
empfangen wir
Radwechsel
Capteur
Ici, les capt
couplés à l'or
S pour ouvrir le r
S pour sélectionner un ID
S capteur
S pour coupler à nouv
S l'ID capteur
S du capteur apparaît.
M pour re
S principal
Réinitialisation des
paramètr
Ici, vous pouvez r
l'ordinat
paramètr
les données sont al
supprimées de l'ordinat
S pour ouvrir le menu des
S paramètr
pour sélectionner Oui ou
S Non
S pour confirmer votr
S choix
V
Ici, vous pouvez consult
configur
S pour ouvrir le menu des
paramètr
pour aller à la val
suivante
S pour sélectionner la
valeur
S pour configur
S pour confirmer
M pour re
principal
Altitude
S pour ouvrir le r
S pour sélectionner la
S Alti Actuelle, la
S Alti de Ref 1 ou la
S Alti de Ref 2
S pour confirmer
S pour régl
S pour confirmer
M pour re
S principal
Cir
S pour ouvrir le menu des
S paramètr
pour sélectionner la vél
S 1 ou la vélo2
S pour confirme
S pour fair
S dans la liste de pneus ou
S une sélection manuell
S pour confirmer
S pour sélectionner l
S pneus ou saisir
S manuellement la
S circ
S pour confirmer
Unités
S pour ouvrir le menu des
paramètr
pour sélectionner l'unité
S pour confirmer
Date
S pour ouvrir le menu des
paramètr
pour configur
S pour confirmer
L'ordinat
de sélection rapide de la haut
Ici, la hauteur actuelle, la haut
de départ 1 ou la hauteur de départ
2 peuvent êtr
Maintenir S et enfonc
3 secondes pour ouvrir la sél
de la hauteur
pour sélectionner la hauteur
désirée.
S pour confirmer
Les valeur
peuvent êtr
menu Réglage.
Altitude selection
Heur
S pour ouvrir le menu des
paramètr
S pour choisir le mode
d'affichage 12 ou 24h
S pour confirmer votr
choix
S pour configur
S pour confirmer
Langue
S pour ouvrir le menu des
paramètr
S pour sélectionner la
langue
S pour confirmer votr
choix
Appuyez sur la toucheM pendant 3secondes pour ouvrir ou f
menu de configuration.
Pour fair
Pour ouvrir le parS .
Appuyez surles t
et confirmez votrS .
Si le r
Avec la touche M , il es
le menu Réglage. «Retour»
Si vous ne fait
minute.
-TS-T
M M
M-T
/ Heure
Réception du signal
/ Affiche l'unité de vitesse sél
/ Affiche la roue1 ou la r
Avertis
Comparaison de la vitesse actuell
moyenne
T
Mode V
Mode Altitude
Mode Boucle c
-T
Mode V Mode Altitude Boucle c
Vitesse moy
Vitesse maximal
Distance
T
Chronomètr
T
Distance t
T
Altitude en montée
Altitude en descente
Pente actuell
Pente ascendant
Pente ascendant
Pente descendant
Pente descendant
Altitude maximale
Altitude en montée vél
Altitude en descente vél
Dans le mode boucl
sont automatiquement r
secondes pendant que vous r
touche pour quitter l
Pour coupl
l'ordinat
Vitesse ID1 = c
Vitesse ID2 = c
Sélectionnez l'ID à c
couplage. L'or
que le c
l'aimant devant l
capteur s'affiche.
Attention: Ce pr
les envir
un périmètre de moins de 5 mètr
Écran
Configuration de l'ordinateur
Icônes T
Couplage du capteur
F
F
sélectionée
Vitesse actuell
Heure
Altitude actuelle
T
Mode
V
fonction
sélectionée
L'ordinat
de vibrations. En l'absence de
signal ou de vibration, il passe en
mode veille au bout de 6minut
et affiche l'heure. En c
vibration, l'or
mode veille et r
opérationnel.
Si l'ordinat
repos (Sl
d'appuyer sur une touche pour l
rallumer
Mode veille/repos
Lorsque la batterie de l'or
est pr
batterie clignote.
Si la batterie du capteur es
presque vide, l
s'allume rouge l
sort du mode veille. L'écr
«Capteur Pile».
Remplacez la batterie f
que possibl
A
Rétroéclairage
Appuyez simultanément surM et pour activer ou désactiv
rétr
dernière utilisation d'une t
Chronomètr
Appuyer sur S pour lancer ou arr
Maintenir S enfonc
à zéro.
T
Le T
Pour r
maintenez la touche M enfonc
sélectionner avant ou arrièrS pour confirmer
initiale. S pour cS enfoncé pendant 3 secondes pour
réinitialiser l
L'ordinat
rec
automatique. L'or
automatiquement les r
la roue à partir de laquell
signal de capteur est r
Changement de vélo
PresS key for 3 sec
reset t
Settings are not modified.
Reset tour data
Sensor
Here y
sensors to the computer
S to open setting
S to select a sensor ID
S to connect the sensor ID.
The display shows the
sensor ID.
M to r
menu
F
Here, the c
reset t
this proc
deleted.
S to open settings
select Y
S to confirm
T
Here the t
shown and set.
S to open settings
go to the next value
S to select v
S to set value
S confirm
M to r
menu
Altitude
S to open setting
to select Actual altitude ,
home altitude 1 or
home altitude 2
S confirm
to set the value
S confirm
M to r
menu
Wheelsize
S open settings
select bik
S confirm
select tir
setting
S confirm
select tir
wheel circumf
manually
S confirm
Units
S open settings
set unit
S confirm
Date
S open settings
set date
S confirm
The computer has a quick sel
function for altitude. Her
select curr
altitude 1 or starting altitude 2.
PresS and for 3 seconds to open
the altitude selection.
to select the desir
S to confirm.
The values of the starting altitudes
can be edited in the settings menu.
Altitude selection
Clock
S open settings
S select 12/24h
S confirm
set clock
S confirm
Language
S open settings
S select language
S confirm
PresM key for 3 sec
Use the keys t
TS ke
Select the desirS ke
When the setting has been made, the display shows "Set OK".
Use the M key t
If there is no r
-KeyS-Key
M M
M-Key
/ Clock
Signal rec
/ Shows select
/ Shows select
Battery alert
Comparison of the current speed with
the average speed
T
Bike mode
Altitude mode
Infinite loop mode enabl
-Key
Bike Mode Altitude Mode Infinite loop mode
Aver
Maximum Speed
T
T
Stopwatch
T
T
T
Altitude uphill
Altitude downhill
Current sl
Aver
Maximum slope uphill
Aver
Maximum slope downhill
Maximum altitude
T
T
With the infinite loop mode enabl
important functions ar
four seconds during the ride. The infinit
disabled by pr
Open the main menu and select "Sensor" to c
for Bik
Speed ID1 = speed sensor Bike1
Speed ID2 = speed sensor Bike2
Select the ID f
computer now sear
vicinity and is enabled. Mov
sensor
sensor ID.
Attention: Ther
vicinity
of at least 5 metr
Display
Set computer
Icons Key
Connect sensors
Functions
Selected
function
Current Speed
Clock
Current altitude
T
Mode
value of the
selected function
The computer is equipped with a
vibration sensor
signals are r
computer switches t
after 6 minutes and displays the
time. As soon as it picks up
vibrations, the computer swit
back to operating mode.
If the computer is in sl
wakes up when any k
Rest / Sleep mode
If the computer battery po
low, the battery symbol flashes.
If the sensor battery power is l
the sensor contr
flashing red aft
display shows "Sensor Batt.".
Replace the weak battery as soon
as possibl
Battery alert
Backlight
PresM and simultaneously to switch the backlight on or off
After pr
Stopwatch
PresS to start or stop the st
PresS for 3 seconds to r
T
The T
TM key for 3 seconds t
T
to select fS to confirm.
to set the initial value. S to c
PresS for 3 seconds to r
The computer has an automatic
bike r
automaticall
settings of the bike fr
sensor signal is rec
Bike change
Maintenez la toucheS pendant
3secondes pour r
les données du par
Cela n'affecte pas l
paramètr
Réinitialisation des données du parc