1/4USER’S GUIDE (Basics)
USER’S GUIDE (Basics)
Please keep all information for future reference.
Be sure to read the separate “Safety Precautions” and use the Digital Piano correctly.
• When the Digital Piano is being operated on battery power on
performing or playing back a song at maximum volume. This is du e to the difference
power and battery power, lfunction. If distortion,
AC adaptor power or lower the volume level.
These instructions provide aano
operationsformation, refer
Guide g
the nearby QR code o
https://support.casio.com/
✔ 700 tones for keyboard play
☞THESE INSTRUCTIONS: Selecting
✔ Auto Accompaniment
☞THESE INSTRUCTIONS: Using Auto A
(page 2/4)
✔ Performance recording
• Storage of r
☞ T
to Record Performance
• Storage of
☞ T
to Record Performance
✔ Registration Function
☞THESE INSTRUCTIONS: Registering and Restori
Setup (Registration) (p
✔ Bluetooth connectiv
device audio through D
☞THESE INSTRUCTIONS: Using the Digital Piano as a
Bluetooth Speaker
✔ Adjustable Touch Respo
☞THESE INSTRUCTIONS: Changing Keyboard
Response to Touch Pressure (Touch Response)
(page 2/4)
✔ Key transposition
☞THESE INSTRUCTIONS: Changing th
Semitone Steps (Tra
✔ Hall simulator and surround
☞THESE INSTRUCTIONS: Using the Sound
Effects (Hall Simula
(page 2/4)
✔ Duet
☞THESE INSTRU
Duet Play (page 3/
✔ Auto arpeggio play
☞THESE INSTRUCTIONS: Using the Arpegg
(page 2/4)
Supported Oper
■ Using the AC Adaptor
Make sure that you use
this Digital Piano. Use of a dif
cause malfunction.
• Never connect the AC
unified polarity plug) that comes with this Digital
Piano to any other devi
Doing so creates the
• Be sure to
connecting or disconnecting the AC adaptor.
• The AC adaptor will become w
very long use. This is normal
malfunctio
✔ Pitch bending of not
keyboard
☞THESE INSTRUCTIONS: Using the Pitch Bend
Wheel (page 2/4)
✔ Two knobs for contro
effects
☞THESE INSTRUCTIONS: Using the
2/4)
✔ MIDI data playback
☞THESE
Player) (page 3/4)
✔ Smart device linking for enhan
function
☞THESE INSTRUCTIONS: Linking with a Smart
Device (A
✔ Other useful featur
• Acoustic piano act
(Acoustic Simula
• DSP, Chorus, and Brilliance effects
• Keyboard pitch ad
• 17 scales including
Tuning)
• Audio output
• Connection to a
information (MI
• Versatile tones (for
☞CASIO WEBSITE:
Audio Device, and Computer
✔ Troubleshooting
☞CASIO WEBSITE:
Included Accessories
● Music Stand
● AC adaptor
● Power cord
● Pedal
● Leaflets
• Safety Precautions
• Other (W
Items included as a
without notice.
Separately Available Accessories
You can get info
separately ava
catalog availabl
CASIO websit
https://support.casio.com/global/en/emi/
PX-S3000/
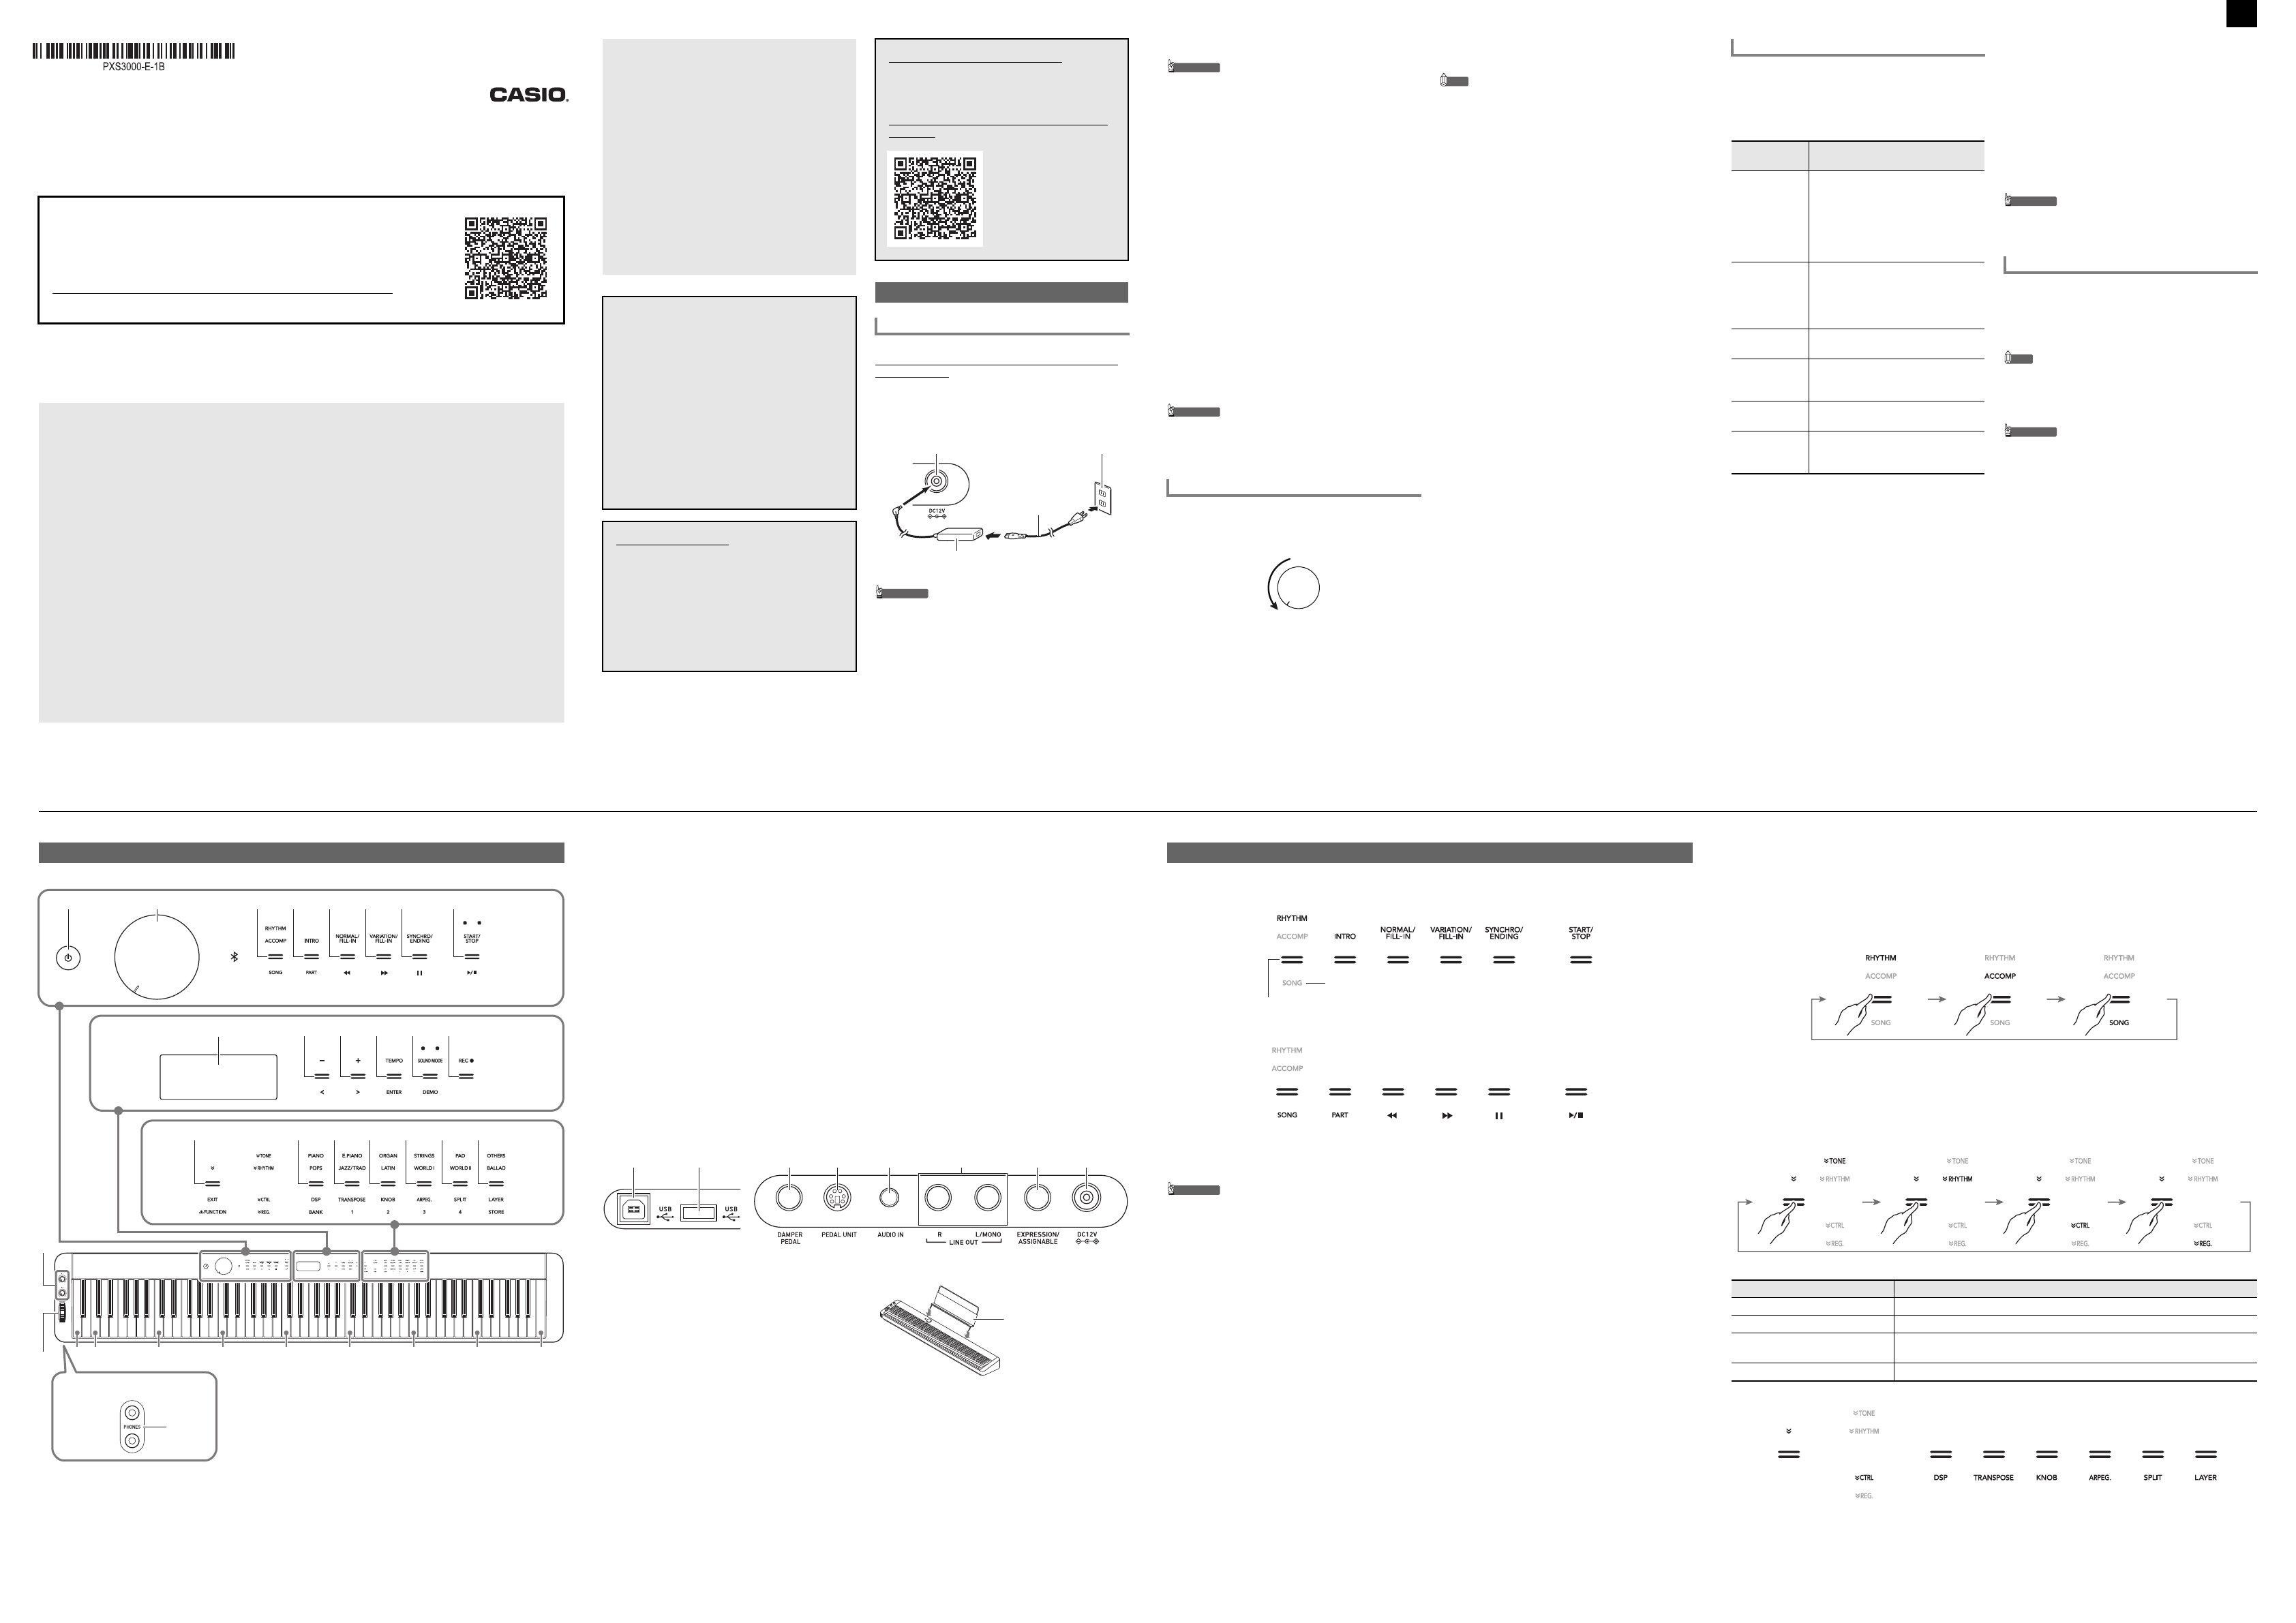
Getting Ready
Preparing Power Supply
Specified AC Adaptor:
(JEITA Standard plug)
AC adaptor
dm DC 12V
Power cord
Household pow
■ Using Batteries
• Be sure to turn off powe
• It is up to
alkaline batteri
• Note
is turned upside down to load batteries.
− Take care to avoid injury due to pinching you
fingers under
− Do not allow the Digital
otherwise be subjecte
can damage the volume knob and keyboard
1.
Open the battery cover on the bottom of the Digital
Piano.
2.
Load six AA-size bat
compartment.
Make sure the positive + and negative - ends
batteries are facing
3.
Insert
the side of the battery com
cover.
■ Low Battery I
The message “LOW BATTERY” ap
when battery power go
the batteries.
• Using the Digital Pi
can
stored in Digit
lost.
1.
Before turning on power, rotate the 2 volume
knob
illustrat
2.
Press the 1P (Power) button to turn on power.
The message “Welcome” wil
followed by the ton
the Digital Pi
• Power may not turn1P
(Power) button
malfunction. I
when you press t1P (Power) button.
3.
Use the 2 volume knob to adjust volume.
4.
To turn off power, hold down the 1P (Power)
button until “Bye” appears on the display.
NOTE
• Pressing the 1P (Power) button
actually puts the
Minute amounts o
Digital Piano in
use the Digital Pia
lightning storm
adaptor from th
■ Power On Alert
After about six min
Piano is being po
Alert f
sequentially to remind
Button lights will return to normal if you touch a button, play
something on the keyboa
operation. To t1P (Power)
button until “Bye
■ Auto Power Off
This Digital Piano is
avoid wasting po
preset amount of
about four ho
adaptor, or six minut
• You can disable Auto
off durin
disable
parameter 3 “Aut3
“Off”. To re
back to “On”. For information about FUNCTION
parameters, se
(FUNCTION Mode)” (page 4/4).
Turning
■ DAMPER PEDAL jack
Connect the provided
Piano’s cr DAMPER jack. You can change
function of this peda
parameter operati3 “DAMPER
PEDAL” 3 “Pedal Targe
For information about FUNCTION parameters, see
“Configuring Fun
(page 4/4).
■ PEDAL UNIT jack
☞CASIO WEBSITE:
Use the cs PEDAL UNIT jack to con
available Pedal Unit
for expression to that availabl
piano.
■ EXPRESSION/ASSIGNABLE jack
☞CASIO WEBSITE:
Use the dl EXPRESSION/ASSIGNABLE jack to connect
a commercially available
sustain pedal (included SP-3
• For information about connectable expression
pedals, be su
available fr
Using
which means you can pra
without disturbing oth
• Be sure to
headphones.
• Headphones do not come
• Use commercially available he
“Separately Available Acce
information abo
• Do not listen to very high volume outpu
headphones for long period. Doing
risk of hearing damage.
• If you are using headphones that require an adaptor
plug, make sure you do not
plugged in when you unplug
do, nothing will sound from
play.
Using a Pe
This setting
(displayed):
Does this:
1. Sustain
(Initial default)
Sustains
depressed, even if t
subsequently release
other tones
as keyboard key are depressed
continue to sound
is depressed.
2. Sostenuto Sustains on
are depressed when t
pressed until t
even if the keyboard
first.
3. Soft Slightly lowers a
played while the peda
4. Arpeggio
Hold
When the arpegg
applies arp
depressed.
5. Start/S Performs
8 START/STOP butt
6. Fill-in Plays a fill-in
depressed while an Auto
Accompaniment is playing.
Using Headphones
■ Front Panel
Touch Buttons
Turning on Digital Pianto light, except for the1P (Power) button. The ab
illustration shows when all buting actual opered
and the applicable t
General Guide
1 2 3 4 5 6 7 8
9
bp
bk bl bm bn bo
co
bq br bs bt ck cl
C1
C2 C3 C4 C5 C6 C7 C8
■ Back
cpUSB port
cqUSB flash drive port
crDAMPER PEDAL jack
csPEDAL UNIT ja
ctAUDI jack
dkLIN , L/MONO jacks
dlEXPRESSION/ASSIGNABLE jack
dmDC 12V terminal
■ Preparing the Music Stand
■ Returning the Digital Piano to Its
Default Settings
Refer to “Retu
Settings” (page 4/
1P (Power) button
2Volume knob
3Mode selectRHYHTM , ACCOMP ,
SONG)
4IN, PART button
5NORMAL/FILL-IN, s button
6VA, d button
7SYNCHRO/ENDING, k butto
8START/STOP, a butt
9Display
bk–, U button
bl+, I bu
bmTEMPO, ENTER button
bnSOUND MODE , DEMO button
boREC0 button
bp^, EXIT , $ FUNCTION b
bq - cl TONE category, RHYHTM category buttons
bqDSP, BANK button
brTRANSPOSE, Area 1 button
bsKNOB, Area 2 button
btARPEG., Area 3 button
ckSPLIT, Area 4 button
clLAYER, STORE button
cmKnob
(K1 ), Knob (K2 )
cnPITCH BEND wheel
coPHON
ES jacks
Turning on Digital Pia
• The buttons and
on Digital Piano*
1
so the buttons a
• Touching th3 mode selector button twice will *
1
which changes theing as sho
Only the enas are lit or fla
*1 For information about
*2 In the illustrations of these instructions, unlit indicator text above ack.
• When operating a touch button, touch it firmly withger. Touch buttons will not respond if you touch
them while wearing gloves.
• If a touch button does not respond, perform increase touch button sensitivity.
1.
Turn off the Digital Piano.
2.
While holding down the C8 keyboard key (the one on the far right), press1P (Power) b
• Keep the C8 keyboar appears
keep the 1P (Power) button
■ Touch Button Light
To save power, you can configure a setting that will turn off all button lights3 Mode
period of non-o
☞CASIO WEBS
Touch Button Operations
■ Mode Selector Button
Your Digital Piano
Touch the 3 Mode selector button to cycle between the three modes.
An to
not displayed.
■ ^ Button
You can bp^ button to cycle between four different functionsix buttons (bq to cl ) on t
the Digital Piano’s fro
Touch bp^ to cycle between t the bp^ button will light to indicate the
currently selected f
Example: Buttons bq tocl are configured
RHYTHM Mode: This is the mode for mostal keyboard p
most other Digit
ACCOMP Mode: This mode is for psing Auto Accompanimen
SONG Mode: Use this mode to pla. Pla
While this function name is lit: Buttons bq through cl perform these operations:
TONE Tone category selection
RHYTHM Rhythm category selection
CTRL DSP selection, transpose ing changes, n, arpeggiator
harmonize setting change,
REG. Registration operations
Continued on the back
PXS3000_A2_EN.fm 1