543167
151
Zoom out
Zoom in
Previous page
1/211
Next page
Printkop reinigen
in de lijst Name [Naam] en klikt op Configure [Configureren].
(4) Selecteer de naam van uw printer in de lijst Product en klik op Maintenance [Onderhoud].
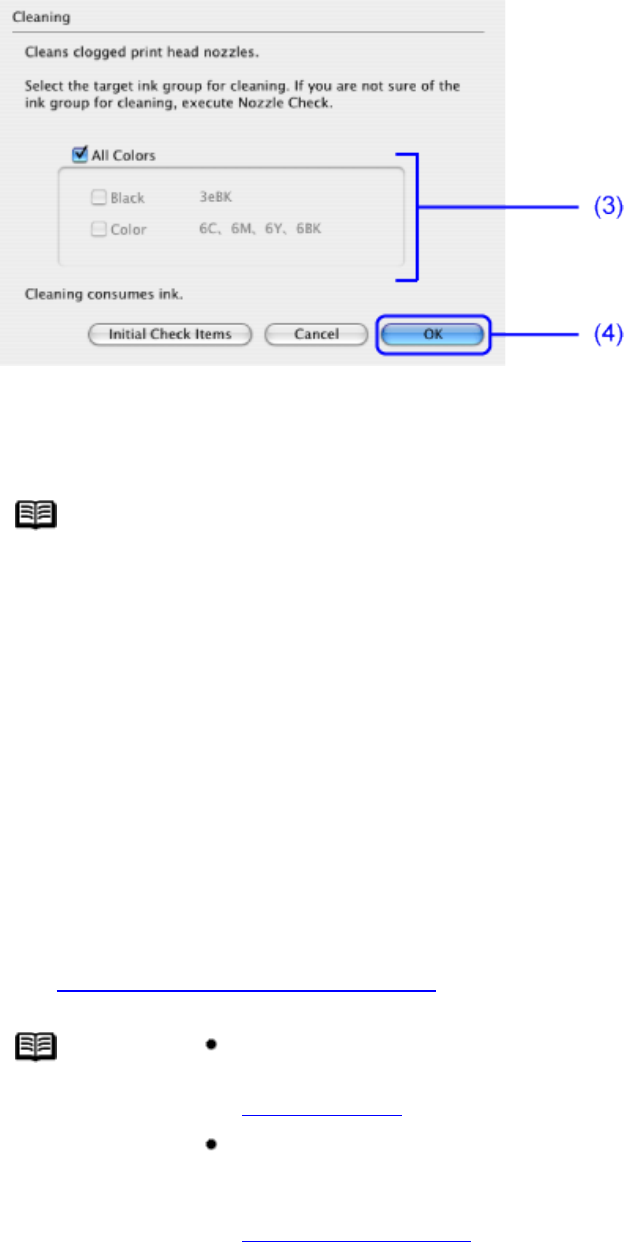
3 Start het reinigen van de printkoppen.
(1) Controleer of Cleaning [Reiniging] is geselecteerd in het pop-up menu.
(2) Klik op Cleaning [Reinig].
(3) Selecteer de inktgroep die u wilt reinigen.
Wanneer u de printkop van zwarte inkttanks (voor iP4000) reinigt: Selecteer Black [Zwart] om de printkop van zwart (BCI-
3eBK) te reinigen, en selecteer Color [Kleur] om de printkop van zwart (BCI-6BK) (alleen iP4000) te reinigen.
Opmerking Als u op Initial Check Items [Eerste controlepunten] klikt, worden de items afgebeeld die vóór het
reinigen moeten worden gecontroleerd.
(4) Klik op OK.
(5) Klik op OK zodra het bevestigingsbericht wordt weergegeven.
Print Head Cleaning [Reiniging printkop] wordt gestart wanneer het lampje AAN/UIT begint te knipperen.
Belangrijk Voer geen andere bewerkingen uit tot het reinigen van de printkop is voltooid. Dit duurt 30 tot 40 seconden.
(6) Lees het bericht en klik op Print Check Pattern [Controleraster afdrukken] om het testpatroon voor de spuitopeningen af
te drukken.
Het testpatroon voor de spuitopeningen wordt afgedrukt.
4 Controleer de conditie van de printkop aan de hand van het testpatroon voor de spuitopeningen.
Zie Testpatroon voor spuitopeningen afdrukken
Opmerking Het testpatroon voor de spuitopeningen wordt niet correct afgedrukt als er onvoldoende inkt is.
Vervang de inkttank als de resterende hoeveelheid inkt onvoldoende is.
Zie Inkttanks vervangen
Als het probleem blijft bestaan nadat u Print Head Cleaning [Reiniging printkop] driemaal hebt
uitgevoerd, kunt u Print Head Deep Cleaning [Dieptereiniging van de printkop] proberen uit te
voeren.
Zie Dieptereiniging van printkop
file:///C|/Temp%201/Canon%20Pixma%20IP4000%20Info%...P4000%20handleiding/HTML/iP4000_3000_UG_ENG-63.htm (3 of 4)16-7-2007 13:08:32
151


Need help? Post your question in this forum.

Forumrules


Report abuse

Libble takes abuse of its services very seriously. We're committed to dealing with such abuse according to the laws in your country of residence. When you submit a report, we'll investigate it and take the appropriate action. We'll get back to you only if we require additional details or have more information to share.

Product:

For example, Anti-Semitic content, racist content, or material that could result in a violent physical act.

For example, a credit card number, a personal identification number, or an unlisted home address. Note that email addresses and full names are not considered private information.

Forumrules

To achieve meaningful questions, we apply the following rules:

Register

Register getting emails for Canon Pixma IP3000 at:


You will receive an email to register for one or both of the options.


Get your user manual by e-mail

Enter your email address to receive the manual of Canon Pixma IP3000 in the language / languages: Dutch as an attachment in your email.

The manual is 2,36 mb in size.


You will receive the manual in your email within minutes. If you have not received an email, then probably have entered the wrong email address or your mailbox is too full. In addition, it may be that your ISP may have a maximum size for emails to receive.

Others manual(s) of Canon Pixma IP3000

Canon Pixma IP3000 Quick start guide - English - 32 pages

Canon Pixma IP3000 Quick start guide - English - 100 pages

Canon Pixma IP3000 User Manual - German - 215 pages


The manual is sent by email. Check your email

If you have not received an email with the manual within fifteen minutes, it may be that you have a entered a wrong email address or that your ISP has set a maximum size to receive email that is smaller than the size of the manual.

The email address you have provided is not correct.

Please check the email address and correct it.

Your question is posted on this page

Would you like to receive an email when new answers and questions are posted? Please enter your email address.


Info