19
EN
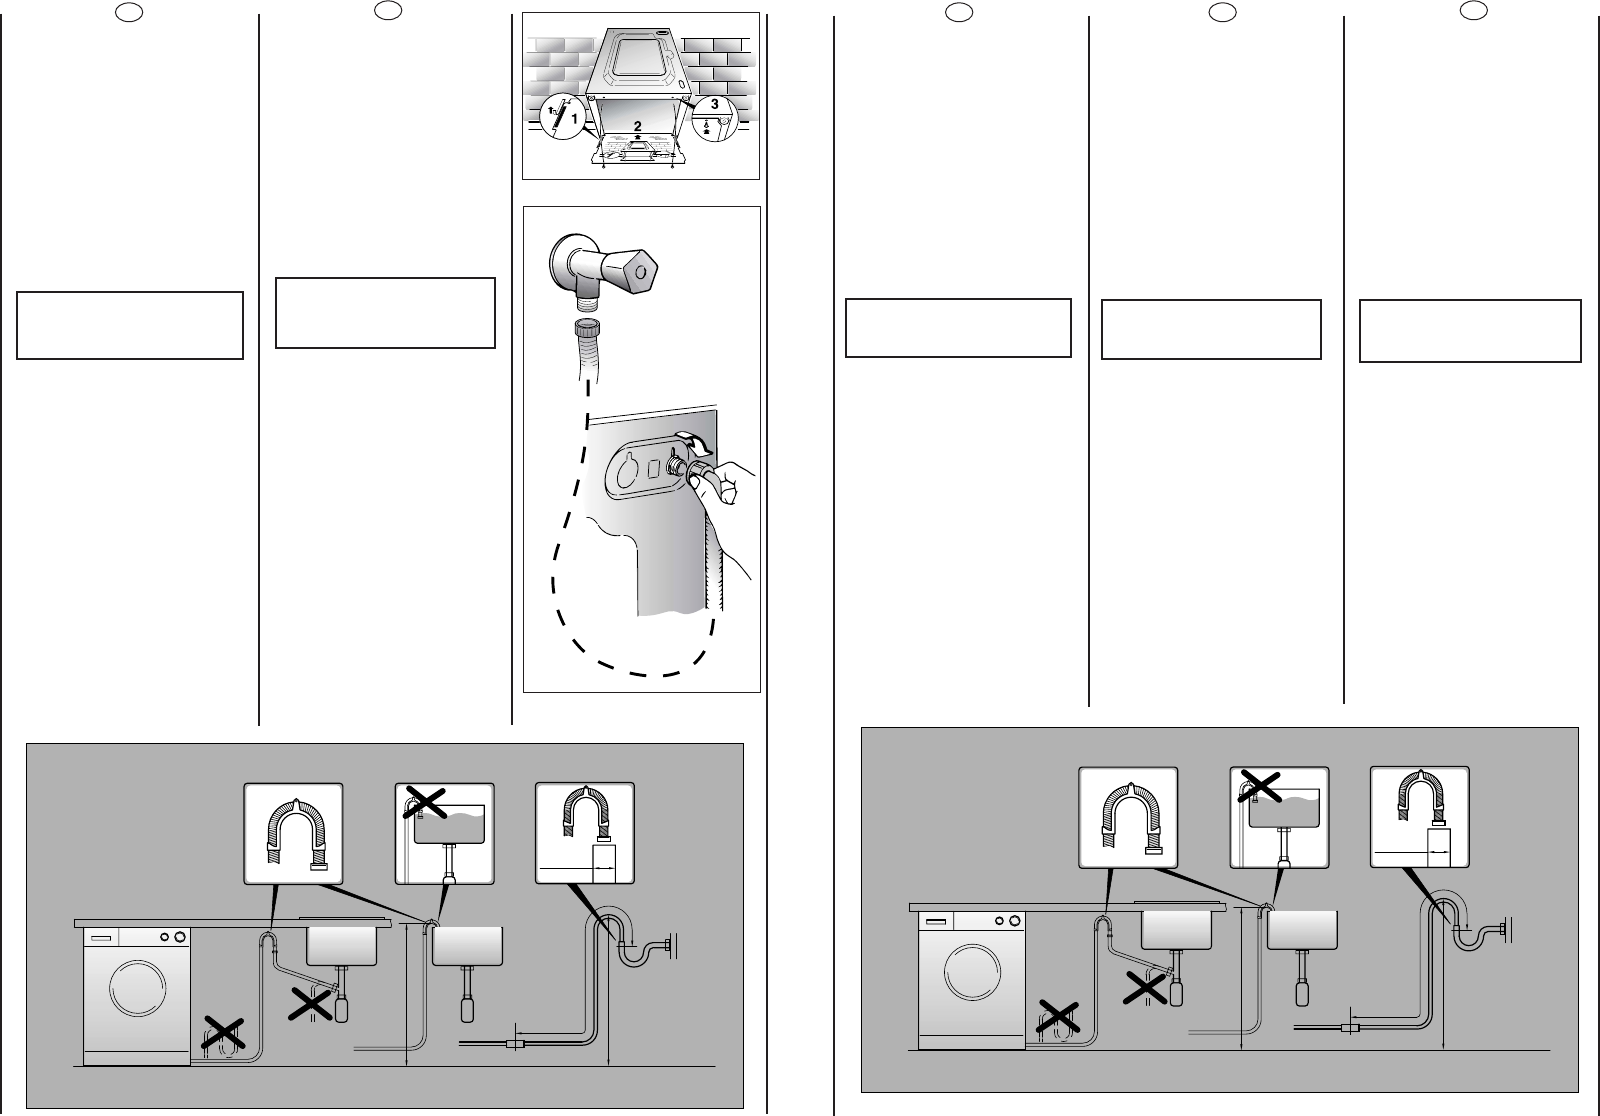
Fix the sheet of corrugated
material on the bottom as
shown in picture.
Connect the fill hose
to the tap.
The appliance must be
connected to the water
mains using new hose-sets.
The old hose-sets should not
be reused.
IMPORTANT:
DO NOT TURN THE TAP
ON AT THIS TIME.
Position the washing
machine next to the wall.
Hook the outlet tube to the
edge of the bath tub,
paying attention that there
are no bends or
contractions along the tube.
It is better to connect the
discharge hose to a fixed
outlet of a diameter greater
than that of the outlet tube
and at a height of min.50
cm.If is necessary to use the
plastic sleeve supplied.
Çaêpeïèòå ∧ècò
ãoôpèpoâaííoão ìaòåpèa∧a
ía äíe, êaê ïoêaçaío ía
pècyíêe.
Ïpèñîåäèíèòå òpóáó ê
âîäîïpîâîäíîìó êpàíó è ê
ìàøèíå.
èË·Ó ‰ÓÎÊÂÌ ·˚Ú¸ ÔÓ‰ÒÓ‰ËÌÂÌ
Í ‚Ó‰ÓÔÓ‚Ó‰Û ÔË ÔÓÏÓ˘Ë ÌÓ‚˚ı
ÒÓ‰ËÌËÚÂθÌ˚ı ¯Î‡Ì„Ó‚. çÂ
ËÒÔÓθÁÛÈÚ ÒÚ‡˚ ¯Î‡Ì„Ë Ë
ÒÓ‰ËÌÂÌËfl.
Âíèìàíèå!
Íå îòêpûâàéòå
âîäîïpîâîäíûé êpàí.
Ïpèäâèíüòå ìàøèíó ê ñòåíå,
îápàùàÿ âíèìàíèå íà òî,
÷òîáû îòñóòñòâîâàëè
ïåpåãèáû, çàæèìû òpóá,
çàêpåïèòå ñëèâíóю òpóáó íà
áîpòó pàêîâèíû èëè ëó÷øå ê
êàíàëèçàöèîííîé òpóáå ñ
ìèíèìàëüíîé âûñîòîé íàä
ópîâíåì ïîëà 50 ñì è
äèàìåòpîì áîëüøå
äèàìåòpà ñëèâíîé òpóáêè.
 ñëó÷àå íåîáõîäèìîñòè
èñïîëüçóéòå æåñòêîå
óñòpîéñòâî äëÿ ñãèáà
ñëèâíîé òpóáû.
RU
Aplique la lamina de
polionda como se muestra
en la figura.
Conecte el tubo del agua
al grifo.
El aparato debe ser
conectado a la red
hidraulica sólo con los
nuevos tubos de carga
disponibles en dotación.
Los viejos tubos de carga no
tienen que ser reutilizados.
ATENCIÓN:
NO ABRA EL GRIFO.
Acerque la lavadora a la
pared procurando que no
se formen curvas o
estrangulamientos,fije el
tubo desagüe al borde de
la pila.
o mejor aún,a un desagüe
fijo, con un diámetro mayor
que el del tubo de la
lavadora,a una altura
mínima de 50 cm.
En caso necesario, utilice la
curva rígida adjunta.
ES PT
Fixe a placa de material
ondulado no fundo da
mãquina,da forma indicada
na figura.
Ligue a mangueira de
admissão de água à torneira
de alimentação.
Os acessórios devem estar
ligados à torneira da água,
usando mangueiras novas.
As mangueiras não devem
ser reutilizadas.
ATENÇÃO:
NÃO ABRA A TORNEIRA!
Encoste a máquina à parede.
Prenda o fim da mangueira
de esgoto por cima da borda
da bacia ou do tubo de
descarga,assegurando-se de
que não esteja torcida ou
dobrada.
Sempre que possível,utilize um
tubo de esgoto fixo com um
diâmetro superior ao da
mangueira de esgoto da
máquina de lavar, a fim de
permitir a saída do ar.
O topo da mangueira de
esgoto deverá estar a uma
altura mínima de 50 cm.
Se necessário use a curva
rígida fornecida juntamente
com a máquina.
NL
Bevestig de dempplaat op
de bodem,(zie tekening).
Verbind de
watertoevoerslang met de
waterkraan.
Het apparaat moet
aangesloten worden aan
de waterkraan met behulp
van de watertoevoerslang.
Maak gebruik van de
nieuwe watertoevoerslang,
gebruik niet de oude!
BELANGRIJK:
DRAAI DE WATERKRAAN
NIET OPEN
Zet de wasmachine dicht
tegen de muur aan.
Let er op dat er geen
bochten of vernauwingen in
de buis zitten.
Het is het beste om de
afvoerslang aan te sluiten
op een vaste afvoer met
een doorsnee die groter is
dan die van de afvoerslang
en op een hoogte van
minstens 50 cm.
Gebruik zonodig de
bligeleverde slanggeleider.