Time of charge of
the battery:
Der
Steckdoseneinsatz
hat einen
integrierten
Kinderschutz.
The socket has a
integrated child
protection
852.103 Manual REV02 Bachmann GmbH
Seite/page 1 von/of 2 Ernsthaldenstr. 33 / D- 70565 Stuttgart / Germany www.bachmann.com
Alle Angaben ohne Gewähr, Änderungen vorbehalten. / Subject to change without notice.
TECHNICAL DESCRIPTION
Dear customer!
Congratulations to your purchase of a quality product. In
order to have much pleasure with this timer and to avoid
wrong handling please read attentively this manual.
Important: This timer has an integrated rechargeable battery,
which has to be charged before the first use. For that, please
plug the timer into a socket outlet. The charge of the battery
starts automatically and will take approx.12 hours. During
the use of the timer the battery will be charged permanently.
Safety regulations: This timer is not a toy and m
away from children. Use this timer only in dry rooms; this is
not for outside use. This timer is only aligned for a m
power of 16A. The timer has to be repaired only by an expert
or after-sales service.
Unusual indication: If the display of your timer shows a
wrong or no indication, please check the following:
- be sure that the timer has no outer damages
- charge the rechargeable battery (for the next 12 hours)
- push down with a pointed thing (i.e. a pen) the reset-button
and program the timer again
First use: - Charge the integrated battery, plug it into a
socket outlet for approx.12 hours.
- Push the Reset-button with a pointed object.
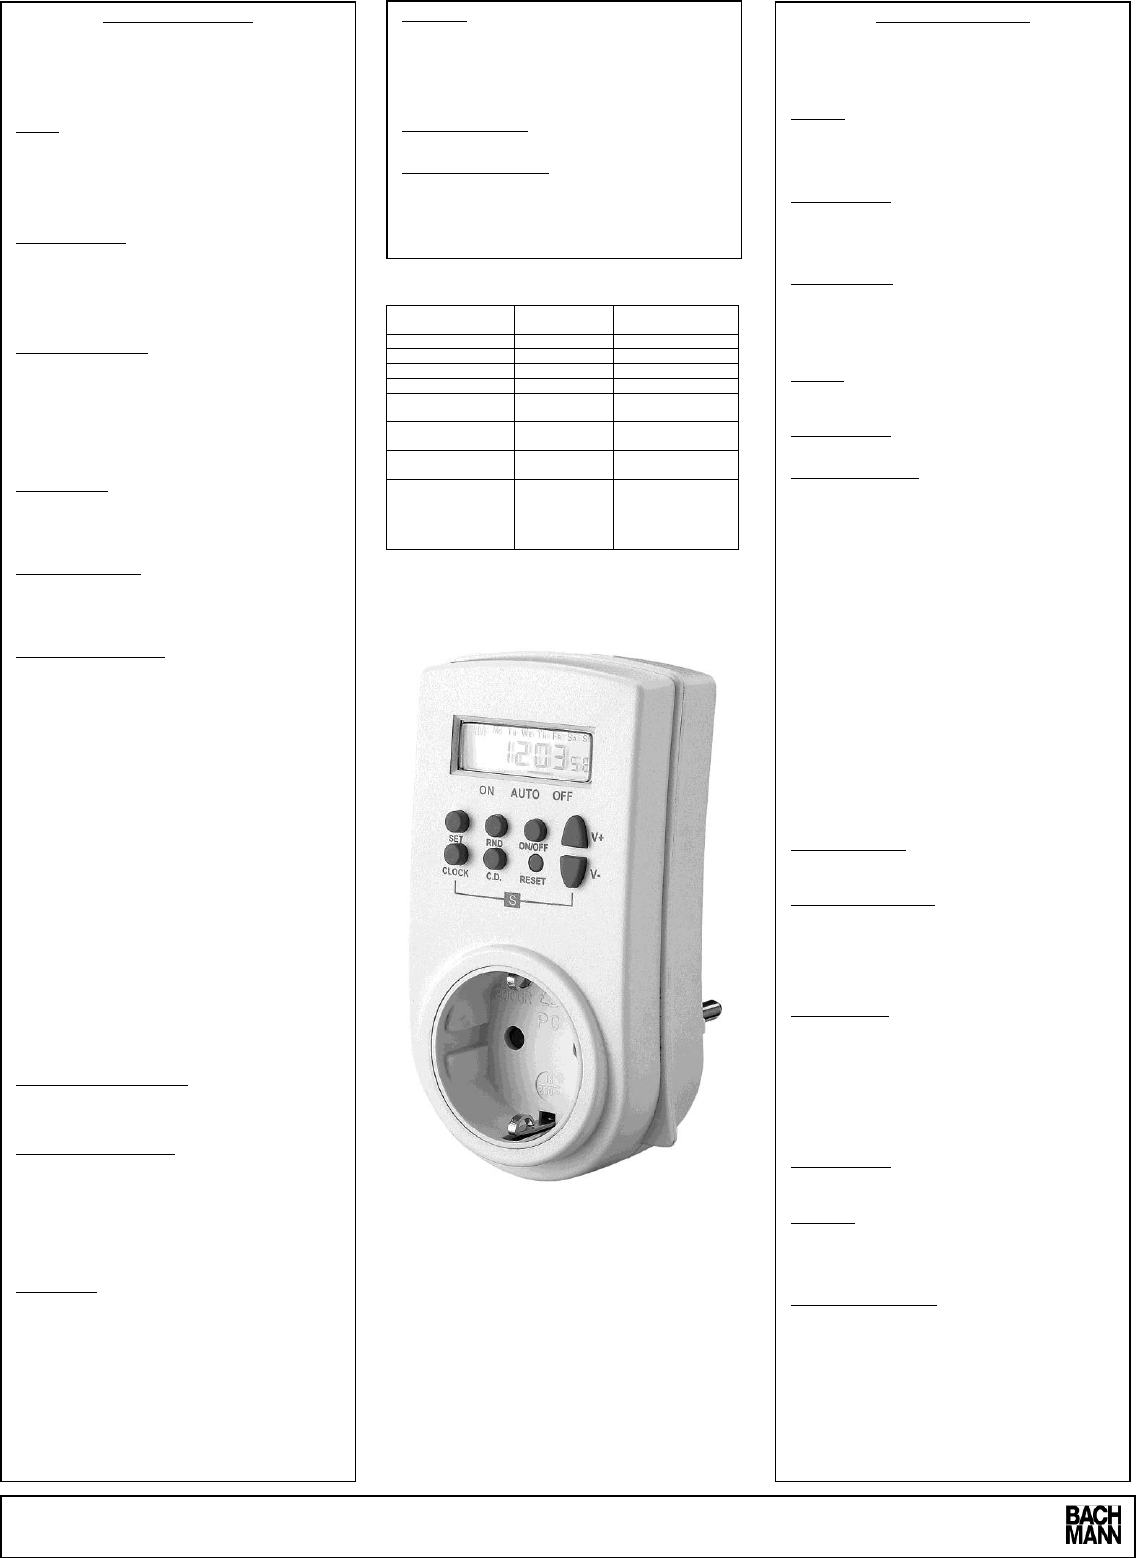
Setting of the time: - Use the Set-button as well as the V+
and V- -buttons to set the correct time and current day.
Setting of the programs: It is possible to save 14 different
day- or week programs. To sim
can choose between the following 15 day combinations by
using the V+-button.
- Mo - Tu, Th, Sa
- Tu - Sa, Su
- We - Mo, Tu, We
- Th - Th, Fr, Sa
- Fr - Mo, Tu,
- Sa - Mo, Tu, We, Th, Fr, Sa
- Su - Mo, Tu, We, Th, Fr, Sa, Su
- Mo, We, Fr
By saving one of these settings, the timer w
active at the indicated days.
- Press the V+ and then the set-button; instead of the
counter it appears a “1” and “ON” on the display. By pressing
the set-button the switch ON time of the first program is
saved.
- Change to the switch OFF time by pressing the V+-button.
Press the set-button to save the OFF time. The first program
is now saved.
- After finishing the programm
current time will be shown on the display and the timer is
operational.
To delete a program: - To delete an ON-/OFF time, the
ON/OFF-button has to be pressed. Now the tim
again.
Manual ON/OFF switching: - With the ON/OFF-button the
timer can be used apart from the mem
Change the mode to ON, AUTO, OFF. The horizontal line on
the display ON-AUTO-OFF appears. If the display shows
AUTO the settings are active. If it shows OFF the tim
switched OFF. With this function all memorized program
can be stopped without deleting them.
Random function: - This timer has an integrated random
function which switches the appliances in a tim
between 1 and 42 minutes irregular ON and OFF. This
function is an effective security against larceny (i.e. during
your absence lights can be switched on and off). In this
random mode the memorized programs are not activated.
Press the RND-button during the AUTO mode and in the
display appears “rOFF”. The random function is activated.
Press the RND-button again and the function random shuts
off and “rOFF” disappears from the display.
12/24 hour modus: The timer can be used in the following
modes: 12 hours or 24 hours. Please press the clock-button
to define which mode you prefer.
Countdown: - Press the V- -button to change to countdown
mode. “dON (or OFF)” appears on the display.
- Use the set-button to enter the countdown tim
- Press the C.D.-button to start the function. Push the button
again to stop the countdown.
Daylight-saving-time mode: - Press the clock-button together
with the V- -button while the timer is in the AUTO mode. The
time is advanced automatically by 1 hour. In the display
appears “S”. To activate again the wintertime, please press
again the clock-button together with the ON/AUTO/OFF
button. On the display “S” dis appears.
BEDIENUNGSANLEITUNG
Sehr geehrter Kunde,
wir gratulieren Ihnen zum Kauf di Zeitschaltuhr. W
wünschen Ihnen viel Vergnügen damit und bitten Sie
folgende Punkte der Bedienungsanleitung vor Inbetrieb-
nahme zu beachten, um Reklamationen zu verm
Wichtig: Die Zeitschaltuhr ist mit einer integrierten
wiederaufladbaren Batterie versehen, die vor der ersten
Benutzung aufgeladen werden muss. Bitte stecken Sie
hierzu die Zeitschaltuhr in eine Steckdose. Der Ladevorgang
beginnt automatisch und dauert ca. 12 Stunden. Bei
Benutzung der Zeitschaltuhr wird die Batterie dauernd
aufgeladen.
Sicherheitshinweise: Die Zeitschaltuhr ist kein Spielzeug und
gehört nicht in Kinderhände. Benutzen Sie die Zeitschaltuhr
nur in trockenen Räumen und nie im Freien. Belasten Sie
die Zeitschaltuhr mit maximal 16A. Bitte nehmen Sie bei
Defekten keine Reparaturen vor, sondern lassen Sie diese
von einer Fachwerk-statt bzw. vom Kundendienst
vornehmen.
Ungewöhnliche Anzeige: Falls Ihre Zeitschaltuhr keine oder
eine falsche Anzeige aufweist, gehen Sie bitte wie folgt vor:
- Vergewissern Sie sich, dass die Zeitschaltuhr keine
Beschädigungen aufweist.
- Laden Sie die wiederaufladbare Batterie durch Einstecken
in eine Steckdose.
- Drücken Sie mit einem spitzen Gegenstand (z.B. einem
Kugelschreiber) die Reset-Taste und programm
Zeitschaltuhr neu.
Erste Benutzung: - Laden Sie die integrierte Batterie, indem
Sie die Zeitschaltuhr in eine Steckdose stecken (der
Ladevorgang dauert 12 Stunden).
- Betätigen Sie die Reset-Taste mit einem spitzen
Gegenstand.
Einstellung der Uhrzeit: - Drücken Sie die Set-Taste und
halten Sie diese.
- Betätigen Sie die Set-Taste und die V+/V- -Tasten, um
Wochentag und Uhrzeit einzustellen und um die Einstellung
zu bestätigen.
Einstellung der Programme: Sie können bis zu 14 verschie-
dene Tages- oder Wochenprogramme speichern. Zur Ver-
einfachung der Programmierung können Sie folgende 15
Kombinationen von Tagen durch Betätigung der V+ und der
Set-Taste auswählen:
- Mo - Tu, Th, Sa
- Tu - Sa, Su
- We - Mo, Tu, We
- Th - Th, Fr, Sa
- Fr - Mo, Tu,
- Sa - Mo, Tu, We, Th, Fr, Sa
- Su - Mo, Tu, We, Th, Fr, Sa, Su
- Mo, We, Fr
- Wenn Sie eine dieser Einstellungen speichern, erfolgt
immer zu den angegebenen Wochentagen die entsprechen-
de Schaltung der Zeitschaltuhr.
- Drücken Sie die V+ und dann die Set-Taste. Die Uhrzeit-
anzeige verschwindet und auf dem Display erscheint eine
„1“ und die Anzeige „ON“. Sie können nun durch Betätigung
der Set- Taste die gewünschte Einschaltzeit („ON“) des
ersten Programms („1“) speichern.
- Sie können nun durch Betätigung der V+-Taste zur Aus-
schaltzeit („OFF“) des ersten Programms („1“) wechseln und
mithilfe der Set-Taste die gewünschte Ausschaltzeit spei-
chern. Das erste Programm ist gespeichert.
- Nach Beendigung der Programmierung drücken Sie bitte
die Clock-Taste. Die Zeitschaltuhr zeigt nun die aktuelle
Uhrzeit an und ist betriebsbereit.
Löschen einer Programmierung: Um eine programmierte
Einschaltzeit bzw. Ausschaltzeit zu löschen, drücken Sie
bitte die ON/OFF-Taste. Die Schaltzeit kann nun neu pro-
grammiert werden.
Manuelle Ein-/Aus-Schaltung: Durch Betätigen der ON/OFF-
Taste können Sie die Zeitschaltuhr außerhalb der gespei-
cherten Programme nutzen. Verändern Sie den Einstell-
modus zu AN, AUTO, AUS. Die horizontale Linie auf dem
LDS Display ON-AUTO-OFF erscheint. Bei Anzeige von
AUTO im Display sind die gespeicherten Programme aktiv.
Bei Anzeige von ON schaltet sich die Zeitschaltuhr an und
bei OFF aus. Mit dieser Funktion deaktivieren Sie alle ge-
speicherten Programme ohne diese zu löschen.
Zufallsfunktion: Diese Zeitschaltuhr hat einen eingebauten
Zufallsgenerator, der angeschlossene Geräte in einem
stand von 1 bis 42 Minuten unregelmäßig ein- oder aus-
schaltet. Diese Funktion ist eine effektive Diebstahlsicherung
(z.B. durch Ein- und Ausschalten von Licht während Ihrer
Abwesenheit). In dem Zufallsmodus sind die gespeicherten
Programme deaktiviert. Drücken Sie die RND-Taste in dem
AUTO-Modus (siehe Manuelle Ein-/Aus-Schaltung) und im
Display erscheint „rOFF“. Der Zufallsgenerator ist aktiviert.
Wenn Sie die RND-Taste nochmals drücken, erlischt im
Display „rOFF“ und der Zufallsgenerator ist wieder
deaktiviert.
Countdown: - Drücken Sie die V- -Taste, um zur Einstellung
des Countdowns zu wechseln, „dON (oder OFF)“ wird im
Display angezeigt.
- Verwenden Sie die Set-Taste , um den Countdown
einzustellen.
- Drücken Sie den C.D.-Knopf, um die Funktion zu starten.
Drücken Sie C.D. erneut, um den Countdown anzuhalten.
12/24-Stunden- Modus: Drücken Sie die Clock-Taste und die
Zeitanzeige springt automatisch um.
Sommer-Winterzeit-Modus: Drücken Sie die Clock-Taste
und die V- -Taste gleichzeitig im AUTO-Modus. Die Zeit stellt
sich automatisch um eine Stunde auf die Somm
Display erscheint die Anzeige „ S“ . Zur Umstellung auf die
Winterzeit drücken Sie nochmals die Clock-Taste und
ON/Auto/OFF-Taste. Die Anzeige „S“ erlischt.