!!
Setting up a Print Server
English
1. Place the RT-N13U Utility CD into the optical drive.
2. Click 'Run Network Printer Setup Program'.
3. Follow the onscreen instructions.
4. Enjoy the printing and scanning functions.
Pусский
1. Поместите компакт-диск RT-N13U в оптический привод.
2. Нажмите ‘Run Network Printer Setup Program’.
3. Следуйте инструкциям на экране.
4. Используйте функции печати и сканирования.
German
1. Legen Sie die RT-N13U-Hilfsprogramm-CD in das optische Laufwerk.
2. Klicken sie auf ‘Netzwerkdrucker-Einstellungsprogramm ausführen’.
3. Folgen Sie den Bildschirmanweisungen.
4. Genießen Sie die Druck- und Scan-Funktionen.
Italiano
1. Inserire il CD contenente l’utilità RT-N13U nell’unità ottica.
2. Cliccare ‘Run Network Printer Setup Program’ (Esegui il programma di congurazione della stampante di rete).
3. Seguire le istruzioni sullo schermo.
4. Sono ora disponibili le funzioni di scansione e stampa.
Lietuvių
1. Įdėkite RT-N13U programos kompaktinį diską į optinio disko įtaisą.
2. Spragtelėkite “Run Network Printer Setup Program” (Paleisti tinklo spausdintuvo sąrankos programą).
3. Vadovaukitės nuorodomis ekrane.
4. Mėgaukitės spausdinimo ir vaizdo nuskaitymo funkcijomis.
Latviski
1. Ievietojiet RT-N13U Utilītu CD optiskajā diskdzinī.
2. Uzklikšķiniet uz ‘Run Network Printer Setup Program’ (Palaist tīkla printera iestatīšanas programmu).
3. Izpildiet displejā redzamos norādījumus.
4. Tagad varat lietot drukāšanas un skenēšanas funkcijas.
Português
1. Introduza o CD com o utilitário RT-N13U na unidade óptica.
2. Clique em ‘Run Network Printer Setup Program’ (Executar programa de instalação da impressora de rede).
3. Siga as instruções mostradas no ecrã.
4. Tire partido das funções de impressão e digitalização.
Română
1. Introduceţi CD-ul utilitar RT-N13U în unitatea optică.
2. Efectuaţi click pe ‘Run Network Printer Setup Program’ (Rulează Programul de Conectare a Imprimantei la Reţea).
3. Urmaţi instrucţiunile de pe ecran.
4. Bucuraţi-vă de funcţiile de tipărire şi scanare.
Polski
1. Włóż płytę CD z narzędziami RT-N13U do napędu optycznego.
2. Kliknij polecenie “Run Network Printer Setup Program” (Uruchom program konguracji drukarki sieciowej).
3. Postępuj zgodnie z poleceniami wyświetlanymi na ekranie.
4. Ciesz się funkcjami drukowania i skanowania.
Español
1. Coloque el CD de utilidades del router RT-N13U en la unidad óptica.
2. Haga clic en ‘Run Network Printer Setup Program’ (Ejecutar programa de conguración de impresora de red).
3. Siga las instrucciones en pantalla.
4. Disfrute de las funciones de impresión y digitalización.
Українська
1. Вставте компакт-диск утиліт RT-N13U в оптичний дисковод.
2. Клацніть по Run Network Printer Setup Program (Запустити програму налаштування мережевого принтера).
3. Виконуйте інструкції на екрані.
4. Користуйтеся всіма функціями сканування та друку.
Français
1. Insérez le CD d’utilitaires du RT-N13U dans le lecteur optique.
2. Cliquez sur ‘Exécuter le programme de conguration d’une imprimante réseau’.
3. Suivez les instructions à l’écran.
4. Utilisez les fonctions d’impression et de scan.
Eesti
1. Sisestage RT-N13U utiliidiga CD optilisse draivi.
2. Klõpsake käsku ‘Run Network Printer Setup Program’ (Käivita võrguprinteri häälestusprogramm).
3. Järgige ekraanijuhiseid.
4. Nautige printimis- ja skannimisfunktsioone.
Magyar
1. Helyezze az RT-N13U segédprogram CD-lemezét az optikai meghajtóba.
2. Kattintson a ’Run Network Printer Setup Program’ (Hálózati nyomtató beállító programjának futtatása) opcióra.
3. Kövesse a képernyőn megjelenő utasításokat.
4. Megkezdheti a nyomtatást és szkennelést.
Slovensky
1. Do optickej jednotky vložte CD s pomocným programom RT-N13U.
2. Kliknite na „Run Network Printer Setup Program” (Spustiť program pre nastavenie sieťovej tlačiarne).
3. Postupujte podľa pokynov na obrazovke.
4. Vychutnávajte si funkcie tlače a skenovania.
Česky
1. Vložte dodaný disk CD s nástroji pro RT-N13U do optické jednotky.
2. Klepněte na „Run Network Printer Setup Program“ (Spustit instalační program síťové tiskárny).
3. Postupujte podle zobrazených pokynů.
4. Nyní můžete začít využívat funkce tisku a skenování.
Suomi
1. Aseta RT-N13U-apuohjelma-CD-levy optiseen asemaan.
2. Napsauta Run Network Printer Setup Program (Suorita verkkotulostimen asennusohjelma).
3. Noudata ruudun ohjeita.
4. Nauti tulostus- ja skannaustoiminnoista.
Nederlands
1. Plaats de RT-N13U-cd met hulpprogramma’s in het optische station.
2. Klik op ‘Run Network Printer Setup Program’ (Installatieprogramma netwerkprinter uitvoeren).
3. Volg de richtlijnen op het scherm.
4. Geniet van de afdruk- en scanfuncties.
Български
1. Поставете диска с помощни програми RT-N13U в оптичното устройство.
2. Натиснете ‘Run Network Printer Setup Program’ (Стартирай програма за инсталиране на мрежов принтер).
3. Следвайте инструкциите на екрана.
4. Наслаждавайте се на функциите за печат и сканиране.
Ελληνικά
1. Τοποθετήστε το CD Βοηθητικών Προγραμμάτων του RT-N13U στη μονάδα οπτικού δίσκου.
2. Κάντε κλικ στο ‘Run Network Printer Setup Program’ (Εκτέλεση του προγράμματος εγκατάστασης δικτυακού εκτυπωτή).
3. Ακολουθήστε τις οδηγίες που εμφανίζονται στην οθόνη.
4. Χρησιμοποιήστε τις λειτουργίες εκτύπωσης και σάρωσης.
3. Follow the onscreen instructions.
1. Place the RT-N13U Utility CD into the optical drive.
2. Click 'Run Network Printer Setup Program'.
4. Enjoy the printing and scanning functions.
!
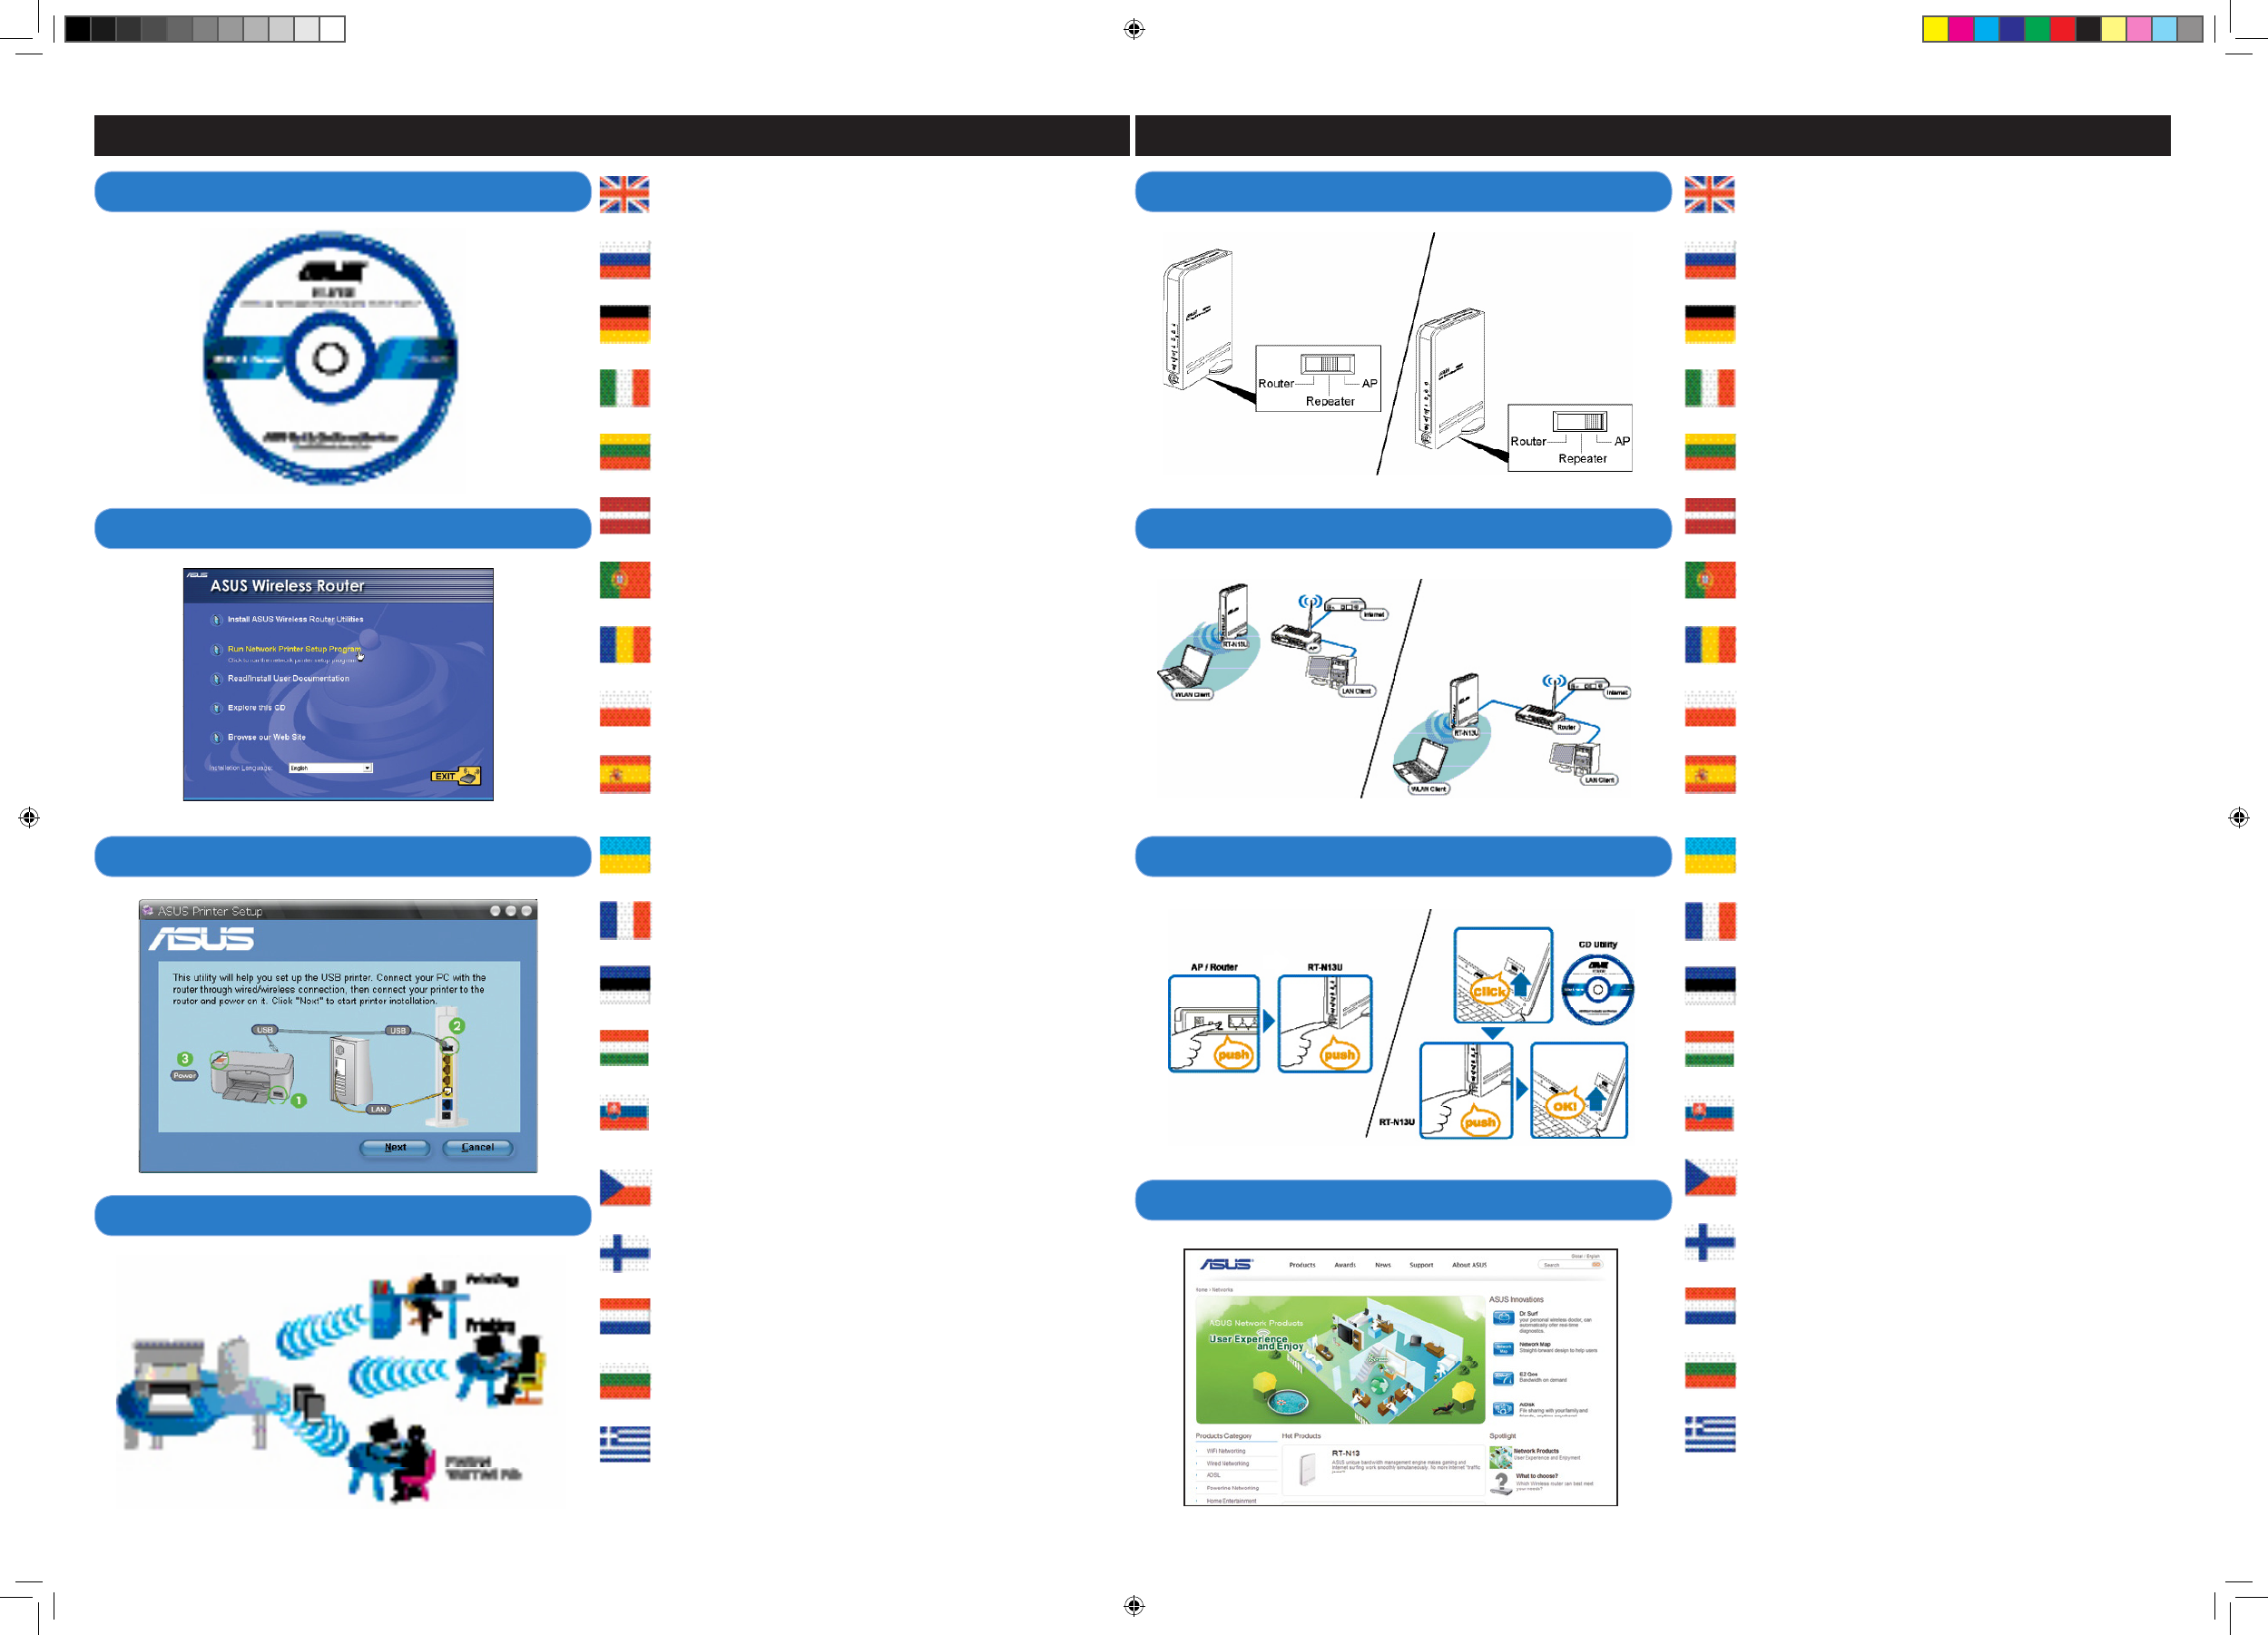
Extending Your Network
English
1. Choose an operation mode.
2. Connect your devices.
3. Press the WPS button for ve seconds to establish wireless connection.
4. Setup is completed.
Pусский
1. Выберите режим работы.
2. Подключите ваши устройства.
3. Нажмите и удерживайте кнопку WPS пять секунд для установки беспроводного подключения.
4. Установка завершена.
German
1. Wählen Sie einen Arbeitsmodus aus.
2. Schließen Sie Ihre Geräte an.
3. Drücken Sie die WPS-Taste für 5 Sekunden, um eine Wireless-Verbindung herzustellen.
4. Die Einrichtung ist fertig.
Italiano
1. Scegliere una modalità operativa.
2. Collegare le periferiche.
3. Premere il pulsante WPS per cinque secondi per stabilire la connessione senza li.
4. La congurazione è stata completata.
Lietuvių
1. Pasirinkite veikimo režimą.
2. Prijunkite prietaisus.
3. Palaikykite nuspaudę WPS mygtuką penkias sekundes bevieliui ryšiui užmegzti.
4. Sąranka baigta.
Latviski
1. Atlasiet darba režīmu.
2. Savienojiet savas ierīces.
3. Piespiediet WPS pogu piecas sekundes, lai izveidotu bezvadu savienojumu.
4. Iestatīšana ir pabeigta.
Português
1. Escolha um modo de funcionamento.
2. Ligue os dispositivos.
3. Prima o botão WPS durante cindo segundos para estabelecer a ligação sem os.
4. A conguração ca assim concluída.
Română
1. Alegeţi un mod de operare.
2. Conectaţi dispozitivele dvs.
3. Apăsaţi butonul WPS preţ de cinci secunde pentru a stabili legătura wireless.
4. Conectarea este nalizată.
Polski
1. Wybierz tryb pracy.
2. Podłącz swoje urządzenia.
3. Naciśnij przycisk WPS na pięć sekund celem ustanowienia połączenia bezprzewodowego.
4. Konguracja została zakończona.
Español
1. Seleccione un modo de funcionamiento.
2. Conecte sus dispositivos.
3. Mantenga pulsado el botón WPS durante cinco segundos para establecer una conexión inalámbrica.
4. Fin de la conguración.
Українська
1. Виберіть режим експлуатації.
2. Підключіть пристрої.
3. Натискайте кнопку WPS п’ять секунд, щоб встановити бездротове підключення.
4. Налаштування завершено.
Français
1. Choisissez un mode de fonctionnement.
2. Connectez les périphériques.
3. Appuyez sur le bouton WPS plus de cinq secondes pour établir une connexion sans l.
4. La conguration est terminée.
Eesti
1. Valige operatsioonirežiim.
2. Ühendage seadmed.
3. Vajutage viis sekundit WPS nuppu, et luua traadita ühendus.
4. Häälestus on lõpule viidud.
Magyar
1. Válasszon működési üzemmódot.
2. Csatlakoztassa az eszközöket.
3. Tartsa lenyomva a WPS gombot öt másodpercig a vezeték nélküli kapcsolat létrehozásához.
4. A beállítás befejeződött.
Slovensky
1. Zvoľte prevádzkový režim.
2. Pripojte svoje zariadenia.
3. Na dobu piatich sekúnd stlačte tlačidlo WPS, čím sa vytvorí bezdrôtové spojenie.
4. Nastavenie je dokončené.
Česky
1. Zvolte provozní režim.
2. Připojte zařízení.
3. Stisknutím a podržením tlačítka WPS po dobu pěti sekund navažte bezdrátové připojení.
4. Instalace je dokončena.
Suomi
1. Valitse toimintatila.
2. Kytke laitteet.
3. Luo langaton yhteys painamalla WPS-painiketta viisi sekuntia.
4. Asennus on valmis.
Nederlands
1. Kies een gebruiksmodus.
2. Sluit uw apparaten aan.
3. Houd de WPS-knop vijf seconden ingedrukt om de draadloze verbinding te maken.
4. De instelling is voltooid.
Български
1. Изберете режим на работа.
2. Свържете устройствата.
3. Натиснете бутона WPS за пет секунди, за да установите безжична връзка.
4. Конфигурирането приключи.
Ελληνικά
1. Επιλέξτε μια κατάσταση λειτουργίας.
2. Συνδέστε τις συσκευές σας.
3. Πατήστε το κουμπί WPS για πέντε δευτερόλεπτα για να δημιουργήσετε την ασύρματη σύνδεση.
4. Η εγκατάσταση έχει ολοκληρωθεί.
3. Press the WPS button for ve seconds to establish wireless connection.
1. Choose an operation mode.
2. Connect your devices.
4. Setup is completed.