563488
1
Zoom out
Zoom in
Previous page
1/2
Next page
EC Declaration of Conformity
We, the undersigned,
Manufacturer:
ASUSTek COMPUTER INC.
Address, City:
No. 150, LI-TE RD., PEITOU, TAIPEI 112, TAIWAN R.O.C.
Country:
TAIWAN
Authorized representative in Europe:
ASUS COMPUTER GmbH
Address, City: HARKORT STR. 21-23, 40880 RATINGEN
Country:
GERMANY
declare the following apparatus:
Product name : EZ N wireless router
Model name : RT-N10
conform with the essential requirements of the following directives:
2004/108/EC-EMC Directive
EN 55022:2006+A1:2007
EN 61000-3-2:2006
EN 55013:2001+A1:2003+A2:2006
EN 55024:1998+A1:2001+A2:2003
EN 61000-3-3:1995+A1:2001+A2:2005
EN 55020:2007
1999/5/EC-R &TTE Directive
EN 300 328 V1.7.1(2006-10)
EN 300 440-1 V1.4.1(2008-05)
EN 300 440-2 V1.2.1(2008-03)
EN 301 511 V9.0.2(2003-03)
EN 301 908-1 V3.2.1(2007-05)
EN 301 908-2 V3.2.1(2007-05)
EN 301 893 V1.4.1(2005-03)
EN 50360:2001
EN 50371:2002
EN 62311:2008
EN 50385:2002
EN 301 489-1 V1.8.1(2008-04)
EN 301 489-3 V1.4.1(2002-08)
EN 301 489-4 V1.3.1(2002-08)
EN 301 489-7 V1.3.1(2005-11)
EN 301 489-9 V1.4.1(2007-11)
EN 301 489-17 V1.3.2(2008-04)
EN 301 489-24 V1.4.1(2007-09)
EN 302 326-2 V1.2.2(2007-06)
EN 302 326-3 V1.3.1(2007-09)
EN 301 357-2 V1.3.1(2006-05)
2006/95/EC-LVD Directive
EN 60950-1:2001+A11:2004 EN60065:2002+A1:2006
CE marking
Declaration Date: Jul. 21, 2009
Year to begin affixing CE marking:2009
Position : CEO
Name : Jerry Shen
Signature : __________
(EC conformity marking)
Quick Start Guide
RT-N10 EZ N Router
NOTE:
For more details and advanced conguration instructions, refer to the user
manual included in the Utility CD.
®
!
Setting up a Home Network
English
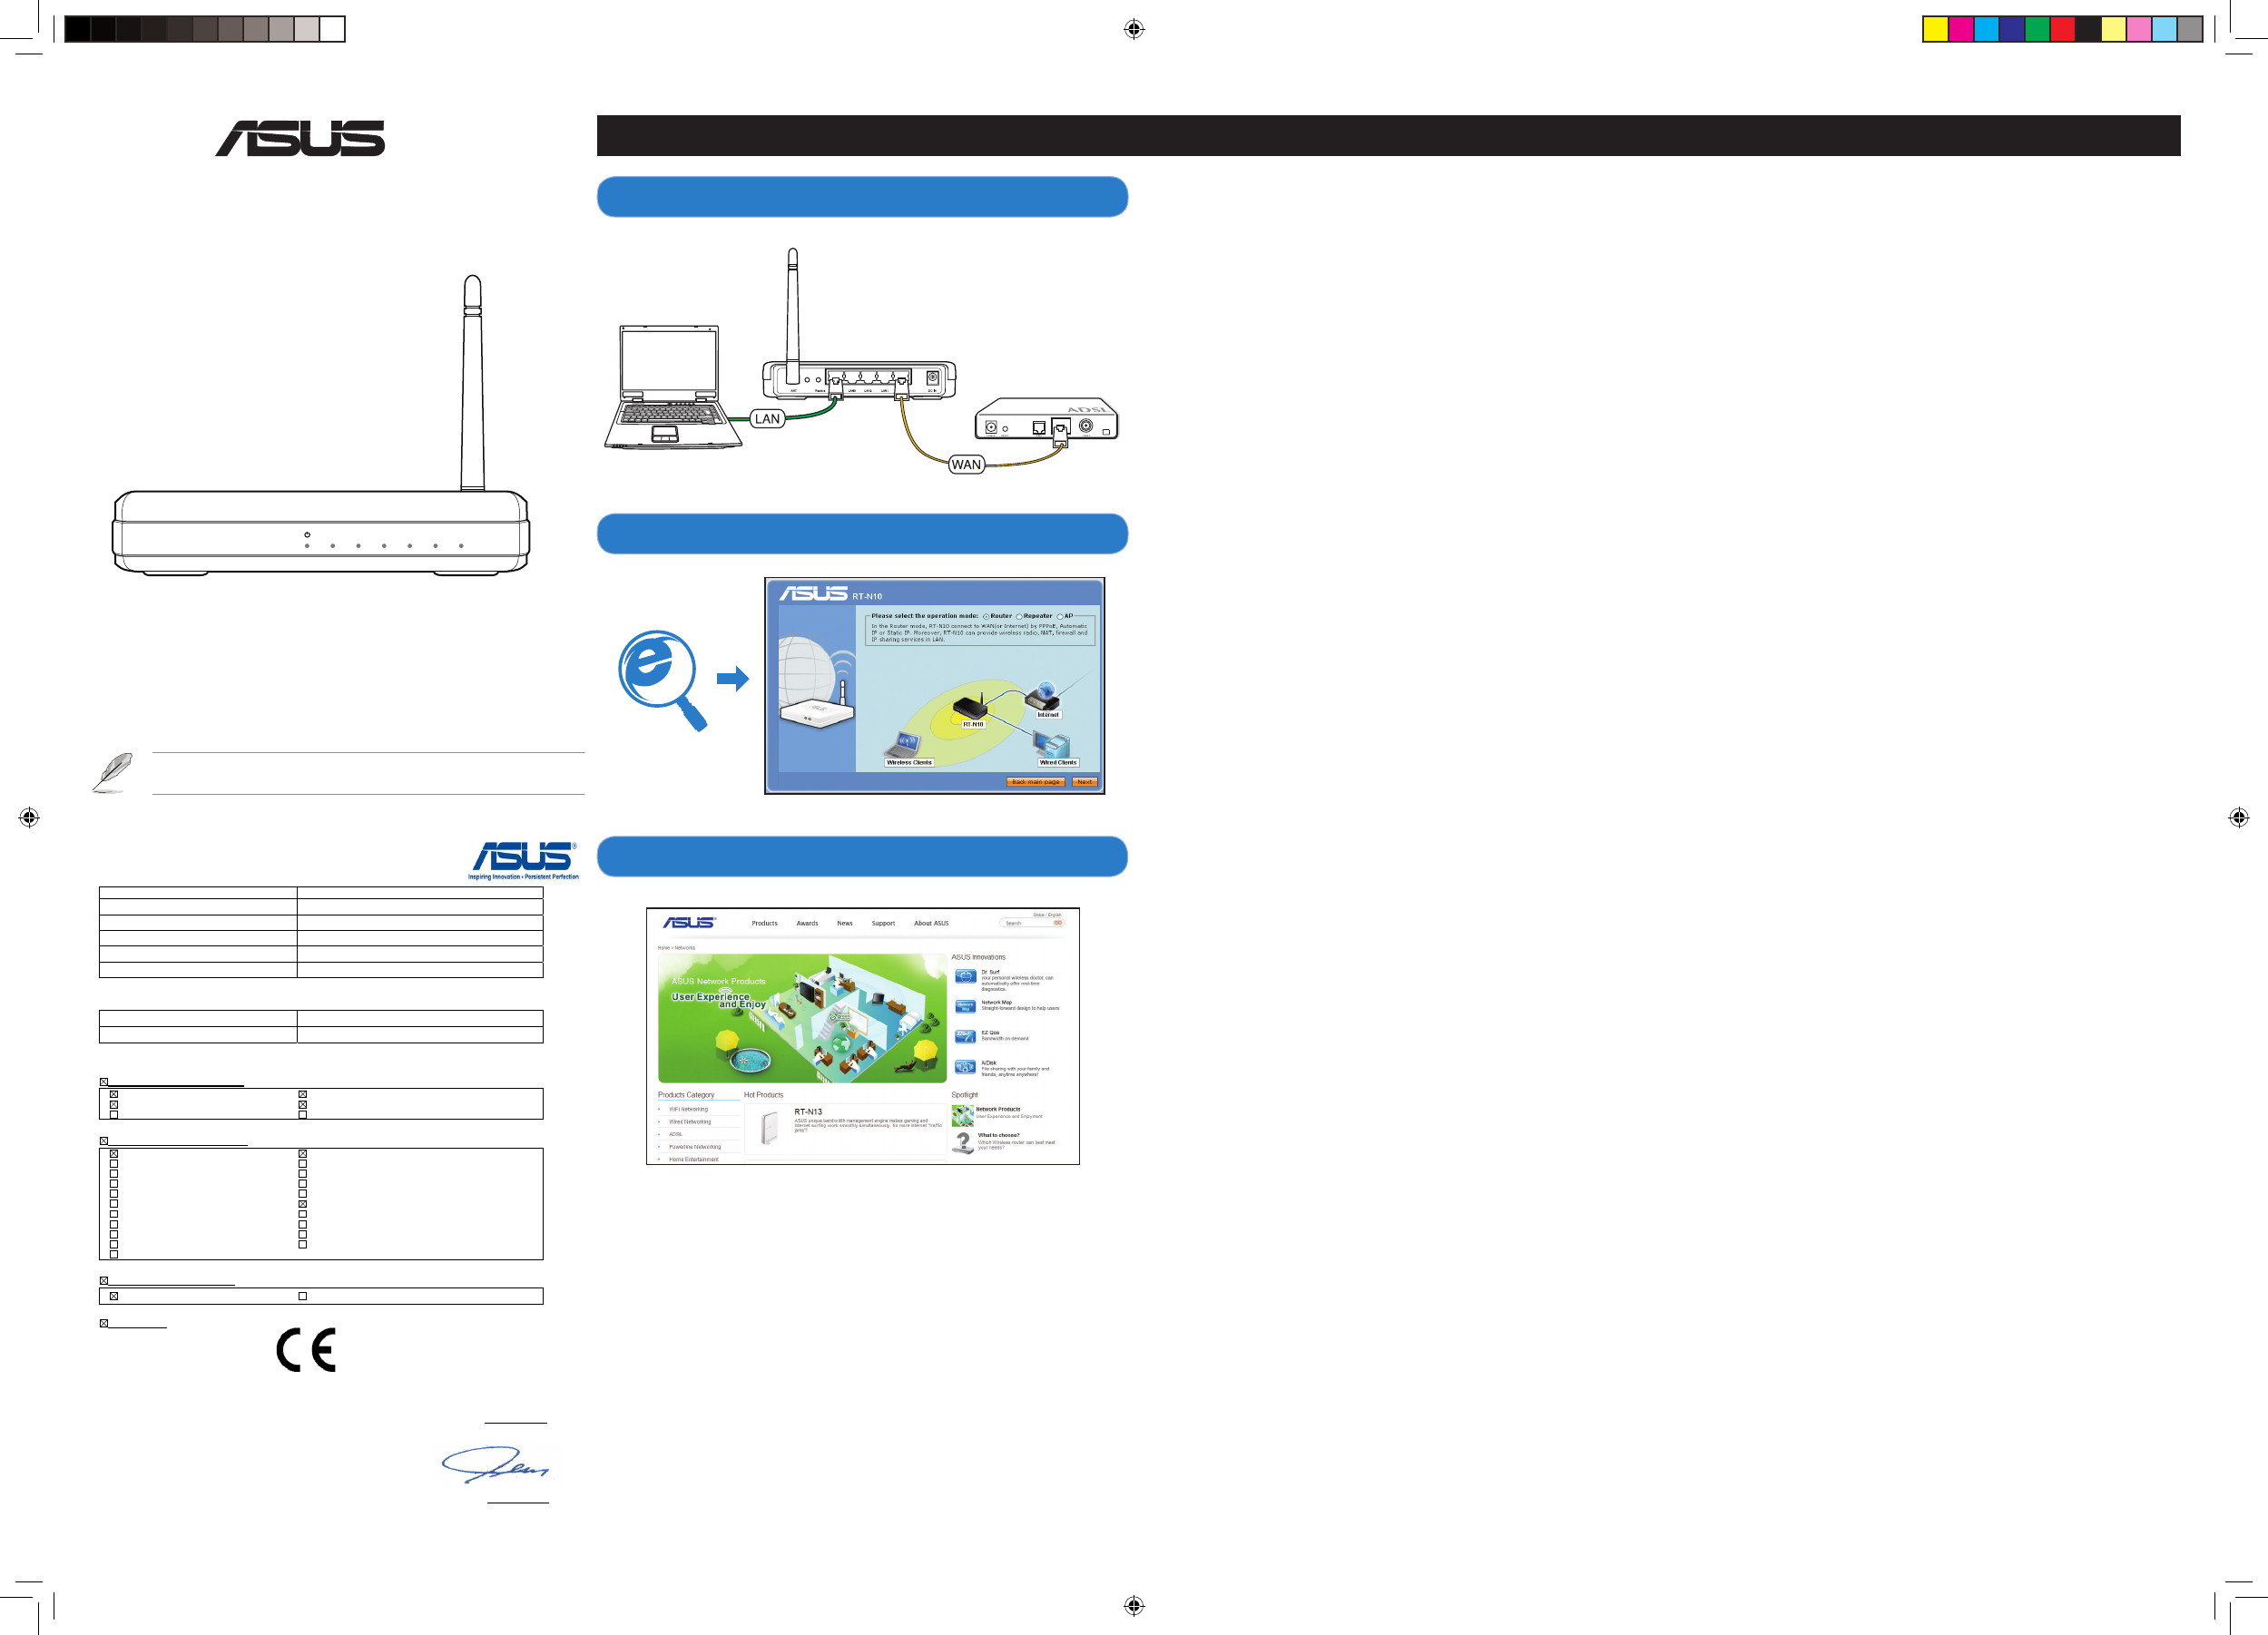
1. Connect your devices.
2. Launch the web browser and follow the Quick Internet Setup (QIS) steps.
* If the QIS web page does not appear after you launched the web browser, disable the proxy
settings of the web browser.
3. Setup is completed.
NOTE: For more details and advanced configuration instructions, refer to the user
manual included in the support CD.
繁體中文
1.連接裝置。
2.開啟網頁瀏覽器並按照快速網際網路設定(QIS)的步驟操作。
*當您啟動網頁瀏覽器後,若QIS頁面沒有顯示,請嘗試關閉瀏覽器的Proxy設定。
3.設定完成。
注意:更多關於進階設定的說明,請參考驅動程式與應用程式光碟中的使用手冊。
簡体中文
1.連接設備。
2.開啟網頁瀏覽器並按照快速互聯網設置(QIS)的步驟操作。
*當您啟動網頁瀏覽器後,若QIS頁面沒有顯示,請嘗試關閉瀏覽器的代理設置。
3.設置完成。
注意:更多關於高級配置的說明,請參考驅動程序與應用程序光盤中的用戶手冊。
Français
1. Connectez les périphériques.
2. Lancez votre navigateur Web puis suivez les étapes du gestionnaire de conguration
rapide d’Internet en ligne (QIS).
* Si la page Web de QIS ne s’afche pas lorsque vous lancez le navigateur Internet, désactivez les
paramètres proxy du navigateur Internet.
3. La conguration est terminée.
NOTE : pour obtenir des instructions détaillées sur les configurations avancées,
consultez le manuel de l’utilisateur situé sur le CD de support.
Deutsch
1. Schließen Sie Ihre Geräte an.
2. Starten sie einen Web-Browser und folgen sie den Internet-Schnelleinstellungsschritten
(QIS).
* wenn die QIS-Seite nicht erscheint, nachdem Sie den Webbrowser gestartet haben, deaktivieren
Sie bitte die Proxy-Einstellungen Ihres Webbrowsers.
3. Die Einrichtung ist fertig.
HINWEIS: Für mehr Details und die erweiterten Kongurationsanweisungen beziehen
Sie sich bitte auf das in der Support-CD enthaltenen Benutzerhandbuch.
Italiano
1. Collegare le periferiche.
2. Avviare il browser web e seguire la procedura QIS (Quick Internet Setup).
* Se,dopo aver avviato il browser web,non si riesce a visualizzare la pagina web QIS, disattivare
le impostazioni proxy del browser.
3. La congurazione è stata completata.
NOTA: Per ulteriori informazioni e per le istruzioni sulla configurazione avanzata,
consultare il manuale utente nel CD di supporto.
Pусский
1. Подключитевашиустройства.
2. ЗапуститебраузериследуйтеинструкциямбыстрогоподключениякИнтернету(QIS).
*ЕслистраницаQISнепоявиласьпослезапускабраузера,отключитенастройкипрокси-серверавбраузере.
3. Установказавершена.
ПРИМЕЧАНИЕ:Дополнительнуюинформациюиинструкциисмотритевруководствепользователя
накомпакт-диске.
Български
1. Свържетеустройствата.
2. Стартирайтеуеббраузъраи следвайтестъпкитевQuickInternetSetup(QIS) (Бързиинтернет
настройки).
*АкоуебсайтътQISнесепоявиследкатостестартиралиуеббраузъра,деактивирайтенастройкитенапрокси
сървъранауеббраузъра.
3. Конфигуриранетоприключи.
ЗАБЕЛЕЖКА:Заповечеинформацияиинструкциизаразширенинастройки,вижтеръководството
напотребителянамиращосенапомощнияCDдиск.
Česky
1. Připojte zařízení.
2. Spusťte weboprohlížeč a postupujte podle kroků Rychlého nastavení Internetu
(QIS).
* Pokud se po spuštění webového prohlížeče nezobrazí webová stránka QIS, deaktivujte nastavení
proxy webového prohlížeče.
3. Instalace je dokončena.
POZNÁMKA: Podrobnější informace a pokyny pro upřesňující konguraci viz uživatelská
příručka na podpůrném disku CD.
Dansk
1. Tilslut enhederne.
2. Start webbrowseren og følg quick-internetopsætning (QIS) trinene.
* Hvis denne QIS side ikke ses efter, at webbrowseren er startet, skal webbrowserens proxyindstillinger
deaktiveres.
3. Opsætning fuldført.
BEMÆRK: For yderligere oplysninger og avancerede konfigurationsanvisninger, se
brugervejledningen på hjælpe-cd’en.
3. Setup is completed.
1. Connectyourdevices.
2. Launch the web browser and follow the Quick Internet Setup (QIS) steps.
RT-N10
EZ N Router
AIR WAN LAN1 LAN2 LAN3 LAN4
RT-N10
W
P
S
Modem
Client
Magyar
1. Csatlakoztassa az eszközöket.
2. Indítsa el a webnst, és kövesse a gyors internetes bls (QIS)
lépéseit.
* Ha a QIS weblap nem jelenik meg a ngészőprogram indítása után, tiltsa le a
böngészőprogram proxy-beállításait.
3. A beállítás befejeződött.
MEGJEGYZÉS: A további részleteket és a speciális konguráció utasításait illetően
tekintse meg a támogató CD-n lévő felhasználói útmutatót.
Bahasa Indonesia
1. Sambungkan perangkat.
2. Aktifkan browser Web, kemudian ikuti langkah-langkah Quick Internet Setup
(QIS).
* Jika halaman Web QIS tidak muncul di layar setelah Anda mengaktifkan browser Web,
nonaktifkan pengaturan proxy browser Web Anda.
3. Kongurasi selesai.
CATATAN: Untuk informasi lebih rinci dan petunjuk kongurasi lanjutan, lihat panduan
pengguna yang tersedia di CD pendukung.
Latviski
1. Savienojiet savas ierīces.
2. Palaidiet tīmekļa rlūku un izpildiet Quick Internet Setup trās interneta
palaišanas) (QIS) soļus.
* Ja pēc tīmekļa pārlūka palaišanas QIS tīmekļa lapa neparādās, atspējojiet proxy iestatījumus
tīmekļa pārlūkā.
3. Iestatīšana ir pabeigta.
PIEZĪME: Detalizētāku informāciju un uzlabotās konfigurācijas instrukcijas
meklējiet atbalsta CD esošajā lietotāja rokasgrāmatā.
Lietuvių
1. Prijunkite prietaisus.
2. Paleiskite interneto naršyklę ir vadovaukitės greitos internetinės sąrankos (QIS)
nuorodomis.
* Jei paleidus interneto naršyklę neatsiveria QIS puslapis, dezaktyvuokite interneto naršyklės
„Proxy“ nustatymus.
3. Sąranka baigta.
PASTABA: Jei reikia daugiau informacijos ir išplėstinės kongūracijos instrukcijų,
žr. vartotojo vadovą, esantį pagalbos kompaktiniame diske (CD).
Nederlands
1. Sluit uw apparaten aan.
2. Start de webbrowser en volg de QIS-stappen (Quick Internet Setup (snelle
internetinstelling)).
* Als de QIS-webpagina niet verschijnt nadat u de webbrowser hebt gestart, moet u de proxy-
instellingen van de webbrowser uitschakelen.
3. De instelling is voltooid.
OPMERKING: Raadpleeg de handleiding op de ondersteunings-cd voor meer
informatie en geavanceerde conguratierichtlijnen.
Eesti
1. Ühendage seadmed.
2. Käivitage veebibrauser ja järgige viisardi Quick Internet Setup (Interneti-ühenduse
kiirhäälestus (QIS)) samme.
* Kui pärast veebibrauseri ivitamist QIS’i veebileht ei ilmu, siis keelake veebibrauseri
puhvrisätted.
3. Häälestus on lõpule viidud.
MÄRKUS: Täiendavat teavet ja täpsemaid konfigureerimisjuhiseid leiate
kasutusjuhendist, mis sisaldub seadmega kaasnenud tugi-CD-l.
Suomi
1. Kytke laitteet.
2. Käynnistä verkkoselain ja noudata QIS-asennuksen vaiheita.
* Jos QIS-verkkosivu ei tule näkyviin verkkoselaimen käynnistämisen jälkeen, ota verkkoselaimen
proxy-asetus pois päältä.
3. Asennus on valmis.
Huomautus: Voit katsoa tarkempia tietoja ja lisämääritysten ohjeita tuki-CD-levyllä
olevasta käyttöoppaasta.
Ελληνικά
1. Συνδέστε τις συσκευές σας.
2. Εκκινήστε το πρόγραμμα πλοήγησης στο διαδίκτυο και ακολουθήστε τα
βήματα της Γρήγορης Εγκατάστασης Internet (QIS).
* Αν η ιστοσελίδα QIS (Γρήγορη Ρύθμιση Internet) δεν εμφανιστεί αφού εκκινήσετε το
πρόγραμμα περιήγησης στο διαδίκτυο, απενεργοποιήστε τις ρυθμίσεις του διακομιστή
μεσολάβησης από το πρόγραμμα περιήγησης στο διαδίκτυο.
3. Η εγκατάσταση έχει ολοκληρωθεί.
ΣΗΜΕΙΩΣΗ: Για περισσότερες λεπτομέρειες και οδηγίες διαμόρφωσης για
προχωρημένους, ανατρέξτε στο εγχειρίδιο χρήστη που παρέχεται στο CD
υποστήριξης.
Q4792_RT-N10 QSG_V2.indd 1 5/5/10 3:48:40 PM
1


Need help? Post your question in this forum.

Forumrules


Report abuse

Libble takes abuse of its services very seriously. We're committed to dealing with such abuse according to the laws in your country of residence. When you submit a report, we'll investigate it and take the appropriate action. We'll get back to you only if we require additional details or have more information to share.

Product:

For example, Anti-Semitic content, racist content, or material that could result in a violent physical act.

For example, a credit card number, a personal identification number, or an unlisted home address. Note that email addresses and full names are not considered private information.

Forumrules

To achieve meaningful questions, we apply the following rules:

Register

Register getting emails for ASUS RT-N10 at:


You will receive an email to register for one or both of the options.


Get your user manual by e-mail

Enter your email address to receive the manual of ASUS RT-N10 in the language / languages: All languages as an attachment in your email.

The manual is 1,2 mb in size.


You will receive the manual in your email within minutes. If you have not received an email, then probably have entered the wrong email address or your mailbox is too full. In addition, it may be that your ISP may have a maximum size for emails to receive.

Others manual(s) of ASUS RT-N10

ASUS RT-N10 User Manual - English - 56 pages

ASUS RT-N10 User Manual - German - 56 pages


The manual is sent by email. Check your email

If you have not received an email with the manual within fifteen minutes, it may be that you have a entered a wrong email address or that your ISP has set a maximum size to receive email that is smaller than the size of the manual.

The email address you have provided is not correct.

Please check the email address and correct it.

Your question is posted on this page

Would you like to receive an email when new answers and questions are posted? Please enter your email address.


Info