instructions
instruc
instructions
instructions
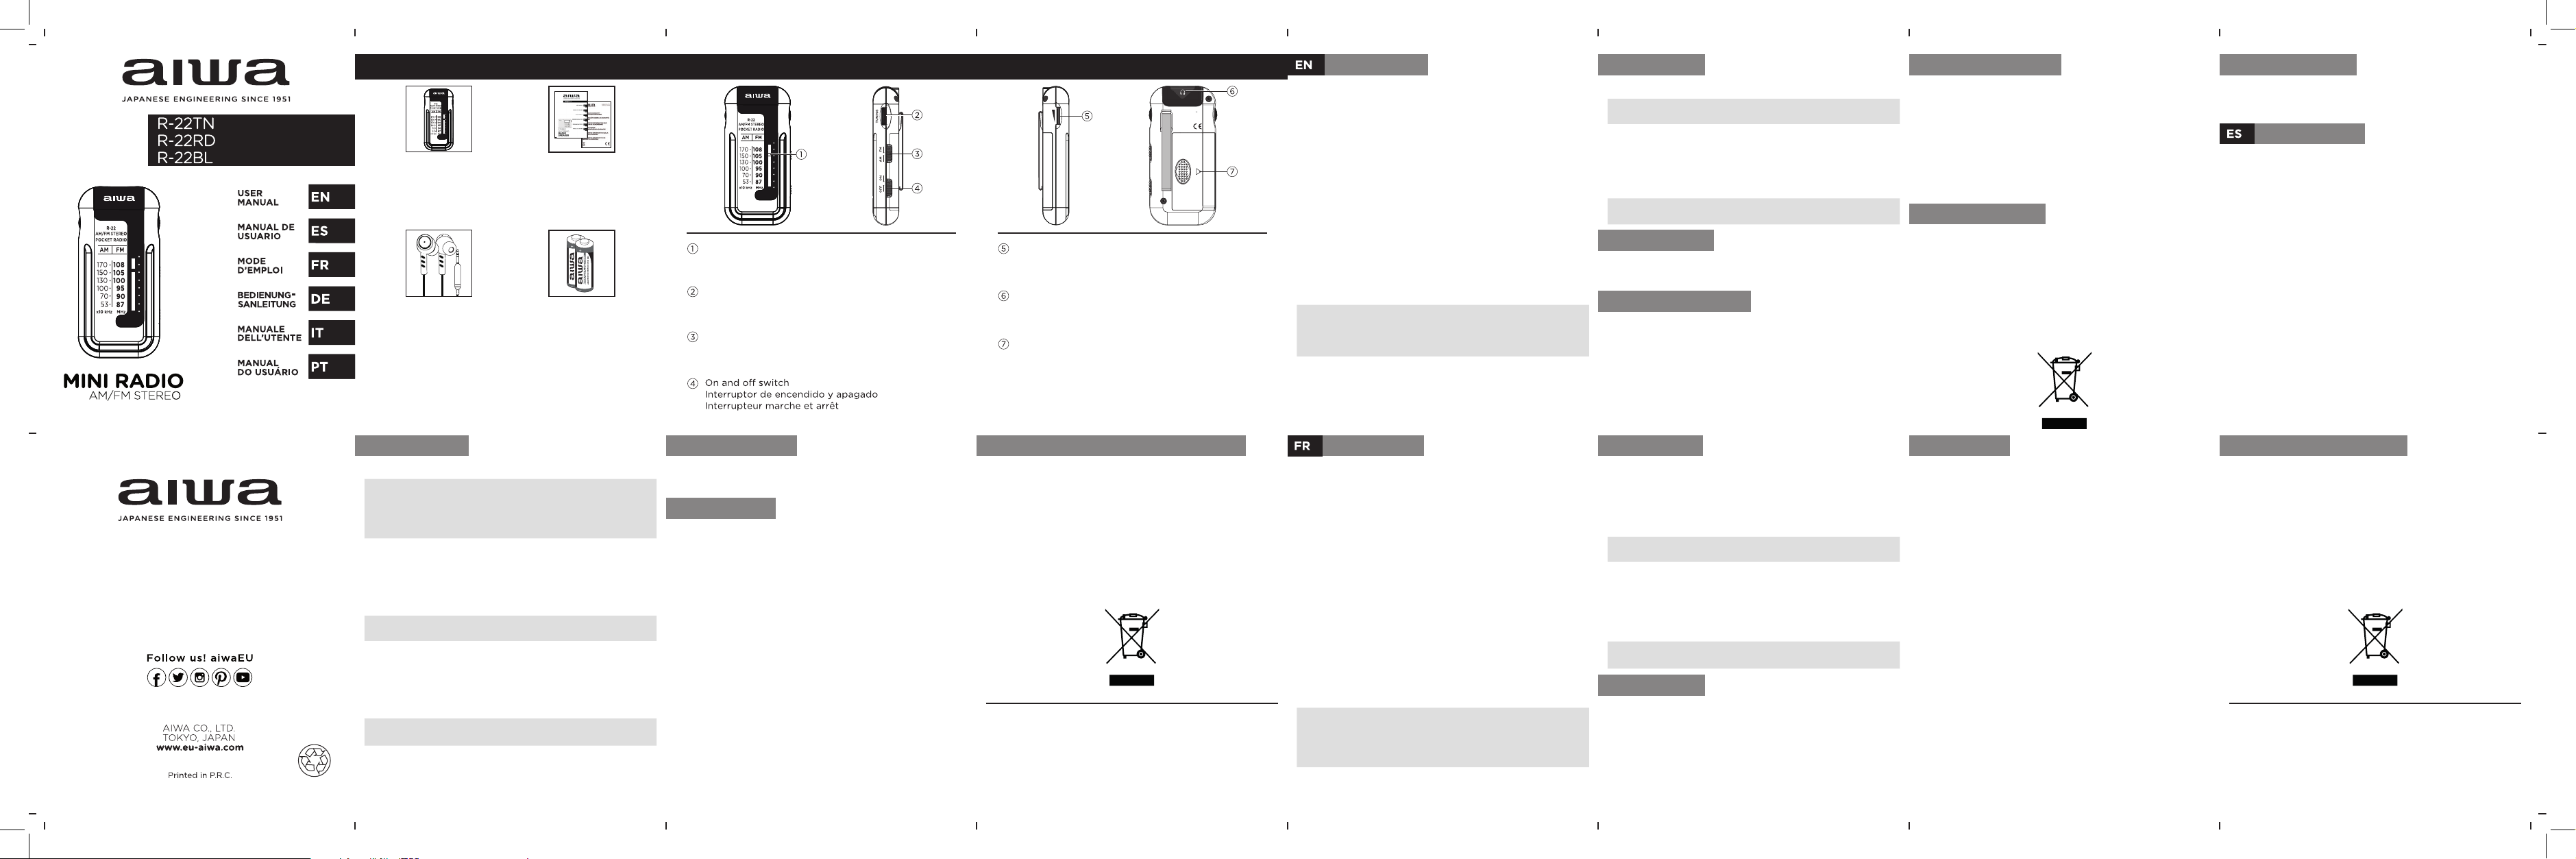
instruc instructions
safety preca
safety preca
precauciones
précautions
specifica
spécifica
especifica
end life disposal
end life disposal
eliminación c del producto élimina en fin de vie
AC BUTT
/ FONCTION DES BOUT
BUTT
/ FONCTION DES BOUT
Pocket r
Radio de bolsillo
Radio de poche
Aiwa-Q Design in-ear
headphones
Auriculares es
Aiwa-Q Design
Modelè de casque stér
Aiwa-Q Design
AAA Batteries Aiw
Alkaline Po
Pilas AAA Aiwa Xtr
Alkaline Po
Batteries AAA Aiw
Alkaline Po
Manual / W
Manual / Hoja de garantia
Manuel / Fiche de garant
Frequency tuner
Sintonizador de frecuencia
Sélecteur de bande radio (AM/FM )
Indicador de frecuencia de radio
Indicateur de fréquence de radio
VOLUME
open
AIWA
EU REPRESENTATIVES:
MEDIA ELECTRONICS S.L, ES-08440
MADE IN P.R.C.
2 LR03, AAA Batteries 3
AM: 522 - 1710 kHz
FM: 87 - 108 MHz
MODEL: R-22
Battery compartment
Compartimento de las baterías
Compartiment à
Dial de volumen
Cadran de volum
Headphone jack
Prise casque
T
1. Push the ON AND OFF SWIT upw
the unit.
2. TFREQUENCY TUNER .
3. Push the ON AND OFF SWIT downFF
the unit.
Listen t
Fully ext
antenna and slide the RADIO BAND SELECT to FM , then
rotatFREQUENCY TUNER to y
Listen t
Slide th e RADIO BAND SELECTOR to AM . Rotate the
FREQUENCY TUNER to y
the radio in the best position f
devic
Encender la r
1. Desplace el INTERRUPT
hacia arriba para enc
2. Sintonice una emisor
SINTONIZADOR DE FRECUENCIA.
3. Apague la radio desplazando el INTERRUPTOR DE
ENCENDIDO Y AP hacia abajo
Banda FM
Extienda completamente el cable de los auricular
funciona como antena, deslicSELECTOR DE BAND
DE RADIO a la posición FM , luego gire el SINT
DE FRECUENCIA a la emisora de FM deseada.
Banda AM
Deslice el SELECT a la posición
AM. Ajuste el SINT a la emisor
deseada, y gire la unidad hasta logr
para obt
una barra de ferrita inc
Allumer la radio
1. Déplacez le cINTERRUPTEUR MARCH ET
ARRÊT pour allumer la radio
2. Syntonise S
DE FRÉQUENCE.
3. Eteignez la radio en déplaçant le SUR ET V.
Bande FM
Déplo
comme une antenneSÉLECTEUR DE BANDE
RADIO à la position FM, puis tournez le S
FRÉQUENCE sur la station FM souhaitée
Bande AM
Placez le SÉLECTEUR DE BANDE RADIO sur la position
AM. Réglez le S sur la
statio
réc
incorpor
V
Adjust the sound with the V.
Connect the headphones (included) to the 3.5mm
HEADPHONE JA on the top of the radio
V
Ajuste el vDIAL DE V.
Conecte los auricular(incluidos) en la TE
AURICULARES de 3.5 mm en la part
V
AjusteCADRAN DE V.
Connectez le casque (f a la PRISE CASQUE 3,5 mm
sur le dessus de la radio
Battery installa
Ope n the battery co2x AA
batteries acc
on the battery compartment.
Instalación de baterías
Abra la tapa de la batAAA/
LR03/UM-4 de acuer
impreso en el c
Installation de piles
Ouvrez le c
piles AAA/LR03/UM-4 c
polarité imprimé sur le compartiment à piles.
• Pow
• Battery Oper
• Puissance de sortie: 0.5W
• Batterie: DC 3V (2 x “
• Potencia de salida: 0.5W
• Batería: DC 3V (2 x “
When this crossed-out wheeled bin s
product, it means the pr
Directiv
All electrical and electronic pr
should be disposed separat
stream via designa
the gov
The corr
potential negativ
human health.
Due to continual r
design and specifications are subject t
further notice.
Debido a la continua r
product
cambios sin pre
En raison de la r
de nos produits, la c
sujettes à modifications sans pr
1. Open flame sourc
placed near the de
2. Do not expose the unit t
humidity to ensur
of your de
3. In order to clean the de
Remov
Do not use liquid cleaners or aerosol cleaners.
Alway
Notes:
This r(Digital Signal Processing) s
this enhances the sound quality
during the listening of r
radio signal, and r
Notas:
Esta radio utiliza un sis
digital (DSP), mejorando la calidad de sonido
y sensibilidad durant
interfer
Note:
Cette r
numérique (DSP), améliorant la qualit
réc
de radio
rejet
W
A
pre
At
Evite el uso de auricular
posibles daños auditivos.
A
Évitez d’utiliser des éc
tout dommage auditif
Notes:
Check the condition of y
Old or discharged batt
Notas:
Compruebe el estado de sus baterías r
Las baterías viejas o descargadas deben ser
Notes:
Cérifiez r
Les piles usages ou déchargées doiv
4. Do not leave the batt
time. Remo
5. Dierd
not be mixed.
If the sound becomes lo
batteries with ne
6. If yt
to y
Do not try to r
1. Las fuentes candentes, c
cer
2. No exponga la unidad a temper
humedades para así gar
durant
3. Para limpiar el dispositiv
Retire las pilas ant
No utilice líquidos o aerosoles de limpie
Use un paño húmedo para la limpie
4. Si no va a utilizar la radio dur
pilas del compartimiento dado que podría det
y dañar la radio.
5. No se deben mez
Si el sonido se vuelve bajo o diss
pilas por otras nue
6. Si adviert
pongase en contacto c
No intente r.
1. Les sourc
pas être plac.
2. N’e
ou à l’humidité pour assur
pendant toute sa dur
3. Pour netto
Retire
N’utilisez pas de netto
Utilisez un chion humide pour le nett.
4. Sius n’alle
retir
se détérior
5. Ne mélangez pas des piles neuv
Si le son devient f
des piles neuves.
6. Si vous r
corr
N’.
El símbolo del cubo de basura tachado sobr
significa que el product
2012/19 / EC.
Todos los product
batería, deben arr
regulación de desechos municipales a tr
instalaciones de rec
las autoridades locales.
La eliminación corr
reducir posibles c
y el medioambiente.
Le symbole de la poubelle à roulett
signifie que le produit est c
européenne 2012/19 / CE.
Tous les produits électriques et électr
la batterie, doiv
déchets municipaux à tra
désignée par le gouvernement ou aut
Le retr
les conséquences négativ
et l’